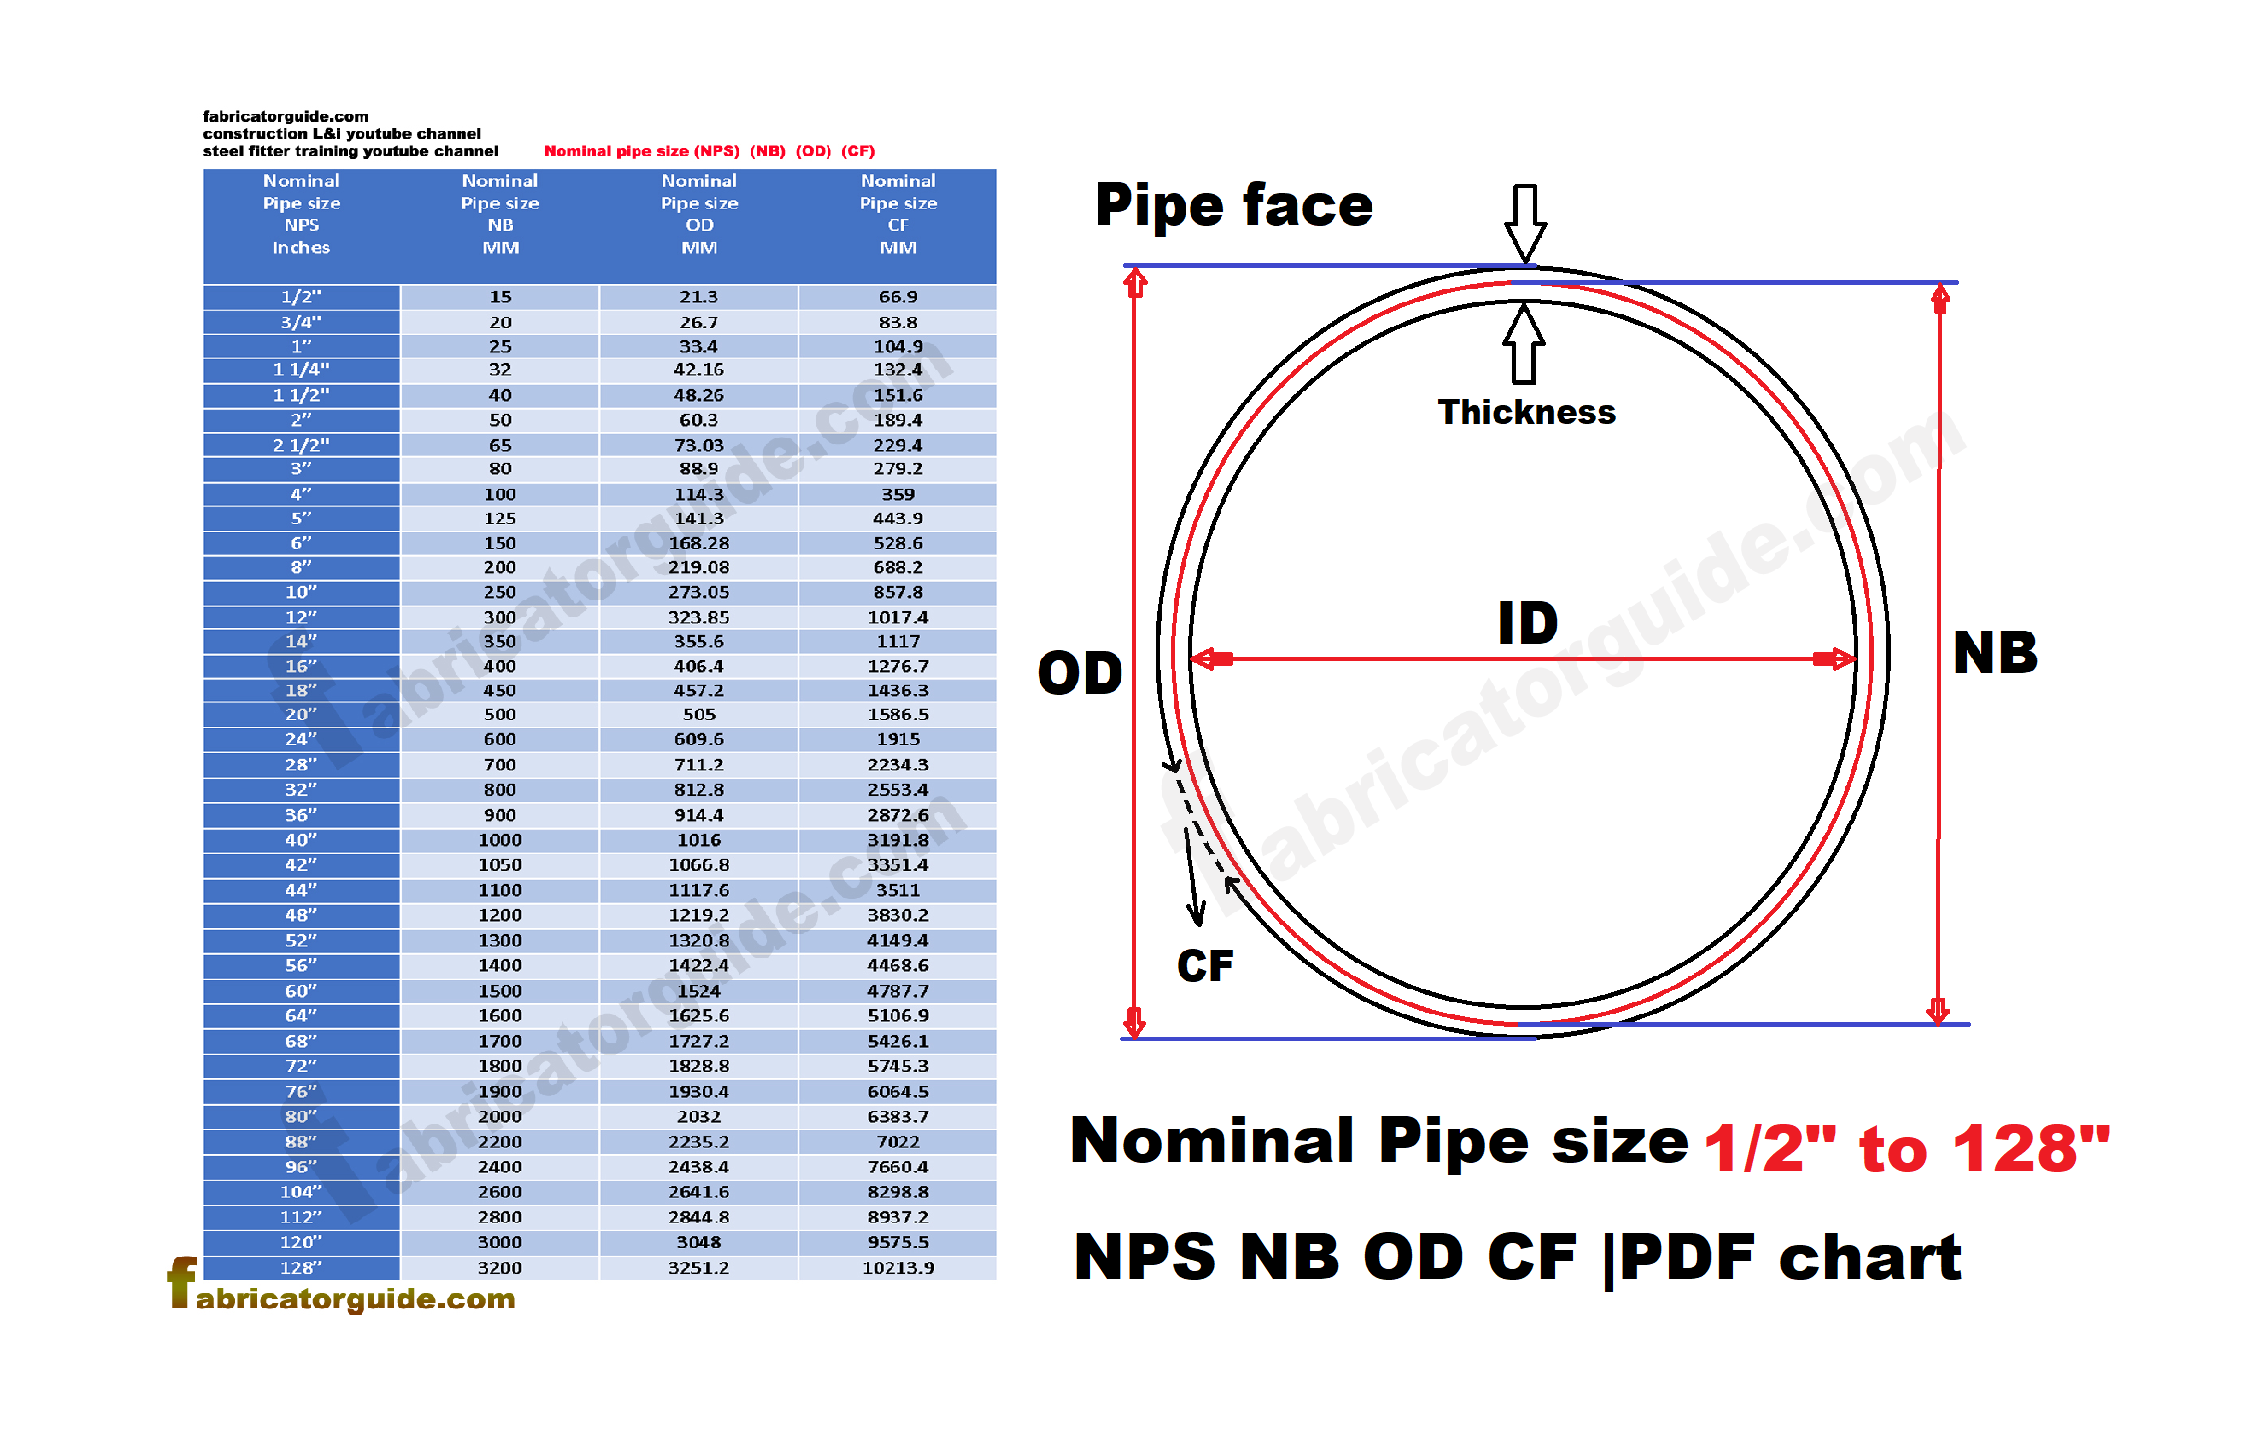
1 2 Inch Pipe Inside Diameter

Many homeowners experience uneven heating or cooling throughout their homes. One room might be perfectly comfortable, while another feels noticeably colder or warmer. While many factors contribute to this, a frequently overlooked culprit is the ductwork, specifically the size and condition of your HVAC system's supply and return ducts. This article focuses on troubleshooting issues related to 1/2-inch inner diameter (ID) pipes and fittings, commonly used in certain parts of HVAC systems and critical for proper refrigerant or condensate flow. Improperly sized or blocked lines can significantly impact system performance. Let's investigate!
Diagnosing Uneven Heating/Cooling & Possible 1/2" Pipe Issues
This diagnosis will focus on identifying symptoms that point to restrictions or problems with the 1/2" ID lines often found in condensate drain lines or small refrigerant lines in mini-split systems. Safety first! Before you begin, turn off the power to your HVAC system at the breaker. Wait a few minutes to ensure the system is completely off before proceeding.
Step 1: Observe & Document the Symptoms (No Tools Required)
Start by carefully observing the problem areas.
- Room Temperature Differences: Precisely note the temperature difference between the problem room(s) and other rooms. A significant difference (more than 5-7 degrees Fahrenheit) warrants further investigation.
- Airflow Strength: Compare the airflow coming from the vents in the problematic room(s) to vents in rooms that are comfortably heated/cooled. Weak or non-existent airflow is a key indicator.
- System Operation: Is your HVAC unit running constantly? Short cycling (turning on and off frequently) can also indicate a problem.
- Unusual Noises: Listen for unusual noises coming from the HVAC unit itself, such as gurgling, hissing, or rattling. These sounds can indicate issues with refrigerant or condensate flow.
- Water Leaks: Carefully inspect around the indoor unit and condensate drain line (often using 1/2" PVC pipe) for any signs of leaks. Water stains or dampness are tell-tale signs.
Write down your observations. The more detailed your notes, the easier it will be to pinpoint the problem.
Step 2: Visual Inspection (No Tools Required)
This step involves a thorough visual inspection of accessible components. Never attempt to disassemble or touch any electrical components.
- Condensate Drain Line: Locate the condensate drain line, usually a white or gray PVC pipe exiting the indoor unit. Trace its path to the drain. Look for:
- Visible clogs: Check the outlet of the drain line for any visible debris or blockage.
- Kinks or damage: Inspect the drain line for any kinks, bends, or damage that could restrict flow.
- Proper slope: Ensure the drain line slopes downwards continuously from the unit to the drain. A back-sloping drain line will prevent proper drainage.
- Air Filter: A clogged air filter restricts airflow, impacting overall system performance. Replace it if it's dirty.
- Outdoor Unit (If Accessible & Safe): (Do not open any panels!) Check for debris around the outdoor unit, such as leaves, grass clippings, or snow. Ensure the unit is clear of obstructions. If you have a mini-split system, carefully visually inspect any exposed small refrigerant lines connecting the indoor and outdoor units for crimps or damage. Do not attempt to touch or repair these lines.
Step 3: Simple Tests (Minimal Tools Required)
The following tests require minimal tools and can help narrow down the problem.
- Condensate Drain Test (Requires a bucket and water): If you suspect a clogged condensate drain line, carefully disconnect the drain line at a point where you can access it and direct the water into a bucket. Slowly pour a cup of water into the drain line (at the unit end). Observe:
- Water flow: Does the water drain freely, or does it back up? Backed-up water indicates a clog.
- Drain pan: Check the drain pan under the indoor unit for standing water. Standing water confirms a drainage issue.
- Vent Airflow Test (Requires a tissue or lightweight paper): Hold a tissue or a small piece of lightweight paper near the vents in the problematic room. Note how strongly the air pushes the tissue. Compare this to the airflow in a room with adequate heating/cooling.
DIY Actions You Can Take (With Caution!)
Based on your observations and tests, here are some simple DIY actions you can take. Remember safety first! Turn off the power to the HVAC system before performing any maintenance.
Clearing a Clogged Condensate Drain Line
This is a common issue and often easily resolved.
- Wet/Dry Vacuum Method: Disconnect the drain line at a point accessible to you. Attach a wet/dry vacuum to the drain line opening (at the drain end). Turn on the vacuum and attempt to suck out any blockage. This often works for minor clogs. Be careful not to damage the drain line with excessive suction.
- Pouring Vinegar: Pour a cup of white vinegar into the drain line. Vinegar can help dissolve algae and other organic matter that may be causing the clog. Let it sit for 30 minutes, then flush with water.
- Using a Wire or Stiff Brush: Carefully insert a flexible wire (like a straightened coat hanger) or a stiff brush into the drain line to break up any clogs. Be gentle to avoid damaging the pipe.
- Flush with Water: After attempting to clear the clog, flush the drain line with water to ensure it's clear. Reconnect the drain line securely.
Replacing a Section of Damaged 1/2" Condensate Drain Line (Requires Basic Plumbing Skills)
If a section of the 1/2" condensate drain line is visibly damaged (cracked, kinked), you can replace it with a new section of PVC pipe and fittings.
- Measure and Cut: Carefully measure the length of the damaged section. Cut a new piece of 1/2" PVC pipe to the same length.
- Prepare the Pipe Ends: Clean the ends of the existing drain line and the new pipe section.
- Use PVC Primer and Cement: Apply PVC primer to the outside of the existing pipe ends and the inside of the PVC fittings (couplings). Then, apply PVC cement to the same surfaces.
- Join the Pieces: Quickly insert the existing pipe ends into the PVC fittings, holding them firmly until the cement sets (usually a few seconds).
- Allow to Cure: Allow the cement to cure completely according to the manufacturer's instructions before running water through the drain line.
When to Call a Professional HVAC Technician
While some HVAC issues can be resolved with simple DIY solutions, certain problems require the expertise of a qualified HVAC technician. Never attempt repairs you're not comfortable with or that involve refrigerant handling or complex electrical work.
Call a professional immediately if:
- Refrigerant Leaks: You suspect a refrigerant leak (e.g., hissing sounds, oily residue on pipes). Refrigerant is harmful and requires specialized equipment to handle safely.
- Electrical Problems: You suspect any electrical issues with the HVAC system.
- Compressor Problems: The compressor is not running or making unusual noises. Compressor repairs require specialized knowledge and equipment.
- Frozen Evaporator Coil: The evaporator coil inside the indoor unit is frozen. This can be caused by several underlying problems, including refrigerant leaks or airflow restrictions.
- Mini-Split Systems: Any issues with the refrigerant lines or the internal components of a mini-split system. These systems require specialized training and equipment. Even a seemingly minor issue with a 1/2" refrigerant line connection can lead to major problems.
- You're Unsure: If you've tried the troubleshooting steps and are still unsure about the problem, it's always best to err on the side of caution and call a professional.
- Any Work Involving Refrigerant: Under no circumstances should you attempt to handle refrigerant. This requires EPA certification and specialized equipment.
Specific to 1/2" Pipe Issues, call a professional if:
- You suspect a refrigerant line issue in a mini-split system: Even minor leaks in these lines can lead to significant performance degradation and costly repairs. Do not attempt to repair these lines yourself.
- The condensate drain line is inaccessible or requires extensive disassembly to access: Complex drain line issues may require professional expertise to resolve.
Preventive Maintenance
Preventive maintenance is key to avoiding HVAC problems and ensuring your system runs efficiently.
- Regular Air Filter Changes: Change your air filter every 1-3 months, depending on usage and air quality.
- Annual Professional Inspection: Schedule an annual inspection and maintenance appointment with a qualified HVAC technician. They can identify and address potential problems before they become major issues.
- Clean the Outdoor Unit: Keep the area around the outdoor unit clear of debris.
- Flush the Condensate Drain Line: Periodically flush the condensate drain line with vinegar or water to prevent clogs.
By following these troubleshooting steps and preventive maintenance tips, you can keep your HVAC system running smoothly and efficiently, ensuring a comfortable home environment. Remember, when in doubt, always consult a professional HVAC technician.
Disclaimer: This article is for informational purposes only and should not be considered a substitute for professional HVAC advice. Always follow safety precautions and consult with a qualified technician for complex repairs.