How To Wire A Mini Split Air Conditioner
One of the most common frustrations homeowners experience with mini-split air conditioners is a sudden and unexpected shutdown. The unit might be running perfectly one moment, and completely unresponsive the next. Before panicking and calling for expensive repairs, let's walk through a systematic approach to troubleshooting the wiring, a frequent culprit in these situations. This guide will provide you with steps to diagnose and potentially fix common wiring issues, while also highlighting when professional help is absolutely necessary.
Understanding Mini-Split Wiring Basics
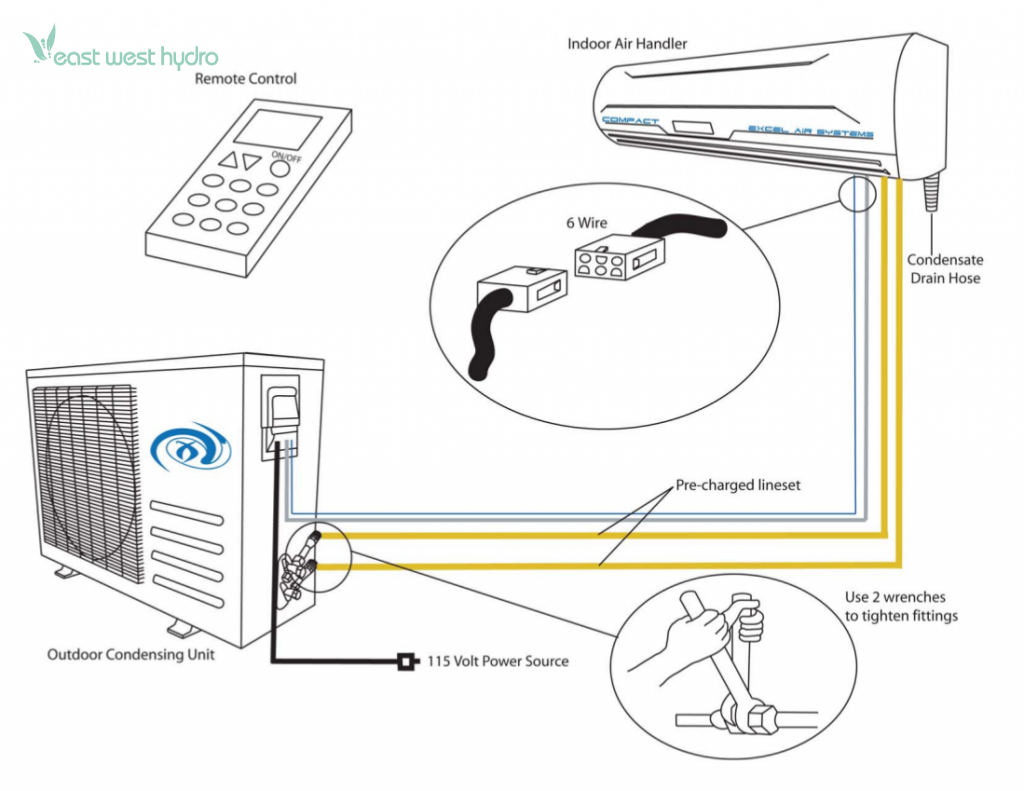
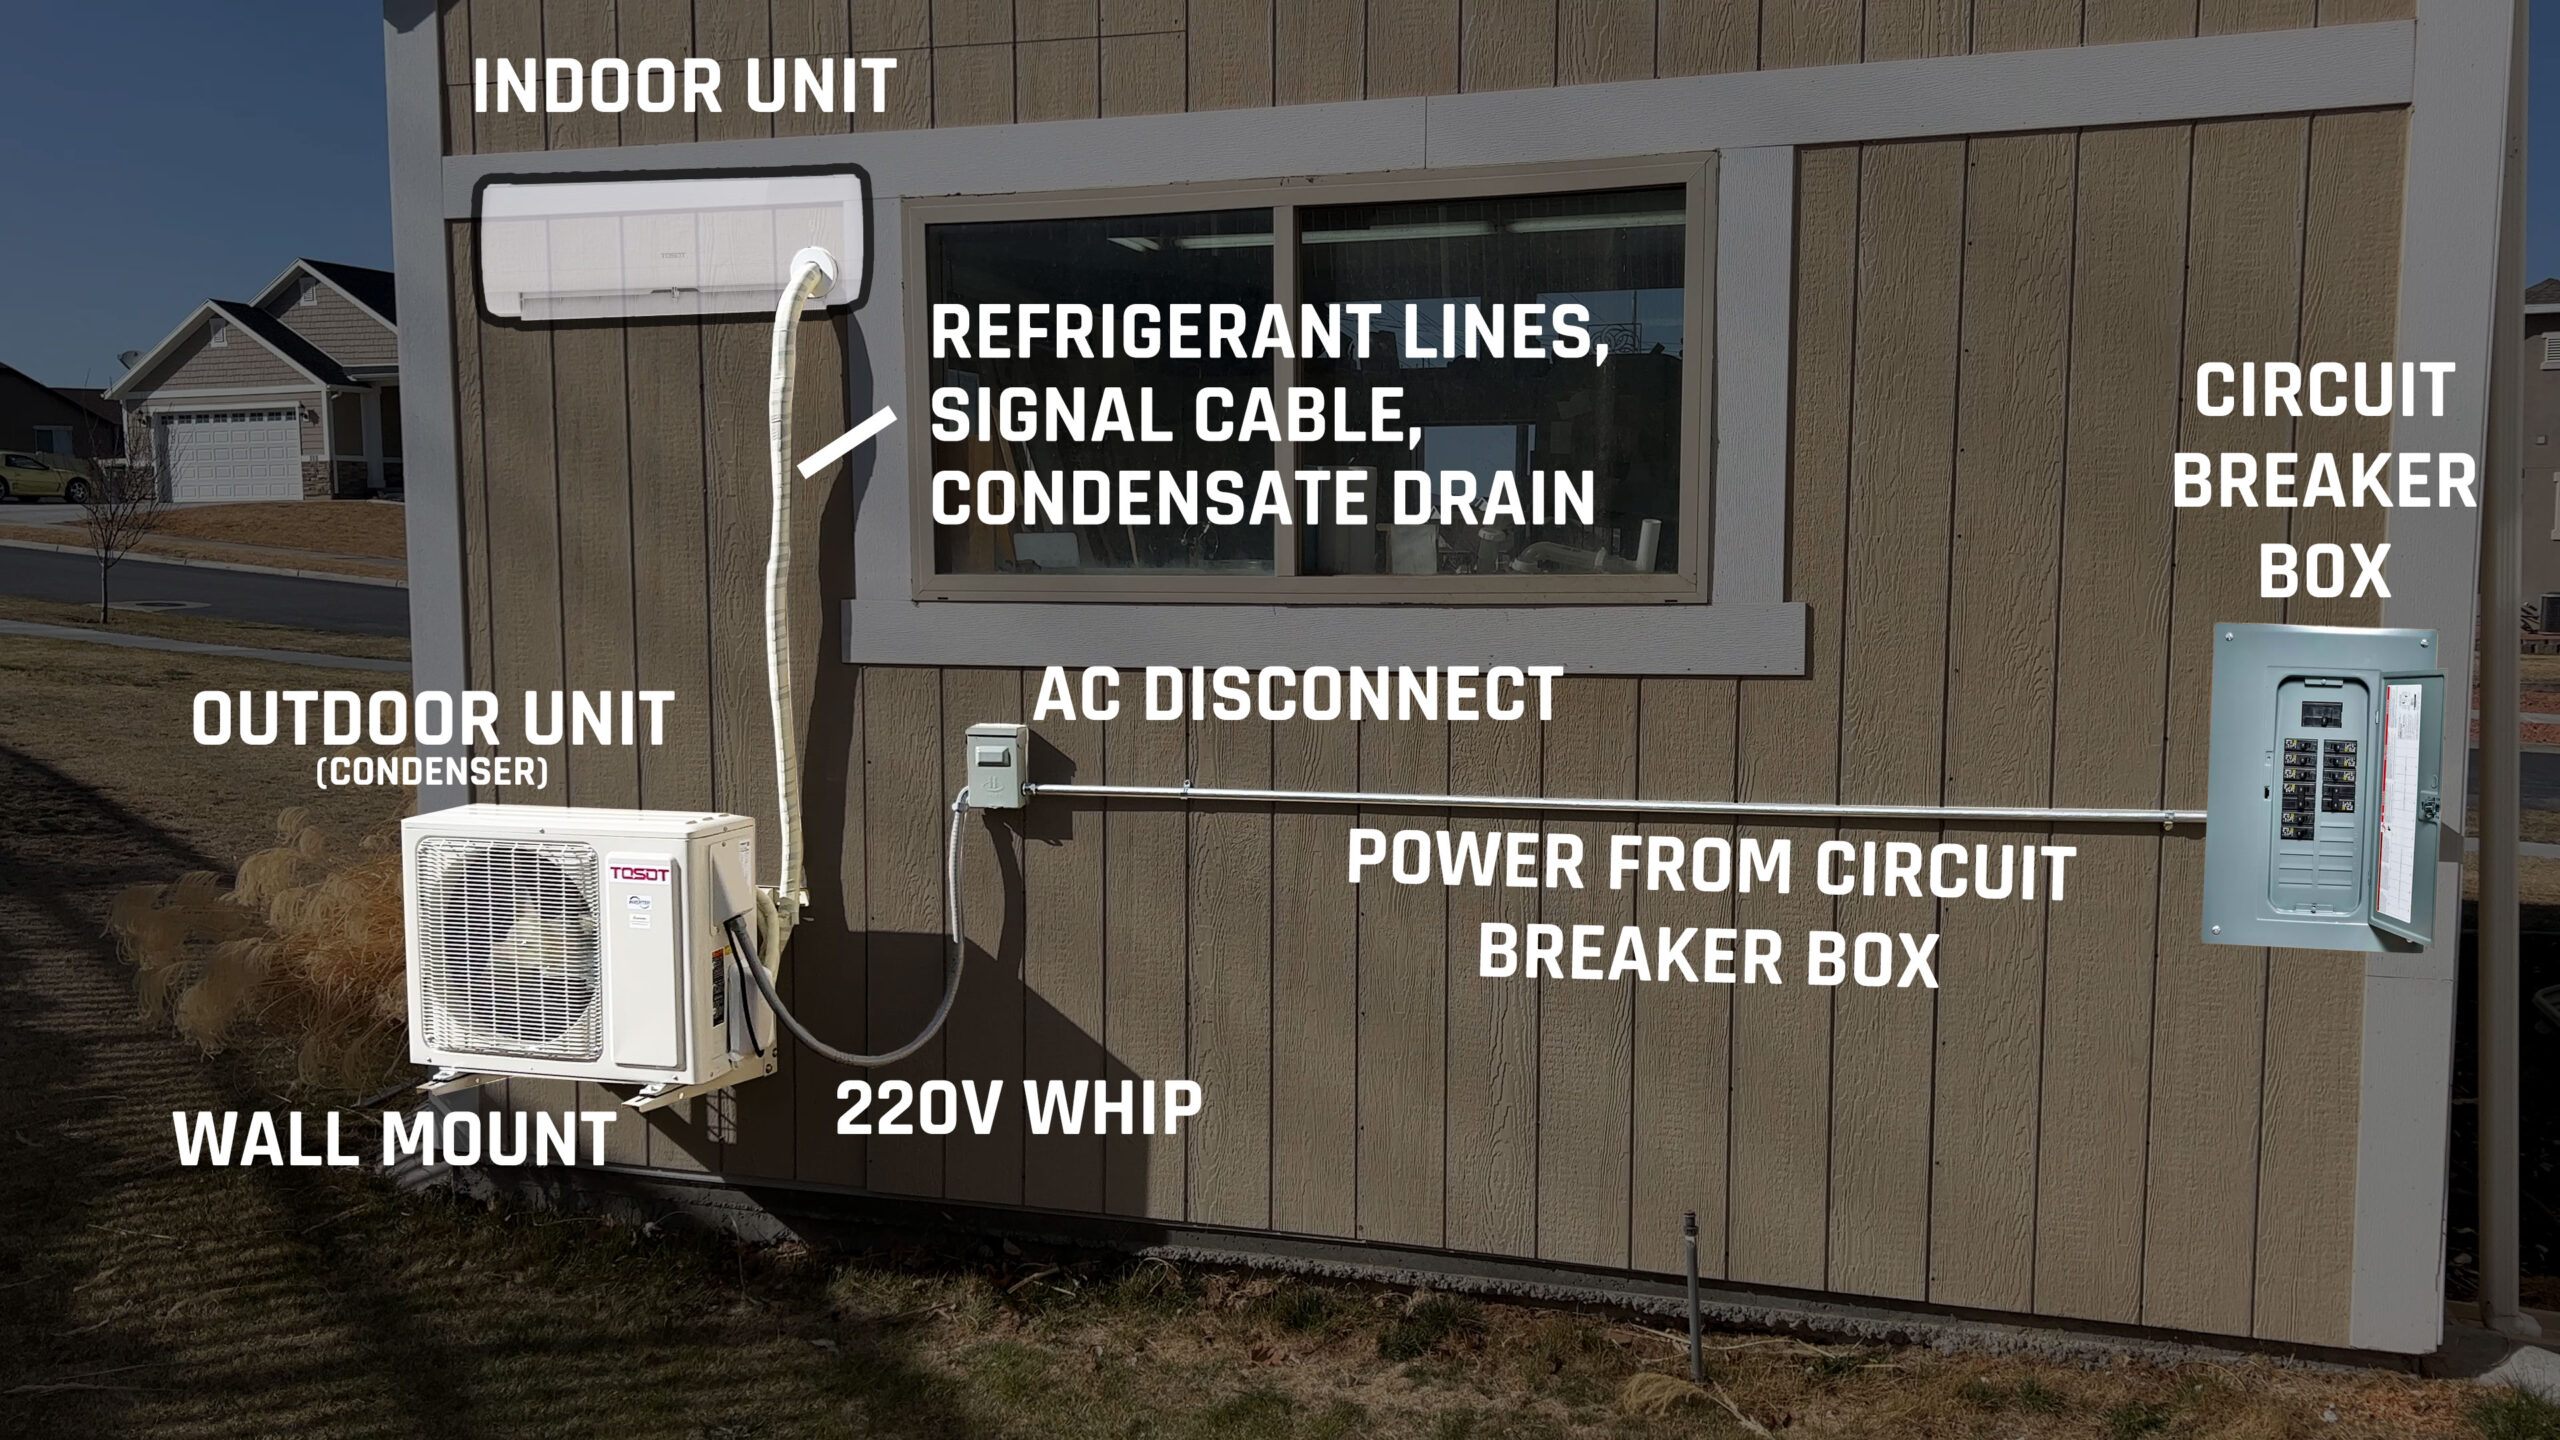
Mini-split systems typically involve two main components: the outdoor condenser unit and the indoor air handler. These units need to communicate electrically, and that communication relies on secure and correctly wired connections. Typically, a cable known as the interconnect cable runs between the outdoor and indoor units. This cable carries power and communication signals.
Important: Working with electricity can be dangerous. Always turn off the power at the breaker before inspecting or working on any wiring. If you're uncomfortable working with electricity, please call a qualified HVAC technician or electrician.
Common Wiring Problems and How to Diagnose Them
Several wiring issues can cause a mini-split to malfunction. Here's a breakdown of common problems and how to identify them:
1. Loose Connections
Loose connections are a frequent offender. Vibration from the units can cause wires to gradually loosen over time. This disrupts the flow of electricity and communication.
Diagnosis:
- Safety First: Turn off the breaker supplying power to the mini-split system. Double-check with a voltage tester to ensure power is off.
- Access the Wiring: Carefully remove the access panels on both the indoor and outdoor units to expose the wiring connections. Usually, these are screwed on. Refer to your mini-split's manual for specific instructions, as models vary.
- Visual Inspection: Thoroughly examine all wire connections. Look for wires that are visibly loose, disconnected, or corroded. Tug gently on each wire to check its security. If a wire pulls out easily, it's definitely loose.
DIY Fix:
- Tighten Screws: If you find loose screws on the terminal blocks where the wires are connected, carefully tighten them. Make sure the wire is properly seated before tightening. Do not overtighten, as this can strip the screw or damage the terminal block.
- Reconnect Disconnected Wires: If a wire is completely disconnected, identify where it should be connected (refer to the wiring diagram on the unit, if available). Reattach the wire securely to the correct terminal.
2. Corroded Wires
Corrosion can build up on wires, especially in humid environments. This corrosion acts as an insulator, hindering electrical conductivity.
Diagnosis:
- Visual Inspection: Look for a greenish or whitish buildup on the wires and terminals.
- Wire Brush Test: If you suspect corrosion, gently try to clean a small section of the wire with a wire brush. If the corrosion comes off easily, it's likely affecting the connection.
DIY Fix:
- Clean Corroded Connections: Use a wire brush or fine-grit sandpaper to carefully clean the corroded areas on the wires and terminals.
- Apply Dielectric Grease: After cleaning, apply a small amount of dielectric grease to the connections. This helps prevent future corrosion.
3. Damaged Wires
Wires can be damaged by rodents, physical impact, or simply wear and tear over time. Damaged insulation exposes the wire, creating a potential short circuit.
Diagnosis:
- Visual Inspection: Look for cuts, cracks, or frayed insulation on the wires. Pay close attention to areas where the wires pass through metal panels or are exposed to the elements.
- Continuity Test (Advanced): If you have a multimeter, you can perform a continuity test on the wires. This will confirm whether the wire is broken internally, even if the damage isn't visible. However, only attempt this if you are comfortable using a multimeter safely.
DIY Fix:
- Minor Insulation Damage: If the damage to the insulation is minor, you can repair it with electrical tape. Wrap the damaged area tightly with several layers of tape, ensuring that no bare wire is exposed.
- Severely Damaged Wire: If the wire is severely damaged or broken, you'll need to replace the entire wire.
Replacing a Wire:
- Turn off the power: Again, double-check that the breaker is off.
- Document the existing wiring: Take a photo of the connections before disconnecting anything. This will be invaluable for reassembly.
- Disconnect the old wire: Carefully disconnect the wire from both ends.
- Obtain a replacement wire: Purchase a wire of the same gauge (thickness) and type as the original. Using the correct gauge is crucial for safety and performance.
- Cut the wire to the correct length: Make sure the new wire is long enough to reach both terminals comfortably, but not so long that it creates unnecessary slack.
- Strip the wire ends: Use a wire stripper to remove a small amount of insulation from each end of the wire, exposing the bare copper conductor.
- Connect the new wire: Securely connect the new wire to the same terminals as the old wire, ensuring that the screws are tightened properly.
4. Incorrect Wiring
If you've recently had work done on your mini-split system, or if you're installing a new system yourself, incorrect wiring is a possibility. Even a seemingly minor wiring error can prevent the unit from functioning properly or even damage the system.
Diagnosis:
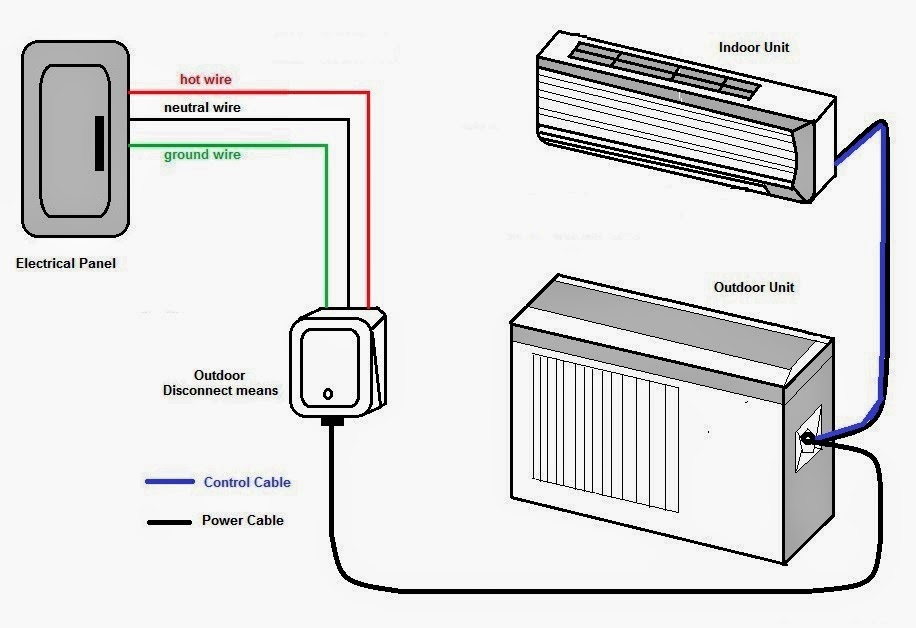
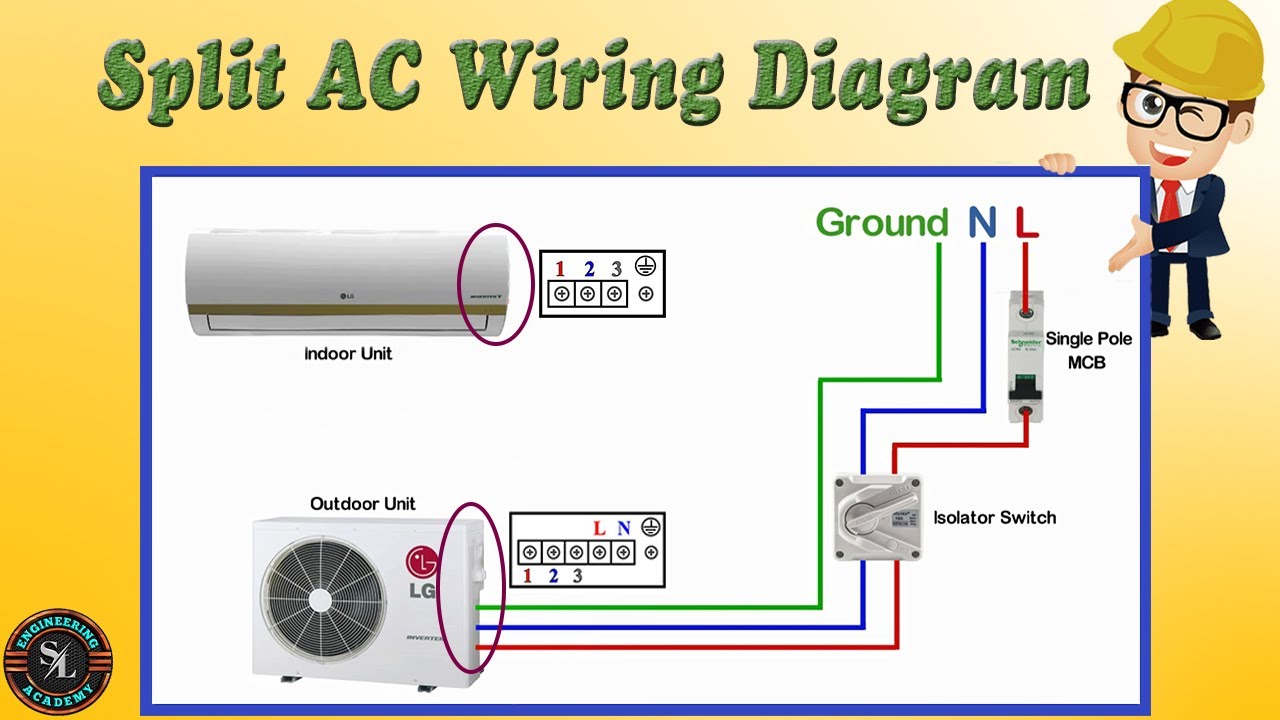
- Compare to Wiring Diagram: Refer to the wiring diagram included with your mini-split system. Carefully compare the actual wiring to the diagram, paying close attention to the color codes and terminal locations.
DIY Fix:
- Correct Wiring Errors: If you find any wiring errors, carefully correct them according to the wiring diagram. Make sure all wires are connected to the correct terminals and that the screws are tightened securely.
When to Call a Professional
While many wiring issues can be resolved with simple DIY fixes, there are situations where professional help is essential. Do not attempt to fix the following issues yourself:
- You are uncomfortable working with electricity: Your safety is paramount. If you're hesitant, call a professional.
- You are unsure about the wiring diagram: Misinterpreting the diagram can lead to further damage.
- You suspect a short circuit or electrical fire: These situations are extremely dangerous and require immediate attention.
- The problem persists after attempting the DIY fixes: If you've checked all the connections, cleaned the wires, and replaced any damaged wires, but the unit still isn't working, there may be a more complex issue.
- The unit has a burning smell: This is a sign of a serious electrical problem. Turn off the power immediately and call a professional.
- You suspect a problem with the compressor or other internal components: These repairs require specialized knowledge and equipment.
- You notice arcing or sparking: This indicates a dangerous electrical fault. Turn off the power and call a professional immediately.
- You lack the proper tools or experience: Attempting repairs without the right tools or experience can be dangerous and may void your warranty.
Specifically, troubleshooting wiring within the control board or inverter of either the indoor or outdoor unit requires specialized knowledge. Tampering with these components can lead to irreversible damage and is best left to qualified technicians.
Safety Precautions
Remember, safety is always the top priority. Before you start any electrical work, take the following precautions:
- Turn off the power: Always turn off the breaker that supplies power to the mini-split system.
- Double-check with a voltage tester: Use a voltage tester to confirm that the power is off before touching any wires.
- Wear safety glasses: Protect your eyes from sparks or debris.
- Use insulated tools: Use tools with insulated handles to prevent electric shock.
- Work in a well-lit area: Ensure that you have adequate lighting to see what you're doing.
- Avoid working in wet conditions: Water and electricity are a dangerous combination.
- If in doubt, call a professional: Never hesitate to call a qualified HVAC technician or electrician if you're unsure about any aspect of the repair.
Preventative Maintenance
To minimize the risk of wiring problems in the future, consider these preventative maintenance tips:
- Regularly inspect connections: Check the wiring connections on both the indoor and outdoor units at least once a year. Tighten any loose screws and clean any corroded connections.
- Protect wires from damage: Ensure that wires are properly secured and protected from physical damage. Use cable ties or conduit to keep wires organized and prevent them from rubbing against sharp edges.
- Keep the area around the units clean: Remove any debris or vegetation that could damage the wiring or interfere with airflow.
- Schedule professional maintenance: Have your mini-split system professionally serviced at least once a year. A qualified technician can identify and address potential problems before they become major issues.
By following these steps, you can confidently troubleshoot and potentially fix common wiring problems with your mini-split air conditioner. Remember to prioritize safety and know when to call a professional. With a little knowledge and care, you can keep your system running smoothly for years to come.