2 Inch Flexible Pvc Pipe Connectors

Let's tackle a common household headache: a leaky bathroom sink drain. Often, the culprit isn't the sink itself, but the intricate network of pipes underneath, specifically the 2-inch flexible PVC pipe connectors that form part of the drain assembly. These flexible connectors are incredibly useful for navigating tight spaces, but they can also be prone to leaks if not properly installed or maintained. Don't panic! Many leaks are simple to fix yourself, saving you a costly plumber's visit. This guide will walk you through a step-by-step troubleshooting process.
Safety First!
Before you even think about touching any pipes, safety is paramount:
- Turn off the water supply. Locate the shut-off valves under the sink (usually two small valves, one for hot and one for cold). Turn them clockwise until they are fully closed. If you can't find shut-off valves, you may need to turn off the main water supply to your house. This is usually located in the basement, garage, or near the water meter.
- Protect yourself. Wear rubber gloves to protect your hands from dirty water and bacteria. An old towel or bucket will also come in handy to catch any spills.
- Work in a well-ventilated area. If you need to use any cleaning solutions or solvents, make sure the room is well-ventilated.
Step 1: Identify the Leak Source
The first step is pinpointing the exact location of the leak. Often, this is fairly obvious, but sometimes the water can travel and make it seem like the leak is coming from somewhere else.
- Dry the area thoroughly. Use a clean cloth or paper towels to dry all the pipes and connectors under the sink. This will make it easier to see where the water is actively leaking from.
- Run the water. Slowly turn on the faucet (both hot and cold) and observe the pipes and connectors closely. Look for drips or trickles of water. Pay particular attention to the joints where the flexible PVC connectors meet other pipes or fittings.
- Check the drain stopper. Fill the sink with a small amount of water and then release the drain stopper. Watch for leaks around the drain flange (the part that connects the sink to the drainpipe) and the P-trap (the curved pipe designed to trap debris and prevent sewer gases from entering your home).
Step 2: Inspect the Flexible PVC Connectors
Once you've identified the general area of the leak, focus on the 2-inch flexible PVC pipe connectors.
- Check for cracks or damage. Carefully examine the flexible PVC pipe for any visible cracks, splits, or punctures. Even a small crack can cause a significant leak. Flexible PVC can become brittle over time, especially if exposed to harsh chemicals or extreme temperatures.
- Inspect the connections. Pay close attention to the connections where the flexible PVC pipe meets other pipes or fittings. Are the connectors properly tightened? Are there any signs of corrosion or wear and tear on the connectors or the surrounding pipes?
- Look for loose clamps. If the flexible PVC pipe is secured with clamps, make sure they are tightened properly. Over time, clamps can loosen due to vibrations or changes in temperature.
- Evaluate the pipe's positioning. Ensure the flexible pipe isn't excessively bent or kinked. Extreme bends can stress the material and lead to cracks or leaks.
Step 3: Tightening Connections (The First Line of Defense)
Often, a simple tightening of the connections can resolve minor leaks.
- Use the right tools. You'll need a pair of channel-lock pliers or a pipe wrench to tighten the connectors. Be careful not to overtighten them, as this can damage the pipe or connector.
- Tighten gradually. Tighten the connectors in small increments, checking for leaks after each adjustment.
- Support the pipes. When tightening connections, make sure to support the pipes to prevent them from twisting or breaking. Use your other hand to hold the pipe in place.
Step 4: Replacing Washers and Seals
If tightening the connections doesn't stop the leak, the next step is to inspect and replace any worn-out washers or seals.
- Disassemble the connection. Carefully loosen the connectors and disconnect the flexible PVC pipe from the fitting.
- Inspect the washers and seals. Examine the washers and seals for any signs of wear and tear, such as cracks, tears, or compression. Replace any damaged washers or seals with new ones of the same size and type. Take the old washer or seal with you to the hardware store to ensure you get the correct replacement.
- Apply plumber's tape (Teflon tape). Before reassembling the connection, wrap the threads of the pipe fitting with plumber's tape (Teflon tape). This will help to create a tighter seal and prevent leaks. Wrap the tape in a clockwise direction, overlapping each layer slightly.
- Reassemble the connection. Carefully reassemble the connection, making sure the washers and seals are properly seated. Tighten the connectors until they are snug, but not overtightened.
Step 5: Replacing a Section of Flexible PVC Pipe
If the flexible PVC pipe itself is damaged, you'll need to replace the damaged section.
- Measure and cut the replacement section. Measure the length of the damaged section of pipe and cut a replacement section of the same length using a PVC pipe cutter or a sharp utility knife. Ensure the cut is clean and square.
- Deburr the cut ends. Use a deburring tool or a piece of sandpaper to smooth the cut ends of the pipe. This will help to prevent leaks.
- Apply PVC cement. If the pipe is glued to the existing fittings, you'll need to use PVC cement to connect the new section. Clean the inside of the fitting and the outside of the pipe with PVC primer. Then, apply a thin, even coat of PVC cement to both surfaces.
- Assemble the connection. Quickly insert the pipe into the fitting and twist it slightly to ensure a good bond. Hold the connection firmly for 30 seconds to allow the cement to set. Follow the cement manufacturer's instructions for curing time before applying water pressure.
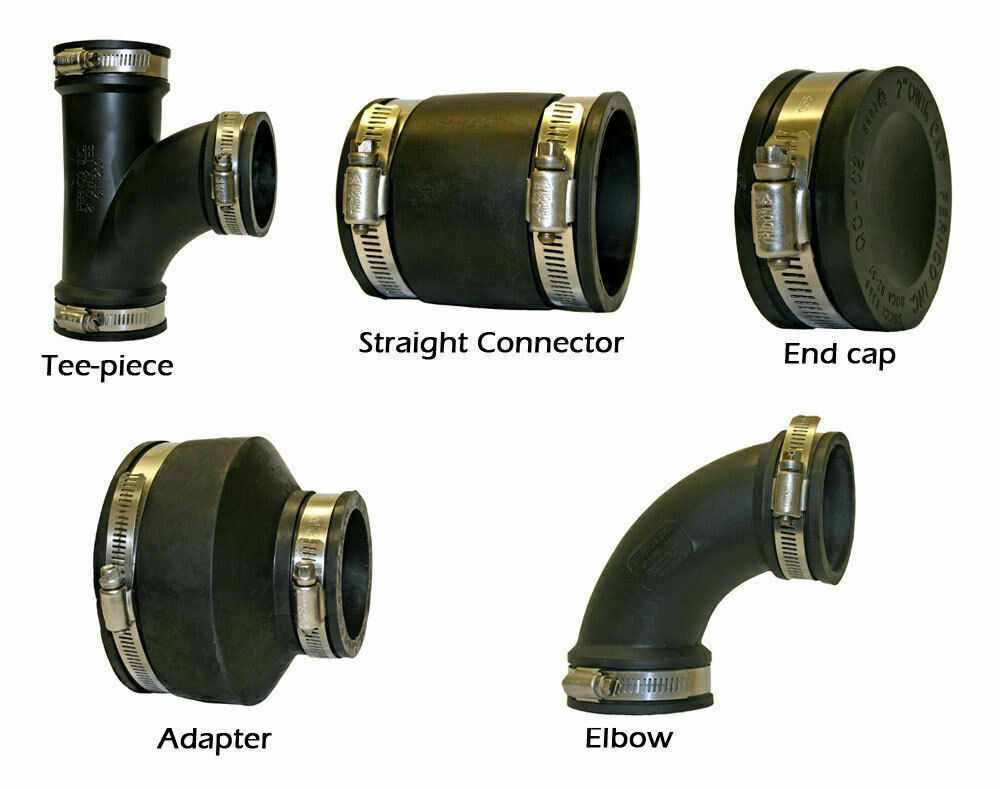
- Use flexible couplings with clamps. Alternatively, you can use flexible couplings with clamps to connect the new section of pipe to the existing fittings. These couplings are easier to install than glued connections and can be a good option if you don't have experience working with PVC cement.
Step 6: When to Call a Professional
While many leaks in 2-inch flexible PVC pipe connectors are relatively simple to fix, there are some situations where it's best to call a professional plumber. Don't hesitate to call in the experts if:
- You're uncomfortable working with plumbing. If you're not confident in your ability to fix the leak yourself, it's always best to call a professional.
- The leak is severe or persistent. If the leak is large or doesn't stop after you've tried the above steps, there may be a more serious underlying problem.
- The pipes are corroded or damaged. If the pipes are corroded or damaged beyond repair, you'll need to replace them, which is best left to a professional.
- The leak is behind a wall or in a difficult-to-reach area. Accessing and repairing leaks in these areas can be challenging and may require specialized tools.
- You suspect there may be mold or water damage. Leaks can lead to mold growth and water damage, which can be hazardous to your health. A professional can assess the damage and recommend the appropriate remediation steps.
- The plumbing system is complex. If you have a complex plumbing system with multiple fixtures and connections, it's best to call a professional to avoid causing further damage.
Preventative Maintenance
The best way to deal with leaks is to prevent them from happening in the first place. Here are a few tips for maintaining your 2-inch flexible PVC pipe connectors:
- Regularly inspect your plumbing. Check under your sinks and around your toilets for any signs of leaks or water damage.
- Avoid using harsh chemicals. Harsh chemicals can damage PVC pipes and connectors, leading to leaks. Use mild, biodegradable cleaning products instead.
- Don't pour grease down the drain. Grease can solidify and clog your pipes, putting stress on the connections and causing leaks.
- Be careful when storing items under the sink. Avoid storing heavy or sharp objects under the sink, as they can damage the pipes and connectors.
- Periodically check and tighten connections. Every few months, check the connections on your flexible PVC pipe connectors and tighten them if necessary.
By following these steps, you can confidently troubleshoot and repair many common leaks in your 2-inch flexible PVC pipe connectors. Remember to prioritize safety and don't hesitate to call a professional when needed. With a little knowledge and effort, you can keep your plumbing system in good working order and prevent costly repairs down the road. Good luck!