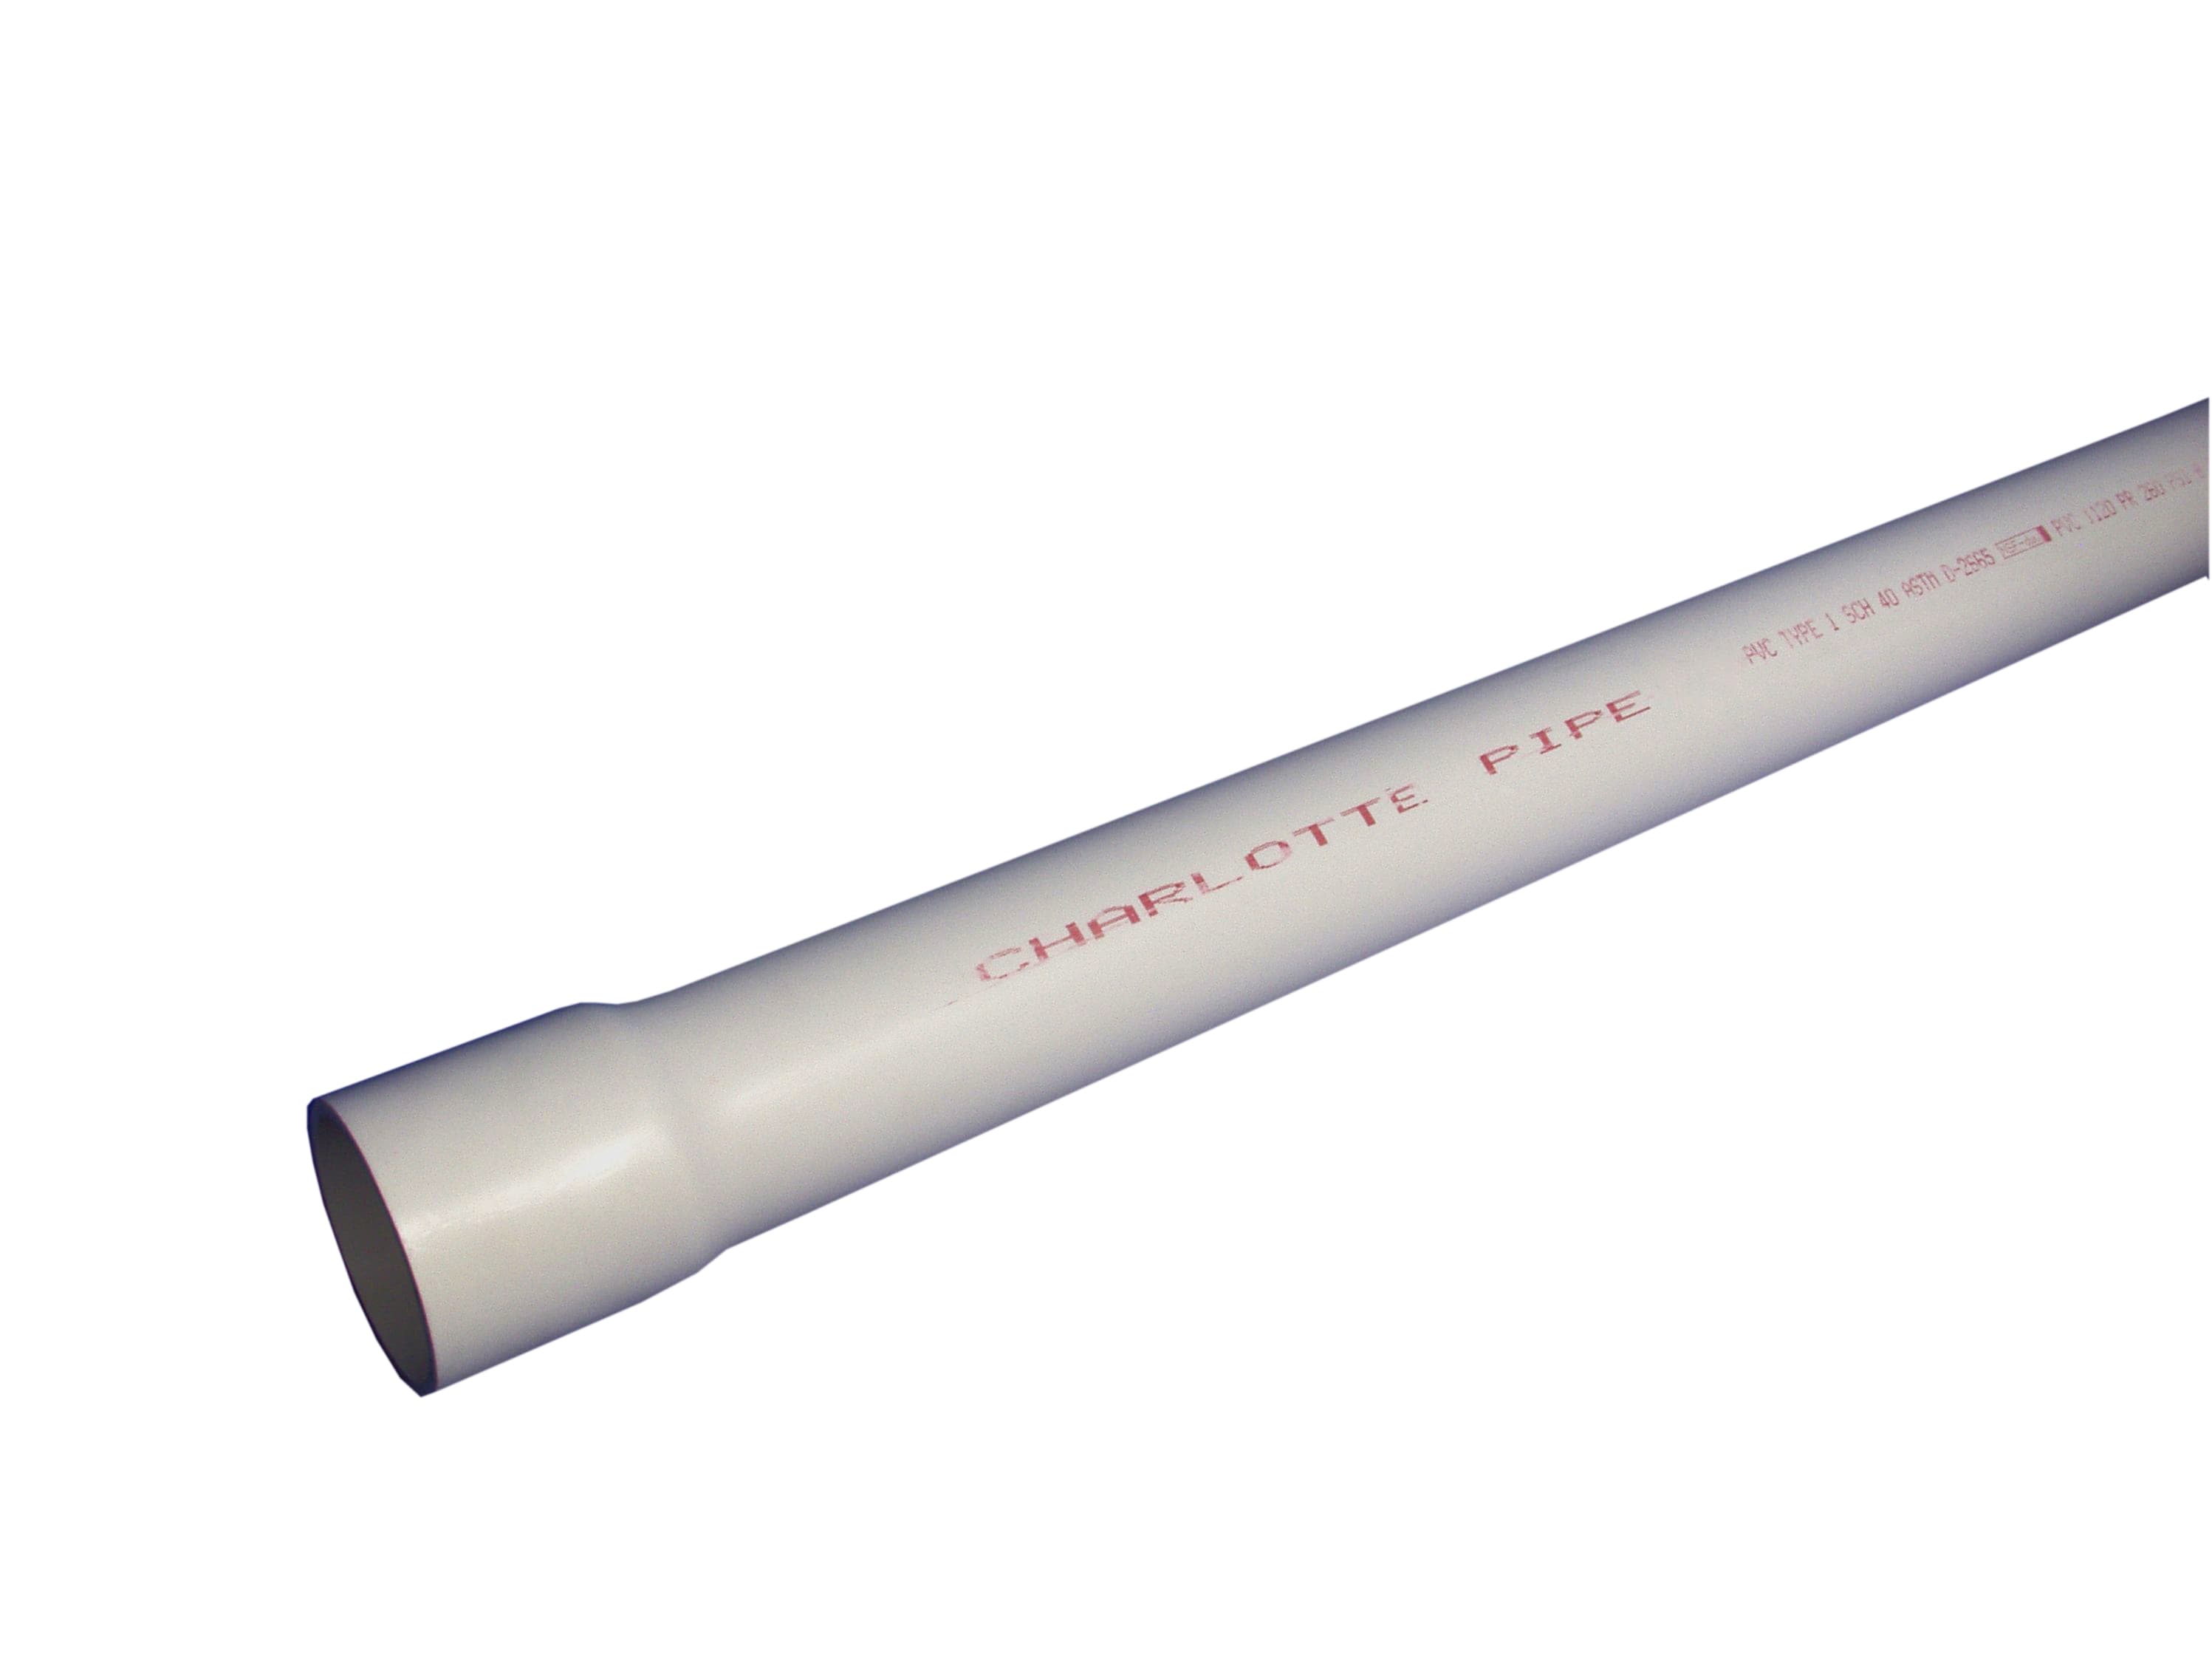
2 Inch Pvc Pipe Schedule 40

Two-inch Schedule 40 PVC pipe is a common component in many residential HVAC systems, especially for condensate drain lines, exhaust vents for high-efficiency furnaces, and intake vents. Understanding its properties, applications, and how to work with it can save you money on repairs and ensure your HVAC system runs efficiently. This guide covers everything you need to know about 2" Schedule 40 PVC in HVAC, from basic knowledge to DIY tips and when to call a professional.
Understanding 2" Schedule 40 PVC Pipe
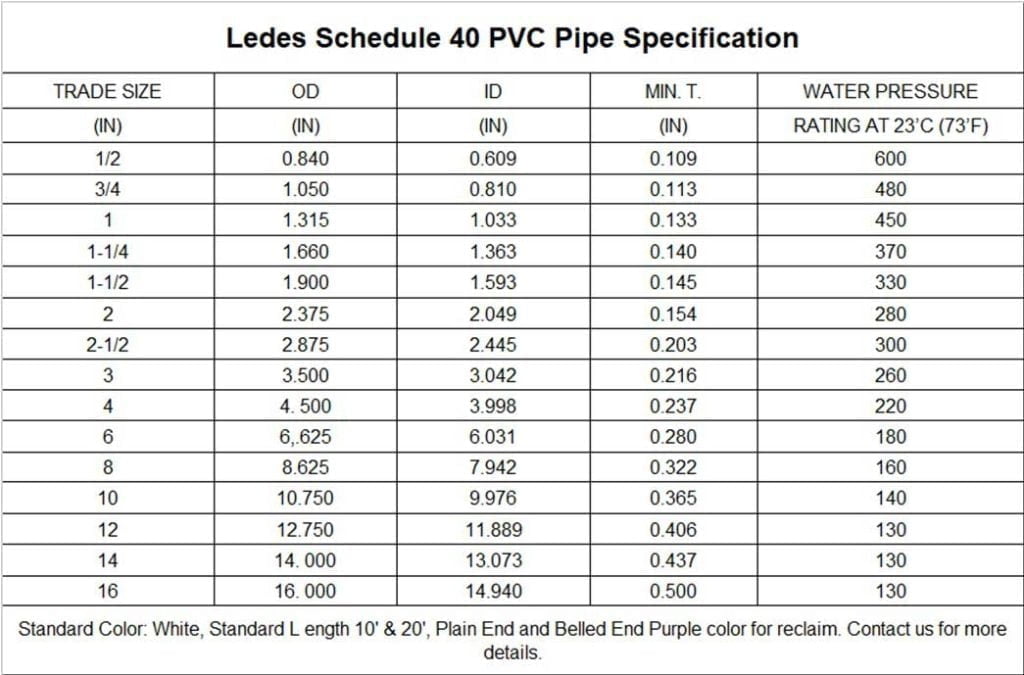
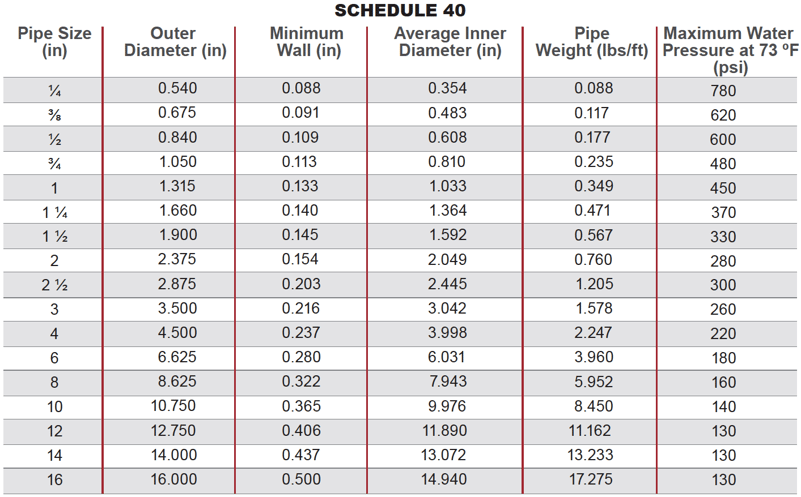
Schedule 40 refers to the wall thickness of the pipe and its ability to withstand pressure. Schedule 40 PVC is a common standard for residential plumbing and low-pressure HVAC applications. The "2 inch" measurement refers to the nominal inner diameter of the pipe, although the actual inner and outer diameters will vary slightly.
Key Properties
- Material: Polyvinyl Chloride (PVC) – a rigid, durable plastic.
- Schedule: 40 – indicates wall thickness and pressure rating.
- Diameter: Nominal 2 inches – refers to the approximate inner diameter.
- Color: Typically white, but can also be gray.
- Advantages: Corrosion-resistant, lightweight, easy to cut and join, relatively inexpensive.
- Disadvantages: Not suitable for high-temperature applications, can become brittle in cold temperatures, requires proper venting for certain applications.
Common HVAC Applications
- Condensate Drain Lines: Draining water produced by air conditioners and high-efficiency furnaces.
- High-Efficiency Furnace Venting: Exhausting combustion gases and drawing in fresh air (check local codes and manufacturer specifications).
- Humidifier Drain Lines: Draining excess water from humidifiers.
- Air Distribution: In some rare cases, short runs of ductwork, although this is less common than using metal ducting.
DIY Troubleshooting and Repairs with 2" PVC
Before attempting any DIY repairs, always turn off the power to your HVAC system at the breaker. Wear safety glasses and gloves to protect yourself from debris and chemicals. If you are uncomfortable with any of these steps, call a qualified HVAC technician.
Common Problems & Solutions
1. Leaks in Condensate Drain Lines
Problem: Water dripping from joints or cracks in the PVC pipe.
Possible Causes:
- Improperly glued joints.
- Cracked or damaged pipe.
- Clogs in the drain line causing pressure buildup.
Solution:
- Identify the Leak: Trace the source of the water.
- Clean the Area: Wipe the pipe and fittings around the leak with a clean cloth.
- Repair Minor Leaks: For small leaks at joints, you might try PVC cement specifically designed for wet conditions. Apply generously after cleaning and drying (if possible). Let it cure completely according to the product instructions.
- Replace Damaged Sections: If the pipe is cracked or severely damaged, cut out the affected section using a PVC cutter or saw. Clean the ends of the existing pipe, apply PVC primer and cement to both the pipe and a new section of 2" Schedule 40 PVC, and join them using couplings.
- Check for Clogs: A clogged drain line can cause pressure to build up and force water out of weak points. Use a wet/dry vacuum to clear any obstructions.
2. Clogged Condensate Drain Line
Problem: Water backing up in the condensate pan, potentially triggering a safety switch or causing water damage.
Possible Causes:
- Algae growth.
- Dirt and debris accumulation.
- Small objects blocking the drain.
Solution:
- Locate the Drain Line: Find where the 2" PVC condensate drain exits your HVAC unit.
- Disconnect the Drain Line (if possible): Carefully disconnect the drain line at a union or fitting, if one exists. If not, you may need to cut the pipe and use a coupling for reassembly.
- Clear the Clog: Use a wet/dry vacuum to suck out any blockages. You can also try using a stiff wire or plumbing snake to break up clogs. Be careful not to damage the pipe.
- Flush the Drain Line: Pour a mixture of hot water and vinegar or a commercial condensate drain cleaner down the drain line to remove algae and debris.
- Reassemble the Drain Line: Reconnect the drain line, ensuring all joints are properly sealed.
- Prevent Future Clogs: Pour a cup of vinegar down the drain line every month to prevent algae growth.
3. Sagging or Unsupported PVC Vent Pipes
Problem: Long runs of 2" PVC vent pipe sagging or lacking proper support.
Possible Causes:
- Insufficient support hangers.
- The weight of the pipe, especially when filled with condensate.
Solution:
- Install Support Hangers: Add PVC pipe hangers or straps every 4-6 feet to support the pipe and prevent sagging.
- Ensure Proper Slope: Make sure the vent pipe slopes slightly downward towards the condensate drain to allow for proper drainage.
Tools and Materials for DIY PVC Repair
- PVC Cutter or Saw: For cutting PVC pipe to the desired length.
- PVC Primer and Cement: For creating strong, watertight joints.
- PVC Couplings and Fittings: For connecting sections of pipe.
- Measuring Tape: For accurate measurements.
- Sandpaper or Deburring Tool: For smoothing rough edges after cutting.
- Wet/Dry Vacuum: For clearing clogged drain lines.
- Safety Glasses: To protect your eyes from debris.
- Gloves: To protect your hands from chemicals and sharp edges.
- Pipe Wrench (optional): For tightening fittings.
When to Call a Professional
While many minor PVC repairs are within the capabilities of a homeowner, some situations require the expertise of a licensed HVAC technician. Do not attempt repairs if you are uncomfortable or unsure about any step.
Call a Professional If:
- You Suspect a Gas Leak: If you smell natural gas near your furnace or vent pipes, evacuate the area immediately and call your gas company and an HVAC professional. Gas leaks are extremely dangerous.
- The Problem Involves Combustion Gases: Venting issues related to furnaces can be complex and potentially dangerous. Incorrect venting can lead to carbon monoxide poisoning.
- The Repair Requires Working Inside the HVAC Unit: Any work inside the furnace, air conditioner, or other HVAC equipment should be performed by a qualified technician.
- You are Unsure of the Cause of the Problem: If you can't diagnose the problem, it's best to call a professional to avoid causing further damage.
- The Repair Requires Permits or Inspections: Some HVAC repairs require permits and inspections to ensure they meet local building codes.
- You lack experience with plumbing or HVAC systems.
Cost Estimates for Common Repairs
The cost of repairing or replacing 2" Schedule 40 PVC components in your HVAC system can vary depending on the extent of the damage, the complexity of the repair, and your location. Here are some general estimates:
- Minor Leak Repair (DIY): $5 - $20 for PVC cement, primer, and couplings.
- Replacing a Section of Condensate Drain Line (DIY): $10 - $30 for pipe, fittings, and cement.
- Clearing a Clogged Drain Line (DIY): $0 - $10 (if you already have a wet/dry vacuum).
- Professional Condensate Drain Line Cleaning: $75 - $150.
- Professional Leak Repair: $100 - $300 (depending on the complexity of the repair).
- Replacing a Section of Vent Pipe (Professional): $200 - $500 (due to the potential for gas leaks and code requirements).
These are just estimates. Always get a quote from a qualified HVAC technician before proceeding with any repairs.
Safety Precautions
Working with HVAC systems and PVC pipe can be dangerous if proper safety precautions are not followed.
- Turn Off the Power: Always turn off the power to your HVAC system at the breaker before starting any repairs.
- Wear Safety Glasses and Gloves: Protect your eyes and hands from debris and chemicals.
- Work in a Well-Ventilated Area: PVC cement and primer can release harmful fumes.
- Follow Manufacturer's Instructions: Always read and follow the instructions on PVC cement, primer, and other products.
- Be Aware of Gas Lines: If you are working near gas lines, be extremely cautious. If you smell gas, evacuate the area immediately and call your gas company.
- Don't Over-Tighten Fittings: Over-tightening fittings can damage the pipe or fittings.
- Dispose of Waste Properly: Dispose of used PVC pipe, cement, and primer according to local regulations.
Conclusion
Understanding 2" Schedule 40 PVC pipe and its applications in HVAC systems empowers you to tackle minor repairs and maintenance tasks. However, always prioritize safety and know when to call a professional. Proper installation and maintenance will ensure your HVAC system operates efficiently and safely for years to come. Remember to consult local codes and manufacturer's specifications for your specific equipment. If you are unsure about any aspect of the repair, contact a qualified HVAC technician.