3/8 Copper Gas Line Btu Chart

Imagine this: It's a chilly evening, and you're looking forward to a cozy night in. You turn up your gas fireplace, expecting a comforting warmth, but... nothing. Or perhaps your gas stove is taking forever to heat up, and dinner is delayed. These are common household frustrations, and sometimes the issue lies in a seemingly simple detail: the gas supply.
Understanding Gas Line Capacity: The 3/8" Copper Gas Line BTU Chart
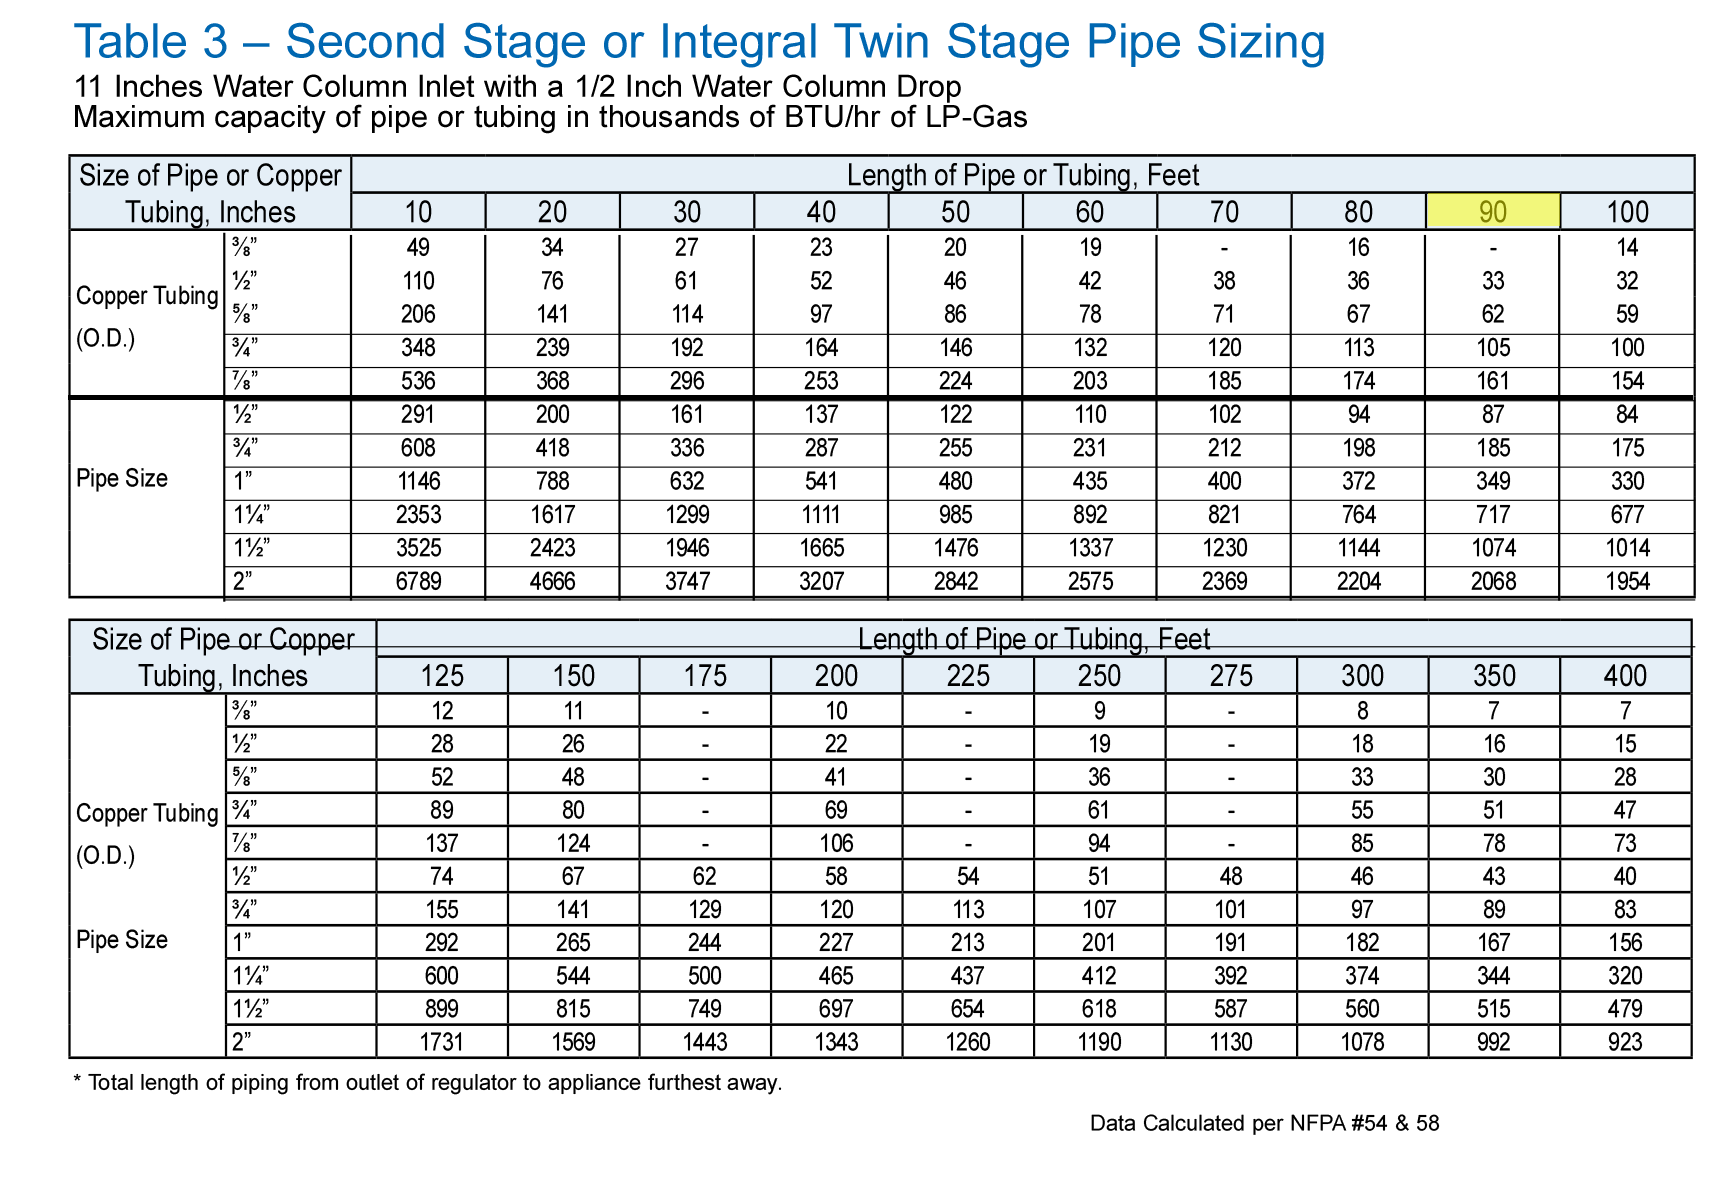
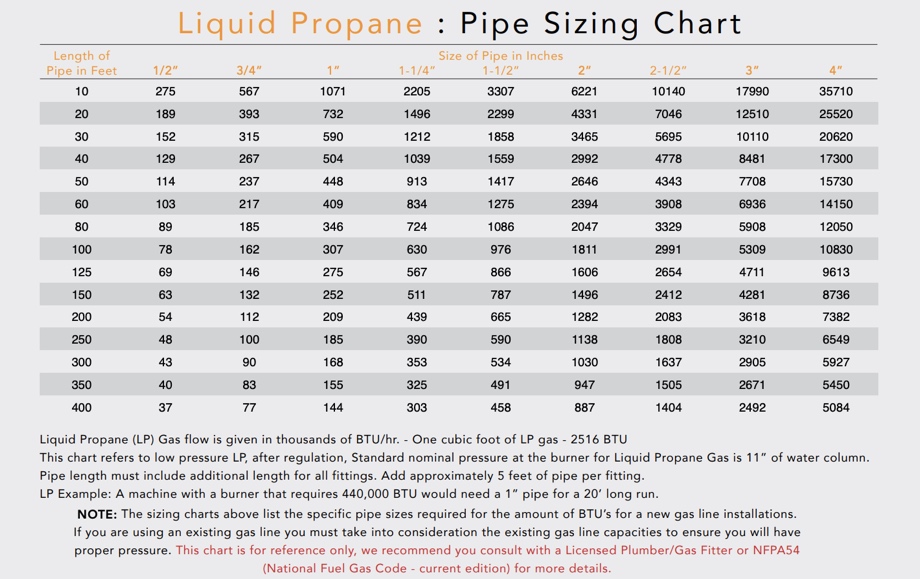
Before diving into troubleshooting, it's crucial to understand the capacity of your gas lines. A 3/8" copper gas line, a common size in many homes, has a specific BTU (British Thermal Unit) carrying capacity depending on the length of the run and the gas pressure. A BTU chart shows how many BTUs per hour a particular size pipe can deliver over a certain distance at a certain gas pressure.
Why is this important? If your appliances require more BTUs than the gas line can supply, they won't function properly, leading to weak flames, slow heating, or even complete failure. The length of the gas line and the number of fittings (elbows, tees, etc.) significantly impact gas flow and pressure. Longer runs and more fittings reduce the available BTU capacity.
Important Safety Note: Working with gas can be dangerous. If you smell gas at any time, immediately evacuate the area and call your local gas company or fire department. Do not attempt any repairs yourself if you suspect a gas leak.
Troubleshooting Your Gas Appliance: A Step-by-Step Guide
Let's address a common scenario: your gas fireplace isn't working correctly. Here's a logical, step-by-step guide to help you troubleshoot the problem.
Step 1: Initial Checks and Safety
- Smell for Gas: Before anything else, sniff around the appliance. If you smell gas, do not proceed. Evacuate and call for professional help.
- Check the Gas Supply: Ensure your main gas valve is ON. It's usually located near your gas meter. Make sure no one has accidentally turned it off.
- Look for Obvious Obstructions: Visually inspect the area around the fireplace. Are there any obstructions blocking the vents or the gas line?
Step 2: Power and Basic Settings
- Check the Power Supply: Many gas fireplaces use electricity to operate the ignition and fan. Make sure the fireplace is plugged in and that the outlet is working. Test the outlet with another device to confirm. Check the circuit breaker.
- Inspect the Remote/Switch: If your fireplace uses a remote control or a wall switch, make sure the batteries are good in the remote and the switch is in the "ON" position. Sometimes, simply replacing the batteries can solve the problem.
- Verify the Settings: Check the fireplace settings. Is the thermostat set high enough? Is the pilot light setting correct (if applicable)?
Step 3: The Pilot Light (If Applicable)
Many older gas fireplaces use a pilot light to ignite the main burner. If the pilot light is out, the fireplace won't work.
- Locate the Pilot Light Assembly: Usually found near the main burner.
- Follow the Lighting Instructions: Most fireplaces have instructions printed near the pilot light assembly. Follow these instructions carefully. Typically, you'll need to press and hold a button while lighting the pilot light with a long lighter or match.
- Hold the Button Long Enough: After lighting the pilot light, continue holding the button for about 20-30 seconds. This allows the thermocouple (a safety device) to heat up and keep the gas valve open.
- Pilot Light Won't Stay Lit? This could indicate a faulty thermocouple. This is a relatively inexpensive part, but replacing it involves working with gas, so it's often best left to a professional.
Step 4: Checking for Blockages
A common cause of gas appliance problems is a blocked burner or vent.
- Inspect the Burner: Carefully examine the burner for any debris, dust, or spider webs. Use a soft brush or vacuum cleaner with a brush attachment to clean the burner. Ensure the gas is turned OFF before cleaning.
- Check the Vents: Make sure the vents are clear of obstructions, both inside and outside your home. Blocked vents can prevent proper combustion and lead to dangerous carbon monoxide buildup.
Step 5: Understanding the 3/8" Copper Gas Line BTU Chart and Your Appliance
This is where the BTU chart comes in. You need to determine if your 3/8" gas line is adequately supplying your appliance.
- Find Your Appliance's BTU Requirement: This information is usually located on a label on the appliance itself or in the owner's manual. It will state the BTU/hour input rating.
- Measure the Gas Line Length: Estimate the length of the 3/8" copper gas line running from the gas meter to your appliance. Be as accurate as possible.
- Count the Fittings: Count the number of elbows, tees, and other fittings in the gas line. Each fitting adds resistance and reduces gas flow. As a general rule, add the following equivalent length to the total pipe length for each fitting:
- Elbow (90 degree): Add 5 feet
- Tee: Add 7 feet
- Consult a BTU Chart: Find a 3/8" copper gas line BTU chart online. These charts typically show the BTU capacity for different pipe lengths and gas pressures (usually measured in inches of water column, "WC"). Most residential gas systems operate at a pressure of 7" WC.
- Compare Requirements and Capacity: Compare your appliance's BTU requirement to the BTU capacity of your gas line based on the chart. If the appliance requires more BTUs than the gas line can supply, that's likely your problem.
Example: Let's say your fireplace requires 30,000 BTU/hour, and you have a 30-foot run of 3/8" copper gas line with two elbows and one tee, resulting in a total equivalent length of 54 feet (30 + 2*5 + 7). Consulting a BTU chart for 3/8" copper at 7" WC might show a capacity of only 25,000 BTU/hour at 60 feet. In this case, the gas line is undersized.
Step 6: Potential DIY Fixes (With Caution)
If the gas line appears to be undersized, there are a few potential (but limited) DIY options, only if you are comfortable and knowledgeable:
- Reduce Gas Demand Elsewhere: If possible, try to reduce the gas demand on other appliances that share the same gas line. For example, avoid running the water heater and the fireplace simultaneously. This is a temporary workaround, not a permanent solution.
- Minimize Fittings (If Possible): If the gas line has an excessive number of unnecessary fittings, you *might* be able to simplify the run, reducing the resistance. This is only advisable if you have experience with plumbing and gas fitting. Consult with a qualified professional before making any changes to gas lines.
- Ensure Proper Ventilation: Proper ventilation is vital for gas appliances. Make sure nothing is obstructing the airflow around the appliance.
Important Note: Do not attempt to increase the gas pressure yourself. This is extremely dangerous and should only be done by a qualified gas technician.
When to Call a Professional
Many gas appliance issues require the expertise of a qualified professional. Here's when you should call a licensed plumber or HVAC technician:
- You Smell Gas: As mentioned before, this is an emergency. Evacuate and call for help immediately.
- You're Uncomfortable Working With Gas: If you're not confident in your ability to work safely with gas, don't attempt any repairs.
- The Pilot Light Won't Stay Lit: This could indicate a faulty thermocouple or a more serious problem with the gas valve.
- You Suspect a Gas Leak: Even a small gas leak can be dangerous.
- The Gas Line is Undersized: If the BTU chart reveals that your gas line is undersized, you'll need a professional to upgrade the gas line to a larger diameter or run a new line.
- You're Experiencing Carbon Monoxide Symptoms: Headaches, dizziness, nausea, and confusion can be symptoms of carbon monoxide poisoning. Open windows and doors, evacuate the area, and call 911 or your local fire department. Install carbon monoxide detectors in your home and test them regularly.
- Any Repair Involves the Gas Valve or Complex Parts: Leave these repairs to the experts.
- Any Time you're not sure: If you're unsure about any aspect of the troubleshooting or repair process, it's always best to err on the side of caution and call a professional.
Conclusion: Safety First!
Troubleshooting gas appliance problems can be manageable with a logical approach and a basic understanding of gas line capacity. However, safety should always be your top priority. When in doubt, call a qualified professional. Remember, a properly functioning gas appliance is essential for your comfort and safety. By following these steps and exercising caution, you can potentially identify and resolve minor issues while knowing when to seek expert assistance. Using a BTU chart can save you time and money, while ensuring proper operation.