480 3 Phase Voltage Per Leg

Is your home's central air conditioner struggling to keep up, especially during peak heat? Or perhaps your electric heat pump is blowing cool air when it should be warm? Many homeowners experiencing these frustrating HVAC issues don't realize a potential culprit lurking behind the scenes: an imbalance in their 480 3-phase electrical system, particularly if they live in a building that supplies power to multiple units or businesses.
While most residential homes use single-phase power, larger properties or those with significant electrical demands (like apartment buildings or commercial spaces converted to residential use) may utilize a 480V 3-phase system. Even if you don't *think* you have 3-phase, it's worth understanding the symptoms and initial troubleshooting steps. A problem in one leg of the 3-phase system can wreak havoc on your HVAC equipment, leading to inefficient operation, reduced lifespan, and even complete failure.
This article provides a practical, step-by-step guide to diagnosing potential issues with your 480V 3-phase system, focusing on the voltage per leg. We'll cover what you can check safely without tools, what requires basic equipment (a multimeter), and when it's absolutely crucial to call a qualified HVAC technician or electrician. Safety is paramount, so always exercise extreme caution when working with electrical systems.
Understanding 480V 3-Phase Power
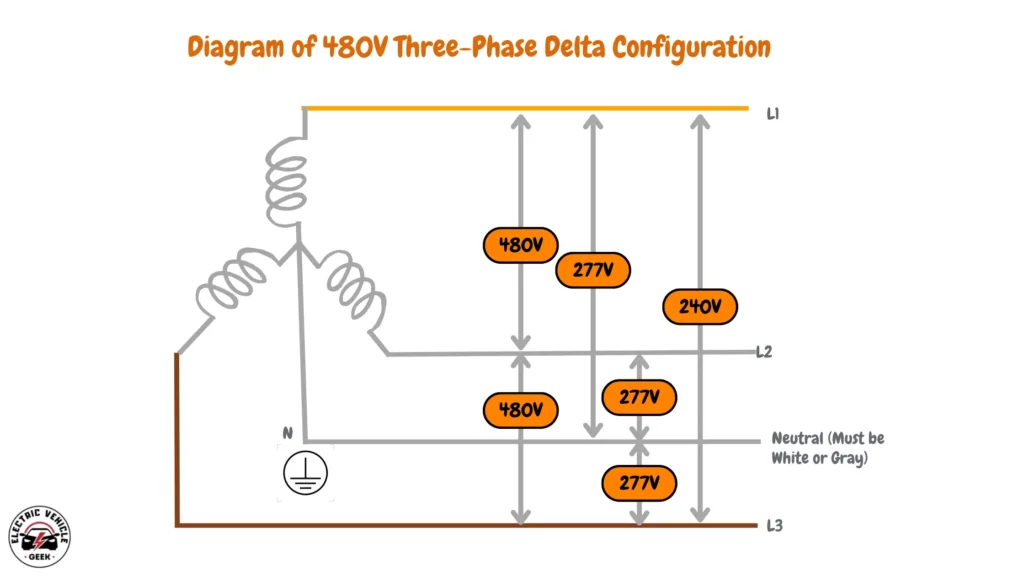
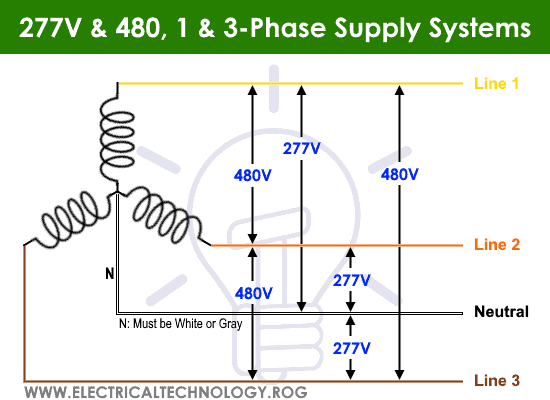
Before diving into troubleshooting, let's briefly explain what 480V 3-phase power means. In a 3-phase system, electrical power is delivered through three separate conductors (legs), each carrying an alternating current that is offset in time from the others. Ideally, the voltage between each leg and neutral should be approximately 277 volts (480V / √3 ≈ 277V). The voltage between any two legs should be around 480 volts. A significant deviation from these values on any one leg can indicate a problem.
Why does this matter for your HVAC? Many commercial-grade HVAC systems and some larger residential units are designed to operate on 3-phase power. An imbalance or voltage drop on one leg can starve the equipment of the power it needs, causing motors to overheat, compressors to struggle, and control systems to malfunction. This results in inefficient cooling/heating, higher energy bills, and potential equipment damage.
Phase 1: Initial Observation (No Tools Required)
Start with some basic observations. These can provide valuable clues without requiring any tools or direct interaction with electrical components.
- Assess HVAC Performance: Is the cooling/heating weaker than usual? Is it taking much longer to reach the desired temperature? Is the unit cycling on and off more frequently than normal? Document these observations.
- Listen for Unusual Noises: Are you hearing any unusual humming, buzzing, or grinding noises from your HVAC unit (indoor or outdoor)? These could indicate motor problems related to voltage imbalances.
- Check Other Electrical Equipment: Are other appliances or equipment in your home (particularly those using 240V or 480V if applicable) exhibiting any problems? Flickering lights, weak performance, or unusual noises could point to a broader electrical issue affecting multiple circuits.
- Visual Inspection (Outdoor Unit): Carefully (without touching anything) inspect the outdoor unit. Are any wires visibly damaged or frayed? Is there any evidence of burning or melting near the electrical connections? If you see any signs of damage, immediately turn off the power to the unit at the breaker and call a professional.
Phase 2: Basic Voltage Testing (Multimeter Required - Exercise Extreme Caution!)
WARNING: This phase involves working with live electricity. If you are not comfortable working with electricity, or if you don't have experience using a multimeter, STOP and call a qualified electrician or HVAC technician. Incorrect measurements or contact with live wires can be extremely dangerous and potentially fatal. Turn off the power at the breaker before touching anything inside the electrical panel!
You will need a digital multimeter (DMM) capable of measuring AC voltage. Make sure it is set to the correct voltage range (typically 600V AC or higher for a 480V system). Also, ensure your meter is rated for the voltage you expect to measure. Wear appropriate safety glasses and insulated gloves.
- Identify the HVAC Disconnect: Locate the disconnect switch near your outdoor HVAC unit. This is a safety switch that allows you to cut power to the unit for servicing.
- Turn Off the Power: Switch the disconnect to the "OFF" position. Double-check that the unit is indeed powered down before proceeding.
- Access the Electrical Connections: Carefully open the access panel to the electrical connections inside the disconnect. You should see three wires (legs) labeled L1, L2, and L3 (or similar), and possibly a neutral wire.
- Measure Voltage (Leg to Leg): Set your multimeter to AC voltage mode (600V or higher). Measure the voltage between each pair of legs:
- L1 to L2
- L2 to L3
- L3 to L1
- Measure Voltage (Leg to Neutral): If a neutral wire is present, measure the voltage between each leg and the neutral:
- L1 to Neutral
- L2 to Neutral
- L3 to Neutral
- Record Your Readings: Carefully record all your voltage readings. Note any significant deviations from the expected values.
- Restore Power: Once you've completed your measurements, carefully close the access panel and turn the disconnect switch back to the "ON" position.
Interpreting Your Voltage Readings
Now that you have your voltage readings, let's interpret them. Here's what different scenarios might indicate:
- All Voltages Within Range: If all your leg-to-leg voltages are close to 480V (e.g., between 456V and 504V) and all your leg-to-neutral voltages are close to 277V (e.g., between 263V and 291V), the 3-phase power supply to your HVAC unit is likely not the primary cause of your problem. The issue may lie within the HVAC unit itself (e.g., a faulty capacitor, compressor, or control board). In this case, you will likely need to call an HVAC professional for further diagnosis.
- One Leg Significantly Lower (Leg to Leg): If one of the leg-to-leg voltage readings is significantly lower than 480V (e.g., below 430V), this indicates a potential problem with that phase. This could be caused by:
- A faulty connection somewhere upstream (e.g., at the main electrical panel, at a distribution panel, or even at the utility transformer).
- A heavy load on that particular phase, drawing down the voltage.
- A faulty breaker or wiring in the electrical panel.
- One Leg Significantly Lower (Leg to Neutral): If one of the leg-to-neutral voltage readings is significantly lower than 277V, this also indicates a potential problem with that phase. The causes are similar to those listed above for leg-to-leg voltage drops. Again, this requires professional attention.
- Voltage Fluctuations: If the voltage readings are constantly fluctuating, this could indicate an intermittent problem with the power supply or a loose connection. This also warrants a call to a qualified electrician.
- Zero Voltage on One Leg: If you measure zero voltage on one of the legs, this indicates a complete loss of power on that phase. This could be due to a tripped breaker, a blown fuse, or a broken wire. This is a serious issue that needs to be addressed immediately by an electrician.
Simple DIY Checks (If Voltage is Within Range)
If your voltage readings are within the acceptable range, the problem likely lies within the HVAC unit itself. Here are a few simple DIY checks you can perform, but remember to **always turn off the power to the unit at the disconnect switch before attempting any of these checks.**
- Check the Air Filter: A clogged air filter restricts airflow, which can significantly reduce the efficiency of your HVAC system. Replace the filter with a clean one.
- Inspect the Outdoor Unit: Remove any debris (leaves, branches, grass clippings) from around the outdoor unit. Make sure the fins are clean and not blocked. Use a garden hose (with a gentle spray) to clean the fins from the outside in. Do not use a pressure washer, as this can damage the fins.
- Check for Blocked Vents: Make sure all supply and return vents inside your home are open and unobstructed. Furniture or rugs can block vents and reduce airflow.
When to Call a Professional (Crucial!)
There are several situations where it's absolutely essential to call a qualified HVAC technician or electrician:
- Any Time You Are Uncomfortable: If you feel uncomfortable working with electricity or you are unsure about any of the steps outlined in this guide, do not proceed. Call a professional.
- Voltage Imbalances: If you find significant voltage imbalances between the legs of your 3-phase system, do not attempt to fix this yourself. This is a potentially dangerous situation that requires the expertise of a qualified electrician.
- Damaged Wiring: If you see any signs of damaged or frayed wiring, burning, or melting near the electrical connections, immediately turn off the power and call a professional.
- Suspect HVAC Component Failure: If your voltage readings are within range, but your HVAC system is still not working correctly, the problem likely lies within the HVAC unit itself. You will need to call an HVAC technician to diagnose and repair the problem. This could involve replacing a faulty capacitor, compressor, control board, or other component.
- Lack of Experience: If you lack experience with HVAC systems or electrical troubleshooting, it's always best to err on the side of caution and call a professional.
Troubleshooting a 480V 3-phase electrical system requires a good understanding of electrical principles and a commitment to safety. By following the steps outlined in this guide, you can gain a better understanding of your system and potentially identify the cause of your HVAC problems. However, remember that safety is always the top priority. When in doubt, call a qualified professional to ensure the job is done safely and correctly.


.JPG)