60 Amp Sub Panel Wire Size
Understanding 60 Amp Sub Panel Wire Size for Your HVAC System
As homeowners, we often take our electrical systems for granted until something goes wrong. When it comes to your HVAC system, a properly sized sub panel and wiring are crucial for safe and efficient operation. Many homeowners add a subpanel to handle the dedicated circuits of their HVAC. Here's a comprehensive guide to understanding 60 amp sub panel wire size, covering everything from the basics to safety considerations.
Why is Correct Wire Size Important?
Using the wrong wire size can lead to several serious problems:
- Overheating: Undersized wires can overheat, melting insulation and potentially causing a fire.
- Voltage Drop: Insufficient wire size can lead to voltage drop, which can damage your HVAC equipment and reduce its efficiency.
- Code Violations: Using the wrong wire size violates electrical codes and could result in fines or require costly corrections.
- Equipment Damage: HVAC components are sensitive to voltage fluctuations; improper wiring can shorten their lifespan.
Determining the Correct Wire Size for a 60 Amp Sub Panel
The National Electrical Code (NEC) provides guidelines for determining the correct wire size based on the amperage rating of the circuit and other factors like wire type, insulation temperature rating, and conduit fill. For a 60 amp sub panel, here's a general overview:
Wire Size Based on Amperage and Wire Type
The most common types of wire used for residential wiring are copper (Cu) and aluminum (Al). Copper is the preferred material due to its superior conductivity and lower risk of corrosion, but aluminum is sometimes used for larger services due to cost considerations.
Copper Wire (Cu)
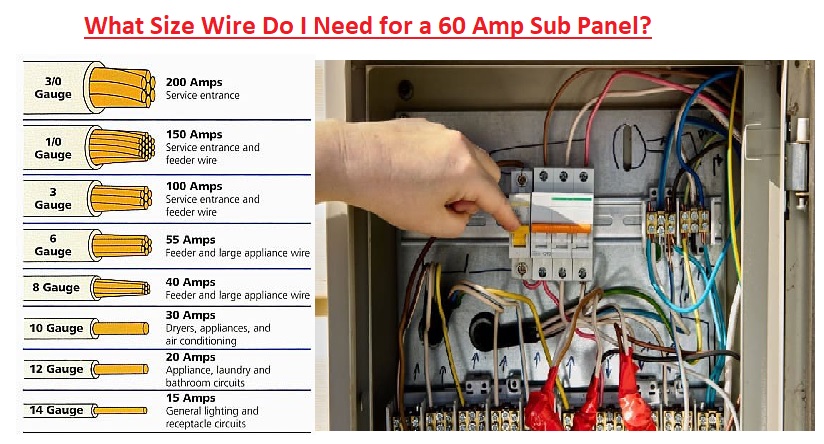
For a 60 amp circuit using copper wire, the NEC typically requires a minimum of #6 AWG (American Wire Gauge) copper wire. This is assuming the wire's insulation is rated for at least 75°C, which is standard for most modern wiring like THHN or THWN. Always double-check the wire's insulation temperature rating before installation.
Aluminum Wire (Al)
If using aluminum wire, a larger gauge is required due to its lower conductivity. For a 60 amp circuit using aluminum wire, a minimum of #4 AWG aluminum wire is typically required, again with an insulation temperature rating of at least 75°C.
Factors Affecting Wire Size Choice
While #6 AWG copper and #4 AWG aluminum are general guidelines, several other factors can influence the required wire size:
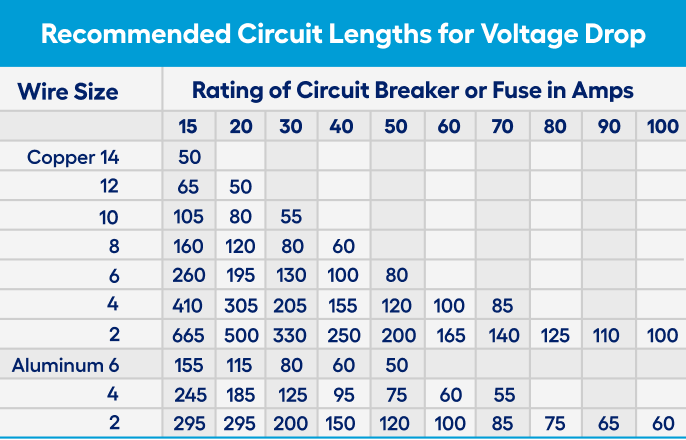
- Distance (Voltage Drop): Longer wire runs experience greater voltage drop. The longer the distance from the main panel to the sub panel, the larger the wire gauge you may need to minimize voltage drop. Use a voltage drop calculator to determine the appropriate size based on the distance.
- Conduit Fill: The NEC limits the number of wires that can be run within a conduit. If the conduit is already crowded, you might need to use a larger conduit or run separate conduits.
- Ambient Temperature: High ambient temperatures can reduce the ampacity of wires. If the wire is run in a hot environment, you may need to use a larger wire gauge.
- Wire Insulation Temperature Rating: The ampacity of a wire is dependent on its insulation temperature rating. Commonly available wires have ratings of 60°C, 75°C, or 90°C. Wires with higher temperature ratings can handle more current. Consult the NEC tables for specific ampacity ratings based on wire type and temperature rating.
Essential Components for a 60 Amp Sub Panel Installation
Installing a 60 amp sub panel involves more than just choosing the right wire size. Here's a list of essential components:
- 60 Amp Sub Panel Enclosure: A metal box to house the circuit breakers. Make sure it's rated for indoor or outdoor use, depending on the location.
- 60 Amp Double-Pole Circuit Breaker: For the main breaker in the sub panel and the breaker in the main panel feeding the sub panel.
- Wire (Copper or Aluminum): As discussed above, typically #6 AWG copper or #4 AWG aluminum.
- Grounding Wire: Typically #10 AWG copper for a 60 amp circuit.
- Connectors and Lugs: For connecting the wires to the breakers and the ground bar. Use connectors that are rated for the type and size of wire you're using (copper or aluminum).
- Conduit and Fittings: To protect the wires from physical damage. PVC or metal conduit can be used.
- Wire Strippers, Cutters, and Crimpers: Essential tools for preparing and connecting the wires.
- Voltage Tester: To verify that the power is off before working on the electrical system. A non-contact voltage tester is highly recommended.
- Screwdrivers and Wrenches: For tightening screws and bolts.
Step-by-Step Guide to Installing a 60 Amp Sub Panel (Simplified Overview)
WARNING: Working with electricity can be dangerous. If you are not comfortable working with electrical systems, hire a qualified electrician. This guide is a simplified overview and should not be used as a substitute for professional guidance.
- Turn Off Power: Turn off the main breaker in your main electrical panel. Verify that the power is off using a voltage tester.
- Mount the Sub Panel: Choose a suitable location for the sub panel and mount it securely.
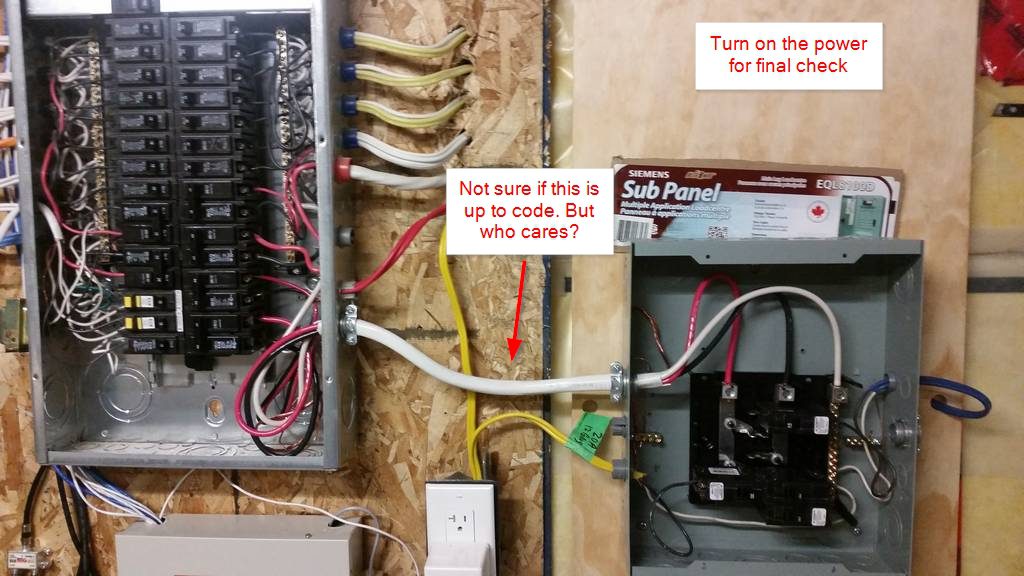
- Run the Wiring: Run the wires from the main panel to the sub panel through conduit. Make sure to leave enough slack for connections.
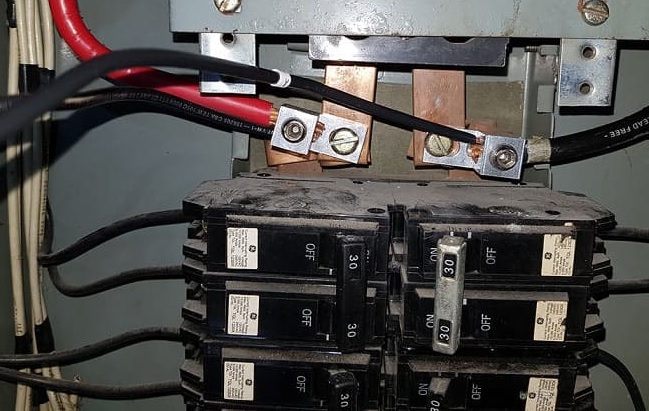
- Connect the Wires in the Main Panel: Connect the wires to a new 60 amp double-pole breaker in the main panel. Connect the ground wire to the ground bar in the main panel.
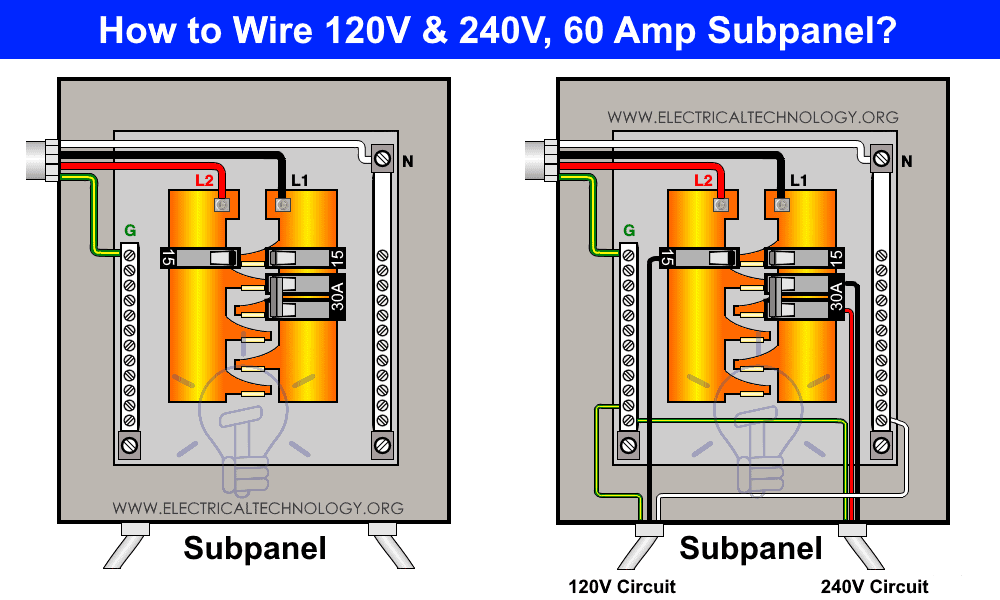
- Connect the Wires in the Sub Panel: Connect the wires to the main breaker in the sub panel. Connect the ground wire to the ground bar in the sub panel. Connect the neutral wire to the neutral bar in the subpanel.
- Install Branch Circuit Breakers: Install the circuit breakers for the individual circuits you'll be running from the sub panel.
- Test the Installation: Turn on the main breaker in the main panel and then turn on the main breaker in the sub panel. Use a voltage tester to verify that the circuits are working correctly.
Important Notes:
- Always follow the NEC guidelines and local electrical codes.
- Use proper grounding techniques to ensure safety.
- Double-check all connections to ensure they are tight and secure.
- Label all circuits clearly.
Safety Precautions When Working with Electrical Systems
Safety should always be your top priority when working with electrical systems. Here are some essential safety precautions:
- Turn off the power: Always turn off the power at the main breaker before working on any electrical circuits. Verify that the power is off using a voltage tester.
- Wear appropriate safety gear: Wear safety glasses and insulated gloves.
- Use insulated tools: Use tools with insulated handles.
- Work in a dry environment: Never work on electrical systems in a wet environment.
- Don't work alone: Have someone nearby in case of an emergency.
- If you are unsure, hire a qualified electrician: If you are not comfortable working with electrical systems, hire a qualified electrician.
Troubleshooting Common Issues
After installing a sub panel, you might encounter some issues. Here are some common problems and how to troubleshoot them:
- Breaker Trips: This could be due to an overload, a short circuit, or a faulty breaker. Check the amperage draw of the circuit and make sure it's not exceeding the breaker's rating. Check for any loose connections or damaged wiring that could be causing a short circuit. If the breaker continues to trip, replace it.
- Voltage Drop: This can be caused by undersized wiring or long wire runs. Use a voltage drop calculator to determine if the wire size is adequate. If the voltage drop is excessive, you may need to use a larger wire gauge or move the sub panel closer to the main panel.
- Loose Connections: Loose connections can cause overheating and voltage drop. Check all connections to ensure they are tight and secure.
- Ground Faults: A ground fault occurs when current flows to ground through an unintended path. This can be caused by damaged wiring or faulty equipment. Use a ground fault circuit interrupter (GFCI) to protect against ground faults.
When to Call a Professional Electrician
While some electrical tasks can be handled by experienced DIYers, certain situations require the expertise of a qualified electrician. Here are some instances when you should call a professional:
- You are not comfortable working with electrical systems.
- You are unsure about any aspect of the installation.
- You encounter any problems that you cannot resolve.
- You suspect that there is a safety hazard.
- Your local electrical codes require a professional installation.
Estimating the Cost of Installing a 60 Amp Sub Panel
The cost of installing a 60 amp sub panel can vary depending on several factors, including:
- The cost of materials: This includes the sub panel enclosure, circuit breakers, wiring, conduit, and fittings.
- The cost of labor: If you hire an electrician, the labor cost will depend on their hourly rate and the complexity of the job.
- The distance from the main panel to the sub panel: Longer wire runs will increase the cost of materials.
- Any necessary permits: Electrical permits are required in most jurisdictions.
As a rough estimate, you can expect to pay between $300 and $800 for a DIY installation, depending on the materials used. Hiring a professional electrician can cost between $500 and $1500 or more, depending on the complexity of the job and local labor rates. It is always a good idea to get multiple quotes from different electricians before hiring someone.
Disclaimer: This information is for general guidance only and should not be considered professional electrical advice. Always consult with a qualified electrician before performing any electrical work.

/electrical-service-size-of-my-home-1152752-04-fdb037b233ef46b092e8867ae52c3429.jpg?strip=all)
:max_bytes(150000):strip_icc()/electrical-service-size-of-my-home-1152752-02-cb088101433646699f34160e0596aacd.jpg?strip=all)
/sub-panels-for-additional-space-1152719-hero-d464dd917e004ffc9f2d10e28d466dca.jpg?strip=all)