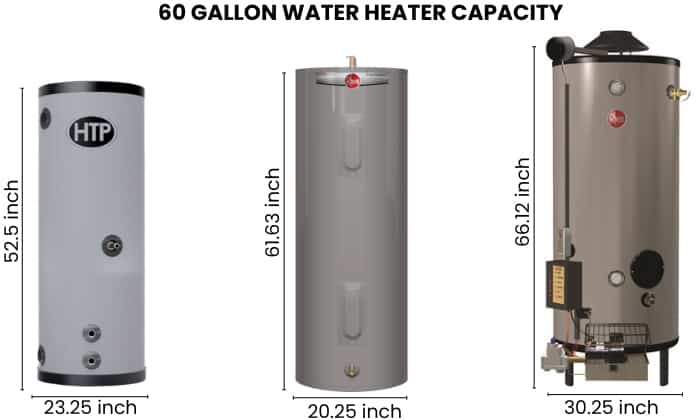
60 Gal Gas Hot Water Heater
One of the most frustrating issues homeowners face with their 60-gallon gas hot water heater is a sudden and unexpected lack of hot water. You turn on the tap, expecting a warm shower, and are greeted with an icy blast. This can stem from a variety of causes, but don't panic! Many of these can be diagnosed and even fixed yourself with a little know-how. This guide will walk you through a methodical troubleshooting process, helping you pinpoint the problem and decide whether you can tackle it yourself or if it's time to call a professional.
Step 1: The Initial Investigation - Is the Gas On?
Before diving into complicated diagnostics, let's start with the basics. The simplest explanation for no hot water is, well, no gas! Double-check that the gas supply to your home is turned on.
Here’s how:
- Check other gas appliances: Are your stove, furnace, or other gas appliances working? If not, the problem likely lies with the main gas supply to your house, and you'll need to contact your gas company immediately.
- Locate the gas shut-off valve: Find the gas shut-off valve near your water heater. It's usually a yellow handle. Ensure it is in the open position (parallel to the gas pipe). If it's perpendicular, it's closed.
- Smell for gas leaks: If you smell gas, do not attempt to light the water heater. Evacuate the area immediately and call your gas company or emergency services from a safe location.
If the gas is on and you don't smell any leaks, proceed to the next step.
Step 2: Pilot Light Problems – The Heart of the Matter
Many gas water heaters use a pilot light to ignite the main burner. If the pilot light has gone out, the main burner won't ignite, and you won't get hot water. Relighting the pilot light is often the solution to this problem.
Here's how to relight the pilot light (always refer to your water heater's manual for specific instructions, as models can vary):
- Turn the gas control valve to the "Pilot" setting: This knob is usually located on the gas control valve assembly, near the bottom of the water heater. You may need to push the knob in to turn it.
- Press and hold the "Pilot" button: While holding the knob in the "Pilot" position, press the red "Pilot" button (or a similar button, depending on your model). This releases gas to the pilot light.
- Light the pilot light: While still holding the "Pilot" button, use a long lighter or match to light the pilot light. You should see a small flame ignite near the pilot light assembly.
- Continue holding the "Pilot" button for 30-60 seconds: This allows the thermocouple (a safety device) to heat up. The thermocouple senses the pilot light flame and keeps the gas valve open.
- Release the "Pilot" button: If the pilot light stays lit after you release the button, congratulations! You've successfully relit the pilot light. If it goes out, repeat steps 2-4. If it still won't stay lit, there may be a problem with the thermocouple or gas valve (see "When to Call a Professional" below).
- Turn the gas control valve to the "On" position: Once the pilot light is lit and stays lit, turn the gas control valve to the "On" position. You should hear the main burner ignite.
- Observe the burner: Watch the burner for a few minutes to ensure it's burning steadily.
Important Safety Note: If you repeatedly have trouble relighting the pilot light, or if you smell gas, do not continue trying to light it. There may be a more serious problem. Call a qualified technician.
Step 3: Thermocouple Troubles – The Safety Sentinel
The thermocouple is a safety device that senses the heat from the pilot light. If the pilot light goes out, the thermocouple cools down and shuts off the gas supply to prevent a gas leak. A faulty thermocouple is a common reason why a pilot light won't stay lit.
Diagnosis: If you can light the pilot light, but it goes out as soon as you release the "Pilot" button, a faulty thermocouple is the most likely culprit.
DIY Fix (Simple Replacement): Replacing a thermocouple is a relatively simple and inexpensive DIY project if you're comfortable working with gas appliances. However, if you're even slightly unsure, it's best to call a professional.
Here's a general outline of how to replace a thermocouple (always refer to your water heater's manual for specific instructions):
- Turn off the gas supply: Turn the gas shut-off valve to the "Off" position.
- Turn off the water supply: Turn off the cold water supply to the water heater.
- Allow the water heater to cool down: Wait for the water heater to cool down completely.
- Disconnect the old thermocouple: The thermocouple is a thin copper rod that connects to the gas control valve. Disconnect it carefully using a wrench or pliers. Note how it's connected before disconnecting it. There might also be a connection to the burner assembly itself – disconnect this as well.
- Install the new thermocouple: Connect the new thermocouple to the gas control valve and burner assembly in the same way the old one was connected. Ensure the connections are tight.
- Relight the pilot light: Follow the instructions in Step 2 to relight the pilot light.
- Test the thermocouple: Hold the "Pilot" button down for 30-60 seconds after lighting the pilot light. Release the button. If the pilot light stays lit, the new thermocouple is working.
- Turn the gas control valve to the "On" position: Turn the gas control valve to the "On" position.
- Turn on the water supply: Turn the cold water supply back on.
Important Safety Note: When working with gas connections, always use pipe dope or Teflon tape on the threads to ensure a gas-tight seal. After completing the repair, test for gas leaks using a solution of soapy water. Brush the soapy water onto the gas connections. If bubbles form, there's a leak. Tighten the connections further or call a professional.
Step 4: Sediment Buildup – The Silent Killer of Efficiency
Over time, sediment (mineral deposits) can build up at the bottom of your water heater. This sediment acts as an insulator, reducing the efficiency of the heater and potentially damaging the tank. Sediment can also cause a rumbling or popping noise when the water heater is operating.
Diagnosis: If you hear rumbling or popping noises coming from your water heater, or if your hot water isn't as hot as it used to be, sediment buildup is a likely cause.
DIY Fix (Flushing the Tank): Flushing the water heater tank can remove sediment and improve its efficiency.
Here's how to flush a water heater tank:
- Turn off the gas supply: Turn the gas shut-off valve to the "Off" position.
- Turn off the cold water supply: Turn off the cold water supply to the water heater.
- Allow the water to cool: Let the water in the tank cool down for several hours, or overnight. Do not attempt to drain a hot water tank.
- Attach a hose to the drain valve: Locate the drain valve near the bottom of the water heater. Attach a garden hose to the valve.
- Run the hose to a safe drainage location: Run the other end of the hose to a drain, a slop sink, or outdoors where the water won't cause damage.
- Open the drain valve: Slowly open the drain valve to allow the water to drain.
- Open a hot water faucet: Open a hot water faucet somewhere in your house to allow air to enter the tank and help the water drain more quickly.
- Flush the tank: Once the tank is nearly empty, briefly open and close the cold water supply valve to stir up the sediment. Repeat this process several times until the water runs clear.
- Close the drain valve: Once the water runs clear, close the drain valve.
- Remove the hose: Disconnect the hose from the drain valve.
- Turn on the cold water supply: Slowly turn on the cold water supply to the water heater.
- Let the tank fill completely: Allow the tank to fill completely before turning on the gas. You'll hear air being purged from the hot water faucets as the tank fills. Close each faucet as water begins to flow.
- Turn the gas supply on: Turn the gas shut-off valve to the "On" position.
- Relight the pilot light: Follow the instructions in Step 2 to relight the pilot light.
- Monitor for leaks: Check the drain valve and other connections for leaks.
Important Tip: Flushing your water heater annually can help prevent sediment buildup and prolong its lifespan.
Step 5: Temperature Setting – Is it Just Too Low?
Sometimes, the simplest solution is the correct one. Check the temperature setting on your water heater. It might have been accidentally turned down.
Diagnosis: If the water isn't as hot as it used to be, but it's still warmer than lukewarm, the temperature setting might be too low.
DIY Fix (Adjusting the Temperature): Most water heaters have a temperature control dial located on the gas control valve assembly. Adjust the dial to your desired temperature. A setting of 120°F (49°C) is generally recommended for safety and energy efficiency. Never set the temperature above 140°F (60°C) to avoid scalding hazards.
Important Safety Note: Be cautious when adjusting the temperature. Water that is too hot can cause serious burns. Supervise children and elderly individuals when using hot water.
When to Call a Professional
While many water heater problems can be resolved with simple DIY fixes, certain issues require the expertise of a qualified technician. Don't hesitate to call a professional if you encounter any of the following situations:
- You smell gas: This is a serious safety hazard. Evacuate the area immediately and call your gas company or emergency services.
- The pilot light won't stay lit after replacing the thermocouple: This could indicate a problem with the gas valve or other components.
- You suspect a gas leak: Even a small gas leak can be dangerous.
- You see water leaking from the tank: A leaking tank usually indicates that the tank is corroded and needs to be replaced.
- The water heater is making loud banging or popping noises even after flushing: This could indicate a more serious sediment buildup problem or a damaged tank.
- You're not comfortable working with gas appliances: Safety should always be your top priority.
- The water heater is old (10+ years): Older water heaters are more prone to problems and may be nearing the end of their lifespan. Replacing an old water heater with a new, energy-efficient model can save you money on your energy bills in the long run.
- You suspect a problem with the gas valve: The gas valve controls the flow of gas to the water heater. If it's not working properly, it can cause a variety of problems.
- Any electrical components are involved: Many modern gas water heaters utilize electrical components for ignition or control. Any troubleshooting involving electrical circuits should be performed by a qualified electrician or HVAC technician.
By following these troubleshooting steps, you can confidently diagnose many common problems with your 60-gallon gas hot water heater. Remember to prioritize safety and don't hesitate to call a professional when needed. With a little maintenance and care, you can keep your water heater running efficiently and reliably for years to come.

:max_bytes(150000):strip_icc()/anatomy-of-a-gas-water-heater-1824894-hero-9fd4ba3442b444838e5bcf7cf49058a6.jpg)
:max_bytes(150000):strip_icc()/rheem-performance-power-vent-natural-gas-tank-water-heater-cb8902789a9a47eea5b8a9d9e3b0700a.jpg)