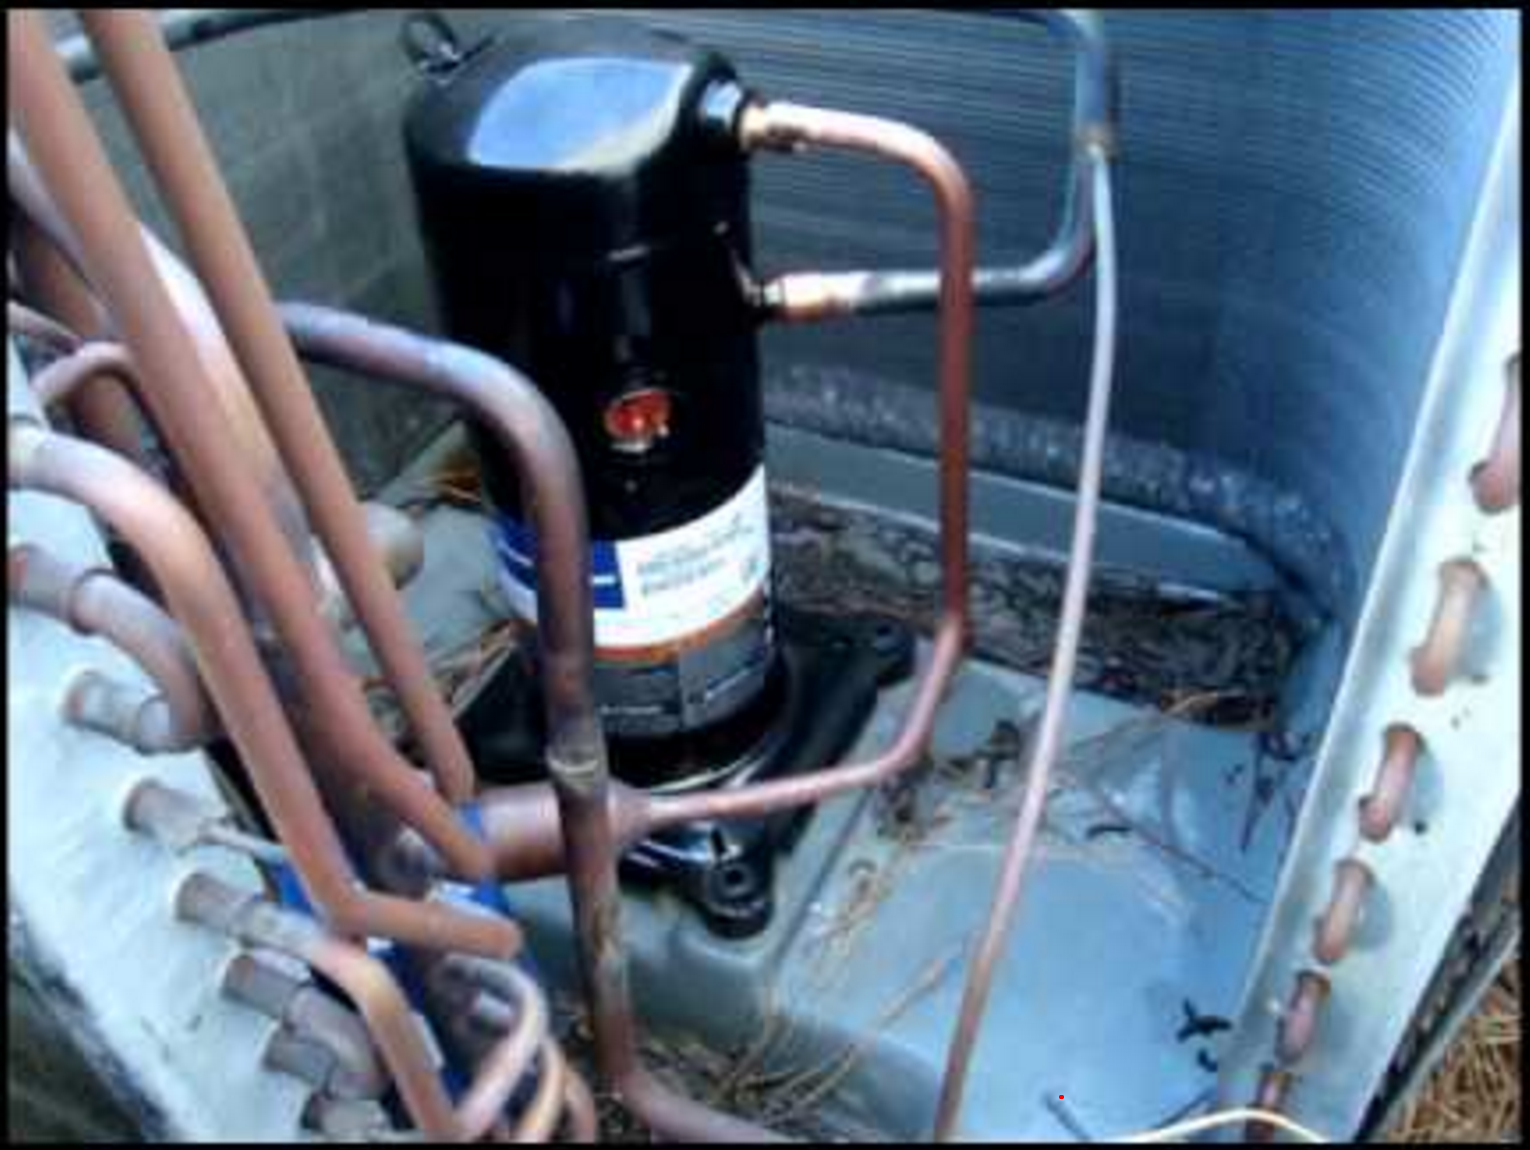
Ac Line From Compressor To Condenser

Homeowners often encounter issues with their air conditioning systems, especially during peak seasons. One common problem is a malfunctioning AC unit where the compressor seems to be running, but the air isn't cooling effectively. This could stem from a problem with the AC line running between the compressor (located in the outdoor unit) and the condenser coil, which plays a critical role in the cooling process.
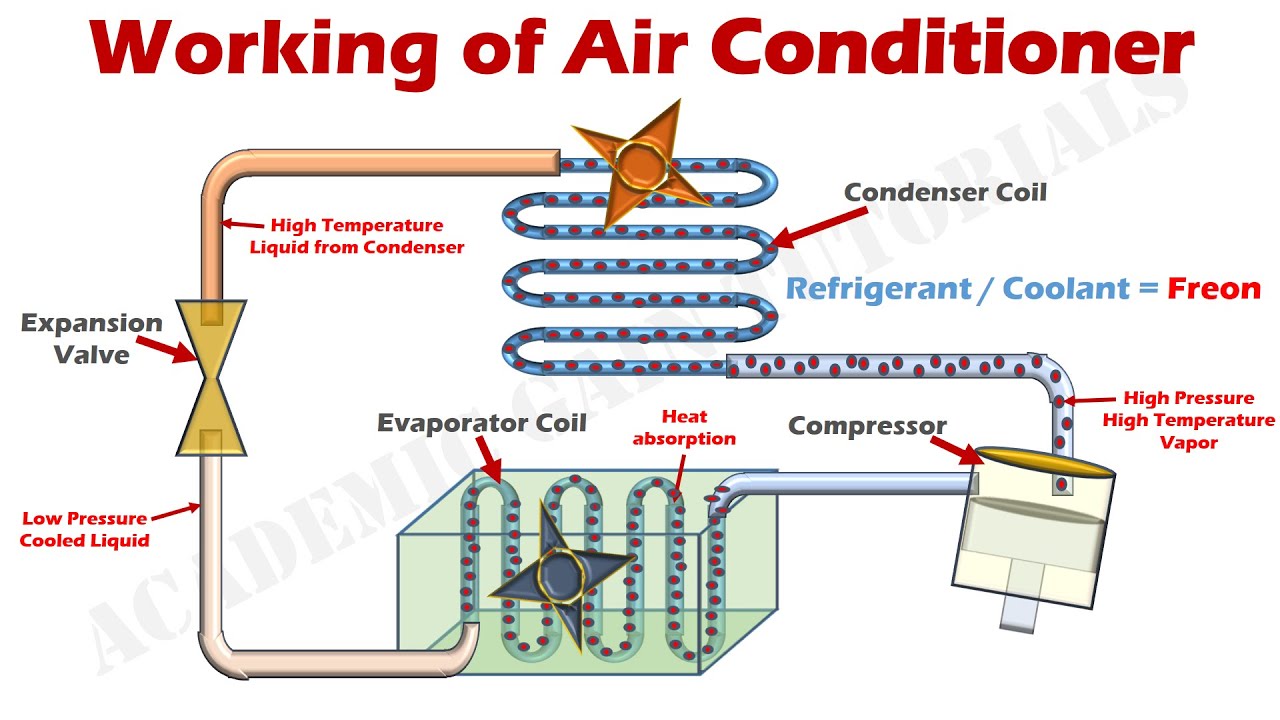
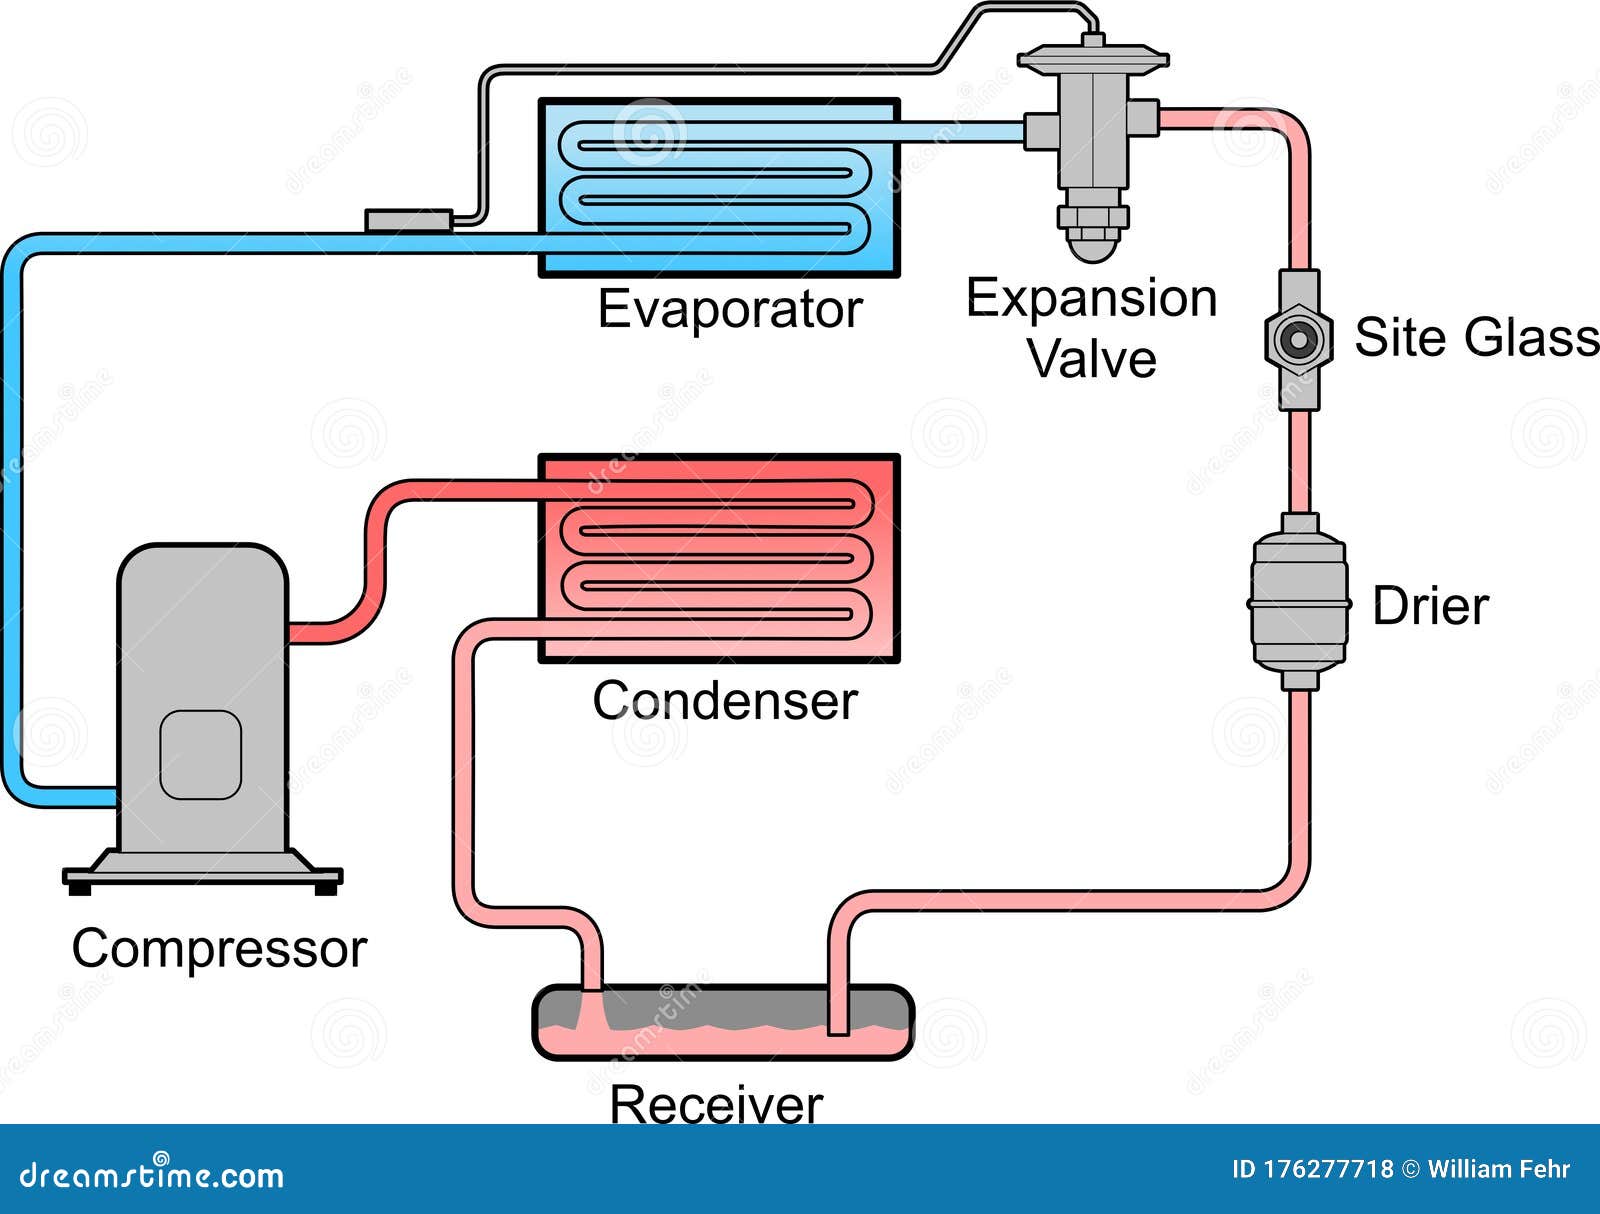
Understanding the AC Line: Compressor to Condenser
The AC line, specifically the discharge line or hot gas line, carries hot, high-pressure refrigerant gas from the compressor to the condenser. The condenser then cools this refrigerant, turning it into a high-pressure liquid. Any issues along this line can severely impact your AC's cooling efficiency. Before you start, always remember safety first! Turn off the power to your AC unit at the breaker box before inspecting anything.
Common Problems with the AC Line
- Refrigerant Leaks: This is the most frequent issue. Leaks reduce the refrigerant charge, hindering the cooling process.
- Blockages: Debris, oil build-up, or even kinked lines can obstruct refrigerant flow.
- Damage to Insulation: If the insulation surrounding the AC line is damaged, it can affect the line's temperature and efficiency.
- Kinked or Collapsed Lines: Physical damage to the lines can restrict refrigerant flow.
Step-by-Step Troubleshooting Guide
Here's a methodical approach to diagnosing and (potentially) fixing issues with your AC line. Remember to always prioritize safety and know your limits. If you're uncomfortable with any of these steps, call a qualified HVAC technician.
Step 1: Safety First – Power Down!
Go to your electrical panel and locate the circuit breaker that controls your outdoor AC unit. Flip the breaker to the "Off" position. Double-check that the unit is indeed powered down before proceeding. This is non-negotiable.
Step 2: Visual Inspection of the AC Line
Carefully inspect the entire length of the AC line from the compressor to the condenser coil. Look for:
- Oil Stains: These are telltale signs of refrigerant leaks. Refrigerant carries oil, so leaks will often leave oily residue near joints, connections, or along the line itself. Pay close attention to areas where the copper tubing is joined or bent.
- Visible Damage: Look for dents, kinks, or flattened sections of the tubing. Even a slight kink can significantly restrict refrigerant flow.
- Insulation Condition: Check the insulation wrapped around the line. Is it torn, missing, or severely degraded? Damaged insulation reduces efficiency.
- Corrosion: Examine the line for signs of rust or corrosion, especially at joints and connections. Corrosion can weaken the line and lead to leaks.
Make notes of anything you find. Photos can also be helpful to show a technician later.
Step 3: Checking for Obvious Leaks (Soapy Water Test)
This test can help pinpoint smaller leaks that aren't immediately obvious. You'll need:
- A spray bottle
- Dish soap
- Water
Mix a small amount of dish soap with water in the spray bottle. Lightly spray the soapy water along the entire length of the AC line, focusing on joints, connections, and any areas where you suspect a leak (based on Step 2). Watch carefully for bubbles to form. Even tiny bubbles indicate a refrigerant leak.
Important: Only perform this test after the AC unit has been off for a significant amount of time to allow the system pressure to stabilize.
Step 4: Assessing Insulation Damage
If you find damaged insulation, you might be able to do a simple DIY repair. Small tears or sections of missing insulation can be patched with insulation tape specifically designed for HVAC systems. This tape is available at most hardware stores.
How to Patch Insulation:
- Clean the area around the damaged insulation.
- Wrap the damaged section with HVAC insulation tape, overlapping the edges of the existing insulation.
- Ensure a tight seal to prevent air and moisture from entering.
Note: If the insulation is extensively damaged or missing over a large area, this may indicate a bigger problem, and you should consult a professional.
Step 5: Checking for Kinks or Collapsed Sections
Carefully examine the AC line for any kinks or collapsed sections. If you find a minor kink, do not attempt to straighten it yourself! This could easily damage the line and create a leak. This is a job best left to professionals with specialized tools.
Step 6: Cleaning the Area Around the Unit (Preventative)
While not directly fixing a problem, keeping the area around your outdoor AC unit clean and free of debris can prevent future issues. Remove any leaves, grass clippings, or other obstructions that could block airflow or damage the lines. Trim back any bushes or shrubs that are growing too close to the unit.
When to Call a Professional HVAC Technician
While some minor issues can be addressed with DIY solutions, certain problems absolutely require a professional. Here's a guide:
- Refrigerant Leaks: Any confirmed refrigerant leak requires a professional. Refrigerant handling requires specialized equipment and certification due to environmental regulations. Trying to fix a leak yourself could be illegal and dangerous. Also, you'll need the leak professionally sealed and the system recharged with the correct type and amount of refrigerant.
- Kinked or Collapsed Lines: Straightening or repairing damaged lines requires specialized tools and expertise. Attempting this yourself could cause further damage and leaks.
- Compressor Problems: If you suspect a problem with the compressor itself (e.g., unusual noises, failure to start), call a professional immediately. Compressor repairs are complex and often require specialized equipment.
- Electrical Issues: If you suspect any electrical problems with the AC unit, do not attempt to fix them yourself. Call a qualified electrician.
- Loss of Cooling After DIY Steps: If you've followed the above steps and your AC is still not cooling properly, it's time to call a professional. There may be an underlying issue that requires specialized diagnostics and repair.
- If You're Uncomfortable: If at any point during the troubleshooting process you feel uncomfortable or unsure about what you're doing, stop and call a professional. It's always better to err on the side of caution.
DIY Precautions
Before attempting any DIY troubleshooting or repairs, keep these precautions in mind:
- Always disconnect power: As mentioned earlier, always disconnect the power to the AC unit at the breaker box before working on it.
- Wear appropriate safety gear: Wear gloves and eye protection when working on the AC unit.
- Don't work in wet conditions: Avoid working on the AC unit if it's raining or the area is wet.
- Be aware of sharp edges: The metal components of the AC unit can have sharp edges. Be careful not to cut yourself.
- Properly dispose of materials: Dispose of any used materials, such as insulation tape, properly.
- Do not release refrigerant: Releasing refrigerant into the atmosphere is illegal and harmful to the environment.
Preventative Maintenance Tips
Regular preventative maintenance can help prevent problems with your AC line and other components. Here are a few tips:
- Regularly clean the outdoor unit: Remove any leaves, grass clippings, or other debris that may be blocking airflow.
- Check the insulation: Inspect the insulation around the AC line periodically and repair any damage promptly.
- Trim back vegetation: Keep bushes and shrubs trimmed back away from the outdoor unit.
- Schedule annual maintenance: Have a qualified HVAC technician inspect and maintain your AC system annually. This can help identify and address potential problems before they become major issues.
By following these troubleshooting steps and preventative maintenance tips, you can help keep your AC system running smoothly and efficiently. Remember, safety is always the top priority. When in doubt, call a professional!