Ac Model Number Decoder
One of the most frustrating issues homeowners face, especially during extreme weather, is inconsistent heating or cooling. You might find that one room is significantly warmer than another, or the system struggles to maintain the set temperature. Before calling for expensive professional help, let's try to diagnose and potentially fix some common causes. This article will guide you through a methodical troubleshooting process.
Understanding Your AC System
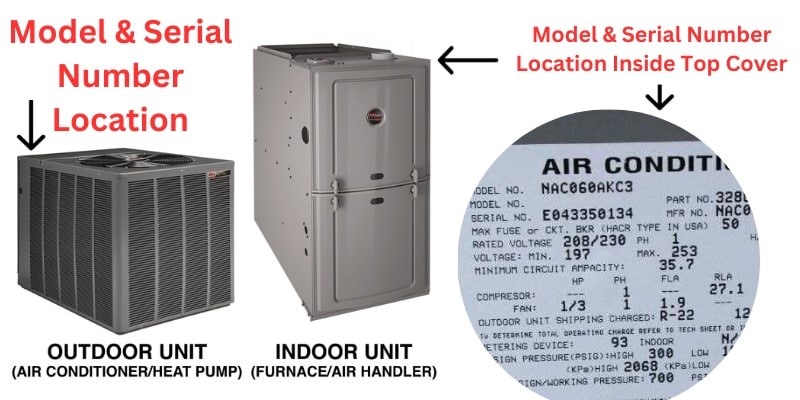
First, it's crucial to understand the basic components of your AC or heating system. Typically, you'll have an outdoor unit (the condenser) and an indoor unit (the air handler, often combined with the furnace). Air ducts distribute the heated or cooled air throughout your home.
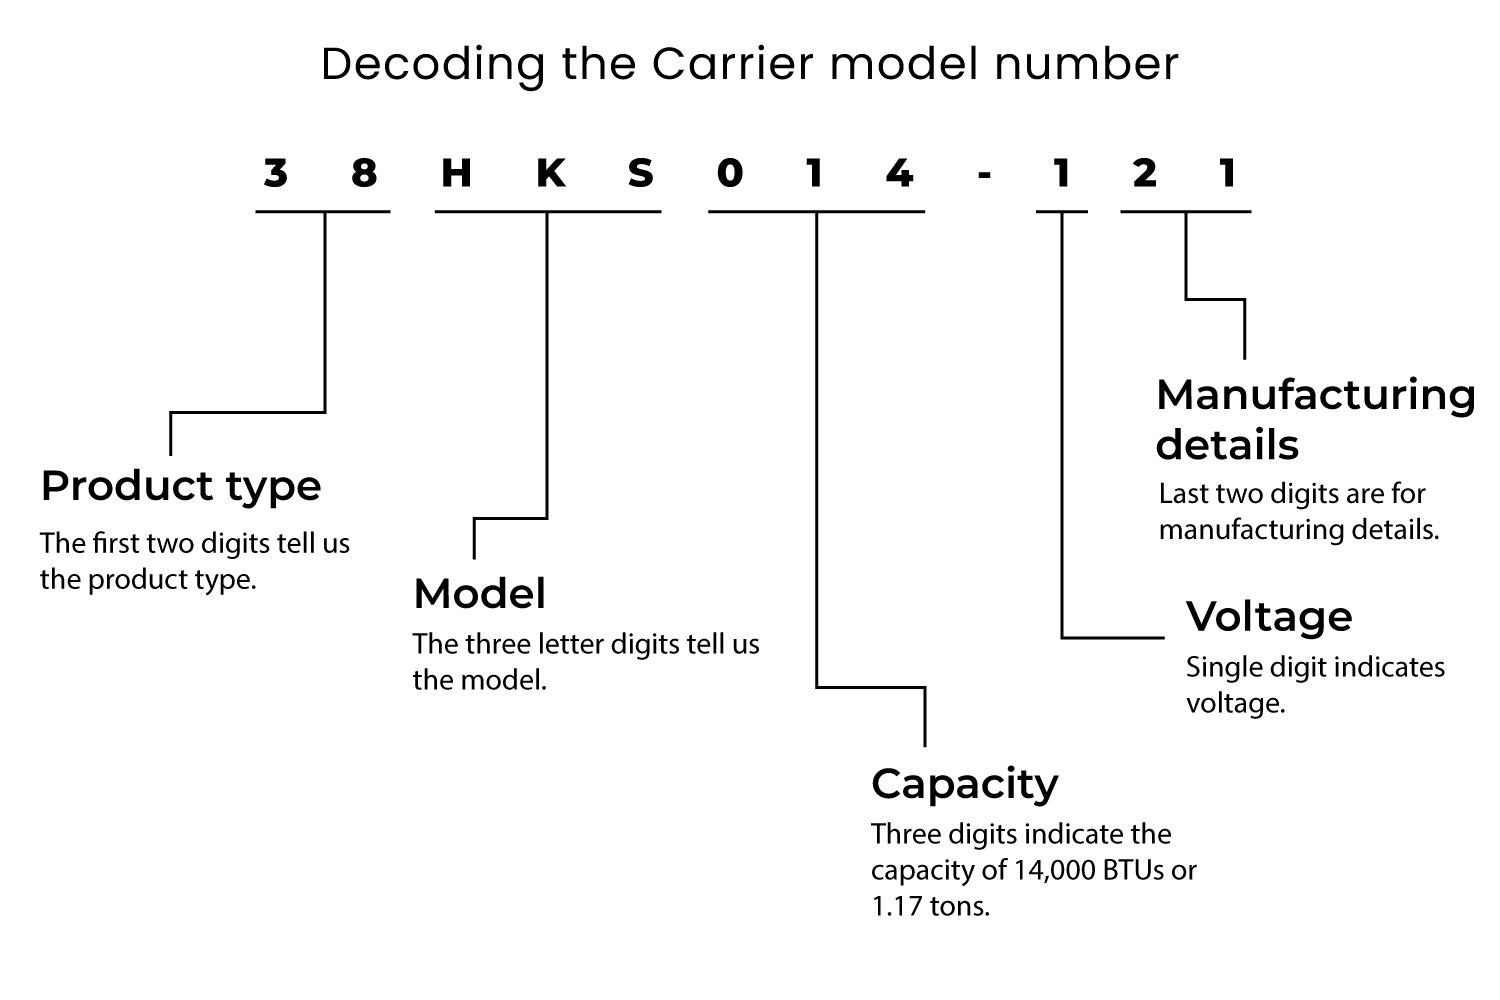
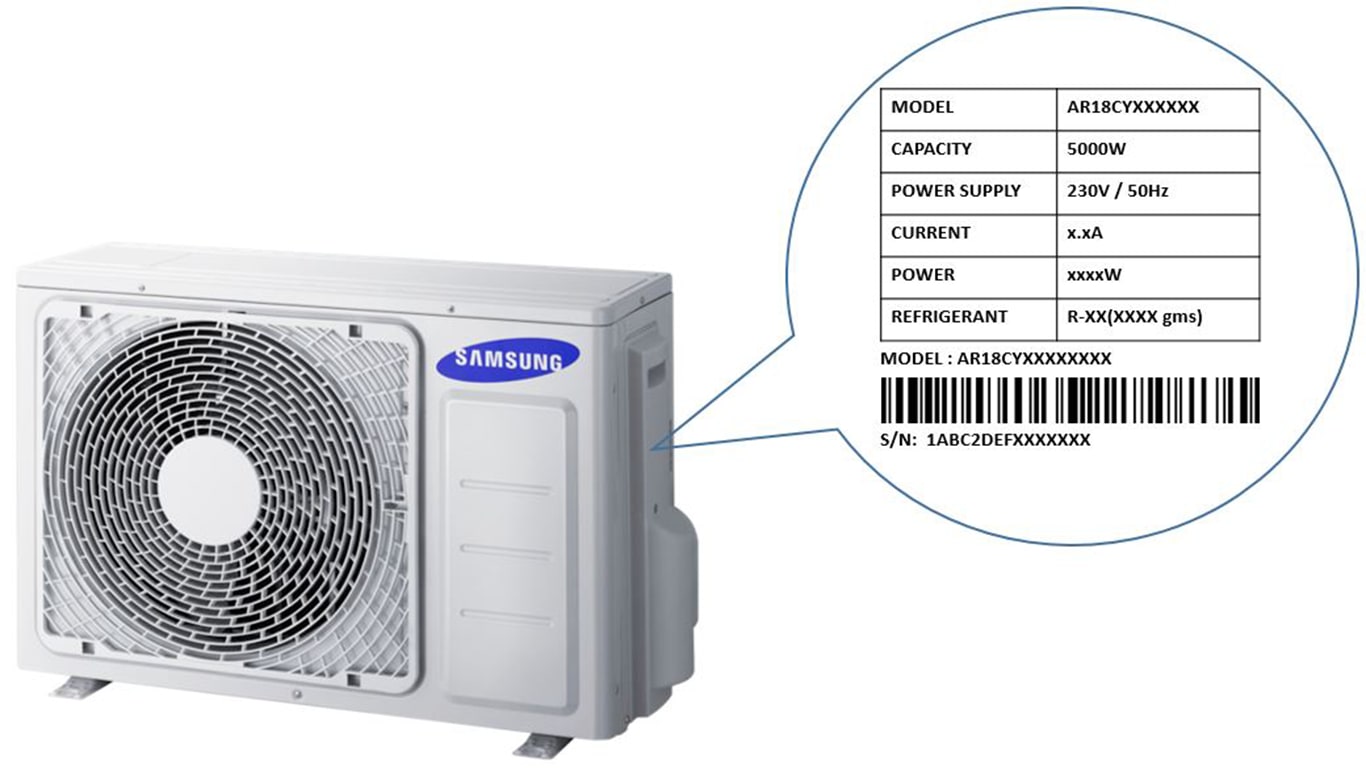
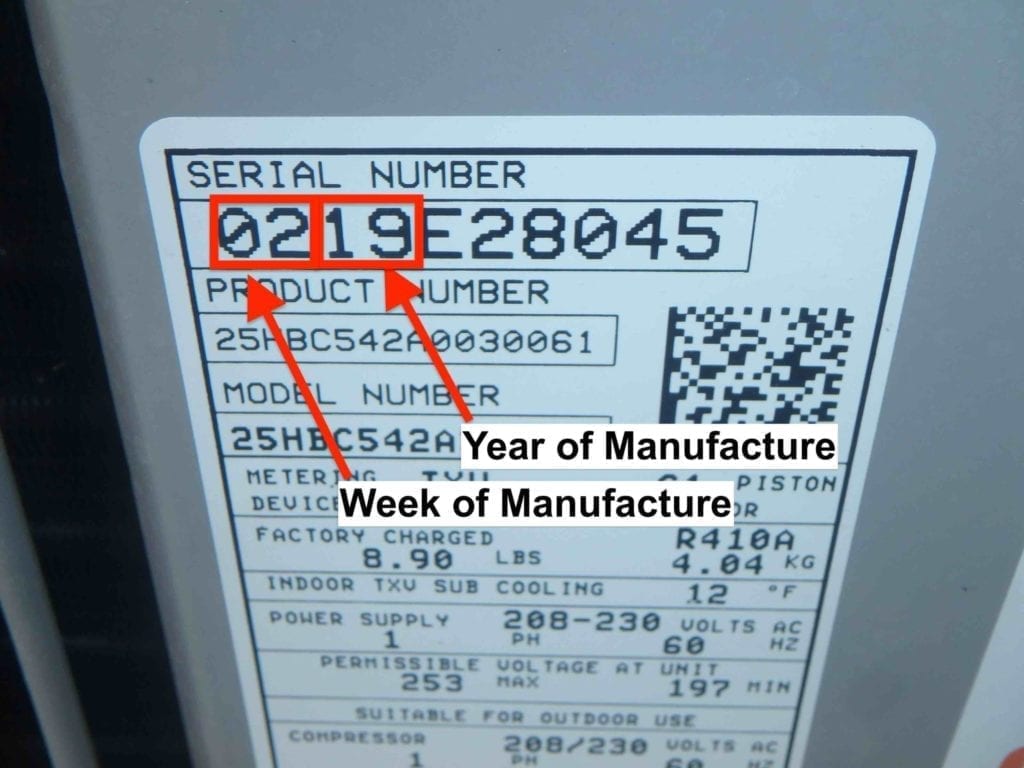
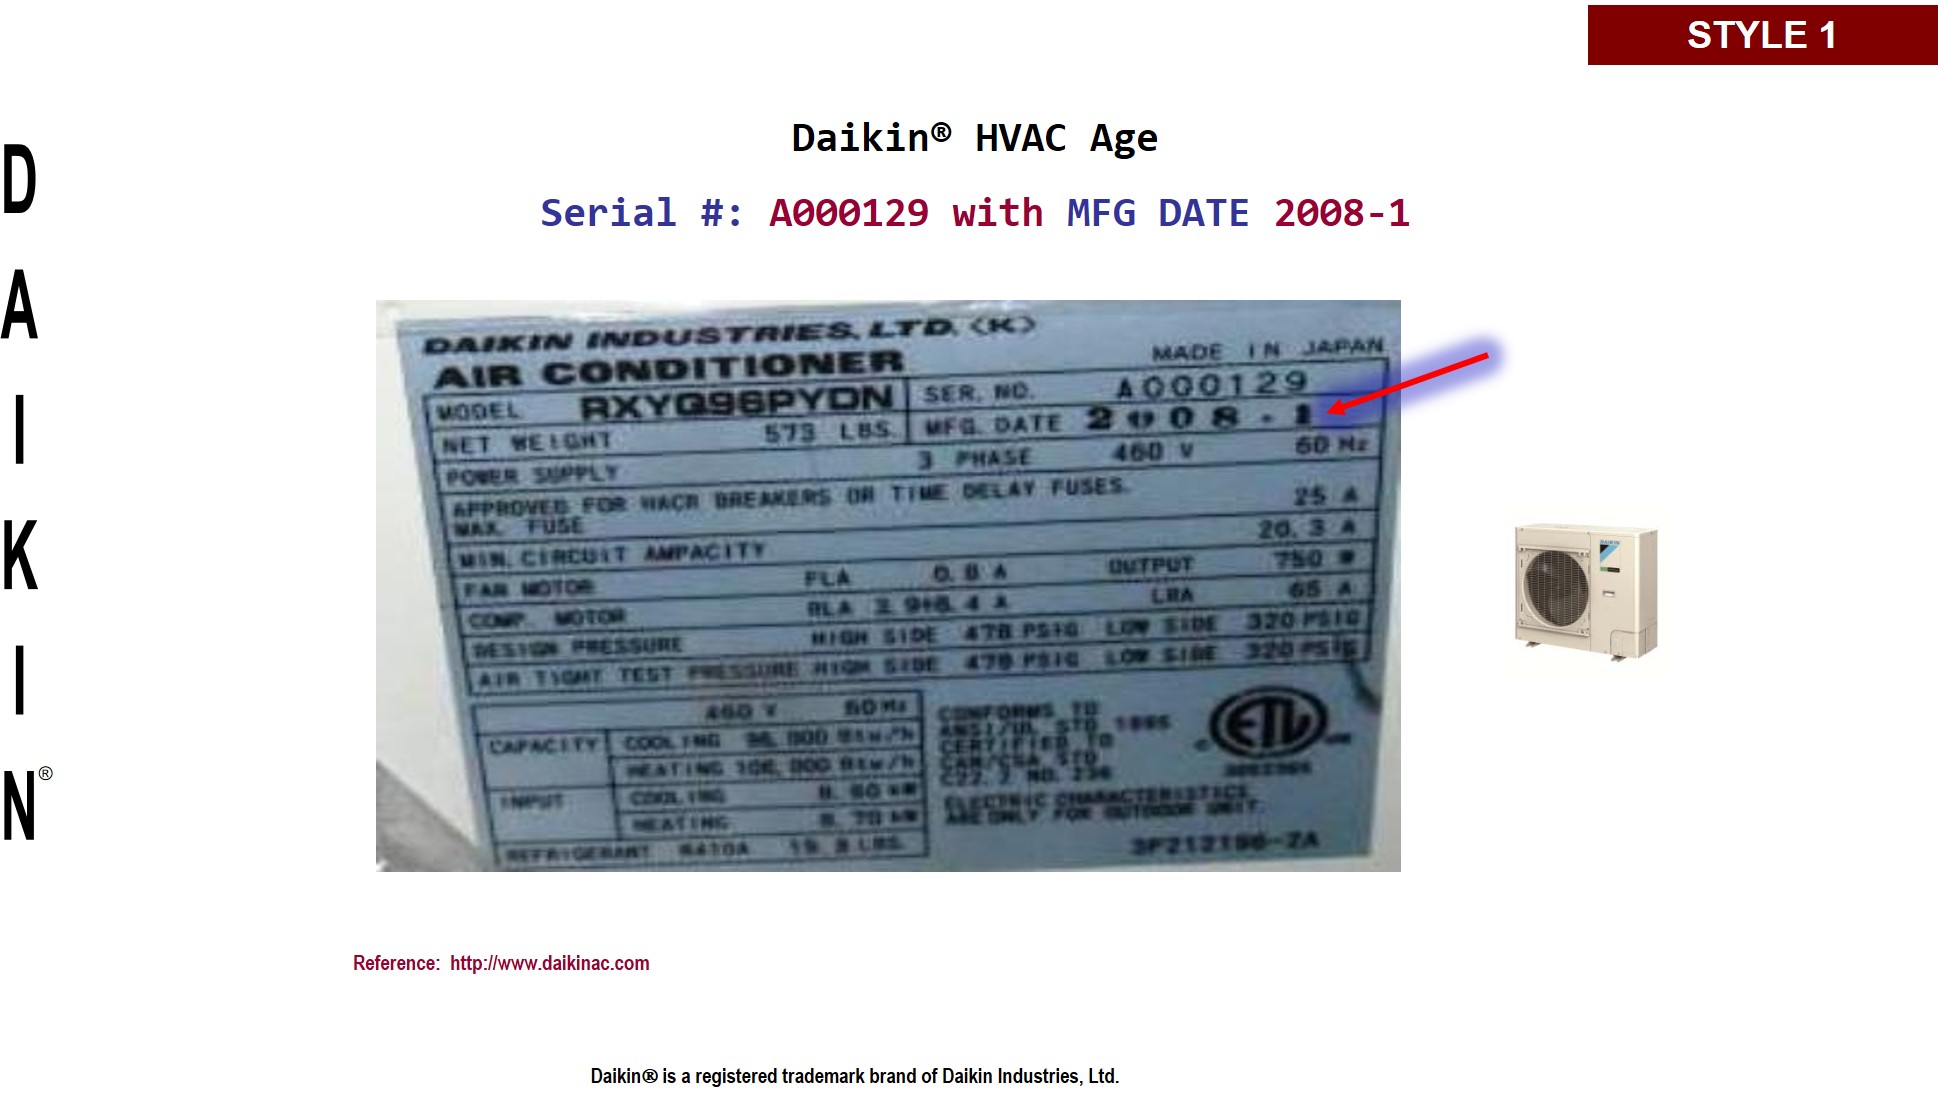
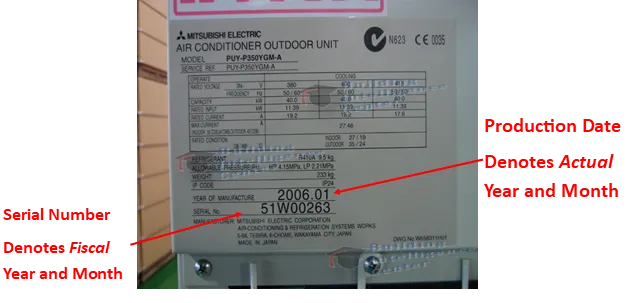
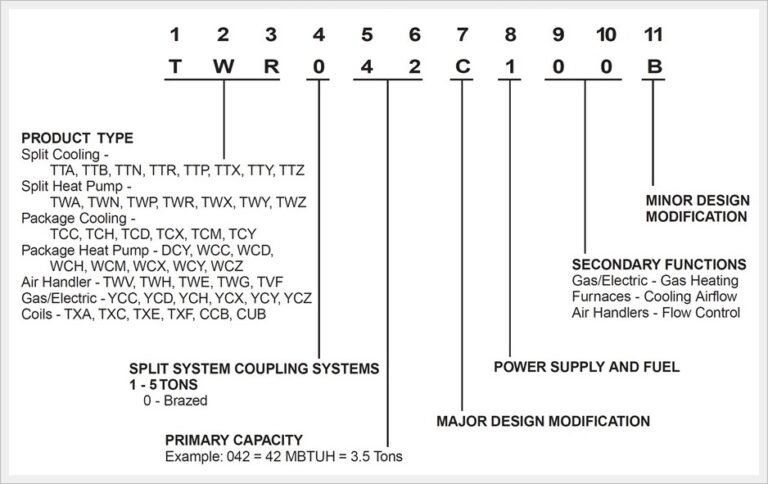
A vital piece of information is your AC model number. This seemingly random string of characters actually holds a wealth of information about your unit's specifications, age, and manufacturer. Knowing how to decode it can be incredibly helpful when troubleshooting or ordering replacement parts. However, in this troubleshooting guide, we focus on practical steps, not specific model number interpretation. Just be sure to have your model number readily available.
Step 1: Initial Checks (No Tools Required)
Let's start with the easiest checks, things you can do without any tools whatsoever.
1. Thermostat Settings:
It sounds obvious, but ensure your thermostat is set to the correct mode (heat or cool) and the desired temperature. Sometimes, a simple setting change is all that's needed.
- Verify Mode: Is the thermostat set to "Cool" in summer and "Heat" in winter?
- Temperature Setpoint: Is the set temperature significantly higher (in winter) or lower (in summer) than the current room temperature? Try lowering the setpoint in summer or raising it in winter to see if the system responds.
- Fan Setting: Is the fan set to "Auto" or "On"? If it's on "On," the fan will run continuously, which can sometimes mask heating/cooling issues or create drafts. Setting it to "Auto" allows the fan to cycle on and off with the heating/cooling system.
2. Airflow Obstructions:
Poor airflow is a major culprit behind inconsistent heating/cooling. Check for these common obstructions:
- Blocked Vents: Make sure no furniture, rugs, or curtains are blocking your supply and return vents.
- Dirty Air Filter: This is the *most common* cause of airflow problems. A clogged filter restricts airflow, forcing your system to work harder and reducing its efficiency. Replace the air filter immediately if it's dirty. This is a simple, inexpensive task that can make a big difference. Check your filter monthly, and replace it every 1-3 months, depending on usage and air quality.
- Outdoor Unit Obstructions: Ensure the outdoor condenser unit isn't blocked by leaves, snow, debris, or overgrown vegetation. Clear any obstructions to allow for proper airflow around the unit. Allow at least two feet of clearance.
3. Check the Breaker:
Locate the circuit breaker for your AC unit in your electrical panel. Ensure the breaker is switched "On." If it's tripped (switched to the "Off" position or in a middle position), reset it by switching it fully "Off" and then back "On." If the breaker trips repeatedly, *do not keep resetting it*. This indicates a more serious electrical problem requiring a qualified electrician or HVAC technician.
Step 2: Deeper Diagnosis (Basic Equipment Needed)
If the initial checks didn't resolve the issue, we can move on to some deeper diagnostics. You'll need a few basic tools for these steps:
- Screwdrivers (Phillips and Flathead): For removing access panels.
- Multimeter (Optional, but highly recommended): For checking voltage and continuity (use with extreme caution and only if you are comfortable with electrical work. If you are unsure, skip this step and call a professional).
- Flashlight: For better visibility.
1. Inspect the Indoor Unit (Air Handler/Furnace):
Safety First: *Turn off the power to the indoor unit at the breaker before removing any access panels.*
- Blower Motor: Visually inspect the blower motor. Is it clean? Is there any visible damage or debris? If you're comfortable using a multimeter, check the voltage to the blower motor to ensure it's receiving power (consult your unit's wiring diagram for correct voltage). *If the motor is not receiving power or is visibly damaged, it needs to be replaced by a professional.*
- Blower Wheel: Check the blower wheel for excessive dust or debris buildup. A dirty blower wheel can significantly reduce airflow. Carefully clean the blower wheel with a brush or vacuum cleaner (ensure the power is still off!).
- Evaporator Coil (Indoor Unit): The evaporator coil is responsible for cooling the air. If it's frozen, it can severely restrict airflow. Signs of a frozen coil include ice buildup on the coil itself or on the refrigerant lines. *If you suspect a frozen coil, turn off the AC unit and allow it to thaw completely (this may take several hours). Once thawed, try running the system again. If the coil freezes again, there's likely a refrigerant leak or another underlying issue requiring professional attention.* Note: a dirty air filter can contribute to a frozen coil.
2. Inspect the Outdoor Unit (Condenser):
Safety First: *Turn off the power to the outdoor unit at the breaker before removing any access panels.*
- Condenser Fan: Ensure the condenser fan blades are clean and free of obstructions. The fan helps dissipate heat from the refrigerant. A damaged or malfunctioning fan can cause the unit to overheat and operate inefficiently. *If the fan is not spinning freely or is damaged, it needs to be replaced by a professional.*
- Condenser Coils: The condenser coils are located around the perimeter of the outdoor unit. They can become dirty over time, reducing the unit's ability to release heat. Carefully clean the coils with a garden hose and a fin comb (available at most hardware stores) to straighten any bent fins. *Avoid using high pressure, as this can damage the fins.*
- Refrigerant Lines: Inspect the refrigerant lines (copper pipes) for any signs of leaks, such as oily residue or ice buildup. *If you suspect a refrigerant leak, do not attempt to repair it yourself. Refrigerant is a hazardous substance, and handling it requires specialized equipment and training. Contact a licensed HVAC technician immediately.*
Step 3: Common DIY Actions (Proceed with Caution)
Based on your diagnosis, here are some simple DIY actions you can take:
- Replace the Air Filter: As mentioned earlier, this is the most common and easiest fix.
- Clean Vents and Clear Obstructions: Ensure all vents are open and unobstructed. Remove any furniture or debris blocking airflow to and from the unit.
- Clean the Blower Wheel (Indoor Unit): Carefully clean the blower wheel with a brush or vacuum cleaner after disconnecting the power.
- Clean the Condenser Coils (Outdoor Unit): Gently clean the condenser coils with a garden hose and a fin comb.
When to Call a Professional HVAC Technician
While many issues can be resolved with simple troubleshooting, some problems require the expertise of a qualified HVAC technician. It is crucial to prioritize your safety. Call a professional if you encounter any of the following situations:
- Refrigerant Leaks: Refrigerant leaks require specialized equipment and training to repair safely and effectively.
- Electrical Problems: If you suspect any electrical problems, such as a repeatedly tripping breaker or faulty wiring, contact a qualified electrician or HVAC technician immediately. Do not attempt to diagnose or repair electrical issues yourself unless you are a qualified electrician.
- Compressor Issues: The compressor is the heart of the AC unit. If you suspect a problem with the compressor (e.g., unusual noises, overheating), contact a professional.
- Frozen Evaporator Coil (Recurring): If the evaporator coil freezes repeatedly, there's likely an underlying issue, such as a refrigerant leak or airflow problem that requires professional attention.
- Complex Repairs: If you're uncomfortable performing any of the troubleshooting steps or if the problem persists after trying the DIY solutions, it's best to call a professional. Attempting to fix complex issues yourself can potentially damage the unit further and void the warranty.
- You Are Unsure: When in doubt, it is always better to contact a qualified HVAC technician.
Remember: Regular maintenance, such as changing the air filter and cleaning the coils, can help prevent many of these problems from occurring in the first place. Consider scheduling annual maintenance with a qualified HVAC technician to ensure your system is running efficiently and safely.