Air Adjustment On Beckett Oil Burner

Many homeowners experience frustrating issues with their oil-fired heating systems, often noticing a decrease in efficiency, sooty deposits, or unusual noises. One common culprit behind these problems is an improperly adjusted air setting on the Beckett oil burner. This article aims to guide you through the diagnosis and basic adjustments, helping you restore your heating system to optimal performance. Remember, safety is paramount. If you're uncomfortable with any of these steps, or if the problem persists, call a qualified HVAC technician immediately.
Understanding the Importance of Air Adjustment
The Beckett oil burner relies on a precise mixture of oil and air for efficient combustion. Too much or too little air can lead to incomplete burning, resulting in wasted fuel, reduced heating capacity, and the production of harmful pollutants like carbon monoxide. A properly adjusted air setting ensures clean, efficient, and safe operation.
Why does the air setting need adjustment? Over time, factors such as nozzle wear, changes in oil viscosity, and accumulation of dust and debris can affect the air-fuel mixture, requiring adjustments to maintain optimal combustion.
Common Symptoms of Incorrect Air Adjustment
Before diving into the adjustment process, let's identify the signs that indicate a problem with your burner's air setting:
- Sooty Deposits: Black soot around the burner, vent pipe, or even inside the combustion chamber is a telltale sign of insufficient air. The oil isn't burning completely, resulting in unburned carbon particles.
- Yellow or Orange Flame: A healthy oil burner flame should be bright white or light yellow. A predominantly yellow or orange flame indicates insufficient air.
- Puffbacks: A "puffback" is a small explosion within the combustion chamber, often accompanied by a loud noise and a burst of smoke. This is a serious symptom of incomplete combustion and a dangerous buildup of fuel.
- Smell of Oil: A strong odor of unburned oil near the burner suggests poor combustion.
- Reduced Heating Efficiency: If your heating bills are unusually high, even with consistent usage, the burner might not be burning fuel efficiently due to an incorrect air setting.
- Noisy Operation: A rumbling or sputtering sound from the burner can indicate an improper air-fuel mixture.
Safety First! Precautions Before You Begin
Your safety is our top priority. Before attempting any adjustments, observe these crucial precautions:
- Turn Off the Power: Locate the circuit breaker that controls the oil burner and switch it to the "OFF" position. This prevents accidental ignition and electrical shock.
- Allow Cooling: Let the burner cool down completely before touching any components. The burner can get extremely hot during operation.
- Wear Appropriate Gear: Wear safety glasses to protect your eyes from soot and debris. Gloves are also recommended to keep your hands clean and protected.
- Ensure Ventilation: Open windows or doors to provide adequate ventilation during the adjustment process. This helps dissipate any fumes.
- Have a Fire Extinguisher Nearby: Keep a fire extinguisher rated for Class B fires (flammable liquids) readily accessible.
- Know Your Limits: If you are uncomfortable with any step of this process, stop immediately and contact a qualified HVAC technician.
Tools You'll Need
To adjust the air setting on your Beckett oil burner, you'll need the following tools:
- Screwdrivers: A flathead and Phillips head screwdriver of appropriate sizes.
- Wrench Set: A set of wrenches for loosening and tightening bolts and screws.
- Combustion Analyzer (Optional but Recommended): A combustion analyzer is a device that measures the levels of oxygen, carbon monoxide, and other gases in the flue. This provides the most accurate way to determine the optimal air setting. While not essential for basic adjustments, it's highly recommended for fine-tuning.
- Flashlight or Work Light: To illuminate the burner components.
- Soot Vacuum or Brush: For cleaning soot and debris.
- Marking Pen or Pencil: To mark the original position of the air band or shutter.
Step-by-Step Guide to Air Adjustment
Follow these steps carefully to adjust the air setting on your Beckett oil burner:
Step 1: Visual Inspection and Cleaning
Before making any adjustments, thoroughly inspect the burner for any obvious issues.
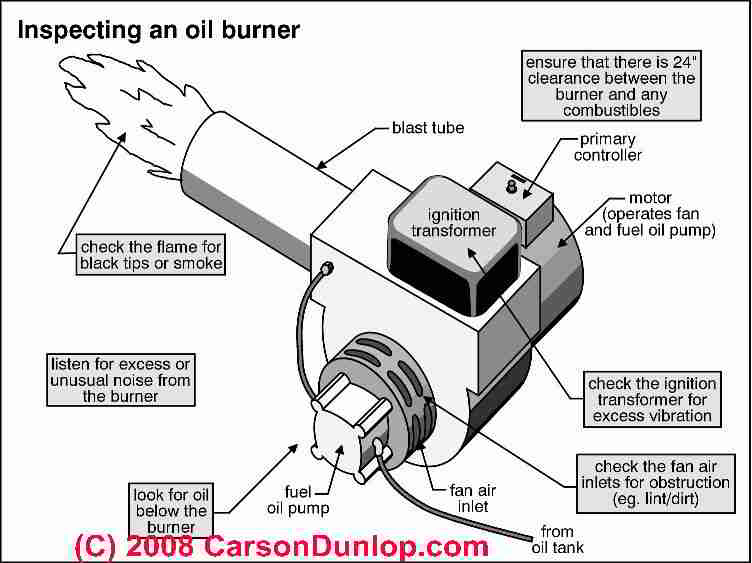
- Inspect the Nozzle: Examine the nozzle for signs of wear, damage, or clogging. A worn nozzle can disrupt the spray pattern and affect combustion. Consider replacing the nozzle if it appears damaged. This is often best left to a professional.
- Clean the Burner: Use a soot vacuum or brush to remove any soot or debris from around the burner, air band, and combustion chamber. Accumulated soot can obstruct airflow and affect combustion.
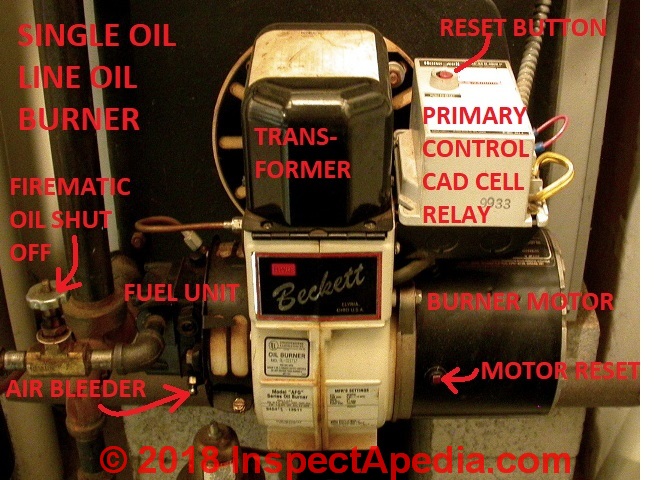
- Check the Air Band or Shutter: Locate the air band (a metal band that rotates to adjust the air intake) or shutter (a set of adjustable louvers). Observe its current position.
Step 2: Identifying the Air Adjustment Mechanism
Beckett oil burners typically use one of two methods for adjusting air intake:
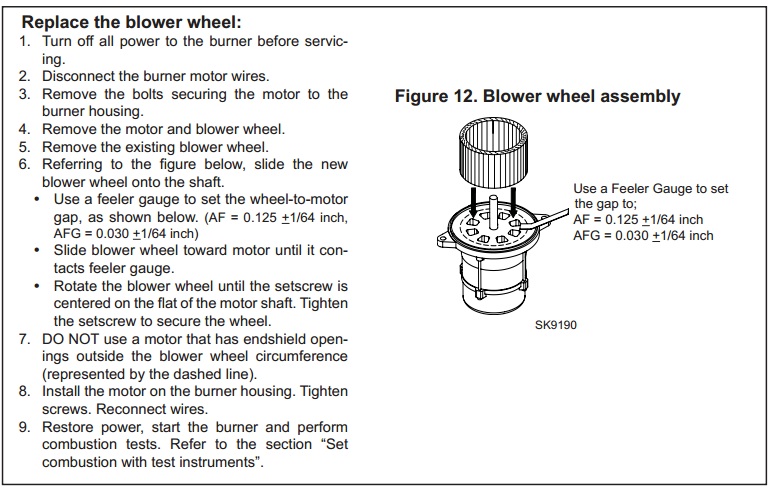
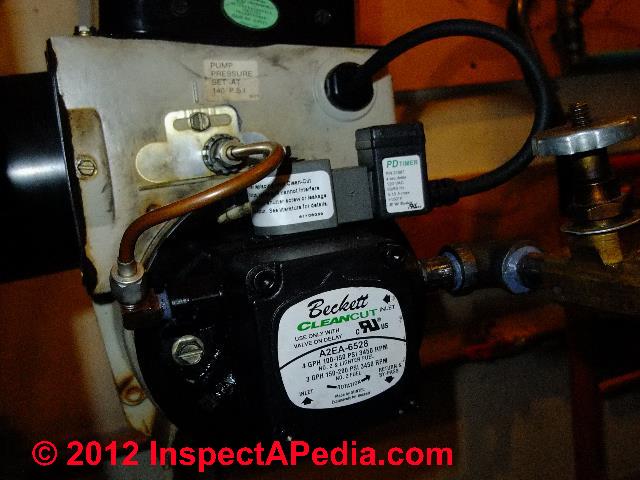
- Air Band: The most common type, the air band is a metal ring that encircles the blower housing. Rotating the air band opens or closes the air intake, regulating the amount of air entering the burner.
- Air Shutter: Some models use adjustable louvers or shutters to control airflow. These shutters are typically adjusted using screws or levers.
Identify which type of air adjustment mechanism your burner uses before proceeding.
Step 3: Initial Adjustment
This step involves making small adjustments to the air setting and observing the flame.
- Mark the Original Position: Use a marking pen or pencil to mark the original position of the air band or shutter. This allows you to easily return to the starting point if needed.
- Small Adjustments: If you suspect too little air (sooty deposits, yellow flame), slightly open the air band or shutter by a small increment (e.g., 1/8 inch). If you suspect too much air (noisy operation, unstable flame), slightly close the air band or shutter.
- Power On and Observe: Restore power to the burner by switching the circuit breaker back to the "ON" position. Allow the burner to run for a few minutes and carefully observe the flame through the inspection port.
- Flame Observation:
- Ideal Flame: A bright white or light yellow flame with a well-defined shape.
- Yellow or Orange Flame: Indicates insufficient air. Open the air band or shutter slightly more.
- Wavering or Unstable Flame: May indicate too much air or other issues. Close the air band or shutter slightly.
- Repeat Adjustments: Repeat steps 2-4, making small adjustments and observing the flame until you achieve a bright white or light yellow flame. Allow a few minutes between adjustments for the burner to stabilize.
Step 4: Fine-Tuning (Recommended with Combustion Analyzer)
For the most accurate and efficient adjustment, use a combustion analyzer.
- Insert the Probe: Insert the combustion analyzer probe into the test port on the flue pipe.
- Take Readings: Follow the analyzer's instructions to take readings for oxygen (O2), carbon monoxide (CO), and flue gas temperature.
- Adjust for Optimal Readings:
- Oxygen (O2): Aim for an O2 reading within the range specified by the burner manufacturer (typically 3-7%). Adjust the air band or shutter to achieve this range. Lower O2 means less air. Higher O2 means more air.
- Carbon Monoxide (CO): CO levels should be as low as possible, ideally below 100 ppm (parts per million). High CO levels indicate incomplete combustion and require adjustment. Decrease air if CO is elevated.
- Flue Gas Temperature: Monitor the flue gas temperature to ensure it is within the manufacturer's recommended range.
- Iterate: Continue making small adjustments and taking readings until you achieve optimal combustion readings.
Step 5: Final Inspection and Testing
After making the adjustments, perform a final inspection to ensure everything is working correctly.
- Visual Inspection: Double-check all connections and components to ensure they are secure. Look for any signs of leaks or damage.
- Run the Burner: Allow the burner to run for an extended period (e.g., 30 minutes) and monitor its performance. Listen for any unusual noises or vibrations.
- Check for Soot: After running the burner, check for soot around the burner and vent pipe. If soot is present, the air setting may still need adjustment.
When to Call a Professional
While these steps can help you address common air adjustment issues, certain situations require the expertise of a qualified HVAC technician.
- Persistent Soot: If you are unable to eliminate soot deposits after making adjustments, there may be underlying issues such as a faulty nozzle, oil pump problems, or a blocked flue.
- High Carbon Monoxide (CO): If CO levels remain high even after adjustment, this indicates a serious combustion problem that requires professional diagnosis and repair. CO is a deadly gas, and high levels pose a significant health risk.
- Puffbacks: Puffbacks are a sign of a serious problem and require immediate professional attention.
- Unfamiliar Components: If you encounter unfamiliar components or are unsure about any step of the adjustment process, do not proceed. Contact a qualified technician.
- Complex Issues: If you suspect more complex issues, such as oil leaks, electrical problems, or burner malfunctions, it's best to leave the repairs to a professional.
- Combustion Analyzer Inaccurate or Unavailable: If you don't have access to a combustion analyzer or the readings are consistently unusual, contact a professional.
Preventative Maintenance
Regular preventative maintenance can help prevent air adjustment problems and extend the life of your oil burner.
- Annual Tune-Up: Schedule an annual tune-up with a qualified HVAC technician. This includes cleaning, inspection, and adjustment of the burner.
- Nozzle Replacement: Replace the oil burner nozzle annually. A worn nozzle can affect the spray pattern and combustion efficiency.
- Filter Replacement: Replace the oil filter regularly (typically every 6-12 months) to prevent clogs and ensure a clean fuel supply.
- Clean the Burner: Periodically clean the burner and surrounding area to remove soot and debris.
By understanding the importance of air adjustment, following these steps carefully, and knowing when to seek professional help, you can ensure your Beckett oil burner operates safely, efficiently, and reliably for years to come.