Air Compressor Wiring Diagram 3 Phase

One of the most frustrating experiences for any homeowner with a workshop is discovering their trusty three-phase air compressor suddenly refuses to start. You've got projects waiting, deadlines looming, and now your compressor is stubbornly silent. Before you call in a costly repairman, let's walk through some basic troubleshooting steps you can take, safely and methodically, using the air compressor wiring diagram.
Understanding Three-Phase Power & Why it Matters
Before we dive in, it's important to understand that three-phase power is different from the standard single-phase electricity in most homes. Three-phase provides a smoother, more efficient power delivery, often used for larger motors like those found in industrial or higher-powered home workshop air compressors. This means the wiring and potential problems are a bit more complex.
Safety First! Before you even think about touching anything, completely disconnect the air compressor from its power source. This usually means flipping the breaker in your electrical panel that controls the compressor circuit. Verify the power is off with a non-contact voltage tester before proceeding. This is not optional; it's critical for your safety. Don't attempt any of these steps if you're uncomfortable working with electricity. Call a qualified electrician!
Common Problem: Compressor Won't Start
The most common symptom is a compressor that simply does nothing when you switch it on. No humming, no attempt to start, just silence. This could stem from several issues, ranging from simple to more complex.
Step 1: Verify Power to the Compressor
This might sound obvious, but start with the basics. Is the circuit breaker tripped? Go to your electrical panel and check the breaker for the compressor circuit. If it's tripped, reset it. If it trips again immediately, do not keep resetting it. This indicates a short circuit or overload, and you'll need to investigate further (potentially with professional help). If the breaker wasn't tripped, use a multimeter to verify that you have the correct voltage (usually 208V, 230V, or 480V depending on your compressor and wiring) at the compressor's disconnect switch (if present) or at the motor starter.
How to use a Multimeter (basic):
- Set your multimeter to the AC voltage range that corresponds to your system voltage (e.g., 250V or 500V range for a 230V system).
- Carefully touch the multimeter probes to the incoming power terminals on the disconnect switch or motor starter. Be extremely careful not to touch any bare wires.
- Read the voltage on the multimeter. You should see a reading close to your system voltage. If you see zero voltage, there's a problem with the power supply to the compressor.
Step 2: Inspect the Disconnect Switch and Wiring
Many compressors have a disconnect switch near the unit for safety. Ensure this switch is in the "ON" position. Inspect the wiring at the disconnect switch for any loose connections, burnt wires, or corrosion. Gently tug on each wire to ensure it's securely connected to its terminal.
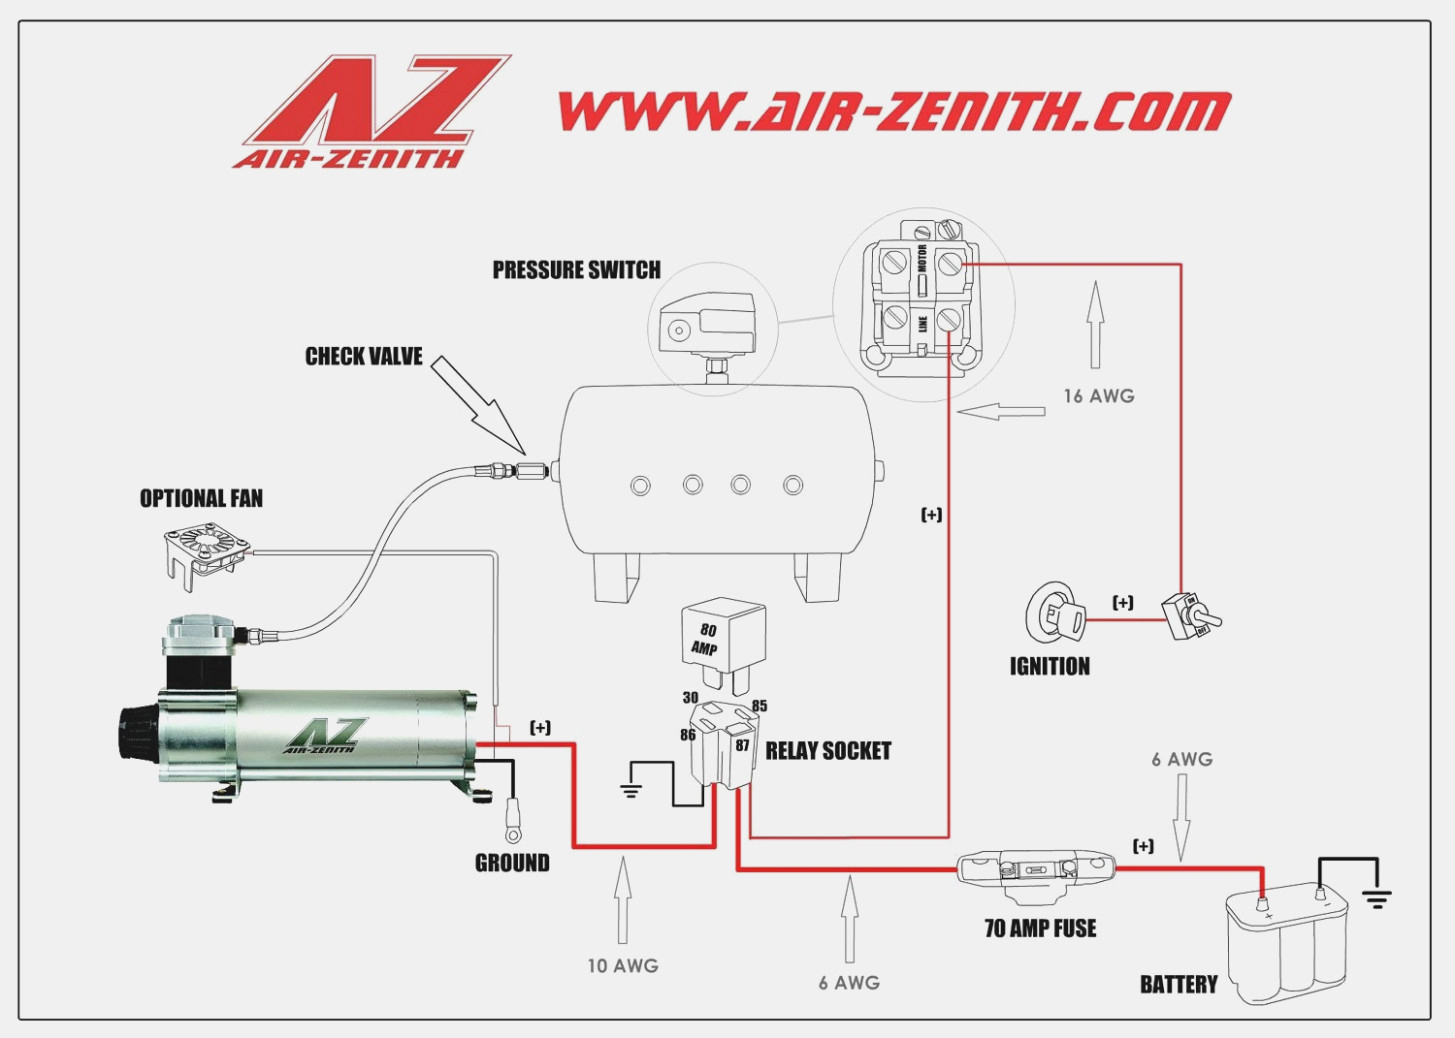
Using the Wiring Diagram: This is where the air compressor wiring diagram becomes essential. Locate the diagram – it's often found inside the motor starter cover or inside the compressor's control panel. The diagram will show you the proper connections for the three phases, the ground wire, and any control wires. Compare the actual wiring to the diagram. Are all the wires connected to the correct terminals? Are there any obvious discrepancies?
DIY Fix: If you find loose connections, carefully tighten them with a screwdriver. If you find corroded wires, clean them with a wire brush or replace them entirely (ensuring you use the correct gauge wire).
Step 3: Examine the Motor Starter
The motor starter is a crucial component that controls the flow of power to the motor. It typically houses overload protection relays and contactors. Open the motor starter cover (after disconnecting power, of course!). Look for these common issues:
- Burnt or Discolored Wires: This indicates excessive heat and a potential short circuit or overload.
- Loose Connections: Again, check all connections for tightness.
- Overload Relays Tripped: Overload relays protect the motor from overheating. They often have a reset button. If the overload relay has tripped, press the reset button. If it trips again immediately, there's likely a problem with the motor or the compressor itself. Do not keep resetting it repeatedly.
- Contactor Problems: The contactor is a switch that connects power to the motor. You can visually inspect the contactor for burnt or pitted contacts. A faulty contactor can prevent the motor from starting. You can also use a multimeter to check for continuity across the contactor contacts when the compressor is supposed to be running (exercise extreme caution when doing this with power on, or ideally, test with power off and manually actuate the contactor).
Using the Wiring Diagram: The wiring diagram will show you how the overload relays and contactor are wired into the circuit. It will also help you identify the correct terminals for testing continuity.
DIY Fix: If you find loose connections, tighten them. If an overload relay has tripped, try resetting it once. If the contactor contacts are visibly damaged, replacing the contactor is generally a job for a qualified electrician.
Step 4: Check the Capacitor (If Applicable)
Some three-phase air compressors, particularly older models or those with single-phase input and three-phase output using a rotary phase converter, may have capacitors. A faulty capacitor can prevent the motor from starting. Capacitors store electrical energy and provide a boost during startup.
How to Inspect a Capacitor:
- Visual Inspection: Look for signs of bulging, leaking, or cracking on the capacitor casing.
- Testing with a Multimeter: You can test a capacitor with a multimeter that has a capacitance function. Discharge the capacitor before testing it! Set the multimeter to the capacitance range and measure the capacitance. Compare the reading to the capacitor's rated capacitance. A significantly lower reading indicates a faulty capacitor.
DIY Fix: Replacing a capacitor can be a DIY job if you're comfortable working with electricity and can follow instructions carefully. However, capacitors can hold a dangerous electrical charge even after the power is disconnected. Always discharge the capacitor before handling it. You can discharge it by carefully shorting the terminals with an insulated screwdriver. Be very careful! Ensure you buy a replacement capacitor with the same voltage and capacitance ratings.
Step 5: Inspect the Motor
The motor itself could be the source of the problem. Here are a few things to look for:
- Burnt Smell: A burnt smell emanating from the motor is a strong indication of overheating and winding damage.
- Difficulty Turning the Motor Shaft: Try to manually turn the motor shaft (with the power disconnected, of course!). It should turn smoothly. If it's difficult to turn or feels "lumpy," there could be bearing problems or internal damage.
- Check Motor Windings (Continuity): Using a multimeter, check the continuity of the motor windings. Disconnect the motor leads from the motor starter first. You should have continuity between each phase winding. If you have no continuity on one or more windings, the motor is likely faulty. Also, check for continuity between each winding and the motor frame. There should be no continuity – if there is, this indicates a short to ground.
Using the Wiring Diagram: The wiring diagram will show you which terminals on the motor correspond to each phase winding.
DIY Fix: Motor repair is generally best left to professionals. Replacing a motor requires careful alignment and knowledge of electrical connections. Unless you have significant experience, it's best to consult a qualified motor repair shop.
When to Call a Professional Electrician
While many of the above steps can be safely performed by a homeowner with basic electrical knowledge, there are situations where you should definitely call a qualified electrician:
- If you're uncomfortable working with electricity at all. Your safety is paramount.
- If you suspect a short circuit or overload. Repeatedly tripping breakers is a sign of a serious problem.
- If you find burnt or severely damaged wiring. This indicates a significant electrical fault.
- If you suspect a problem with the motor starter that you cannot diagnose or repair. Motor starters contain complex components, and improper repairs can be dangerous.
- If you suspect a problem with the motor itself. Motor repairs often require specialized equipment and knowledge.
- If you've tried all the DIY fixes and the compressor still won't start. This indicates a more complex problem that requires professional diagnosis.
- If you're dealing with high voltage (480V or higher). High voltage can be extremely dangerous.
Preventative Maintenance
The best way to avoid air compressor problems is to perform regular preventative maintenance. Here are a few tips:
- Regularly check and tighten all electrical connections. Loose connections can cause overheating and voltage drops.
- Keep the compressor clean and free of debris. Dust and dirt can clog cooling fins and cause the motor to overheat.
- Drain the air tank regularly to remove moisture. Moisture can cause corrosion and damage to the tank and internal components.
- Inspect the air filter and replace it as needed. A clogged air filter can restrict airflow and cause the motor to work harder.
- Lubricate the compressor according to the manufacturer's recommendations. Proper lubrication is essential for long motor life.
By following these troubleshooting steps and performing regular maintenance, you can keep your three-phase air compressor running smoothly and reliably for years to come. Remember, safety is always the top priority. If you're unsure about anything, don't hesitate to call a qualified electrician.
Disclaimer: This article is for informational purposes only and should not be considered a substitute for professional electrical advice. Always consult a qualified electrician for any electrical work.