Air Conditioner Air Flow Direction Diagram
Is your air conditioner blowing air in the wrong direction, weakly, or not at all? A properly functioning AC unit circulates cool air evenly throughout your home. When this airflow is disrupted, it can lead to discomfort, higher energy bills, and even potential damage to the unit itself. Before calling a professional, let's explore some simple troubleshooting steps you can take to diagnose and potentially fix the issue.
Understanding Air Conditioner Airflow
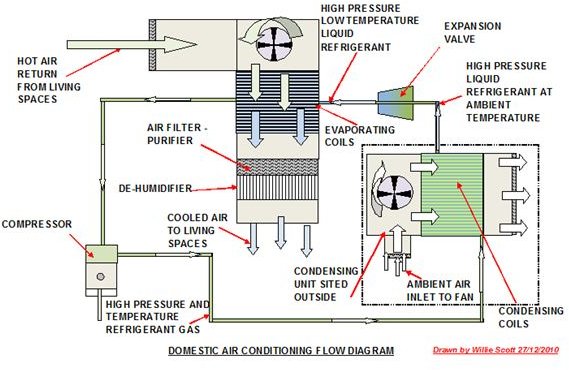
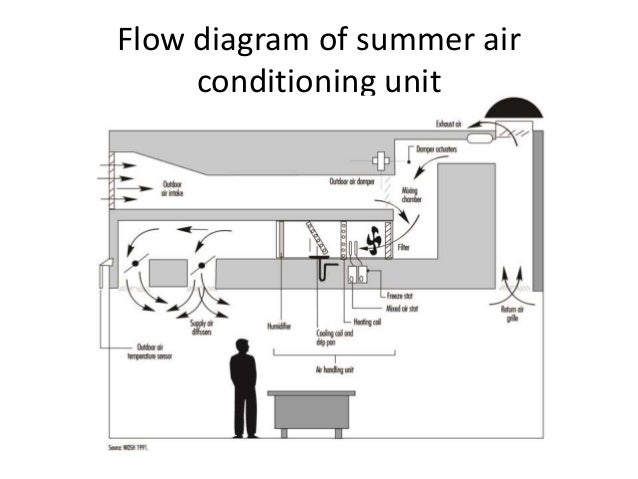
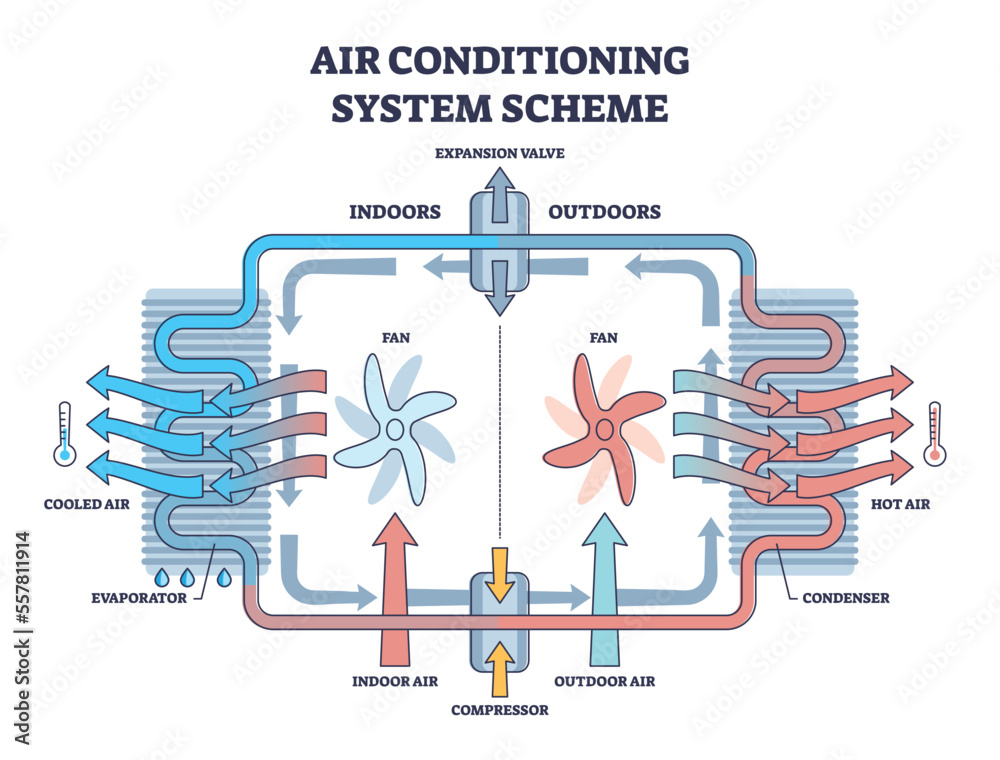
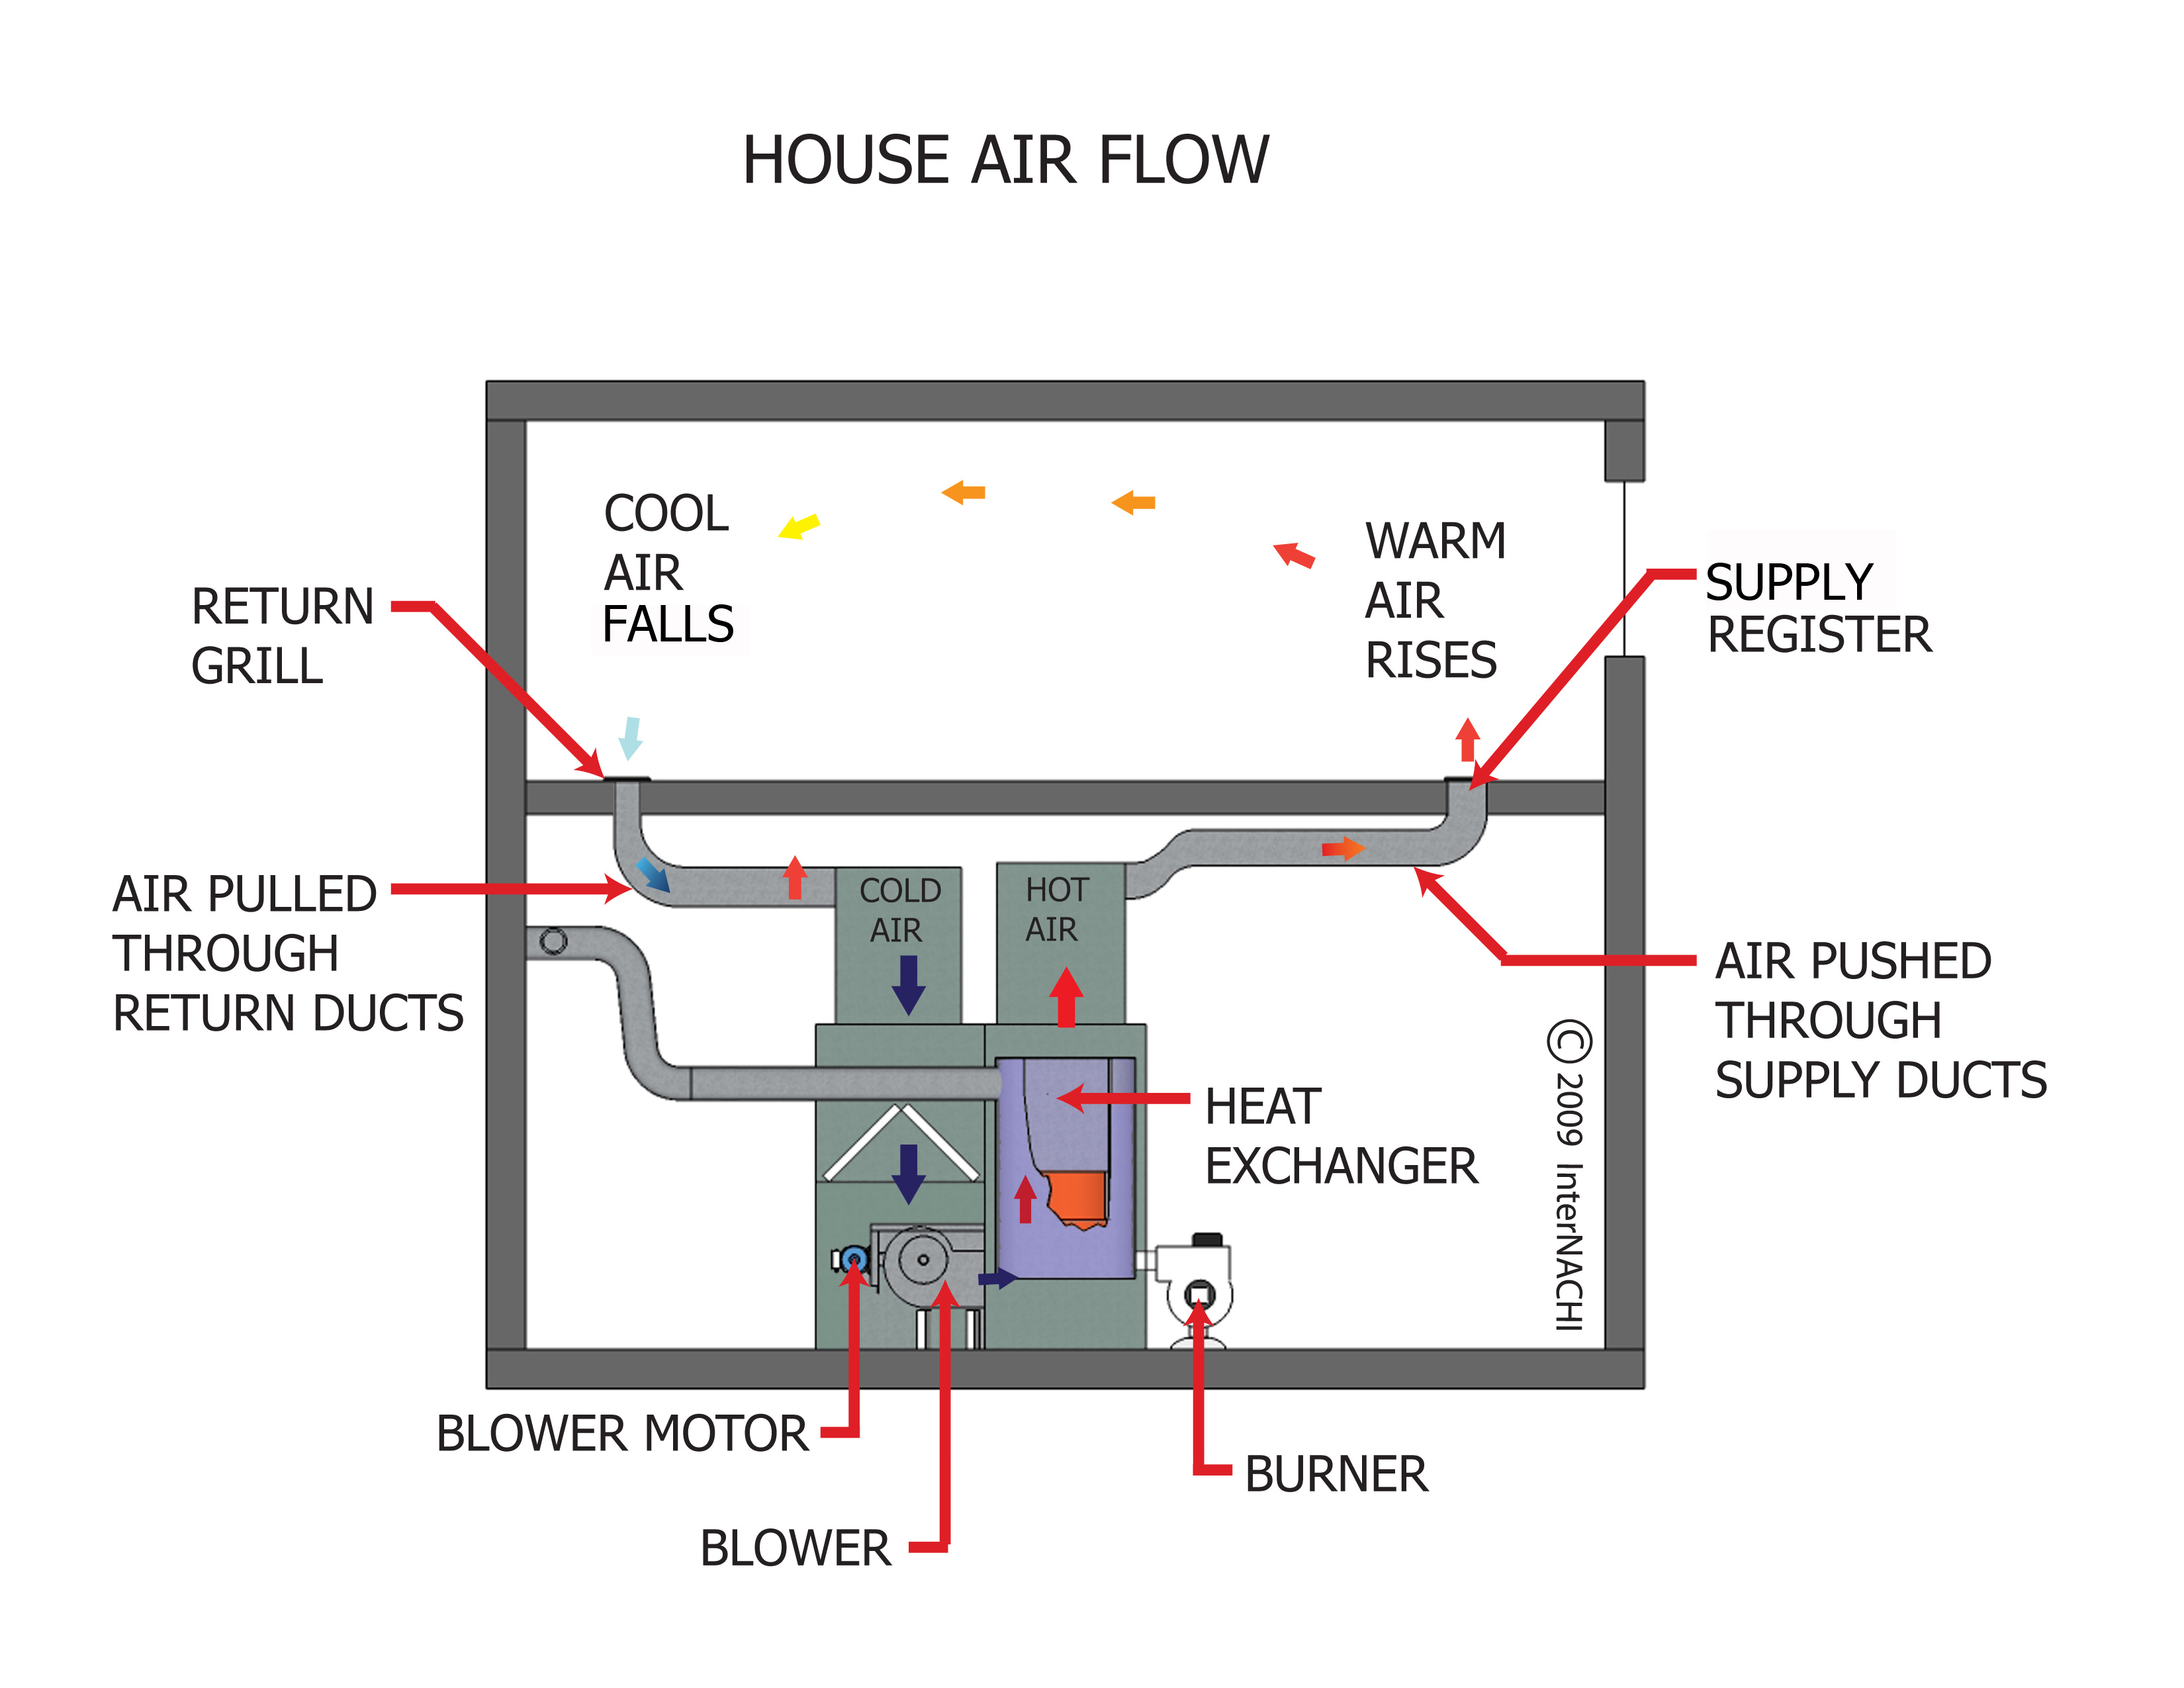
To effectively troubleshoot, it's important to understand how your AC system is *supposed* to work. Air conditioners cool air by drawing warm air in, passing it over a cold evaporator coil, and then blowing the cooled air back into the room. This process relies on a consistent and directed airflow pattern.
Typically, the airflow pattern involves:
- Return Air Vents: These vents pull warm air from the rooms. They are often located high on walls or ceilings.
- Air Filter: Positioned near the return air vent, the filter cleans the air before it enters the system.
- Air Handler/Blower Fan: This unit contains the fan that pushes air through the ductwork.
- Evaporator Coil: Located inside the air handler, the coil cools the air.
- Ductwork: A network of channels that deliver cool air to different rooms.
- Supply Air Vents: These vents release the cooled air into the rooms. They are often located low on walls or floors.
An 'Air Conditioner Air Flow Direction Diagram' is a visual representation of this process, showing the path air takes from the return vents, through the unit, and back into the living space. It’s a useful tool for understanding and troubleshooting airflow issues.
Troubleshooting Airflow Problems: A Step-by-Step Guide
1. Safety First!
Before you begin, always ensure your safety. Turn off the power to the AC unit at the circuit breaker. This will prevent electrical shock. If you’re uncomfortable working with electrical components, stop and call a qualified HVAC technician.
2. Check the Thermostat Settings
This might seem obvious, but it's often overlooked. Verify that your thermostat is set to "Cool" mode and that the temperature setting is lower than the current room temperature. Make sure the fan setting is on "Auto" or "On," not "Off". A simple settings adjustment is sometimes the only fix you need!
3. Inspect the Air Filter
A dirty air filter is the most common cause of airflow problems. A clogged filter restricts airflow, forcing the system to work harder and reducing its efficiency. It can even cause the evaporator coil to freeze. Here's how to check and replace your filter:
- Locate the Filter: The filter is usually located near the return air vent or inside the air handler unit. Refer to your owner's manual if you're unsure.
- Inspect the Filter: Remove the filter and hold it up to the light. If you can't see light through it, it's time to replace it.
- Replace the Filter: Purchase a new filter of the correct size and type (check the old filter for specifications). Slide the new filter into place, ensuring the arrow on the filter points in the direction of airflow (usually towards the blower motor).
- Regular Maintenance: Change your air filter every 1-3 months, or more often if you have pets or allergies.
4. Examine the Supply and Return Vents
Make sure that all supply and return vents are open and unobstructed. Furniture, rugs, or curtains can block airflow. Check each vent for blockages and clear any obstructions. Look closely for dust accumulation, which can further restrict airflow. Use a vacuum cleaner with a brush attachment to clean the vents.
5. Check for Frozen Evaporator Coil
A frozen evaporator coil restricts airflow significantly. This often happens due to a dirty air filter or low refrigerant levels. Here's how to check:
- Locate the Evaporator Coil: The evaporator coil is located inside the air handler unit.
- Visual Inspection: Look for ice buildup on the coil. You may need to remove an access panel to see it. Be very careful when removing panels and avoid touching any electrical components.
- If Frozen: Turn off the AC unit and set the thermostat fan to "On" (not "Auto"). This will circulate air over the coil and help it thaw. Allow several hours for the ice to melt completely.
- Prevention: Once the coil is thawed, replace the air filter and monitor the unit's performance. If the coil freezes again, you may have a refrigerant leak, which requires professional attention.
6. Inspect the Condenser Unit (Outdoor Unit)
The outdoor condenser unit plays a critical role in the cooling process. Over time, debris such as leaves, grass clippings, and dirt can accumulate around the unit, restricting airflow and reducing its efficiency.
- Clear Debris: Turn off the power to the condenser unit at the breaker. Carefully remove any debris from around the unit, using a brush or garden hose (on a gentle setting).
- Check for Bent Fins: The condenser fins (the thin metal plates surrounding the unit) can easily bend, restricting airflow. Use a fin comb (available at most hardware stores) to gently straighten any bent fins.
- Ensure Clearance: Make sure there is adequate clearance (at least 2-3 feet) around the unit for proper airflow. Trim any bushes or plants that are growing too close.
7. Inspect the Ductwork (If Accessible)
Damaged or leaking ductwork can significantly reduce airflow and efficiency. While inspecting the entire ductwork system may not be feasible for most homeowners, you can check for visible signs of damage in accessible areas, such as the attic or basement.
- Look for Tears or Disconnections: Check for tears, holes, or disconnections in the ductwork.
- Seal Leaks: Use duct tape or mastic sealant to seal any small leaks or tears. For larger repairs or inaccessible ductwork, it’s best to call a professional.
- Insulation: Ensure that the ductwork is properly insulated. Damaged or missing insulation can lead to energy loss and reduced airflow.
8. Check the Blower Fan
The blower fan is responsible for moving air through the entire system. A malfunctioning blower fan can cause weak or no airflow. Working with the blower fan involves electricity and should only be attempted if you are comfortable and knowledgeable about electrical repairs. If not, call a professional.
- Access the Blower Motor: Turn off the power to the AC unit at the breaker. Locate the blower motor inside the air handler unit. You may need to remove an access panel to reach it.
- Visual Inspection: Check the blower fan blades for any obstructions or damage. Clean any debris from the blades.
- Test the Capacitor (If you are comfortable with electrical work): The capacitor helps start and run the blower motor. A failing capacitor is a common cause of blower motor problems. Be extremely careful when working with capacitors, as they can store a dangerous electrical charge even after the power is turned off. Use a multimeter to test the capacitor's capacitance. If the reading is significantly lower than the rated capacitance, the capacitor needs to be replaced.
- Consider Professional Help: If you suspect the blower motor itself is failing, it's best to call a qualified HVAC technician. Replacing a blower motor can be complex and requires specialized tools and knowledge.
When to Call a Professional
While many airflow problems can be resolved with simple DIY fixes, some issues require professional attention. Here are some situations where it's best to call a qualified HVAC technician:
- Refrigerant Leaks: Refrigerant is essential for cooling, and leaks can reduce airflow and damage the system.
- Compressor Problems: The compressor is the heart of the AC unit, and repairs can be expensive.
- Electrical Issues: Any electrical repairs beyond simple capacitor replacement should be handled by a professional.
- Complex Ductwork Repairs: If you have extensive ductwork damage or leaks in inaccessible areas.
- Persistent Problems: If you've tried the troubleshooting steps above and the airflow problem persists.
Remember: Working with electricity, gas, or complex HVAC components can be dangerous. Always prioritize your safety and consult a professional when in doubt.
Preventative Maintenance for Optimal Airflow
Regular maintenance can help prevent airflow problems and extend the life of your AC unit. Consider these preventative measures:
- Regular Filter Changes: As mentioned earlier, change your air filter every 1-3 months.
- Professional Tune-Ups: Schedule annual or bi-annual tune-ups with a qualified HVAC technician. They can inspect the system, clean the coils, check refrigerant levels, and identify potential problems before they become major issues.
- Clean Condenser Unit: Keep the area around the outdoor condenser unit clear of debris.
- Inspect Ductwork Regularly: Check for visible signs of damage or leaks in accessible ductwork.
By following these troubleshooting steps and preventative maintenance tips, you can improve the airflow in your home and keep your AC unit running efficiently. Addressing airflow issues promptly can save you money on energy bills and prevent costly repairs down the road. And remember, when in doubt, always consult a qualified HVAC technician for assistance.