Air Conditioning Copper Pipe Size Chart
Ever noticed your air conditioner struggling to keep up on a hot day, even though it's running constantly? Or perhaps your energy bills have inexplicably spiked? While there could be many reasons, a common culprit often overlooked is the incorrect copper pipe size used in your AC system.
Using the wrong diameter pipes can severely hamper your AC's efficiency and lifespan. Imagine trying to drink a milkshake through a coffee stirrer – it's frustrating and inefficient! The same principle applies to refrigerant flowing through copper pipes.
This guide will help you understand the importance of proper copper pipe sizing, diagnose potential problems related to it, and perform some basic troubleshooting. Remember, safety is paramount. If you're uncomfortable with any of these steps, or suspect a major issue, always consult a qualified HVAC professional.
Understanding the Importance of Copper Pipe Size
Your air conditioner relies on a closed-loop system where refrigerant absorbs heat from inside your home and releases it outside. This refrigerant travels through copper pipes connecting the indoor unit (evaporator coil) to the outdoor unit (condenser coil). The diameter of these pipes directly impacts the system's ability to efficiently transfer heat.
Too Small Pipes: Imagine trying to force a large volume of water through a narrow pipe. The pressure builds up, restricting flow and increasing strain. Similarly, undersized copper pipes restrict refrigerant flow, leading to:
- Reduced cooling capacity: Your AC struggles to cool the air effectively.
- Increased energy consumption: The compressor works harder to compensate, leading to higher bills.
- Compressor damage: The overworked compressor can overheat and fail prematurely.
- Liquid refrigerant floodback: Liquid refrigerant can return to the compressor, damaging it.
Too Large Pipes: While seemingly less problematic, oversized pipes can also cause issues. They can lead to:
- Reduced refrigerant velocity: The refrigerant may not flow fast enough to properly carry oil back to the compressor.
- Oil logging: Oil can accumulate in the evaporator, reducing heat transfer efficiency.
- Increased material costs: You're paying for more copper than necessary.
In essence, the correct copper pipe size ensures the optimal refrigerant flow for your specific AC system, maximizing efficiency and prolonging its lifespan.
Diagnosing Potential Problems
Before diving into any DIY troubleshooting, it's crucial to accurately diagnose the issue. Here are some common signs that might indicate a problem with your copper pipe sizing:
- Insufficient Cooling: Your AC runs constantly but struggles to cool your home, especially during peak hours.
- High Energy Bills: A sudden and unexplained increase in your electricity bill, despite no change in usage habits.
- Compressor Issues: Unusual noises from the outdoor unit, such as clicking, buzzing, or grinding. Frequent compressor shutdowns or failures.
- Frozen Evaporator Coil: Ice buildup on the indoor unit's evaporator coil (usually requires professional diagnosis, but can be related to refrigerant flow issues).
- Uneven Cooling: Some rooms are cooler than others, even though the vents are open.
Important: These symptoms can also be caused by other issues, such as a refrigerant leak, dirty air filter, or malfunctioning compressor. It's essential to rule out these possibilities before focusing solely on pipe sizing.
Step-by-Step Diagnosis
Follow these steps to investigate potential copper pipe sizing problems:
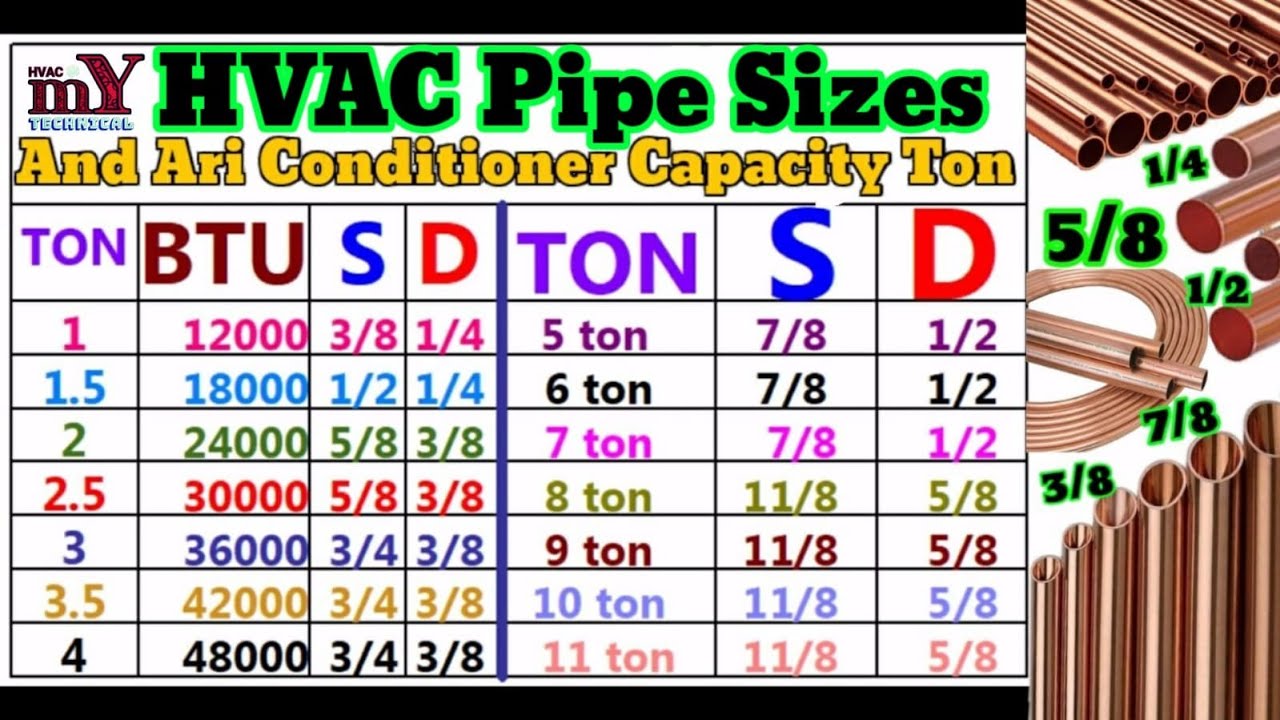
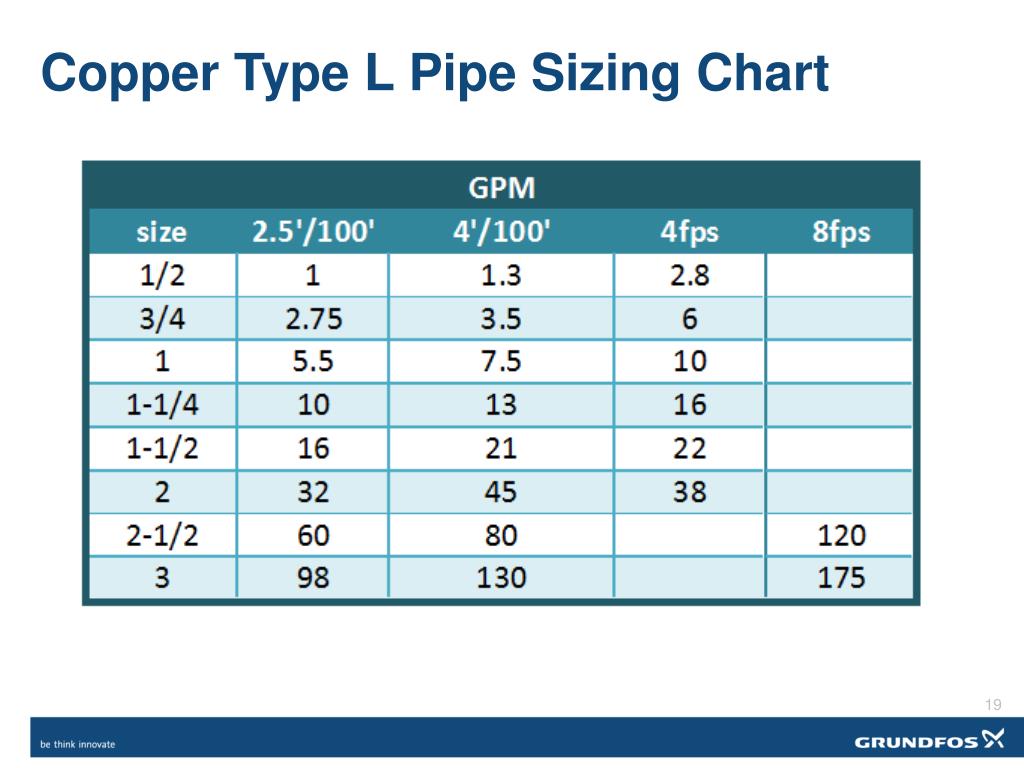
- Check Your AC System Specifications: This is the most crucial step. Locate the manufacturer's specifications for your AC unit. This information is usually found on a sticker on the outdoor unit or in the owner's manual. Look for the required liquid line and suction line (gas line) sizes for your specific model and BTU rating.
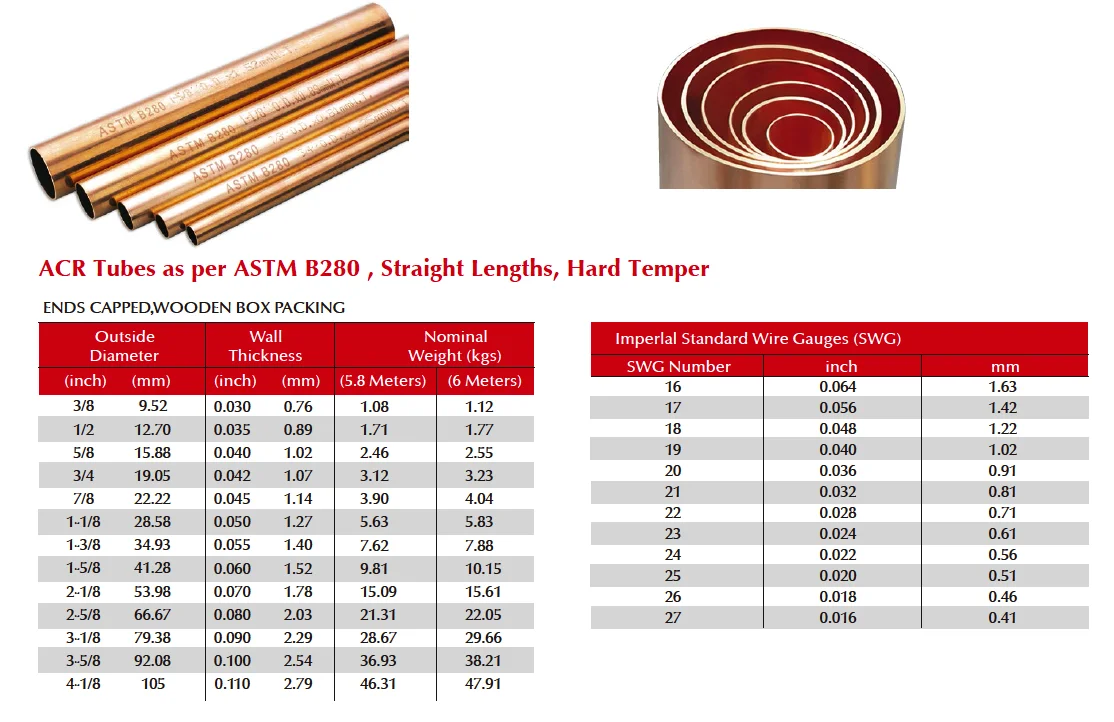
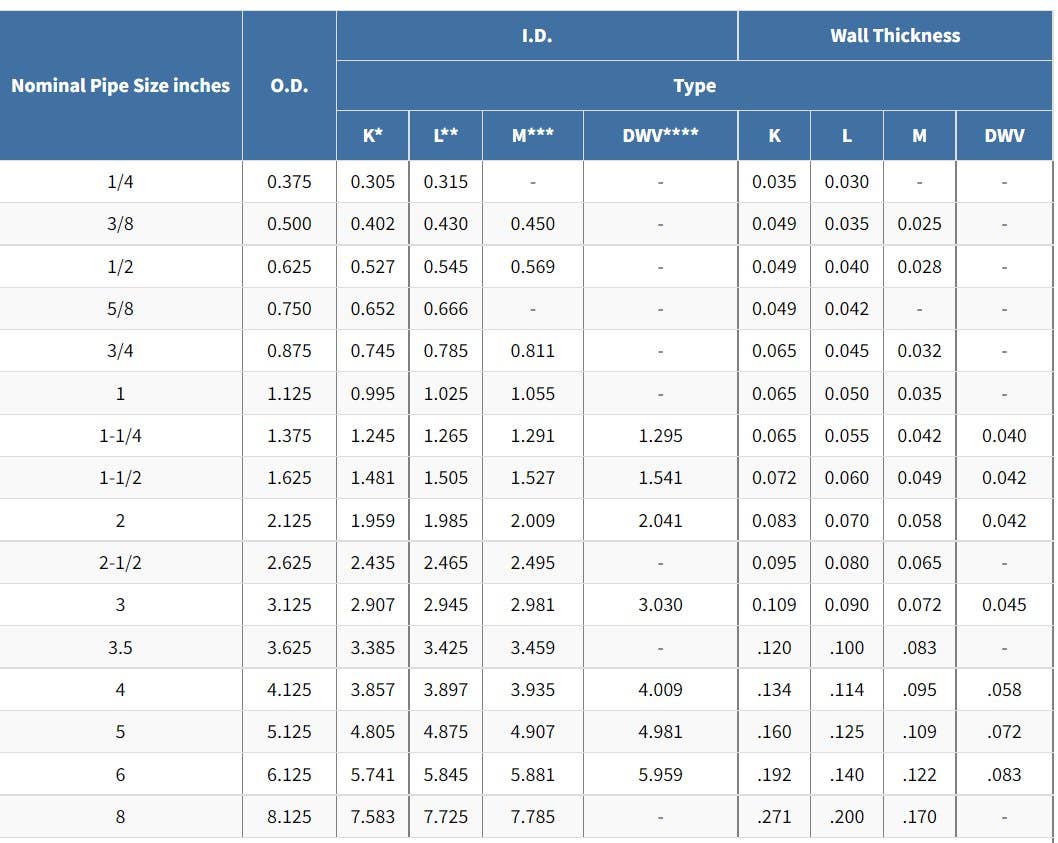
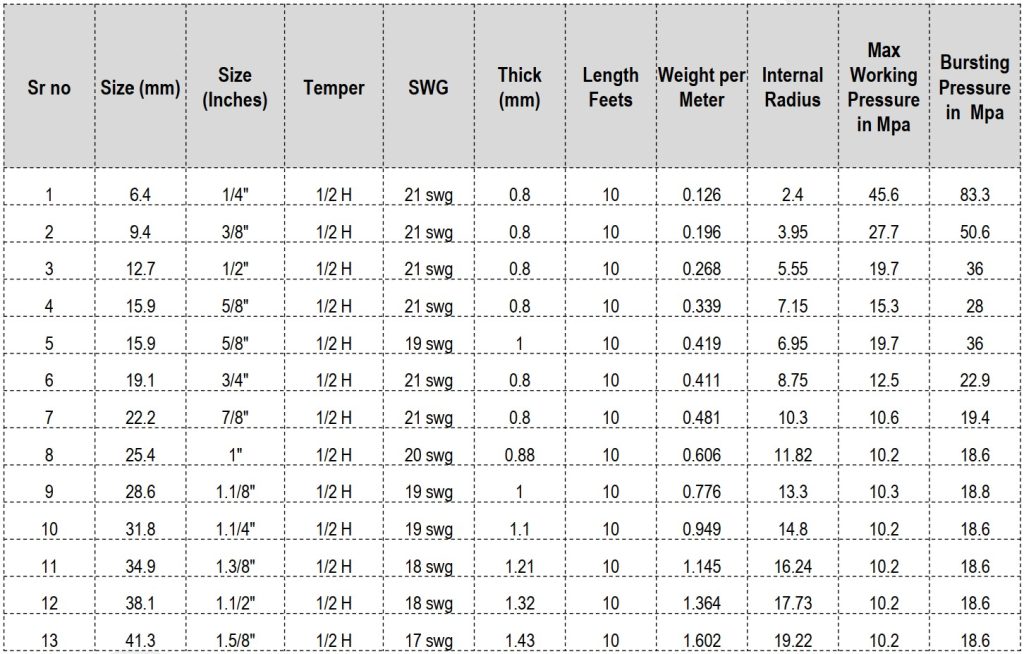
- Visually Inspect the Copper Pipes: Examine the copper pipes connecting the indoor and outdoor units. Are they visibly damaged, kinked, or corroded? Note the diameter of the pipes. You might need a measuring tape or caliper for accurate readings. The diameter is usually stamped on the pipe itself.
- Compare Pipe Sizes to Specifications: Compare the actual pipe sizes to the manufacturer's specifications. Do they match? If the actual sizes are significantly smaller or larger than what's recommended, it could indicate a problem.
- Check for Leaks: Look for signs of refrigerant leaks, such as oily residue or hissing sounds, especially at joints and connections. Refrigerant leaks can exacerbate the effects of incorrect pipe sizing.
- Evaluate System Age and History: Has the AC system been recently installed or modified? Was it working correctly before? Knowing the system's history can provide valuable clues.
Simple DIY Fixes (With Caution!)
Important Note: The following DIY fixes are limited to minor adjustments and visual inspections. Cutting, soldering, or replacing copper pipes requires specialized tools and expertise and should only be performed by a licensed HVAC professional. Attempting these tasks without proper knowledge and experience can be dangerous and void your warranty.
1. Insulating Exposed Pipes
Exposed, uninsulated copper pipes can lose significant amounts of heat (or gain heat in the case of the suction line), reducing efficiency. This is especially true for pipes running through unconditioned spaces like attics or crawl spaces.
DIY Fix:
- Purchase foam pipe insulation: Buy pre-slit foam pipe insulation with the correct inner diameter for your copper pipes.
- Install the insulation: Simply slide the insulation over the exposed pipes, ensuring a snug fit. Seal the seams with duct tape.
This simple step can improve efficiency and reduce energy waste.
2. Cleaning Debris Around the Outdoor Unit
Obstructions around the outdoor unit can restrict airflow, making the system work harder. This can indirectly exacerbate the effects of incorrect pipe sizing.
DIY Fix:
- Clear away debris: Remove any leaves, branches, grass clippings, or other obstructions within a 2-3 foot radius of the outdoor unit.
- Clean the condenser fins: Use a fin comb or a gentle stream of water (from a hose with a nozzle) to clean the condenser fins, removing any accumulated dirt and debris. Be careful not to bend the fins.
Improved airflow helps the system operate more efficiently.
3. Checking and Replacing Air Filter
A dirty air filter restricts airflow to the indoor coil, reducing the efficiency of the air conditioner and potentially leading to issues that mimic improper pipe sizing.
DIY Fix:
- Locate the air filter: The air filter is usually located in the return air duct or in the indoor unit itself.
- Inspect the filter: If the filter is dirty, replace it with a new filter of the same size and type.
- Follow recommended replacement schedule: Check your filter monthly and replace as needed.
A clean air filter ensures proper airflow and efficient cooling.
When to Call a Professional
While some minor adjustments can be done yourself, certain situations require professional intervention. Attempting to fix complex issues without proper training and tools can be dangerous and costly.
Call a licensed HVAC professional immediately if:
- You suspect a refrigerant leak: Handling refrigerant requires specialized equipment and training.
- The copper pipes need to be cut, soldered, or replaced: This involves working with high-pressure systems and requires expertise.
- You are unsure about the correct pipe size or have difficulty identifying the problem: It's better to be safe than sorry.
- The compressor is making unusual noises or frequently shutting down: This could indicate a serious problem that requires professional diagnosis and repair.
- You are uncomfortable working with electrical components: AC systems involve high-voltage electricity, which can be dangerous.
- Your AC system is still under warranty: DIY repairs may void your warranty.
In summary, if you've identified a potential problem with your copper pipe sizing and it requires more than just simple insulation or cleaning, it's time to call in the experts. Don't risk damaging your AC system or jeopardizing your safety.
Preventative Measures
The best way to avoid copper pipe sizing problems is to ensure the system is installed correctly from the start. Here are some preventative measures:
- Hire a qualified HVAC contractor: Choose a reputable and licensed contractor with experience in installing AC systems.
- Ensure proper sizing: Make sure the contractor properly calculates the required pipe sizes based on your AC unit's specifications and the length of the refrigerant lines.
- Regular maintenance: Schedule regular maintenance checks to identify and address potential problems early on.
- Proper insulation: Ensure all refrigerant lines are properly insulated, especially in unconditioned spaces.
By taking these preventative measures, you can ensure the long-term efficiency and reliability of your AC system.
Troubleshooting your AC system can feel daunting, but by understanding the basics of copper pipe sizing and following these steps, you can confidently diagnose potential problems and take appropriate action. Remember to prioritize safety and don't hesitate to call a professional when needed.