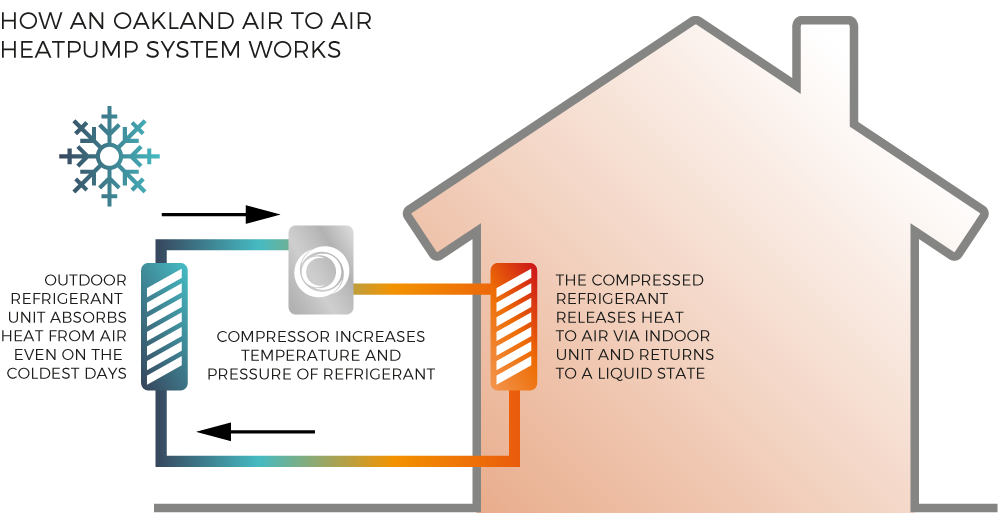
Air To Air Heat Pump Installation
So, you've recently had a new air-to-air heat pump installed – fantastic! You're looking forward to efficient heating and cooling, but something isn't quite right. Maybe the system isn't heating or cooling as effectively as you expected, or perhaps you're hearing strange noises. Don't panic! Many common post-installation issues are easily diagnosed and sometimes even corrected with a little troubleshooting. Let's walk through some common problems and how to approach them.
Problem: Inadequate Heating or Cooling
This is probably the most frequent complaint. The heat pump runs, but the temperature isn't changing significantly, or it takes an extremely long time to reach the desired setting.
Step 1: Verify Thermostat Settings
First and foremost, double-check your thermostat. It sounds obvious, but it's often the culprit! Make sure it's set to the correct mode (heat or cool) and that the target temperature is realistically achievable. Is it set to "Auto" and accidentally switching between heating and cooling modes unexpectedly? Verify the set point on the thermostat is at least 3-5 degrees different than the current room temperature to call for heating or cooling.
DIY Fix: Reset the thermostat to factory settings. Consult your thermostat's manual for instructions. Sometimes a glitch in the programming can cause unexpected behavior.
Step 2: Airflow Obstruction
A restricted airflow is a major performance killer. Heat pumps rely on moving a significant volume of air across the coils to transfer heat effectively.
Diagnosis:
- Check the air filter. This is the most common cause of restricted airflow. A dirty filter drastically reduces the amount of air the system can move.
- Inspect supply and return vents. Are any of them blocked by furniture, rugs, or curtains? Make sure nothing is obstructing the airflow.
- Look for obstructions in the outdoor unit. Debris like leaves, snow, or ice can accumulate around the outdoor unit, hindering its ability to exchange heat with the outside air.
DIY Fix:
- Replace the air filter. Aim to do this every 1-3 months, depending on the filter type and the level of dust and debris in your home.
- Clear any obstructions from vents and the outdoor unit. Trim back overgrown vegetation near the outdoor unit.
Step 3: Refrigerant Leaks (Requires Professional Assistance!)
If the system is still underperforming after addressing airflow, a refrigerant leak might be the issue. Refrigerant is the lifeblood of your heat pump; without enough, it can't effectively transfer heat.
Diagnosis: While you can't definitively diagnose a refrigerant leak yourself, here are some telltale signs:
- Ice buildup on the refrigerant lines or the outdoor unit. This indicates the system isn't absorbing heat efficiently, often due to low refrigerant.
- The system runs constantly without achieving the desired temperature.
- Hissing or bubbling sounds coming from the refrigerant lines.
DO NOT attempt to handle refrigerant yourself. It's a regulated substance, and improper handling can be dangerous and illegal.
Professional Intervention Required: If you suspect a refrigerant leak, immediately contact a licensed HVAC technician. They have the tools and expertise to safely locate and repair the leak, and then recharge the system with the proper amount of refrigerant.
Step 4: Ductwork Issues (Potential Professional Intervention)
Leaky or poorly insulated ductwork can significantly reduce the efficiency of your heat pump. Conditioned air escapes before it reaches its intended destination, wasting energy and reducing comfort.
Diagnosis:
- Visually inspect accessible ductwork. Look for obvious tears, gaps, or disconnections.
- Feel for drafts around duct joints. Run your hand along the seams of the ductwork while the system is running.
- Check for improperly insulated ductwork in unconditioned spaces (attic, crawl space).
DIY Fix (Minor Issues):
- Seal small leaks with duct tape. While not a permanent solution, duct tape can provide a temporary fix for minor leaks. However, remember that "duct tape" isn't really for ducts. Consider using foil tape or mastic sealant for a more permanent solution.
- Ensure insulation is properly secured around ductwork.
Professional Intervention (Major Issues): If you find extensive damage, disconnected ductwork, or improperly sized ductwork, consult a qualified HVAC contractor. They can assess the situation and recommend the best course of action, which might include duct repair, replacement, or resizing.
Step 5: Improper System Sizing (Requires Professional Assessment)
Sometimes, the problem isn't the installation itself, but rather that the heat pump is simply the wrong size for your home. An undersized system won't be able to adequately heat or cool the space, while an oversized system can lead to short cycling (frequent on/off cycles), which is inefficient and can shorten the lifespan of the equipment.
Diagnosis: This is difficult to determine definitively without professional expertise. However, if your system runs almost constantly without reaching the desired temperature, or if it cycles on and off very frequently, improper sizing might be a factor.
Professional Intervention Required: Contact an HVAC professional for a load calculation. They will assess factors like the size of your home, insulation levels, window efficiency, and climate to determine the appropriate size heat pump for your needs. If the system is indeed improperly sized, replacement may be necessary.
Problem: Strange Noises
Unusual noises can be a sign of a mechanical problem. Here are a few common noises and what they might indicate:
Step 1: Rattling or Vibrating
Diagnosis:
- Loose panels or components. Check the outdoor unit and the indoor unit (air handler) for any loose screws, panels, or covers.
- Debris inside the outdoor unit. Leaves, twigs, or other debris can get caught in the fan blades, causing a rattling noise.
DIY Fix:
- Tighten any loose screws or panels. Be careful not to overtighten.
- Remove any debris from the outdoor unit. Turn off the power to the unit before attempting this.
Step 2: Hissing or Bubbling (Refrigerant Leak - See Above)
As mentioned earlier, a hissing or bubbling sound often indicates a refrigerant leak. Contact a professional immediately.
Step 3: Grinding or Squealing
Diagnosis: These noises often indicate a problem with a motor or fan. The blower motor in the indoor unit or the fan motor in the outdoor unit might be failing.
Professional Intervention Required: Turn off the system and contact an HVAC technician. Continuing to run the system with a failing motor can cause further damage and potentially lead to a complete system failure.
Step 4: Clicking
Diagnosis: A clicking sound, especially at the start or end of a cycle, could indicate a problem with the reversing valve. The reversing valve is responsible for switching the system between heating and cooling modes.
Professional Intervention Required: Contact an HVAC technician to diagnose and repair or replace the reversing valve.
Problem: System Not Turning On
If your heat pump isn't turning on at all, here are some things to check before calling for professional help.
Step 1: Check the Power Supply
Diagnosis:
- Check the circuit breaker. Make sure the breaker for the heat pump hasn't tripped.
- Verify the power switch on the outdoor unit is turned on. Some units have a separate power switch located on the side.
DIY Fix:
- Reset the circuit breaker. If it trips again immediately, there may be a more serious electrical problem.
- Ensure the power switch on the outdoor unit is in the "On" position.
Step 2: Thermostat Issues
Diagnosis:
- Check the thermostat batteries (if applicable).
- Ensure the thermostat is properly programmed.
DIY Fix:
- Replace the thermostat batteries.
- Reset the thermostat to factory settings and reprogram it.
Step 3: Condensate Drain Blockage (Potential Professional Intervention)
A clogged condensate drain can trigger a safety switch that prevents the system from turning on. This is especially common in humid environments.
Diagnosis:
- Look for water pooling around the indoor unit.
- Locate the condensate drain line (usually a PVC pipe) and check for clogs.
DIY Fix (Minor Issues):
- Use a wet/dry vacuum to suck out any clogs from the condensate drain line. You can also try using a stiff wire to break up any blockages.
Professional Intervention (Major Issues): If you can't clear the clog yourself, or if the condensate drain line is damaged, contact an HVAC technician.
When to Call a Professional: A Recap
While many simple issues can be addressed with DIY troubleshooting, there are times when professional intervention is essential. Here's a summary of when to call a qualified HVAC technician:
- Suspected Refrigerant Leaks: Any sign of low refrigerant (ice buildup, hissing sounds) requires immediate professional attention.
- Electrical Issues: If the circuit breaker trips repeatedly, or if you suspect any electrical problems with the system, DO NOT attempt to fix it yourself. Electrical work is dangerous and should only be performed by a qualified electrician or HVAC technician.
- Motor or Fan Problems: Grinding, squealing, or other unusual noises coming from the motors or fans warrant professional diagnosis and repair.
- Reversing Valve Problems: Clicking sounds at the start or end of a cycle often indicate a problem with the reversing valve.
- Complex Ductwork Issues: Extensive damage, disconnected ductwork, or improperly sized ductwork require professional assessment and repair.
- Improper System Sizing: If you suspect the system is the wrong size for your home, consult an HVAC professional for a load calculation.
- Condensate Drain Blockage: If you are unable to clear the blockage in the condensate drain line.
By following these troubleshooting steps and knowing when to seek professional help, you can ensure your new air-to-air heat pump provides years of efficient and reliable service.