Amount Of Pressure In Column Of Water In A Well
Low water pressure from your well can be incredibly frustrating. Imagine taking a shower with a trickle of water or struggling to fill your washing machine. Before you call a professional, let's explore some common causes and simple troubleshooting steps you can take to diagnose and possibly fix the problem yourself. We'll focus on issues directly related to the amount of pressure in your column of water within your well system.
Understanding the Basics
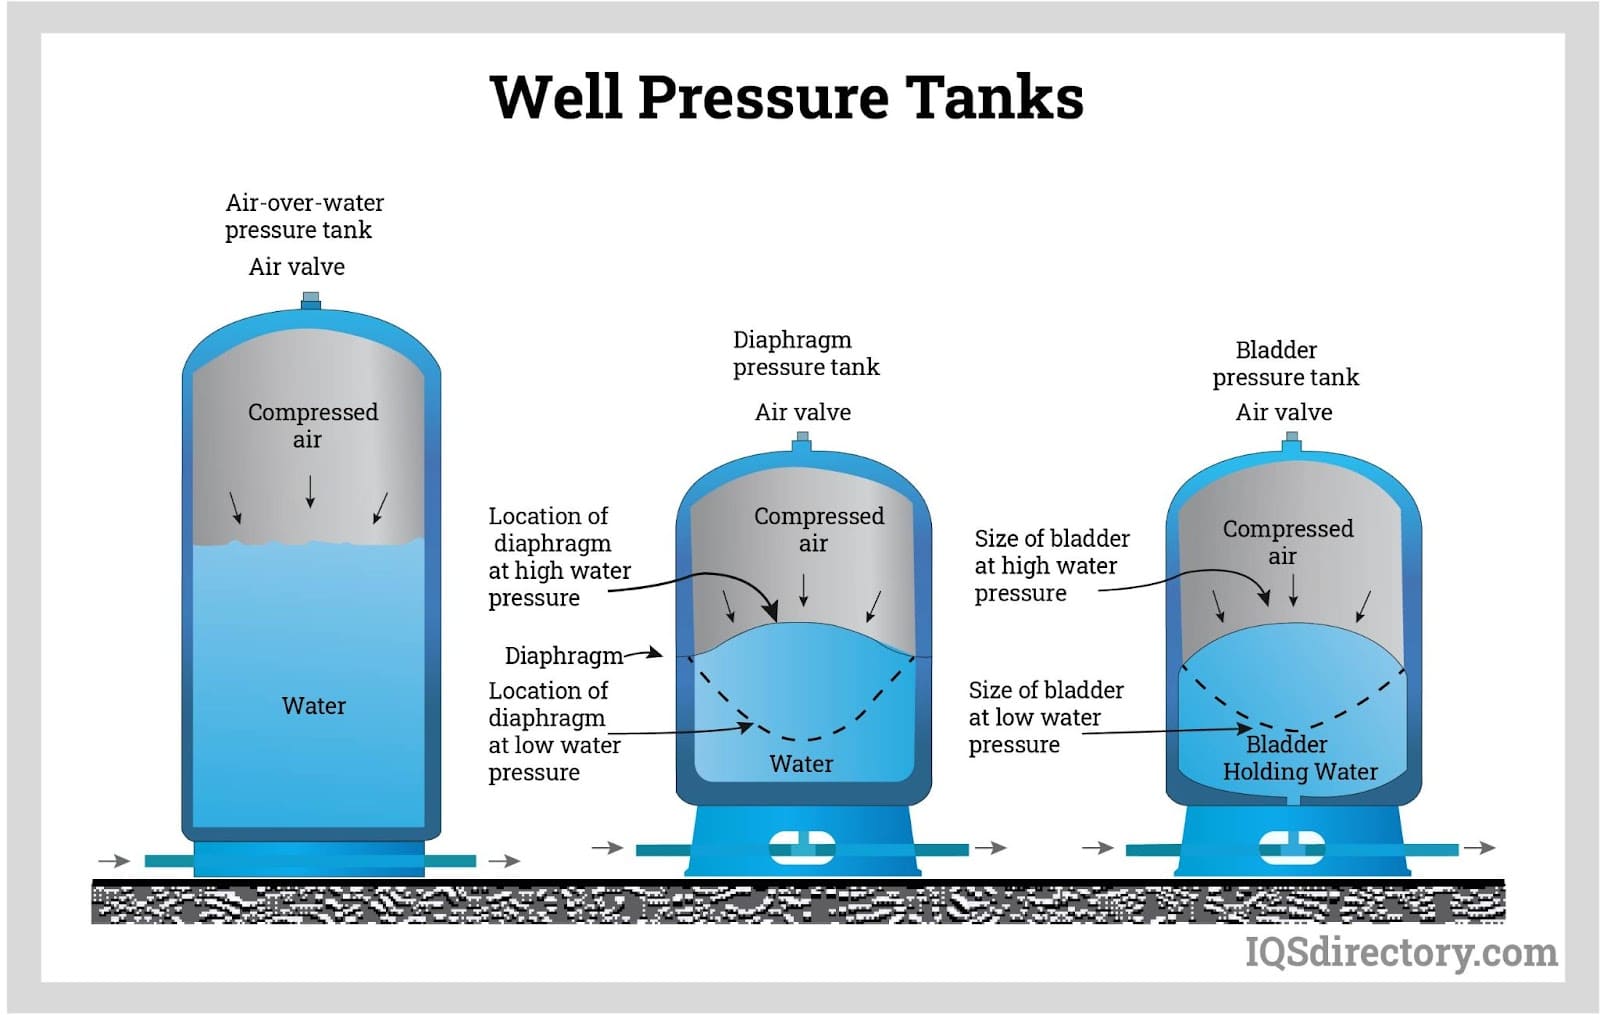
First, it's important to understand that the pressure you experience at your faucets is largely determined by two components: the well pump and the pressure tank. The pump pulls water from the well and delivers it to the pressure tank, which stores water under pressure, ready for use in your home. When you open a faucet, the pressurized water in the tank is released. When the pressure in the tank drops below a certain level (the cut-in pressure), the pump kicks on to refill the tank.
Problems with either of these components, or the piping connecting them, can lead to low water pressure.
Step 1: Check Your Pressure Tank
The pressure tank is a crucial element of your well system. A malfunctioning tank can drastically reduce water pressure.
Checking the Air Charge
Most pressure tanks use a compressed air bladder to maintain pressure. If the air charge is incorrect, your system won't function properly. This is often the first and easiest thing to check.
- Turn off the pump. Locate the breaker switch for your well pump in your electrical panel and switch it off. This is a critical safety step.
- Drain the water. Open a faucet outside (if possible) or a hose bib that is lower than the pressure tank. Let the water run until it stops completely. This ensures there's no water pressure interfering with your air charge reading.
- Locate the Schrader valve. This valve looks just like the valve on a car tire. It's usually located on the top of the tank, often under a plastic cap.
- Check the air pressure. Use a tire pressure gauge to check the air pressure in the tank.
- Compare to the cut-in pressure. The air pressure in the tank should be 2 PSI lower than the cut-in pressure of your well pump. The cut-in pressure is the pressure at which your pump turns on to refill the tank. This information is typically found on the pump pressure switch (a small gray box connected to the pipe near the pressure tank) or in your well system documentation. For example, if your pump's cut-in pressure is 30 PSI, the air pressure in the tank should be 28 PSI.
- Adjust the air pressure.
- If the pressure is too low: Use a bicycle pump or air compressor to add air to the tank through the Schrader valve. Check the pressure frequently as you add air.
- If the pressure is too high: Depress the pin in the center of the Schrader valve to release air. Again, check the pressure frequently as you release air.
- Turn the pump back on. Once the air pressure is correct, close the drain valve, turn the pump breaker back on, and allow the tank to refill. Monitor the water pressure at your faucets.
Important Note: If water comes out of the Schrader valve when you check the air pressure, it indicates a ruptured bladder inside the tank. This means the tank is faulty and needs to be replaced. This is generally a job best left to a professional.
Step 2: Check the Pressure Switch
The pressure switch controls the on/off operation of your well pump based on the water pressure in the system. A faulty switch can cause low pressure or prevent the pump from turning on altogether.
Inspecting the Switch
- Turn off the pump. Again, locate the breaker switch for your well pump and turn it off.
- Locate the pressure switch. As mentioned earlier, this is typically a small gray box connected to the pipe near the pressure tank.
- Remove the cover. Carefully remove the cover of the pressure switch. You may need a screwdriver.
- Inspect the contacts. Look for signs of corrosion, dirt, or damage on the electrical contacts inside the switch.
- Clean the contacts. If you see any corrosion or dirt, use a small brush (like a toothbrush) to gently clean the contacts. Important: Ensure the power is OFF before attempting to clean anything electrical. You can also use electrical contact cleaner, but follow the product instructions carefully.
- Check for clogs. The pressure switch is connected to the water pipe by a small tube or opening. This opening can become clogged with sediment or debris, preventing the switch from accurately sensing the water pressure. Use a small wire or needle to carefully clean out any clogs in this opening.
- Adjust the pressure settings (proceed with caution). The pressure switch has adjustment screws or nuts that allow you to set the cut-in and cut-out pressure. However, adjusting these settings incorrectly can damage your pump or cause other problems. Only attempt to adjust these settings if you are comfortable and understand the potential consequences. Consult your well system documentation or a professional before making any adjustments. Usually, there will be instructions inside the cover on how to adjust this.
- Replace the cover and turn on the pump. After inspecting and cleaning the switch (and potentially making minor adjustments), replace the cover and turn the pump breaker back on. Monitor the water pressure.
If the pressure switch is severely corroded, damaged, or unresponsive, it's best to replace it. This is a relatively inexpensive part and a straightforward repair, but if you're uncomfortable working with electrical components, call a professional.
Step 3: Check for Leaks
Leaks in your well system can significantly reduce water pressure. Even small leaks can make a difference over time.
Inspect Above-Ground Plumbing
- Visually inspect all visible pipes and connections. Look for signs of water leaks, such as drips, wet spots, or corrosion. Pay close attention to joints, fittings, and valves.
- Check the pressure tank. Examine the tank for any signs of leaks or rust.
- Check the pump housing. Inspect the pump housing for any cracks or leaks.
Address Found Leaks
Minor leaks at pipe connections can often be fixed by tightening the fittings or replacing the Teflon tape. More significant leaks may require replacing sections of pipe or fittings. For leaks on the pressure tank or pump housing, professional repair or replacement is usually necessary.
Step 4: Examine Well Casing and Components
Problems within the well itself are more complex and often require specialized equipment to diagnose and repair.
Well Casing Inspection
The well casing is the pipe that lines the well bore, preventing the collapse of the surrounding soil and keeping contaminants out of the water supply. Cracks, corrosion, or other damage to the casing can reduce the well's capacity or allow contaminants to enter the water.
Submersible Pump Inspection
A submersible pump that is located inside the well is most common today. While inaccessible for visual inspection without special equipment, a submersible pump may be experiencing wear that reduces its pumping efficiency or capacity.
Consider these symptoms
- Water is dirty or turbid.
- Water pressure surges or pulsates.
- Pump runs excessively or continuously.
- There are noises from the well.
If you suspect a problem with the well casing or the submersible pump, call a qualified well technician. These issues require specialized equipment and expertise to diagnose and repair.
Step 5: Check Your Well Water Level (If Possible)
In some cases, a low water level in your well can cause low water pressure. This is especially true during periods of drought or high water usage. If you have access to the well and are comfortable doing so, you can check the water level.
- Turn off the pump. As always, start by turning off the pump breaker.
- Use a weighted line. Tie a weight to the end of a long, clean string or tape measure.
- Lower the line into the well. Carefully lower the weighted line into the well until it reaches the water.
- Mark the line. When the weight hits the water, mark the line at the top of the well casing.
- Measure the distance. Pull the line out of the well and measure the distance from the weight to the mark. This is the depth to the water level.
- Compare to the well's specifications. Your well documentation may include information about the well's static water level (the water level when the pump is not running) and pumping water level (the water level when the pump is running). Compare your measurement to these specifications.
If the water level is significantly lower than normal, it could indicate a problem with the well's recharge rate or a failing pump. In this case, it's best to consult with a well professional.
When to Call a Professional
While many low water pressure issues can be resolved with simple DIY troubleshooting, some problems require professional intervention. Here's when to call a qualified well technician:
- You suspect a problem with the well casing or submersible pump.
- You are uncomfortable working with electrical components.
- You have tried the troubleshooting steps above and the problem persists.
- You suspect contamination of your well water.
- You are unsure about any aspect of your well system.
- Water coming out of the Schrader valve of your pressure tank.
A qualified well technician can diagnose the problem accurately and recommend the appropriate solution. They have the specialized equipment and expertise to handle complex well repairs and ensure the safety and reliability of your water supply.
By following these steps and knowing when to call for help, you can effectively troubleshoot low water pressure from your well and maintain a reliable water supply for your home.