At What Temp Should You Turn The Heat On

One of the most common homeowner frustrations, as the seasons change, is inconsistent heating. You set your thermostat, expecting a cozy, warm house, but instead, you're left shivering. Maybe some rooms are warm, others freezing. Determining at what temperature you should turn on the heat is only half the battle; making sure your system actually delivers that heat consistently is the real challenge.
Troubleshooting Inconsistent Heating: A Step-by-Step Guide
Before you call in a costly HVAC technician, let's go through a methodical process to diagnose and potentially fix the problem yourself. We'll start with simple checks that require no tools and then move on to steps that might need basic equipment.
Step 1: The Obvious Checks (No Tools Required)
Begin with the easy stuff – often, the solution is staring you right in the face.
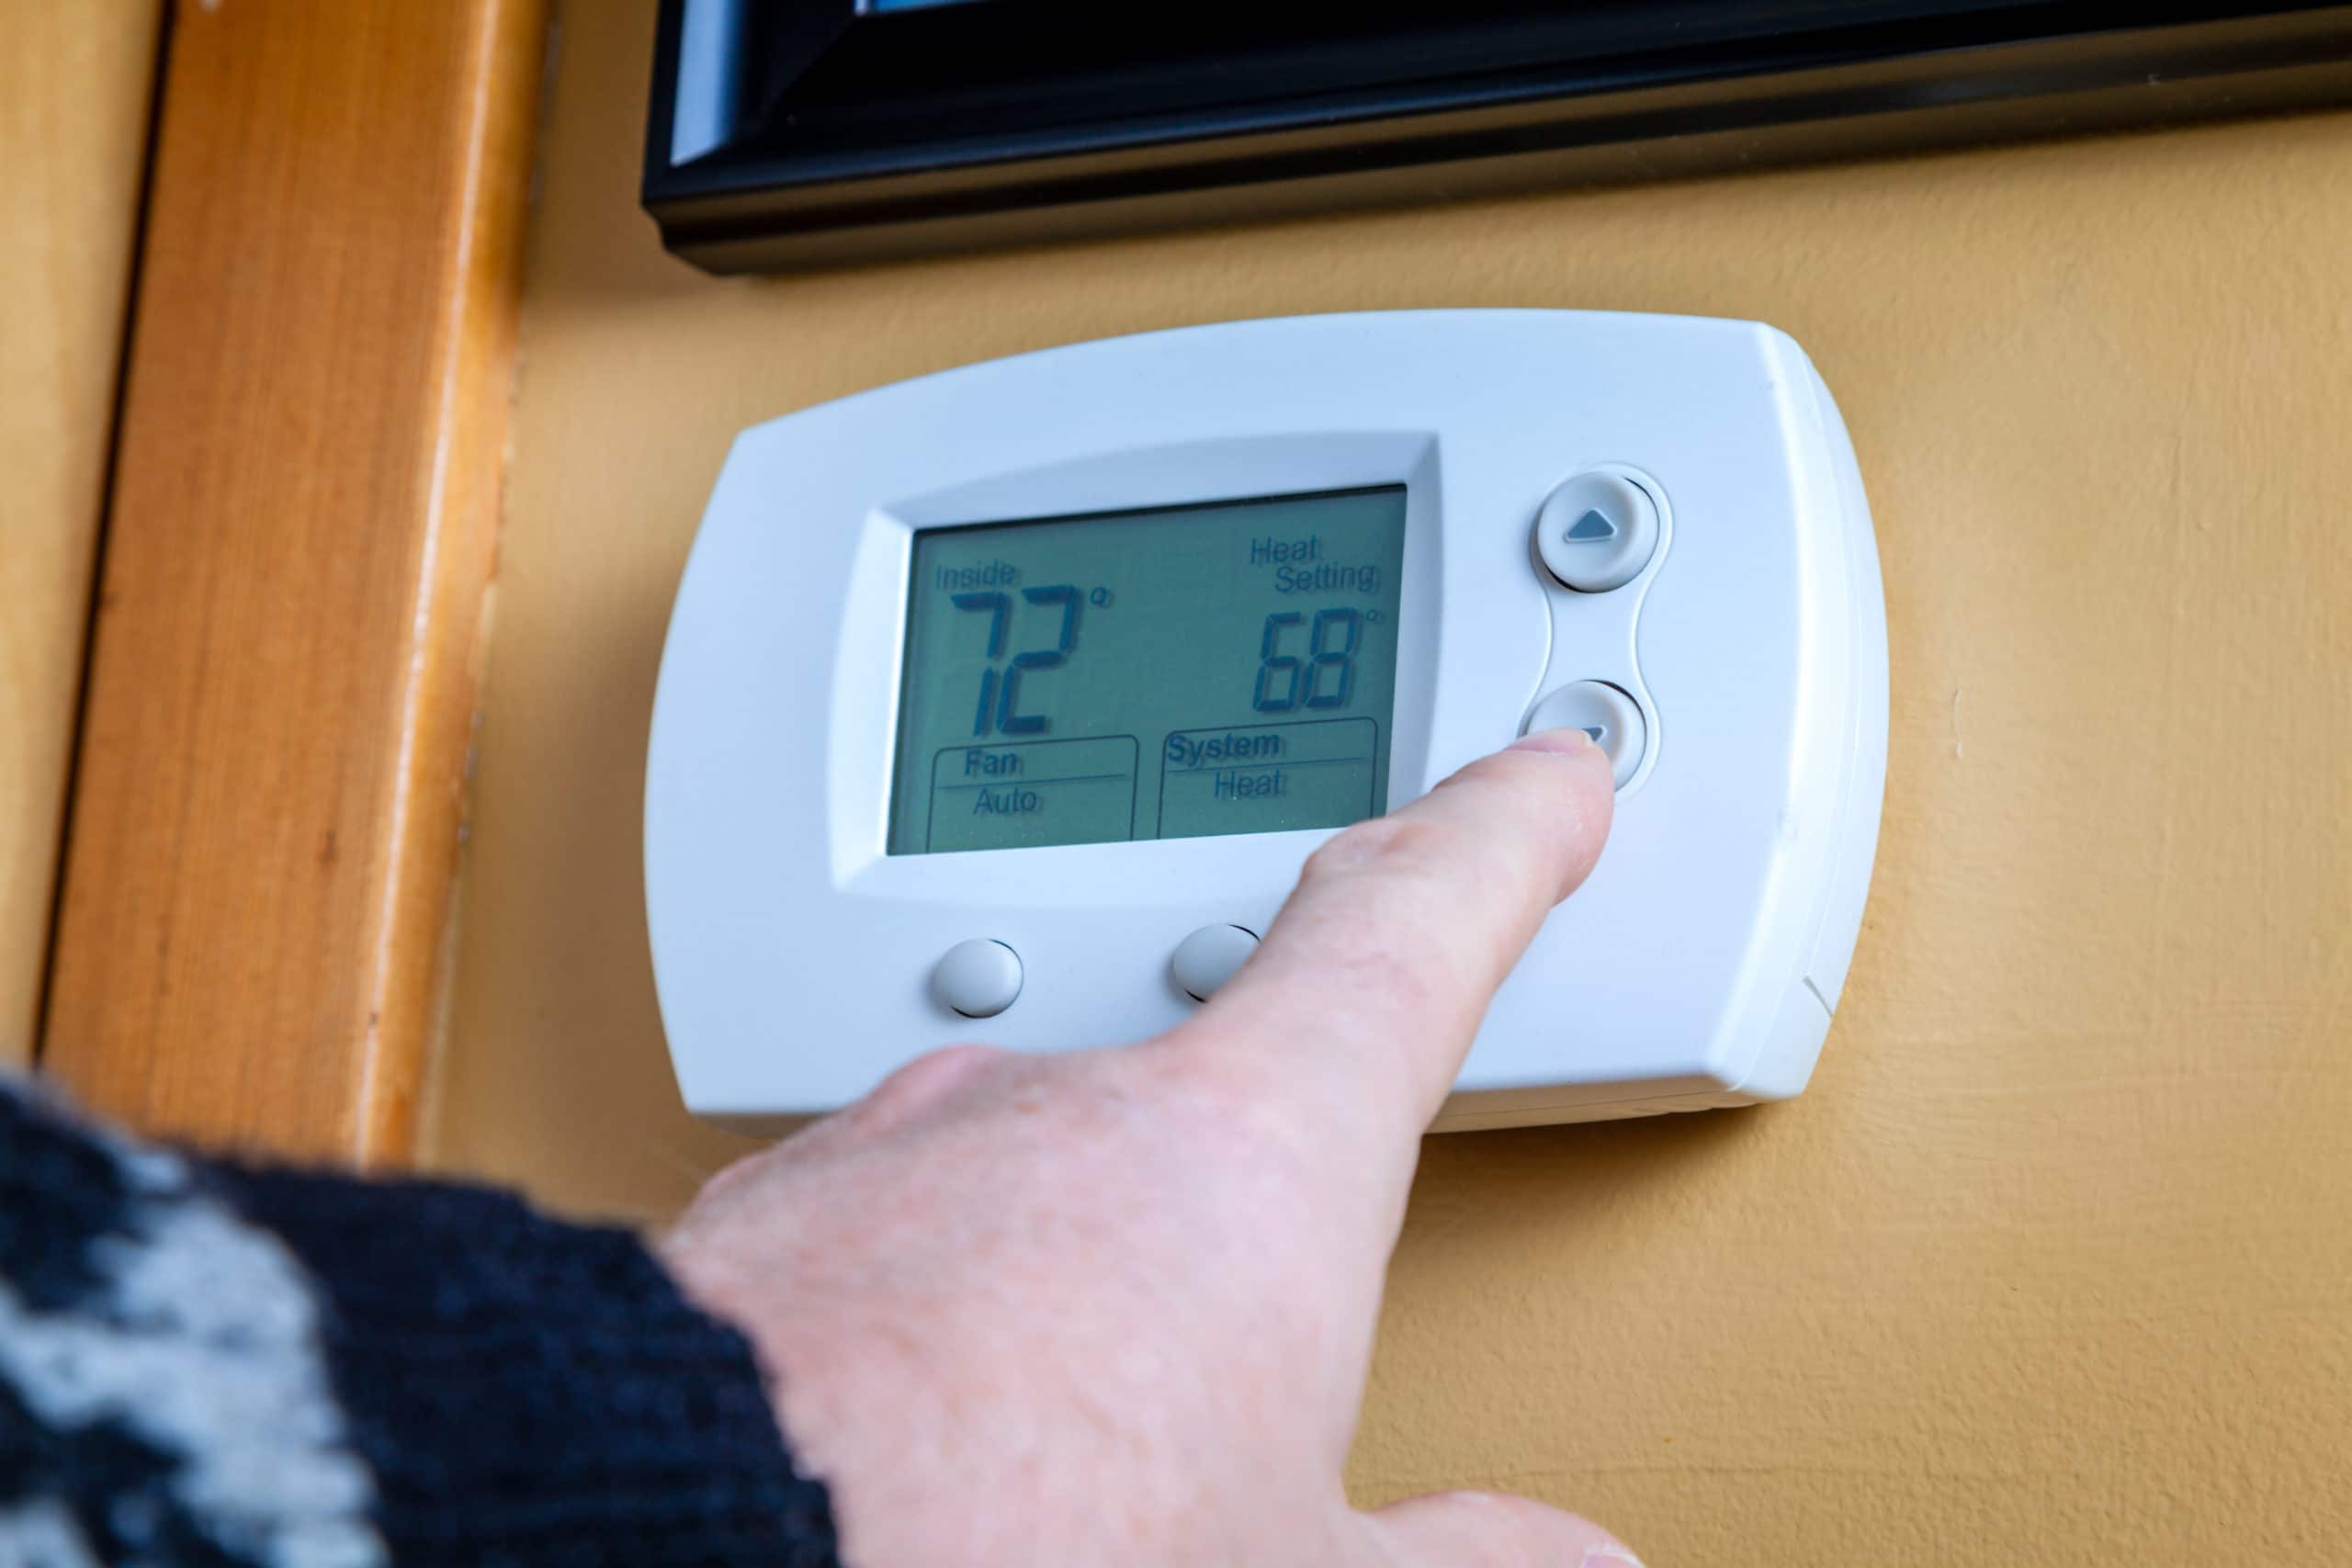
- Thermostat Setting: Double-check that your thermostat is set to HEAT and that the desired temperature is higher than the current room temperature. It sounds simple, but it's easily overlooked.
- Thermostat Batteries: Many digital thermostats rely on batteries. Low batteries can cause erratic behavior. Replace them, even if the display looks okay.
- Air Vents: Ensure all air vents are open and unobstructed. Furniture, rugs, or even curtains can block airflow.
- Return Air Grilles: Just like vents, return air grilles need to be free and clear. These grilles suck air back into the furnace, and if blocked, the system won't function efficiently. Check for dust buildup and vacuum if necessary.
- System Power: Make sure the furnace or heating system switch is on. It's usually located near the unit and can accidentally be switched off.
Important: If your heat still isn't working after these checks, proceed to the next step. If at any point you feel uncomfortable or unsure about proceeding, stop and call a professional.
Step 2: Checking the Furnace (Basic Visual Inspection - Power Off!)
For this step, you'll want to locate your furnace. This is usually in the basement, attic, or a utility closet. Before you do anything, turn off the power to the furnace at the circuit breaker. This is a critical safety step.
- Pilot Light (Gas Furnaces): If you have an older gas furnace, it might have a pilot light. Check to see if it's lit. If it's out, follow the manufacturer's instructions (usually printed on a label near the pilot light) to relight it. If you smell gas, do not attempt to light the pilot light. Evacuate the area and call your gas company or a qualified HVAC technician immediately.
- Flame Sensor (Gas Furnaces): The flame sensor is a small metal rod located near the burner. If it's dirty, it can prevent the furnace from staying lit. Gently clean it with a fine steel wool or emery cloth.
- Blower Motor: Visually inspect the blower motor. Is it clean? Are there any obvious signs of damage, like burnt wires or debris? Do not touch the motor unless the power is off.
- Filter: A dirty air filter is one of the most common causes of heating problems. Replace it with a new one. This is a simple, inexpensive task that can make a huge difference. Check your filter every month and replace it as needed.
Tools Needed (Optional): A flashlight can be helpful for a better view.
Important: If you suspect any electrical issues or see signs of gas leaks, immediately turn off the gas and electricity to the furnace and call a professional.
Step 3: Examining the Heat Pump (If Applicable - Power Off!)
If you have a heat pump instead of a furnace, the troubleshooting process is slightly different. Again, turn off the power to the heat pump at the circuit breaker before you begin.
- Outdoor Unit: Check the outdoor unit for ice or snow buildup. If it's heavily iced over, it could be preventing the heat pump from working efficiently. Some icing is normal, but excessive ice indicates a problem. You can carefully try to melt the ice with a garden hose (on a day when temperatures are above freezing), but be extremely cautious not to damage the unit.
- Airflow Obstruction: Clear any leaves, branches, or debris from around the outdoor unit. Ensure proper airflow.
- Refrigerant Leaks: Visually inspect the refrigerant lines (copper pipes) for any signs of leaks, such as oily residue or hissing sounds. Do not touch refrigerant lines. If you suspect a leak, call a professional immediately.
Tools Needed (Optional): A garden hose (for melting ice).
Important: Heat pump issues often involve refrigerant, which is a hazardous substance. Never attempt to repair refrigerant leaks yourself. This requires specialized equipment and training.
Step 4: Checking Ductwork (Visual Inspection)
While you can't easily inspect the entire ductwork system, you can check the accessible portions for leaks or damage.
- Visible Leaks: Look for gaps or tears in the ductwork, especially at joints. Seal any small leaks with duct tape (not regular tape). For larger leaks, you may need to use foil tape or mastic sealant.
- Insulation: Ensure that ductwork in unheated areas (like attics or crawl spaces) is properly insulated. Damaged or missing insulation can lead to significant heat loss.
Tools Needed: Duct tape, foil tape, or mastic sealant.
Step 5: Using a Multimeter (Advanced - Use with Caution!)
This step requires a multimeter and some basic electrical knowledge. If you are not comfortable working with electricity, skip this step and call a professional. Always turn off the power to the furnace or heat pump before using a multimeter.
- Testing the Capacitor: Capacitors are used in both furnaces and heat pumps to start motors. A faulty capacitor can prevent the system from starting. Use a multimeter to test the capacitor's capacitance. If the reading is significantly lower than the rated capacitance (usually printed on the capacitor), the capacitor needs to be replaced. Discharge the capacitor before handling it.
- Testing the Thermostat: Use a multimeter to check the continuity of the thermostat wires. This can help determine if the thermostat is sending the correct signals to the furnace or heat pump.
Tools Needed: Multimeter.
Important: Working with electricity can be dangerous. Take precautions, and always double-check your work. If you are unsure about anything, call a professional.
When to Call a Professional HVAC Technician
While these DIY steps can address many common heating problems, there are situations where a professional is absolutely necessary. Here are some warning signs:
- Gas Leaks: If you smell gas, immediately evacuate the area and call your gas company or a qualified HVAC technician.
- Refrigerant Leaks: If you suspect a refrigerant leak, call a professional. Refrigerant is a hazardous substance that requires specialized handling.
- Electrical Issues: If you see sparks, smoke, or smell burning electrical components, call a professional.
- Complex Repairs: If you've tried the DIY steps and your heating system still isn't working, it's likely a more complex issue that requires professional diagnosis and repair.
- No Experience: If you are uncomfortable performing any of these tasks, especially those involving electricity or gas, it's always best to call a professional.
In general, when facing serious issues, avoid attempting to fix the problem yourself. An experienced technician can accurately diagnose the problem, repair the system safely, and ensure that it's operating efficiently.
Determining the Right Temperature to Turn On Your Heat
So, back to the original question: At what temperature should you turn on the heat? The answer is subjective and depends on your personal preferences and tolerance for cold. However, here are some general guidelines:
- Health Considerations: For infants, elderly individuals, and people with certain medical conditions, maintaining a warmer indoor temperature is important.
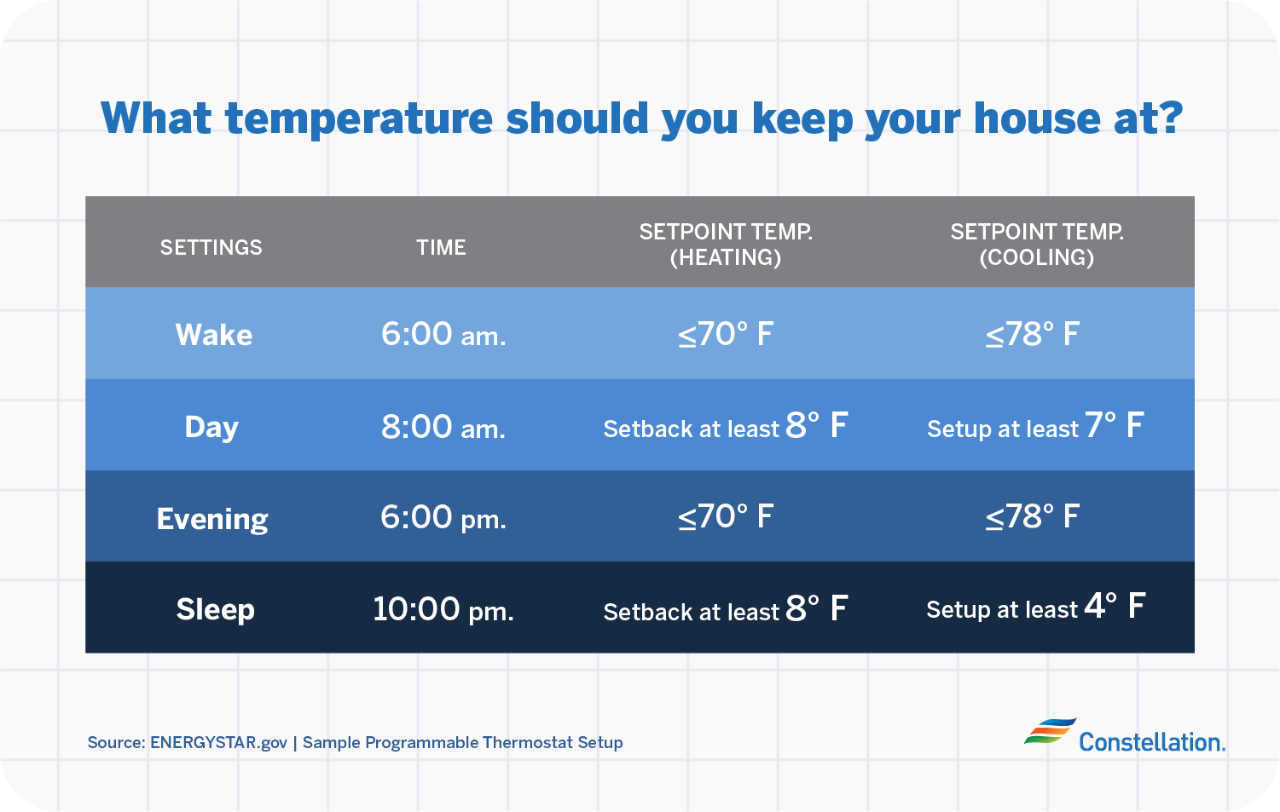
- Energy Efficiency: Lowering your thermostat by a few degrees can save you money on your heating bill. Consider using a programmable thermostat to automatically adjust the temperature when you're asleep or away from home.
- Comfort Level: Ultimately, the best temperature is the one that keeps you and your family comfortable. Experiment to find the setting that works best for you.
General Recommendation: Most people find that a temperature between 68°F and 72°F is comfortable during the day. At night, you can lower the temperature to 62°F to 65°F to save energy.
Preventative Maintenance for a Healthy Heating System
The best way to avoid heating problems is to perform regular preventative maintenance. Here are some key tasks:
- Change the Air Filter Regularly: This is the most important thing you can do to keep your heating system running smoothly. Check your filter every month and replace it as needed.
- Schedule Annual HVAC Tune-Ups: Have a qualified HVAC technician inspect and tune up your heating system once a year. This will help identify and address potential problems before they become major issues.
- Keep Vents and Registers Clean: Dust and debris can build up in vents and registers, reducing airflow. Clean them regularly with a vacuum cleaner.
- Clear Outdoor Unit: Ensure that the outdoor unit of your heat pump is free of debris.
By following these troubleshooting steps and practicing preventative maintenance, you can keep your heating system running efficiently and comfortably all winter long, and make sure that when you do turn on your heat, it performs as you expect.