Attic Bathroom Exhaust Fan Venting Options
Do you ever feel like your attic bathroom is perpetually damp, musty, or even contributing to temperature swings in your home? A poorly vented bathroom exhaust fan, especially in an attic bathroom, is a common culprit. Moisture buildup can lead to mold growth, peeling paint, and even structural damage over time. Furthermore, improperly vented warm, moist air can infiltrate your attic, affecting your home's overall energy efficiency, causing your HVAC system to work harder and increasing your energy bills. This article will guide you through troubleshooting common attic bathroom exhaust fan venting issues and offer practical solutions you can implement yourself.
Diagnosing the Problem: Is Your Venting the Culprit?
Before diving into the attic, let’s gather some initial clues. These observations, combined with a physical inspection, will pinpoint the problem. Follow these steps carefully:
Step 1: Observe the Bathroom Environment (No Tools Required)
Start by carefully observing the bathroom itself.
- Check for Excessive Moisture: After a shower or bath, does the mirror fog up excessively? Does the moisture linger for an unusually long time, even with the fan running?
- Look for Signs of Mold or Mildew: Examine the walls, ceiling, and grout lines for any discoloration or visible mold growth. Pay close attention to corners and areas near the shower or tub.
- Smell for Musty Odors: A persistent musty odor is a strong indicator of trapped moisture and potential mold.
- Inspect the Paint and Wallpaper: Look for peeling paint, bubbling, or discoloration on the walls and ceiling. These are telltale signs of moisture damage.
Step 2: Assess the Fan's Performance (No Tools Required)
Next, evaluate how the exhaust fan itself is performing.
- Listen to the Fan Motor: Does the fan motor sound weak, labored, or excessively noisy? A struggling motor may not be providing adequate airflow.
- Feel for Airflow: While the fan is running, hold a piece of toilet paper near the fan. The paper should be strongly drawn towards the fan. If the airflow feels weak or nonexistent, there’s a problem.
- Check for Backdrafting: On a windy day, hold the same piece of toilet paper near the fan while it’s *off*. Does the paper flutter *away* from the fan, indicating air is being pushed *back* into the bathroom? This indicates a venting issue allowing outside air to enter.
Step 3: Attic Inspection – The Visual Assessment (Basic Equipment Needed: Flashlight, Ladder)
Now, it’s time to head to the attic for a visual inspection. Safety first! Use a sturdy ladder and wear appropriate safety gear, including gloves and a dust mask. Never step on drywall; only walk on the joists.
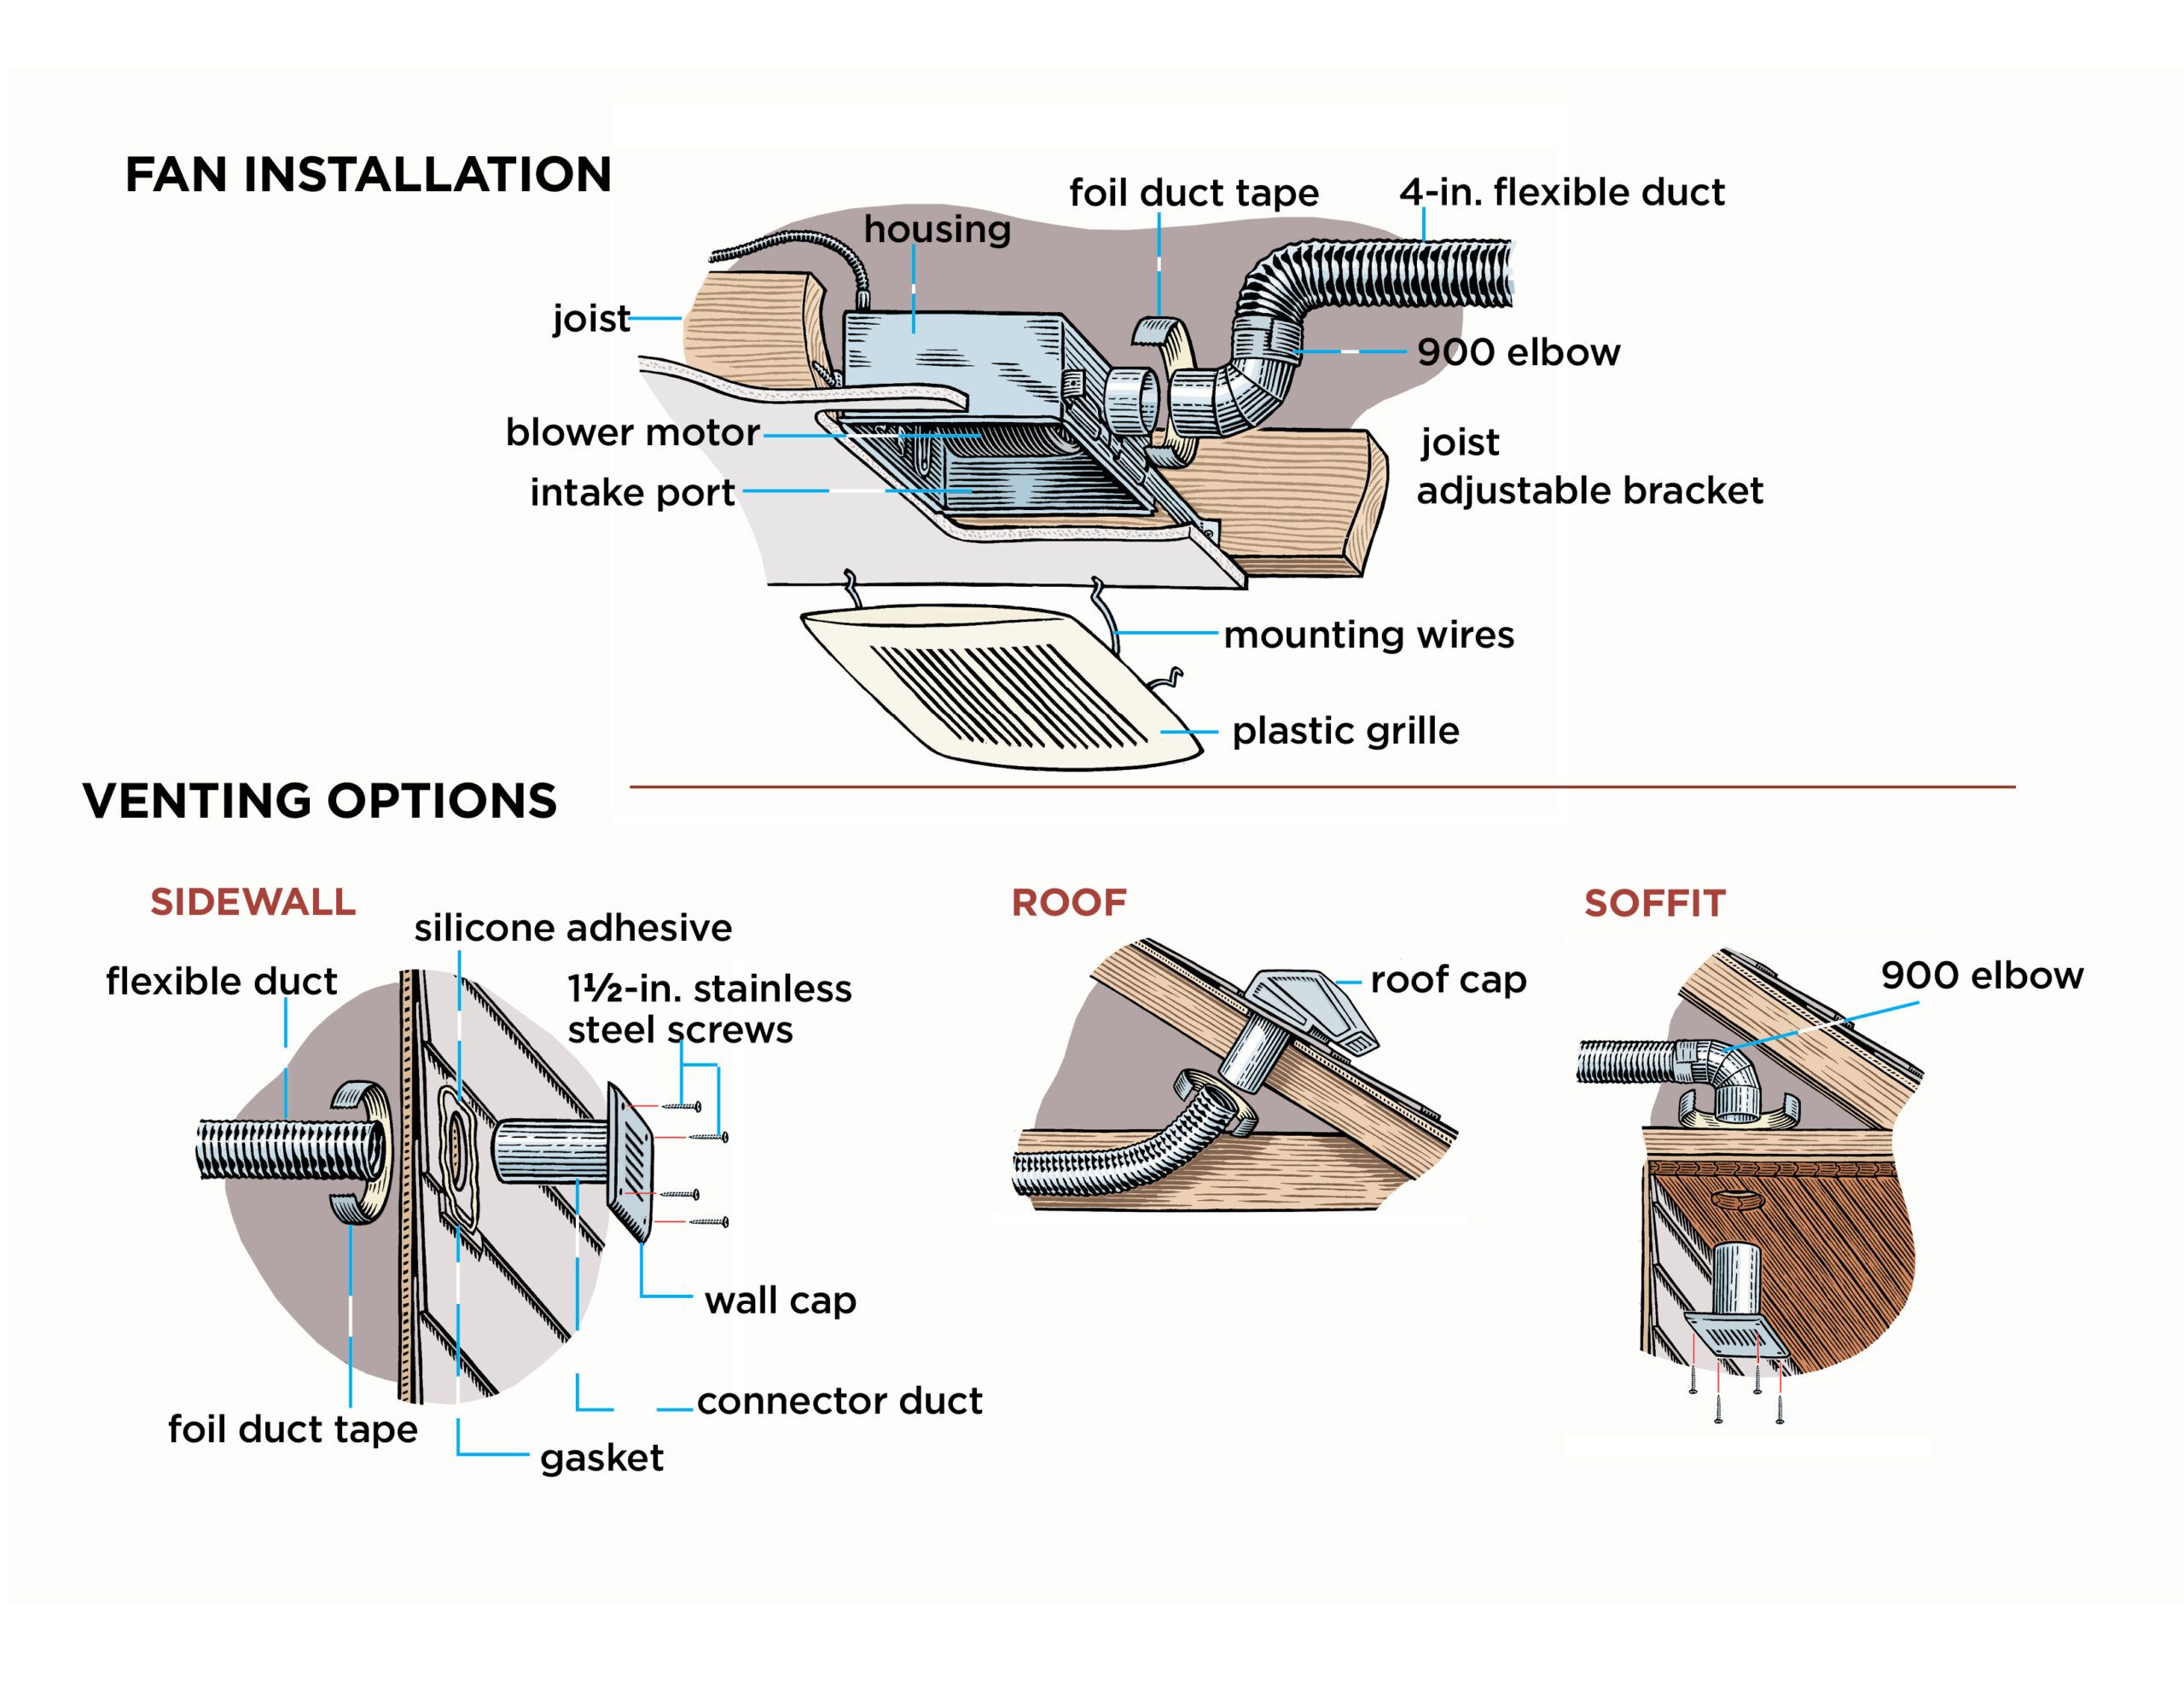
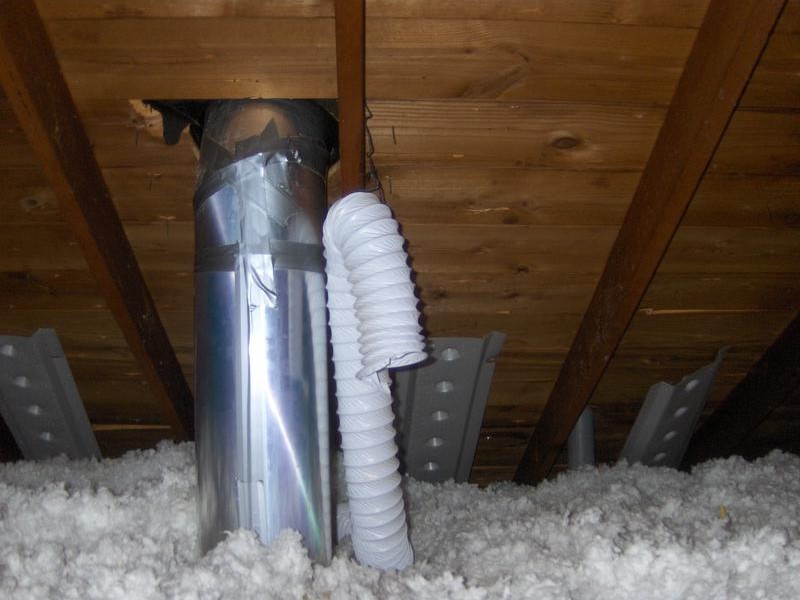
- Locate the Exhaust Fan Duct: Find the duct connected to your bathroom exhaust fan. It should run from the fan housing in the bathroom, through the attic, and exit to the outdoors.
- Inspect the Duct Material: What is the duct made of? Is it flexible or rigid? Flexible ducts are common but can sag, reducing airflow. Look for tears, punctures, or disconnections.
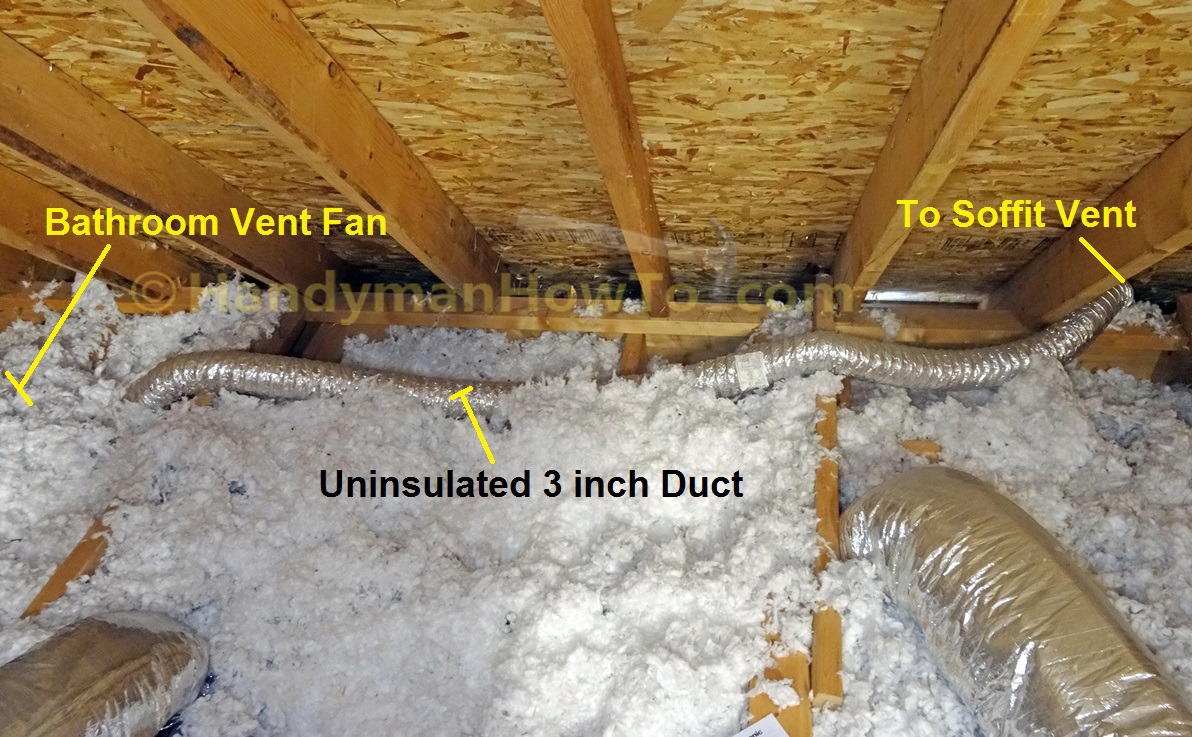
- Check for Proper Insulation: Is the duct insulated? An uninsulated duct in a cold attic can lead to condensation inside the duct, which can drip back into the bathroom or encourage mold growth.
- Examine the Duct Route: Is the duct run as straight as possible with minimal bends? Sharp bends restrict airflow. Is the duct sagging significantly between supports? Sagging also reduces airflow and can trap moisture.
- Identify the Vent Termination Point: Where does the duct terminate? Ideally, it should vent directly to the outside through a roof vent, a gable vent, or a soffit vent.
- Inspect the Vent Termination: Is the vent termination blocked by debris such as leaves, bird nests, or snow? Is the damper (a flap that prevents backdrafting) working correctly? It should open easily when the fan is on and close when the fan is off.
Common Attic Bathroom Exhaust Fan Venting Problems and DIY Solutions
Based on your diagnosis, here are some common problems and DIY solutions. Always turn off the power to the exhaust fan at the circuit breaker before performing any work on the fan or ductwork.
Problem 1: Disconnected or Damaged Ductwork
Symptoms: Weak airflow, moisture buildup in the attic near the fan, noticeable gaps in the ductwork.
DIY Solution:
- Reconnecting Disconnected Ducts: Use foil tape (not duct tape, which dries out and cracks over time) to securely reconnect the duct sections. Make sure the connection is airtight.
- Repairing Small Tears or Punctures: For small tears, use foil tape to patch the damaged area. Overlap the tape generously around the tear.
- Replacing Severely Damaged Ductwork: If the ductwork is severely damaged or deteriorated, consider replacing the entire section. Measure the diameter of the existing duct and purchase a replacement section of the same size. Always use insulated ductwork in the attic.
Problem 2: Sagging Ductwork
Symptoms: Reduced airflow, potential for moisture to accumulate in the sagging sections.
DIY Solution:
- Add Supports: Install straps or hangers to support the ductwork and prevent sagging. Space the supports every 4-6 feet. You can use metal duct straps or even heavy-duty zip ties for this purpose. Ensure the supports are securely attached to the attic framing.
Problem 3: Improper Duct Material (Uninsulated or Non-Recommended Type)
Symptoms: Condensation inside the duct, water stains on the ceiling, mold growth.
DIY Solution:
- Replace with Insulated Ductwork: Replace uninsulated ductwork with insulated ductwork. This will prevent condensation from forming inside the duct.
- Avoid Using "Dryer Vent" Ductwork: While it might seem convenient, using dryer vent ductwork (typically made of thin foil) is not recommended for bathroom exhaust fans. It's not as durable and can easily tear. Stick to dedicated insulated ductwork designed for ventilation systems.
Problem 4: Blocked Vent Termination
Symptoms: Weak airflow, backdrafting, visible debris blocking the vent.
DIY Solution:
- Clear Debris: Carefully remove any leaves, bird nests, snow, or other debris blocking the vent termination. Wear gloves and a dust mask.
- Check the Damper: Ensure the damper (the flap that prevents backdrafting) is working properly. It should open easily when the fan is on and close when the fan is off. If the damper is stuck, try lubricating it with a silicone-based lubricant. If it’s damaged, replace the vent termination.
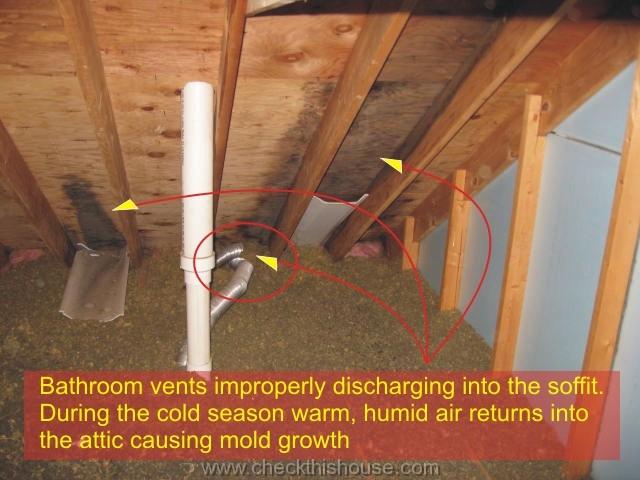
Problem 5: Improper Vent Termination Location
Symptoms: Moisture buildup in the attic, potential for water damage to the roof, ice dams in winter.
DIY Solution (Limited): This is often a complex issue that may require professional help. However, you can make some minor improvements.
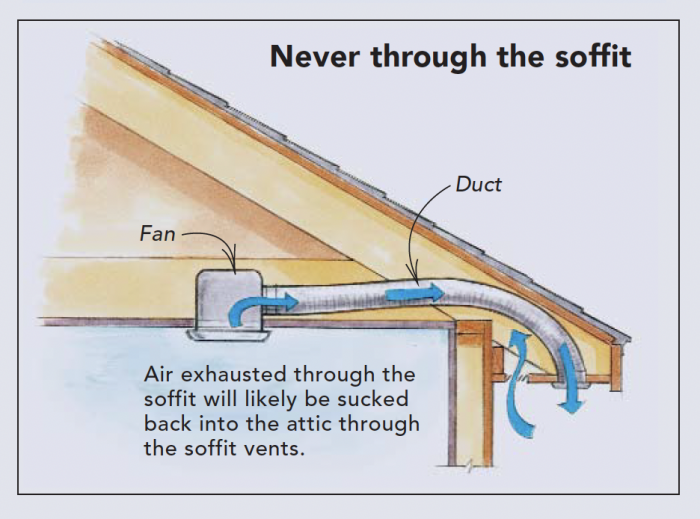
- Avoid Venting Directly into the Attic: Never vent the exhaust fan directly into the attic. This is a common mistake and leads to significant moisture problems. The duct *must* terminate to the outside. If you find it venting into the attic, address this immediately.
- Extending to an Existing Vent: If possible, and *if done correctly*, you *might* be able to extend the ductwork to an existing gable or soffit vent. However, ensure the existing vent is adequately sized to handle the additional airflow and that the connection is airtight and properly insulated. Improperly done, this can exacerbate the problem.
- Roof Venting Considerations: Ideally, bathroom exhaust fans should be vented through a dedicated roof vent with a proper flashing to prevent leaks. However, installing a roof vent is a more complex project that often requires professional expertise.
When to Call a Professional: Knowing Your Limits
While many venting issues can be resolved with DIY solutions, some problems require the expertise of a qualified HVAC professional. Do not hesitate to call a professional if you encounter any of the following situations:
- Electrical Issues: If you suspect any electrical problems with the exhaust fan wiring, do not attempt to fix it yourself. Electrical work can be dangerous and should only be performed by a licensed electrician.
- Roof Vent Installation: Installing a new roof vent requires specialized skills and tools. Improper installation can lead to roof leaks and significant water damage.
- Complex Ductwork Rerouting: If the ductwork needs to be significantly rerouted or if you are unsure about the proper duct sizing, consult with an HVAC professional.
- Mold Remediation: If you find significant mold growth in the attic or bathroom, consult with a mold remediation specialist.
- You're Uncomfortable or Uncertain: If at any point you feel uncomfortable or uncertain about performing a particular task, it’s always best to err on the side of caution and call a professional.
Here's a summary table for clarity:
| Issue | DIY Possible? | Requires Professional? |
|---|---|---|
| Disconnected duct | Yes (minor disconnections) | No |
| Sagging duct | Yes (adding supports) | No |
| Blocked vent | Yes (clearing debris) | No |
| Uninsulated duct | Yes (replacing with insulated) | Potentially (complex runs) |
| Venting *into* attic | Potentially (minor extension, *carefully*) | Yes (roof vent install, significant rerouting) |
| Electrical problems | No | Yes |
| Significant mold | No | Yes (mold remediation specialist) |
By carefully diagnosing the problem and following these practical steps, you can often improve the venting of your attic bathroom exhaust fan, prevent moisture buildup, and improve your home's energy efficiency. Remember to prioritize safety and don’t hesitate to seek professional help when needed. Good luck!