Average Cost For Mini Split Installation

One of the most common headaches homeowners face when considering mini-split systems is understanding the factors that influence the average cost for installation. It's easy to get sticker shock when first researching prices, and unexpected expenses can quickly derail a budget. This article aims to demystify the process, helping you understand what affects the installation cost and empowering you to troubleshoot potential issues that might inflate the price or cause problems after installation.
Understanding the Baseline: Initial Assessment
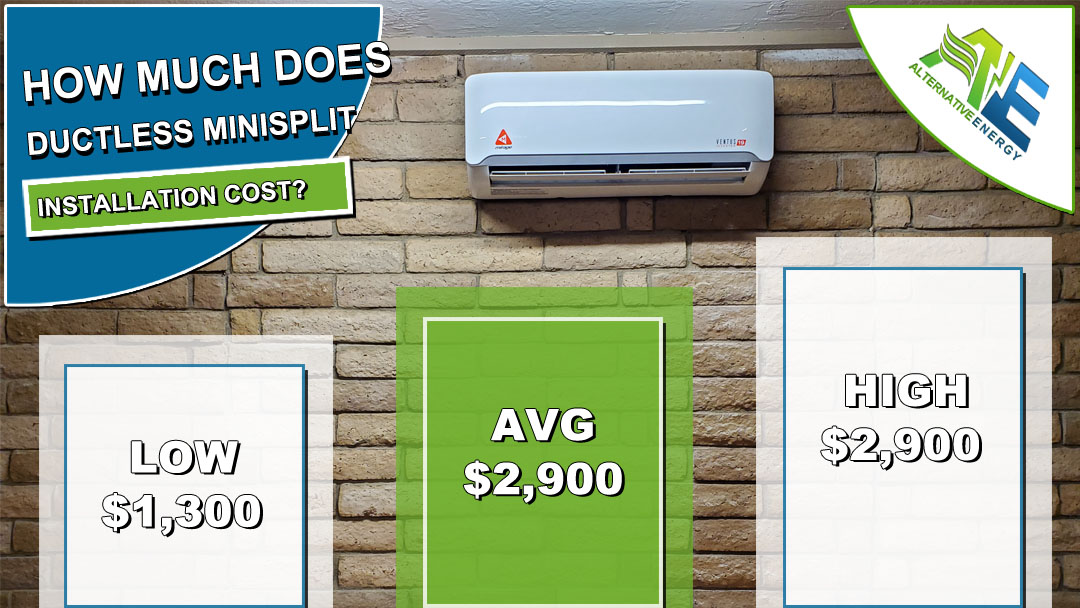
Before diving into the details, let's establish a general idea. On average, you can expect to pay anywhere from $3,000 to $8,000 to install a single-zone mini-split system. This range is broad because several factors come into play. A single-zone system is the simplest setup, typically consisting of one outdoor unit connected to one indoor air handler (head unit). Multi-zone systems, with multiple indoor units, will naturally cost more.
Factors Affecting Installation Cost: A Deeper Dive
Many factors significantly influence the final price tag. Understanding these will help you anticipate costs and potentially identify areas where you might be able to save money.
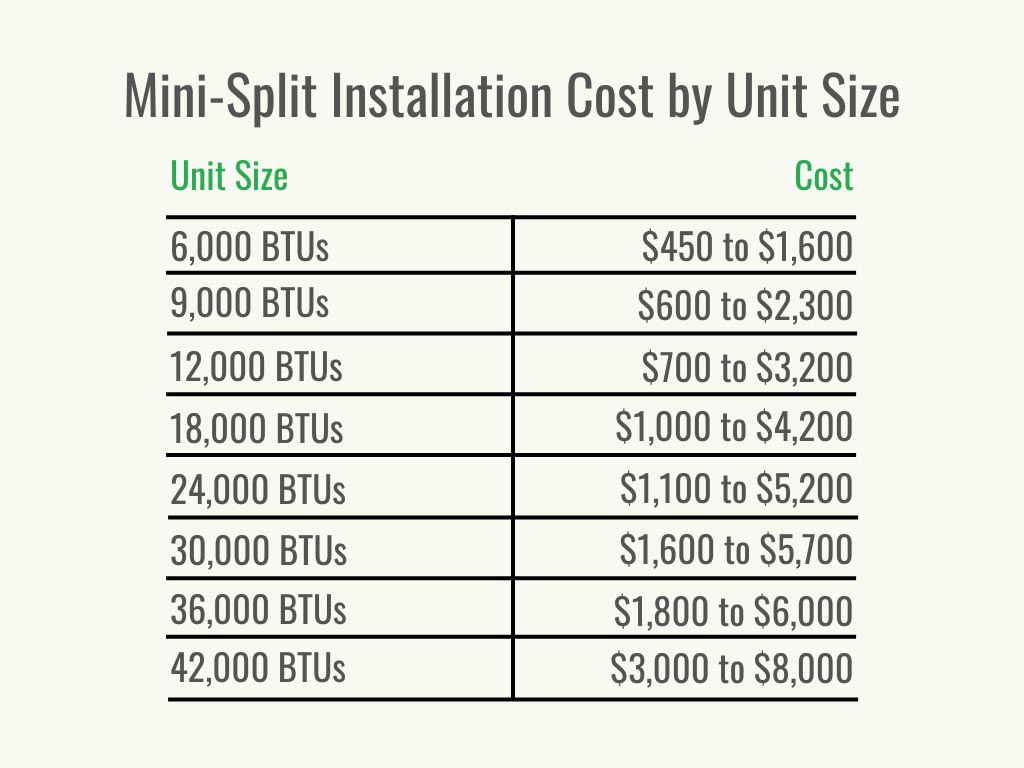
- System Size (BTU Rating): Larger spaces require more powerful units (measured in BTU - British Thermal Units). A higher BTU rating means a more expensive unit and potentially more complex installation.
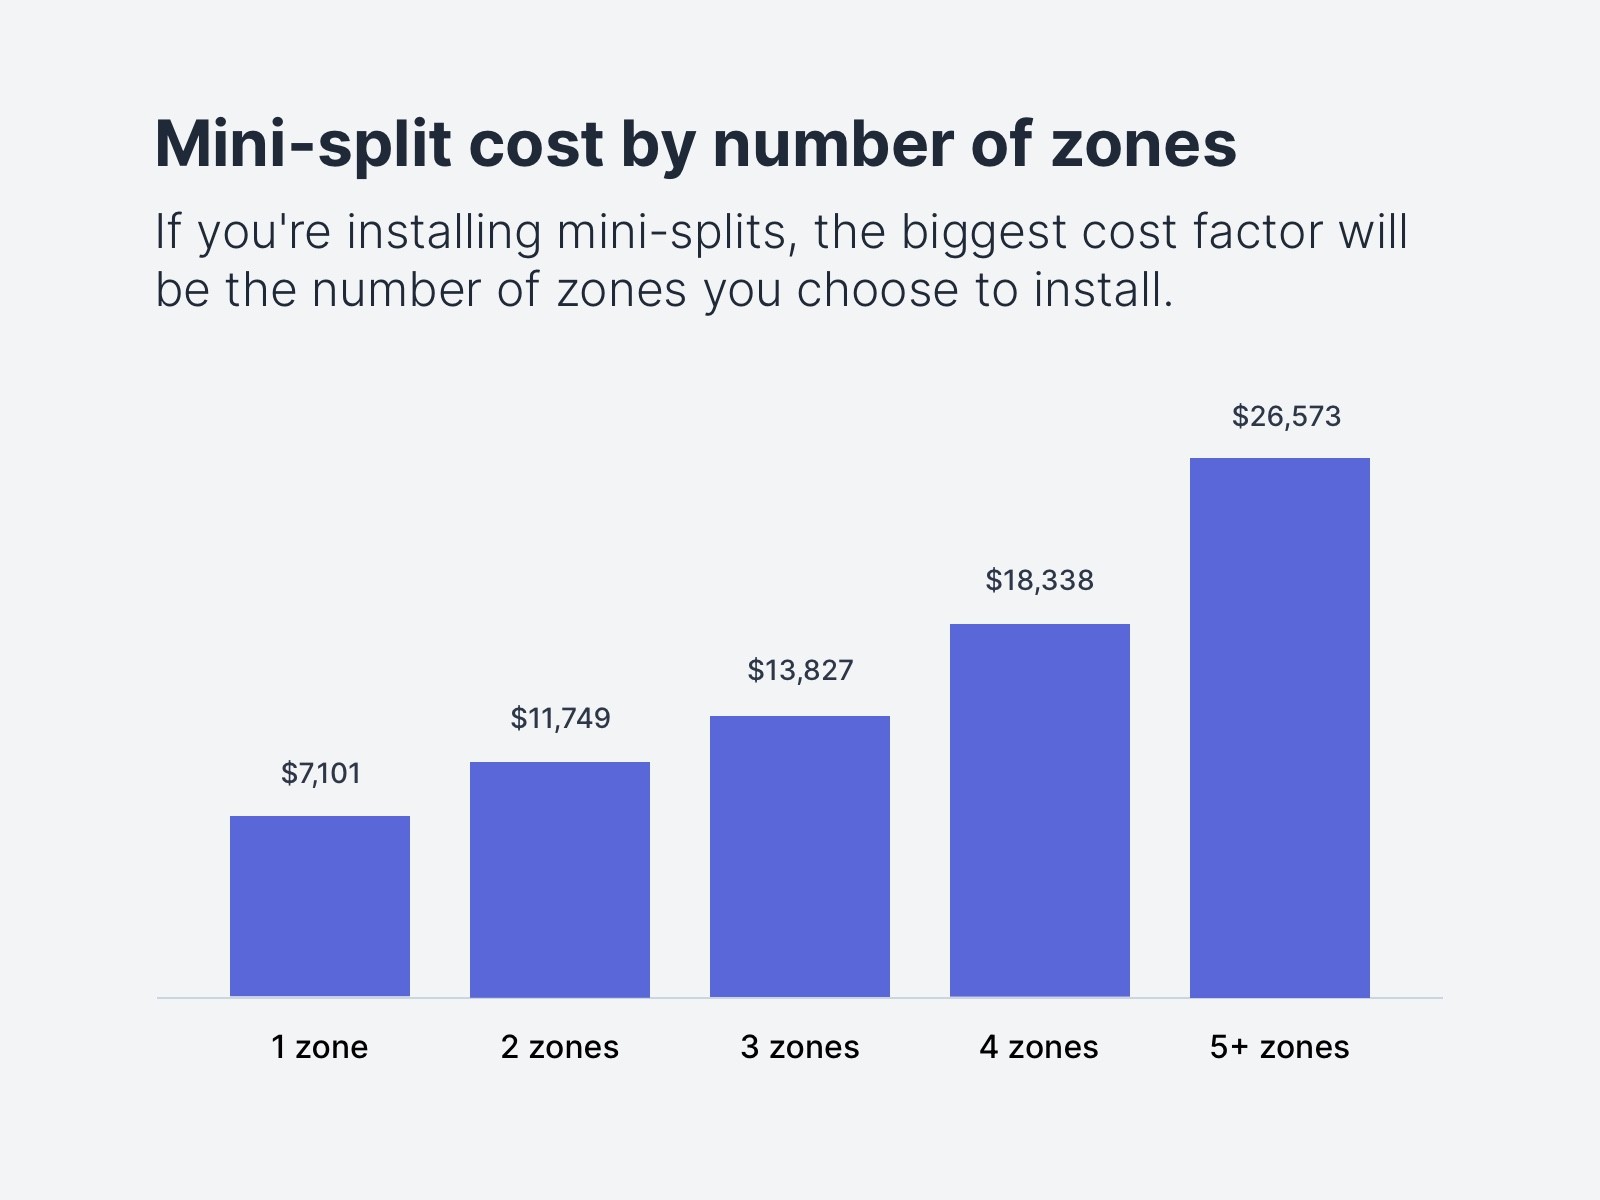
- Number of Zones: Each additional indoor unit increases the cost of the system itself and adds to the labor required for installation, including running refrigerant lines and electrical wiring.
- Distance Between Indoor and Outdoor Units: The further apart the units are, the more refrigerant lines and electrical wiring are needed. This also affects the labor cost, as it takes more time to run the lines.
- Complexity of Installation: Obstacles like thick walls, challenging access to the installation location, or the need for extensive electrical work can increase labor costs.
- Brand and Features: Some brands are known for higher quality and features, which come at a premium. Features like smart home integration, advanced filtration, and ultra-quiet operation can all add to the price.
- Location of the Installation: Labor costs vary significantly depending on your geographical location. Metropolitan areas generally have higher labor rates than rural areas.
- Permits and Inspections: Depending on your local regulations, you might need permits for the installation. Inspections are also typically required to ensure the system meets safety standards. These fees contribute to the overall cost.
- Electrical Work: Mini-splits require a dedicated electrical circuit. If your existing electrical panel doesn't have the capacity, you'll need to upgrade it, which can be a significant expense.
Troubleshooting Potential Cost Inflators: DIY Checks Before Calling a Pro
Before you even get a quote, and certainly before installation begins, there are some things you can check yourself to avoid unnecessary expenses and identify potential red flags.
1. Electrical Panel Capacity Check
The Problem: Your existing electrical panel might not have enough capacity to handle the additional load of the mini-split system. This is a common problem, especially in older homes.
Diagnosis:
- Locate Your Electrical Panel: It's usually in the basement, garage, or utility room.
- Check the Amperage Rating: Look for a number followed by "A" (e.g., 100A, 200A) on the main breaker switch. This is the total amperage your panel can handle.
- Calculate Existing Load: This is the tricky part. You need to estimate the amperage used by all your appliances and circuits. A simplified approach is to list all major appliances (refrigerator, oven, air conditioner, etc.) and their wattage. Convert wattage to amperage by dividing by 120 (for standard outlets) or 240 (for appliances like ovens and dryers). Add up all the amperage values.
- Check Mini-Split Amperage Requirements: The mini-split's specifications will list its amperage requirements (often on a label on the unit itself or in the product manual).
- Compare: Add the mini-split's amperage requirement to your estimated existing load. If the total exceeds your panel's amperage rating, you'll likely need an upgrade.
DIY Fix: Unfortunately, there's no DIY fix for insufficient panel capacity. This requires a licensed electrician. However, knowing you need an upgrade before getting a quote from a mini-split installer will allow you to budget accordingly and avoid surprises.
When to Call a Pro: If your calculations indicate your panel lacks the necessary amperage, contact a licensed electrician immediately for an evaluation and upgrade estimate. Don't attempt electrical work yourself unless you are a qualified electrician.
2. Obstruction and Accessibility Assessment
The Problem: Difficult access to the installation location (both indoor and outdoor units) or obstructions like trees, fences, or walls can significantly increase labor costs.
Diagnosis:
- Outdoor Unit Location: Is the desired location easily accessible for the installer? Are there trees, bushes, or fences blocking access? Is the ground level and stable?
- Indoor Unit Location: Is the chosen wall free of obstructions like pipes, wires, or insulation? Is there easy access for running refrigerant lines and electrical wiring to the outdoor unit? Are there any asbestos issues?
- Refrigerant Line Path: Visualize the path the refrigerant lines will take between the indoor and outdoor units. Are there any tight corners, long distances, or obstacles in the way?
DIY Fixes:
- Clear Obstructions: Trim bushes, remove fences (if possible and safe), and clear debris from the installation area.
- Ensure Clear Path: If possible, plan the refrigerant line path to avoid obstacles. Consider alternative locations for the indoor or outdoor unit if the original location is too challenging.
When to Call a Pro:
- If obstructions require significant demolition or structural changes.
- If you suspect the presence of asbestos in the walls.
- If you are unsure about the best way to route refrigerant lines to avoid damage to your home's structure.
3. Refrigerant Line Length Estimation
The Problem: Longer refrigerant lines mean more materials and labor, driving up the installation cost. It also impacts the system's efficiency, as the compressor has to work harder to pump refrigerant over longer distances.
Diagnosis:
- Measure the Distance: Use a measuring tape to estimate the distance between the proposed indoor and outdoor unit locations.
- Consider Vertical Rise: If the outdoor unit will be significantly lower than the indoor unit, add extra length to account for the vertical rise. A good rule of thumb is to add at least 5 feet for every 10 feet of vertical rise.
- Add Buffer: Always add a few extra feet for bends and connections.
DIY Fix:
- Optimize Unit Placement: Consider moving the units closer together if possible, without compromising system performance.
When to Call a Pro: While you can estimate the line length, the installer will ultimately determine the exact length needed. However, having an accurate estimate will help you compare quotes from different installers and ensure you're not being overcharged. If the installer's estimate seems significantly higher than yours, ask for a detailed explanation.
4. Understanding the Quote Breakdown
The Problem: Vague or incomplete quotes can lead to hidden costs and unpleasant surprises later on.
Diagnosis:
- Request Detailed Quotes: Insist on a written quote that itemizes all costs, including the system itself, labor, materials (refrigerant lines, electrical wiring, etc.), permits, and any other associated fees.
- Compare Multiple Quotes: Get at least three quotes from different installers. Don't just focus on the bottom line; compare the details of each quote.
- Ask Questions: Don't be afraid to ask the installer to explain anything you don't understand. Clarify any vague language or unclear line items.
DIY Fix: Thoroughly reviewing the quotes and asking questions before signing a contract is the best way to avoid hidden costs. Pay attention to:
- Warranty information.
- Brands and models offered.
- Payment schedules.
- Project timelines.
When to Call a Pro: If you're uncomfortable with any aspect of the quote or the installer's explanation, seek a second opinion from another installer or consult with a trusted friend or family member who has experience with home improvement projects. Always be wary of extremely low bids, as they may indicate substandard work or hidden costs.
5. Check for Existing Insulation
The Problem: Poor insulation can negate the efficiency of your new mini-split, causing it to work harder and increase your energy bills. Inadequate insulation can also lead to temperature fluctuations and discomfort.
Diagnosis:
- Inspect Walls and Ceilings: Check for obvious signs of inadequate insulation, such as drafts, cold walls, or ice dams on the roof in winter.
- Check Attics and Crawl Spaces: Inspect the insulation in your attic and crawl spaces. Is it evenly distributed? Is it the recommended thickness for your climate zone?
- Consider a Professional Energy Audit: A professional energy audit can identify areas where your home is losing energy and recommend specific improvements.
DIY Fixes:
- Seal Air Leaks: Caulk around windows and doors, and seal any gaps or cracks in walls and ceilings.
- Add Insulation (If Comfortable): If you're comfortable working in attics or crawl spaces, you can add insulation yourself. However, be sure to follow safety precautions and wear appropriate protective gear.
When to Call a Pro:
- If you suspect you have asbestos.
- If you need to insulate walls or ceilings that are difficult to access.
- If you want a professional assessment of your home's insulation needs.
Empowering Yourself: Avoiding Costly Mistakes
By taking the time to understand the factors that influence the average cost for mini-split installation and performing these simple DIY checks, you can empower yourself to make informed decisions, avoid costly mistakes, and ensure a smooth and successful installation process. Remember, knowledge is power! Doing your homework and asking the right questions will go a long way toward achieving your home comfort goals without breaking the bank.
Remember to always prioritize safety when working with electricity or potentially hazardous materials. When in doubt, call a qualified professional.