Average Cost Of Heat Pump Installation

One of the most common household headaches is a malfunctioning heating system. Picture this: it's a chilly evening, and your heat pump is blowing cold air, or worse, not turning on at all. Before you panic and call a professional, there are a few troubleshooting steps you can take to try and resolve the issue yourself. This guide will walk you through some basic checks and simple fixes, helping you save time and potentially money.
Troubleshooting Your Heat Pump: A Step-by-Step Guide
1. Initial Assessment: Is it Really Broken?
Before diving into complex diagnostics, it's crucial to determine the nature of the problem. Ask yourself these questions:
- Is the unit completely unresponsive, or is it making strange noises?
- Is it blowing cold air when it should be blowing warm air (or vice versa)?
- Have there been any recent power outages or storms in your area?
- Has the system been recently serviced, or have any changes been made to your thermostat settings?
Answering these questions can provide valuable clues about the source of the problem.
2. Power Supply Checks: The First Line of Defense
Often, the simplest solutions are the most overlooked. Let's start with the power supply:
- Check the Thermostat: Ensure the thermostat is set to "Heat" (or "Cool," depending on the season) and that the desired temperature is higher (or lower) than the current room temperature. It sounds obvious, but it's a common mistake. Also, check the batteries in your thermostat, especially if it's a digital model. Low batteries can cause erratic behavior.
- Inspect the Breaker: Locate the circuit breaker for your heat pump in your electrical panel. Make sure the breaker is in the "On" position. If it's tripped to the "Off" position, switch it completely to "Off" and then back to "On." This resets the breaker. If the breaker trips again immediately, do not keep resetting it. This indicates a more serious electrical issue that requires professional attention.
- Outdoor Disconnect Switch: Many heat pumps have an outdoor disconnect switch located near the unit. Make sure this switch is also in the "On" position.
- Power Cord Inspection: For portable heat pumps, check the power cord for any damage, such as cuts or fraying. Never use a damaged power cord, as it poses a serious electrical hazard.
Important Safety Note: Always turn off the power to the heat pump at the breaker before attempting any inspection or maintenance.
3. Filter Inspection and Cleaning: Maintaining Airflow
A dirty air filter is a common cause of heat pump problems. It restricts airflow, causing the system to work harder and less efficiently. This can lead to overheating, reduced heating/cooling capacity, and even damage to the unit.
- Locate the Filter: The filter is usually located in the indoor unit, often behind a removable panel. Check your heat pump's manual for the exact location.
- Inspect the Filter: Remove the filter and hold it up to the light. If you can't see light through it, it's definitely time to clean or replace it.
- Cleaning or Replacing:
- Disposable Filters: These filters should be replaced regularly, typically every 1-3 months, depending on usage and air quality.
- Washable Filters: These filters can be cleaned with a vacuum cleaner and then rinsed with water. Allow the filter to dry completely before reinstalling it.
Regular filter maintenance is crucial for the longevity and efficiency of your heat pump.
4. Outdoor Unit Inspection: Clearing Obstructions
The outdoor unit of your heat pump needs to be free of obstructions to function correctly. Debris can block airflow and reduce efficiency.
- Clear Debris: Remove any leaves, branches, snow, ice, or other debris that may be blocking the unit. Pay particular attention to the fins around the unit, as these are essential for heat transfer. Use a soft brush or garden hose to gently remove any accumulated dirt or debris. Avoid using high-pressure water, as this can damage the fins.
- Check for Ice Buildup: In cold weather, ice can build up on the outdoor unit. Most heat pumps have a defrost cycle that automatically melts the ice. However, if the ice buildup is excessive, it could indicate a problem with the defrost cycle. If you suspect a problem with the defrost cycle, contact a professional.
- Ensure Proper Airflow: Make sure there is adequate space around the outdoor unit for proper airflow. Overgrown shrubs or fences can restrict airflow and reduce efficiency.
Caution: Be careful when working around the outdoor unit, as the fins can be sharp.
5. Thermostat Settings and Programming: Understanding Your System
Incorrect thermostat settings can lead to unexpected heating or cooling issues. Review your thermostat settings carefully:
- Mode Selection: Ensure the thermostat is set to the correct mode (Heat or Cool).
- Temperature Settings: Verify that the desired temperature is appropriate for the current season.
- Fan Settings: Some thermostats have different fan settings, such as "Auto" or "On." In "Auto" mode, the fan only runs when the heat pump is actively heating or cooling. In "On" mode, the fan runs continuously, which can increase energy consumption.
- Programming: If your thermostat is programmable, review the program settings to ensure they are correct. Incorrect programming can cause the heat pump to turn on or off at unexpected times.
Consult your thermostat's manual for detailed instructions on setting and programming the thermostat.
6. Simple Part Replacements (Proceed with Caution and Only if Comfortable)
Some minor issues can be resolved by replacing simple parts. However, it's crucial to proceed with caution and only attempt these replacements if you are comfortable and confident in your abilities. Always disconnect the power to the unit before attempting any part replacement.
- Capacitor Replacement (Advanced - Requires Electrical Knowledge): Capacitors are used to start and run the motors in your heat pump. If a capacitor fails, the motor may not start, or it may run erratically. Warning: Capacitors store electrical charge even after the power is turned off. Discharging a capacitor can be dangerous and requires specialized tools and knowledge. If you are not comfortable working with electricity, do not attempt to replace a capacitor. Contact a qualified HVAC technician.
- Contactor Replacement (Advanced - Requires Electrical Knowledge): Contactors are electrical switches that control the flow of power to the compressor and fan motors. If a contactor fails, the heat pump may not turn on, or it may run intermittently. Warning: Contactors carry high voltage. If you are not comfortable working with electricity, do not attempt to replace a contactor. Contact a qualified HVAC technician.
Important: When replacing any part, make sure to use the correct replacement part. Refer to your heat pump's manual for the correct part number.
When to Call a Professional: Recognizing the Limits of DIY
While these troubleshooting steps can resolve many common heat pump problems, there are situations where it's best to call a qualified HVAC technician. Here are some signs that professional help is needed:
- Refrigerant Leaks: Refrigerant is essential for the heat pump's ability to transfer heat. If you suspect a refrigerant leak (e.g., you notice a hissing sound or a sweet, oily smell near the unit), do not attempt to repair it yourself. Refrigerant leaks require specialized equipment and training to repair safely and legally.
- Electrical Issues: If you encounter any electrical issues, such as tripped breakers that repeatedly trip, burning smells, or exposed wires, do not attempt to repair them yourself. Electrical repairs can be dangerous and should only be performed by a qualified electrician.
- Compressor Problems: The compressor is the heart of the heat pump. If the compressor is making loud noises, not turning on, or not pumping refrigerant effectively, it likely needs to be replaced. Compressor replacement is a complex and expensive repair that should only be performed by a professional.
- Defrost Cycle Problems: If your heat pump is constantly icing up, even though it has a defrost cycle, there may be a problem with the defrost system. This could be due to a faulty defrost timer, sensor, or relay. Diagnosing and repairing defrost cycle problems requires specialized knowledge and equipment.
- You've Tried Everything Else: If you've followed all the troubleshooting steps in this guide and your heat pump is still not working correctly, it's time to call a professional. They have the expertise and equipment to diagnose and repair more complex problems.
- Unit is Under Warranty: If your heat pump is still under warranty, attempting repairs yourself may void the warranty. It's best to contact the manufacturer or a qualified HVAC technician to perform any repairs covered by the warranty.
Attempting to repair complex HVAC issues without the proper knowledge and equipment can be dangerous and may even damage your system further. When in doubt, it's always best to err on the side of caution and call a professional.
Understanding the Average Cost of Heat Pump Installation (Information Only - Troubleshooting Doesn't Fix This)
While this article focuses on troubleshooting, it's useful to have some context on the average cost of heat pump installation. Knowing this can help you make informed decisions about repairing versus replacing your unit.
The cost of heat pump installation can vary widely depending on several factors, including:
- Type of Heat Pump: There are different types of heat pumps, such as air-source, geothermal, and ductless mini-split systems. Geothermal systems are typically the most expensive to install, while ductless mini-split systems can be a cost-effective option for smaller spaces.
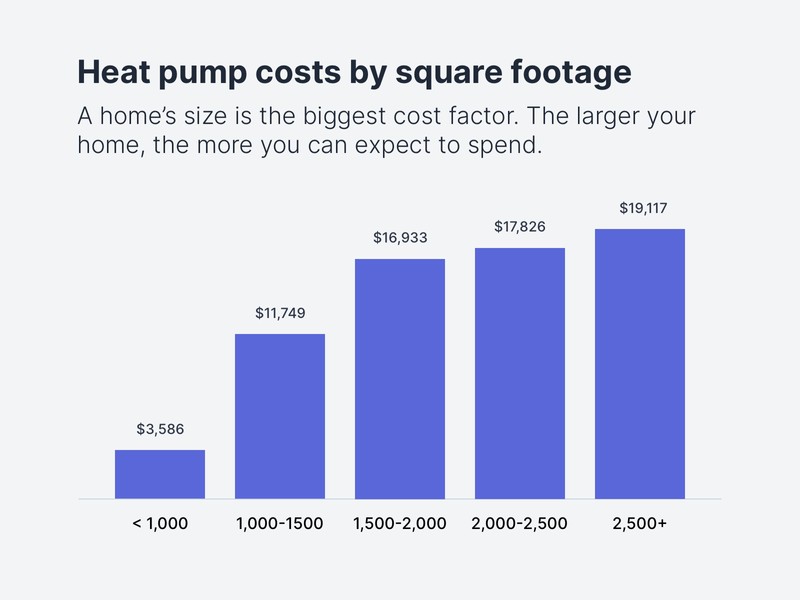
- Size of the Unit: The size of the heat pump needed will depend on the size of your home and your heating and cooling needs. Larger units will typically cost more to install.
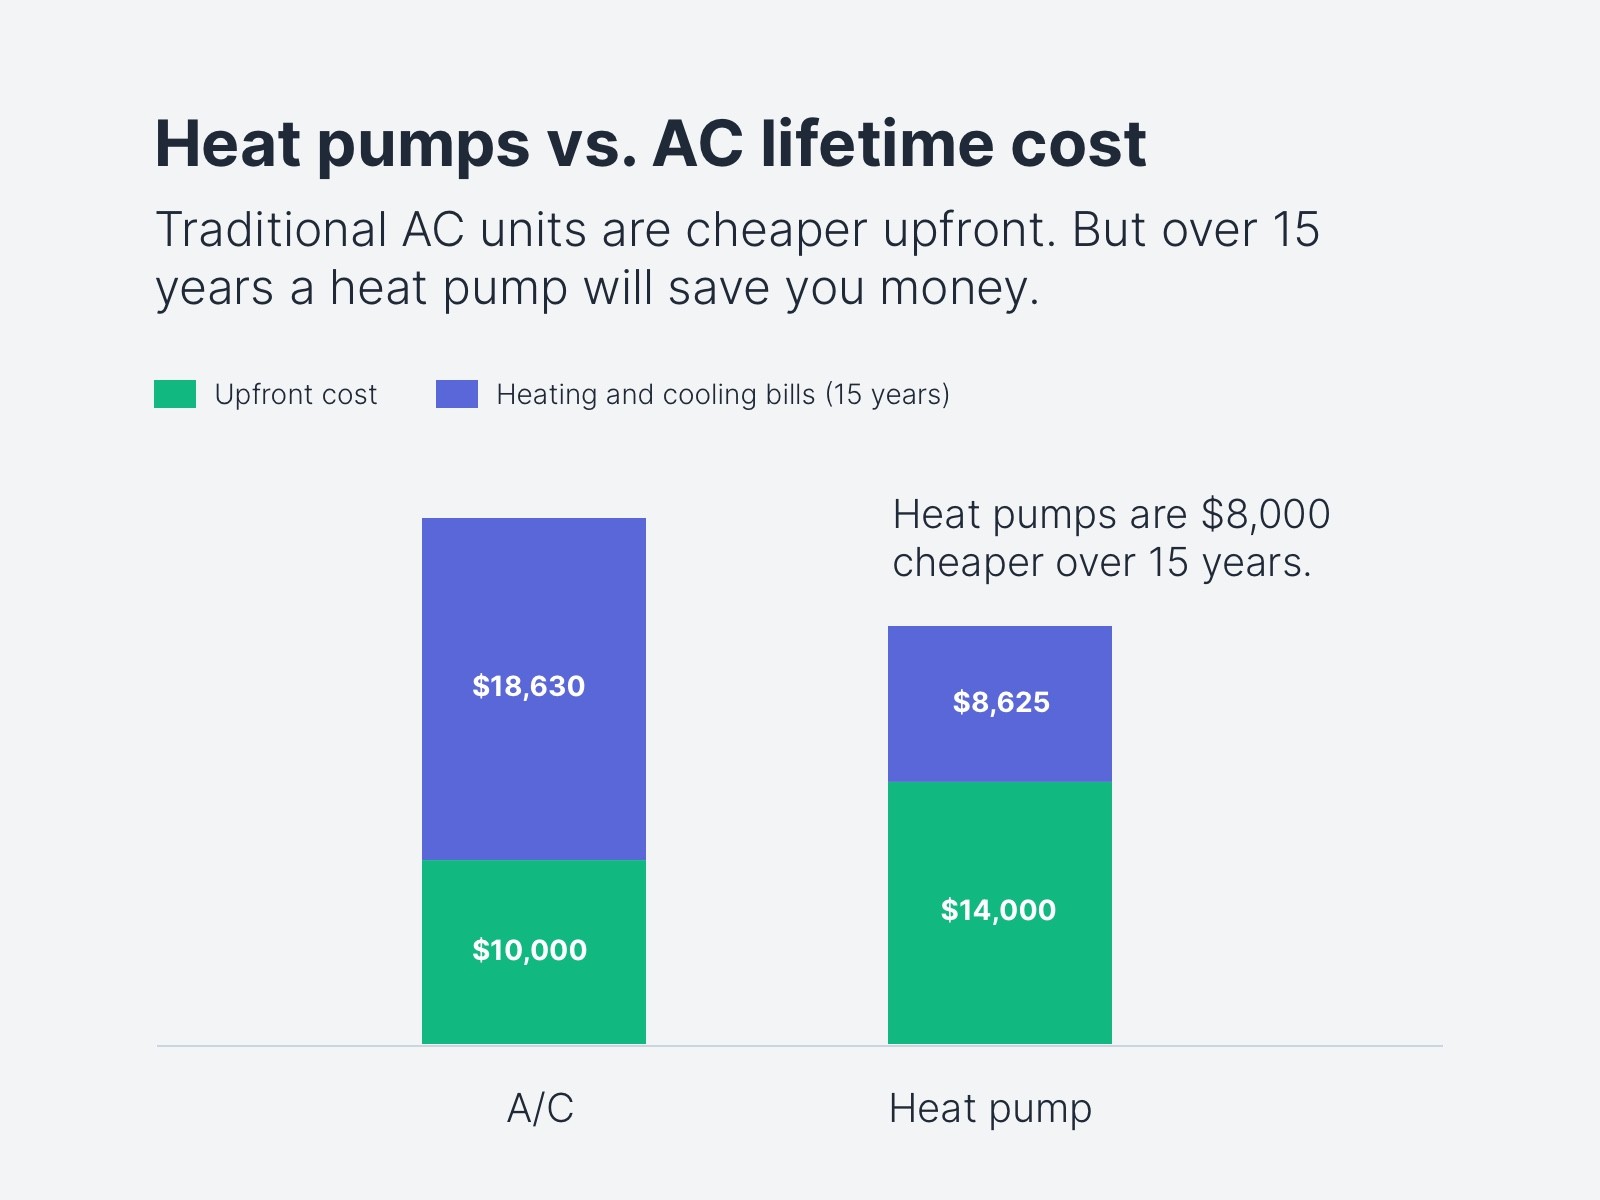
- Efficiency Rating: Heat pumps are rated for efficiency using SEER (Seasonal Energy Efficiency Ratio) for cooling and HSPF (Heating Seasonal Performance Factor) for heating. Higher efficiency units will typically cost more upfront but can save you money on energy bills in the long run.
- Ductwork: If your home doesn't already have ductwork, you'll need to have it installed, which will add to the overall cost. Ductless mini-split systems are a good option if you don't have ductwork.
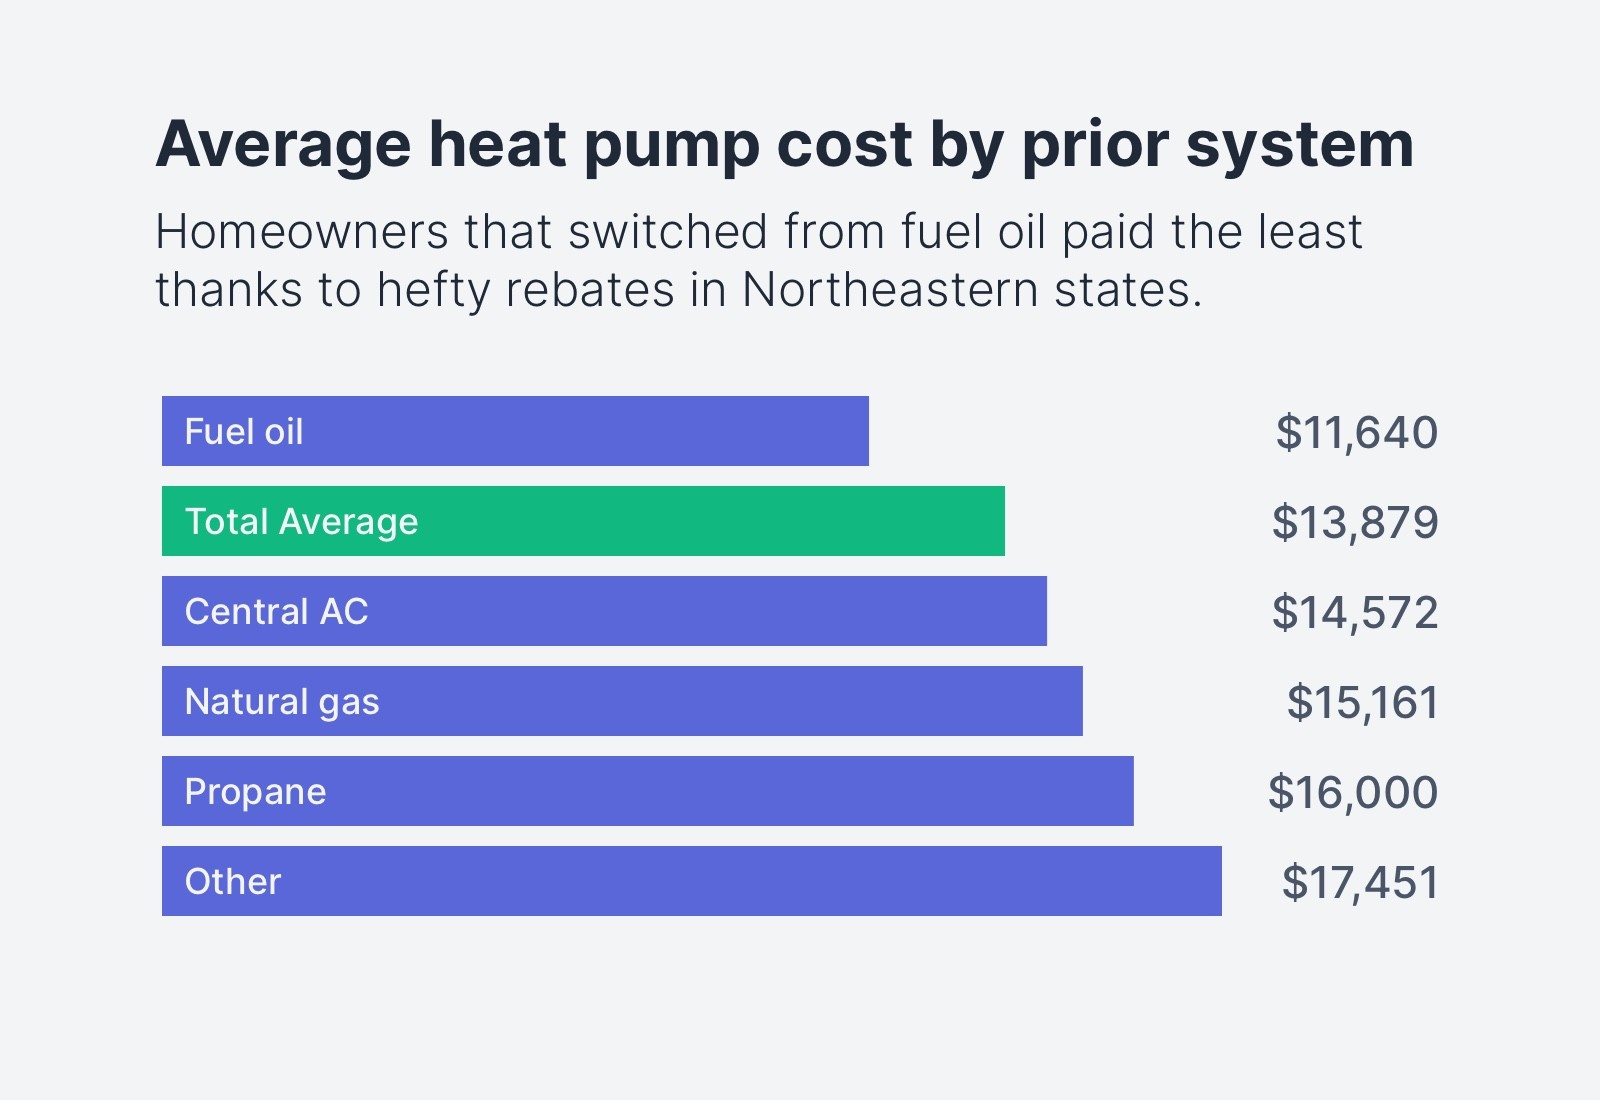
- Installation Costs: Labor costs can vary depending on your location and the HVAC contractor you choose. It's important to get quotes from multiple contractors before making a decision.
- Permits and Inspections: You may need to obtain permits and inspections for your heat pump installation, which will add to the cost.
As a general guideline, the average cost of heat pump installation can range from $4,000 to $12,000 or more. It's crucial to get a professional assessment to determine the best heat pump for your home and to get an accurate quote for installation. When you have this, you can then decide whether or not the repair is worth doing.
Disclaimer: This article provides general troubleshooting advice. Always consult your heat pump's manual and follow all safety precautions. If you are not comfortable performing any of these tasks, or if you suspect a more serious problem, contact a qualified HVAC technician.