Average Cost To Install Air Conditioning

Many homeowners face the frustrating reality of a failing or completely broken air conditioning system, especially during the hottest months. One of the first questions that springs to mind is: "How much is this going to cost me?" Figuring out the average cost to install air conditioning can feel like navigating a minefield. Prices can vary wildly depending on numerous factors. This article will help you understand the cost drivers and, more importantly, troubleshoot your current system to potentially avoid a costly replacement.
Understanding the Problem: Is it Really a Replacement Situation?
Before diving into the cost of new AC units, let's determine if a replacement is truly necessary. Sometimes, what seems like a major problem can be a minor, easily fixable issue. The common problem we'll address is: "My AC isn't cooling like it used to, or not cooling at all."
Step-by-Step Diagnosis and DIY Troubleshooting
Step 1: Check the Thermostat
This might seem obvious, but it's the most common culprit! Ensure your thermostat is set to "Cool" mode, not "Heat" or "Off." Also, make sure the temperature setting is lower than the current room temperature. Sometimes, a simple accidental adjustment is all it takes.
Step 2: Inspect the Air Filter
A dirty air filter is a primary cause of reduced airflow and cooling efficiency. Locate your air filter (usually in the indoor air handler unit). Remove it and inspect it. If it's visibly clogged with dust and debris, it needs replacing. A clean air filter allows for optimal airflow and prevents the AC unit from working harder than it needs to.
DIY Fix: Replace the dirty air filter with a new one. You can purchase these at most hardware stores. Make sure you get the correct size!
Step 3: Examine the Outdoor Unit (Condenser)
The outdoor unit (the condenser) is a crucial part of your AC system. Ensure it's free of obstructions. Are there bushes, leaves, or debris blocking airflow around the unit? This can significantly reduce its efficiency.
DIY Fix: Clear away any obstructions within 2-3 feet of the unit on all sides. Use a garden hose to gently spray the fins of the condenser unit to remove any accumulated dirt or debris. Be careful not to bend the fins! If you find bent fins, you can try using a fin comb (available at hardware stores) to gently straighten them.
Step 4: Check the Circuit Breaker
Locate your electrical panel and check the circuit breaker for your AC unit. It might be labeled "AC," "Air Conditioner," or "HVAC." Is the breaker tripped (in the "Off" position or in a middle position)?
DIY Fix: If the breaker is tripped, switch it to the "Off" position and then back to the "On" position. If it immediately trips again, do not keep resetting it! This indicates a more serious electrical problem that requires professional attention.
Step 5: Inspect the Condensate Drain Line
Your AC unit produces condensation, which is drained through a condensate drain line. If this line becomes clogged, it can cause the unit to shut down or leak. Look for a PVC pipe near your indoor unit. Is there water leaking around it?
DIY Fix: Locate the end of the drain line (usually outside your home). Use a wet/dry vacuum to suck out any clogs from the drain line. You can also try pouring a cup of vinegar down the drain line to help dissolve any buildup.
Step 6: Listen for Unusual Noises
Pay attention to the sounds your AC unit is making, both indoors and outdoors. Are you hearing any unusual noises like banging, grinding, or hissing? These noises can indicate mechanical problems.
Any unusual noises emanating from the unit is a strong indication that it's time to call a professional.
When to Call a Professional: The Point of No Return
If you've tried all the DIY troubleshooting steps above and your AC is still not cooling properly, it's time to call a qualified HVAC technician. Here are some specific scenarios that warrant professional intervention:
* Refrigerant Leaks: Refrigerant is crucial for the cooling process. If you suspect a leak (e.g., ice buildup on the copper lines, AC not cooling even after cleaning the coils), do not attempt to fix it yourself. Handling refrigerant requires specialized equipment and training. It's also environmentally regulated. * Electrical Issues: As mentioned before, if the circuit breaker trips repeatedly, this signals an electrical problem that needs a professional electrician or HVAC technician. Never attempt to work on electrical components yourself if you are not qualified. * Compressor Problems: The compressor is the heart of the AC unit. If it's failing, the unit will not cool effectively. Compressor repairs are complex and expensive, and often it's more cost-effective to replace the entire unit. * Major Component Failure: If you suspect a major component like the blower motor or condenser fan motor is failing, it's best to have a professional diagnose and repair or replace it. * Strange Smells: Burning smells are a signal of electrical or mechanical issues. Turn off the unit immediately and call for help. * Ice Formation: Ice buildup on the coils indicates a serious issue, such as a refrigerant leak or airflow blockage.Understanding the Average Cost to Install Air Conditioning
Now that we've covered troubleshooting, let's address the big question: What is the average cost to install air conditioning? The price can range dramatically depending on several factors.
Factors Affecting AC Installation Costs
* Type of System: Central AC systems are generally more expensive to install than window units or ductless mini-split systems. * Size of the Unit (BTU): The British Thermal Unit (BTU) rating determines the cooling capacity of the unit. Larger homes require units with higher BTU ratings, which cost more. * Efficiency (SEER Rating): The Seasonal Energy Efficiency Ratio (SEER) measures the energy efficiency of the AC unit. Higher SEER ratings mean better energy savings but also a higher upfront cost. * Ductwork: If you don't have existing ductwork, installing it can significantly increase the cost. * Labor Costs: Labor costs vary depending on your location and the complexity of the installation. * Permits and Inspections: Many municipalities require permits and inspections for AC installations, which add to the overall cost. * Brand and Model: Some brands are more expensive than others, and certain models have advanced features that increase the price. * Home Condition: Pre existing conditions like asbestos and lead can be present in older homes and can increase the overall cost. * Geographic Location: Coastal, Mountain, and areas of high humidity, for example, can all play a part in increased costs.Ballpark Cost Estimates
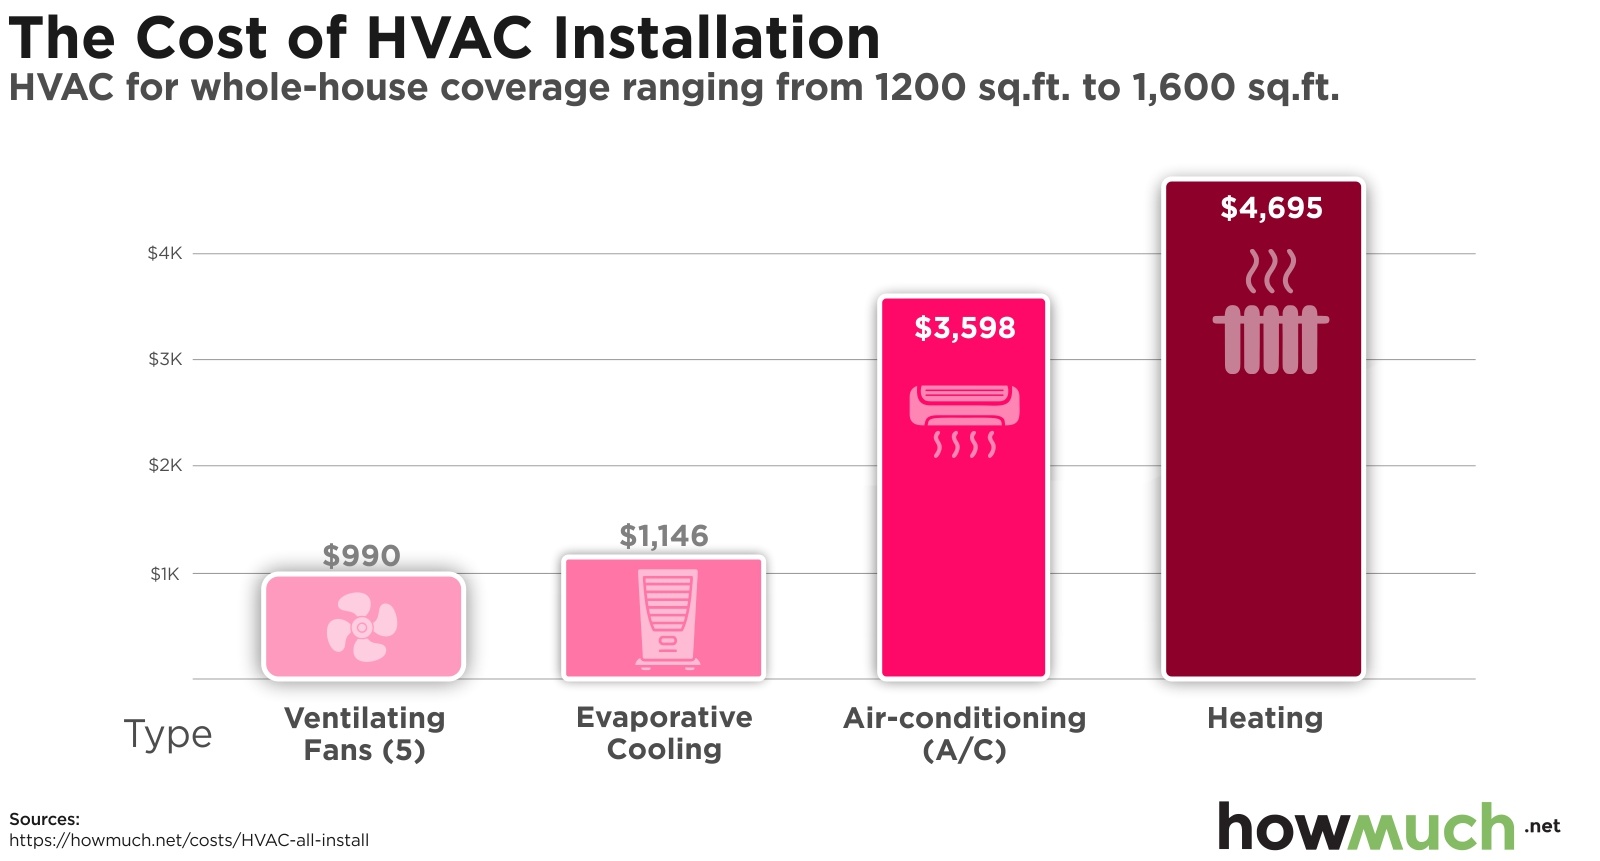
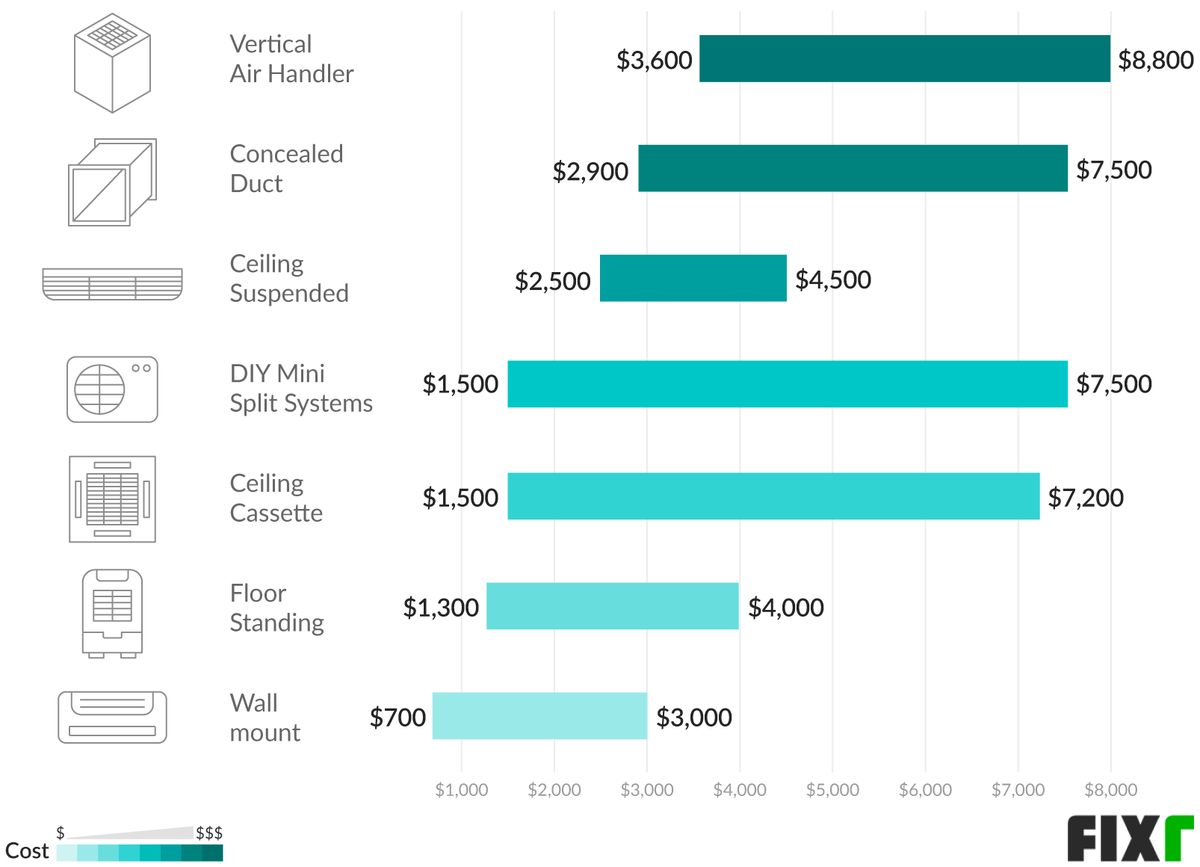
Here are some general cost ranges to give you an idea:
* Window Unit: $150 - $800 (for the unit itself, installation is usually DIY). * Ductless Mini-Split System: $3,000 - $8,000 (per zone, installed). * Central AC System (Replacement): $4,000 - $12,000 (installed). * Central AC System (New Installation with Ductwork): $8,000 - $20,000+ (installed).These are just estimates! The best way to get an accurate cost estimate is to get quotes from multiple reputable HVAC contractors in your area.
Getting Accurate Quotes
When getting quotes, be sure to ask the following questions:
* Is the quote all-inclusive? Does it include the cost of the unit, labor, permits, and any other fees? * What is the SEER rating of the unit? * What size unit (BTU) is recommended for my home? Make sure the contractor performs a proper load calculation to determine the correct size. * What is the warranty on the unit and the installation? * Are they licensed and insured? * Can they provide references from previous customers? * What brands do they install and recommend?Financing Options
Replacing an AC unit can be a significant expense. Explore financing options such as:
* HVAC financing programs: Many HVAC companies offer financing options through third-party lenders. * Home equity loans or lines of credit: These can offer lower interest rates than other types of loans. * Energy-efficient home improvement loans: Some government programs offer loans or rebates for energy-efficient upgrades.Preventative Maintenance: Avoiding Future Problems
The best way to avoid costly AC repairs or replacements is to perform regular preventative maintenance. Here are some tips:
* Change your air filter regularly (every 1-3 months). * Schedule annual AC maintenance with a qualified HVAC technician. They will inspect the unit, clean the coils, check the refrigerant levels, and perform other necessary maintenance. * Keep the outdoor unit free of debris. * Consider a programmable thermostat to optimize energy usage. * Ensure proper insulation in your home to reduce cooling load.Conclusion
Dealing with a failing AC system can be stressful, but understanding the potential causes, troubleshooting simple issues, and knowing when to call a professional can empower you to make informed decisions. While the average cost to install air conditioning can be significant, preventative maintenance and timely repairs can help extend the life of your system and avoid unexpected expenses. Remember to get multiple quotes from reputable contractors and explore financing options to find the best solution for your needs and budget. By taking proactive steps, you can ensure a comfortable and cool home for years to come.