Beckett Afg Oil Burner Parts Diagram
Imagine waking up on a chilly morning only to find your house is freezing. The first culprit you suspect? Your furnace. Often, the heart of a home heating system, especially in older homes, is an oil burner, and a common brand is Beckett. When a Beckett AFG oil burner fails, it can leave you in the cold. Fortunately, some basic troubleshooting steps can help you identify and potentially resolve the issue before calling a professional.
Understanding the Beckett AFG Oil Burner
The Beckett AFG oil burner is a complex piece of machinery, but understanding its basic components is key to troubleshooting. Here's a simplified overview:
- Motor: Powers the fan and fuel pump.
- Fuel Pump: Draws oil from the tank and delivers it to the nozzle.
- Nozzle: Sprays the oil into a fine mist for combustion.
- Ignition System (Electrodes & Transformer): Creates the spark to ignite the oil.
- Cad Cell (Flame Sensor): Detects the flame and keeps the burner running.
- Primary Control (Safety Control): The brains of the operation, monitoring the burner's function and shutting it down if problems arise.
Before you begin any troubleshooting, always turn off the power to the furnace at the circuit breaker. Safety first!
Troubleshooting: A Step-by-Step Guide
This guide will walk you through common problems and potential DIY fixes. Remember: if you're uncomfortable with any step, or if the problem seems complex, call a qualified HVAC technician.
Step 1: Checking the Power Supply
The simplest things are often overlooked. Ensure the burner is actually receiving power.
- Check the Circuit Breaker: Locate the breaker for the furnace in your electrical panel. Is it tripped? If so, reset it. If it trips again immediately, there's a short circuit, and you'll need a professional.
- Check the Emergency Shut-Off Switch: Most furnaces have an emergency shut-off switch, often located near the furnace or at the top of the basement stairs. Make sure it's in the "on" position.
- Voltage Test: *(For Experienced Users Only - Use Caution!)* If you're comfortable using a multimeter, carefully check the voltage at the burner's power connection. If there's no voltage, the problem lies upstream, and you'll need an electrician. Never attempt this if you are not comfortable and familiar with electrical safety.
Step 2: Checking the Thermostat
A malfunctioning thermostat can prevent the burner from firing.
- Ensure the Thermostat is Set Correctly: Make sure the thermostat is set to "heat" and that the temperature is set higher than the current room temperature.
- Check the Thermostat Batteries: Some thermostats require batteries. Replace them if they're old.
- Bypass the Thermostat: *(For Experienced Users Only - Use Caution!)* Carefully remove the thermostat wires from the terminals on the furnace control panel and connect them directly. If the burner starts, the thermostat is the problem. Note the original wire connections before disconnecting! If you're not comfortable, skip this step.
Step 3: Checking the Oil Supply
No oil, no heat. It seems obvious, but it's a common issue.
- Check the Oil Tank Level: Is there enough oil in the tank? A low oil level can cause the burner to sputter or fail to start. Consider ordering a delivery if needed.
- Check the Oil Tank Shut-Off Valve: Make sure the valve between the oil tank and the burner is open.
- Check for Oil Leaks: Inspect the oil lines and connections for any signs of leaks. If you find a leak, call a professional immediately. Oil leaks are a fire hazard.
- Check the Oil Filter: Oil filters are usually located near the burner. A clogged filter can restrict oil flow. If you're comfortable, you can try replacing it:
- Turn off the power to the burner.
- Close the oil tank shut-off valve.
- Place a container under the filter to catch any spilled oil.
- Carefully remove the old filter and install a new one of the correct type.
- Open the oil tank shut-off valve and prime the burner (see Step 6).
- Turn the power back on.
Step 4: Resetting the Burner
Many oil burners have a reset button, usually located on the primary control. Pressing this button can sometimes clear a temporary fault.
- Locate the Reset Button: It's usually a small, red or orange button on the primary control.
- Press the Reset Button: Press the button once and wait. If the burner starts, great! If it doesn't, or if it trips again soon after, do not keep pressing the reset button. Repeatedly resetting the burner without addressing the underlying problem can damage the burner and is a safety hazard. Call a professional.
Step 5: Inspecting the Burner Components (Visual Inspection Only)
A visual inspection can sometimes reveal obvious problems.
- Check the Electrodes: Carefully (with the power off!) inspect the electrodes (the two metal rods near the nozzle) for cracks, dirt, or improper spacing. They should be clean and properly positioned. However, *do not attempt to adjust or clean them yourself unless you have experience. Incorrect adjustment can lead to ignition problems.*
- Check the Nozzle: Look at the nozzle for any signs of damage or blockage. *Do not attempt to clean or remove the nozzle yourself. This requires specialized tools and knowledge.*
- Check the Blower Fan: Make sure the blower fan is free of obstructions and spins freely. Remove any dust or debris that may be blocking it (with the power off!).
Step 6: Priming the Burner
If the oil lines have been drained (for example, after running out of oil or replacing the oil filter), you may need to prime the burner to remove air from the lines.
- Locate the Bleeder Valve: The bleeder valve is usually a small screw or fitting on the fuel pump.
- Prepare for Oil Spillage: Place a container under the bleeder valve to catch any spilled oil.
- Loosen the Bleeder Valve: Slowly loosen the bleeder valve until oil starts to flow out, free of air bubbles.
- Tighten the Bleeder Valve: Once the oil flows smoothly, tighten the bleeder valve.
- Try Resetting the Burner: Press the reset button on the primary control (once!).
When to Call a Professional
While these DIY steps can resolve many common issues, some problems require the expertise of a qualified HVAC technician. Call a professional if:
- You smell oil or suspect an oil leak.
- The burner repeatedly trips the circuit breaker.
- The burner makes unusual noises.
- You see smoke coming from the burner.
- You are uncomfortable with any of the troubleshooting steps.
- The burner continues to malfunction after you've tried the basic fixes.
- You suspect a problem with the primary control, ignition transformer, or fuel pump. These are complex components best left to professionals.
Preventive Maintenance
The best way to avoid furnace problems is to perform regular preventive maintenance. Consider these tips:
- Annual Professional Tune-Up: Schedule a yearly tune-up with a qualified HVAC technician. They will clean and inspect the burner, adjust the settings, and replace any worn parts.
- Regularly Check the Oil Filter: Replace the oil filter annually, or more often if needed.
- Keep the Area Around the Furnace Clean: Remove any dust, debris, or flammable materials from around the furnace.
- Monitor Your Oil Consumption: A sudden increase in oil consumption could indicate a problem with the burner.
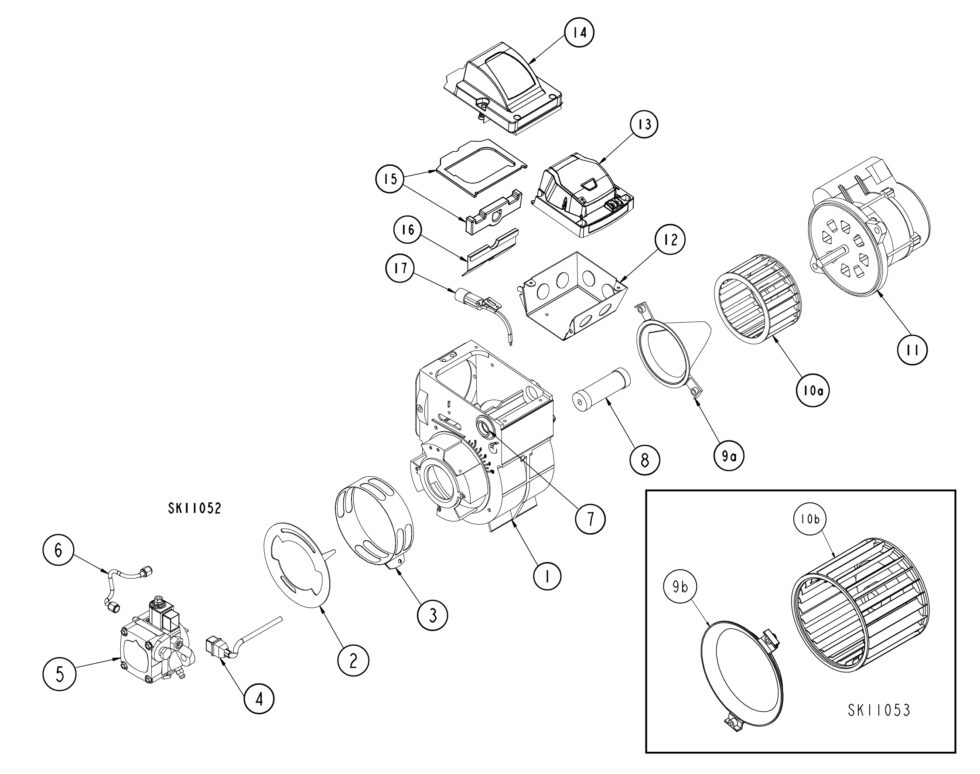
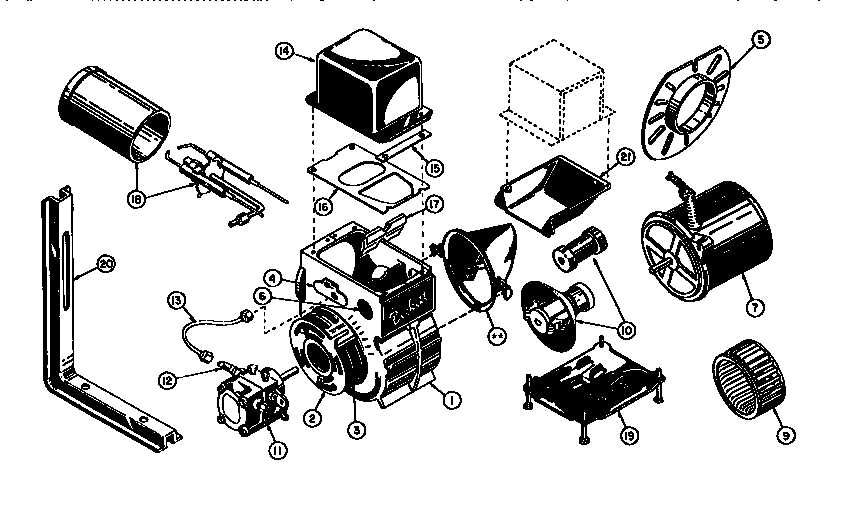
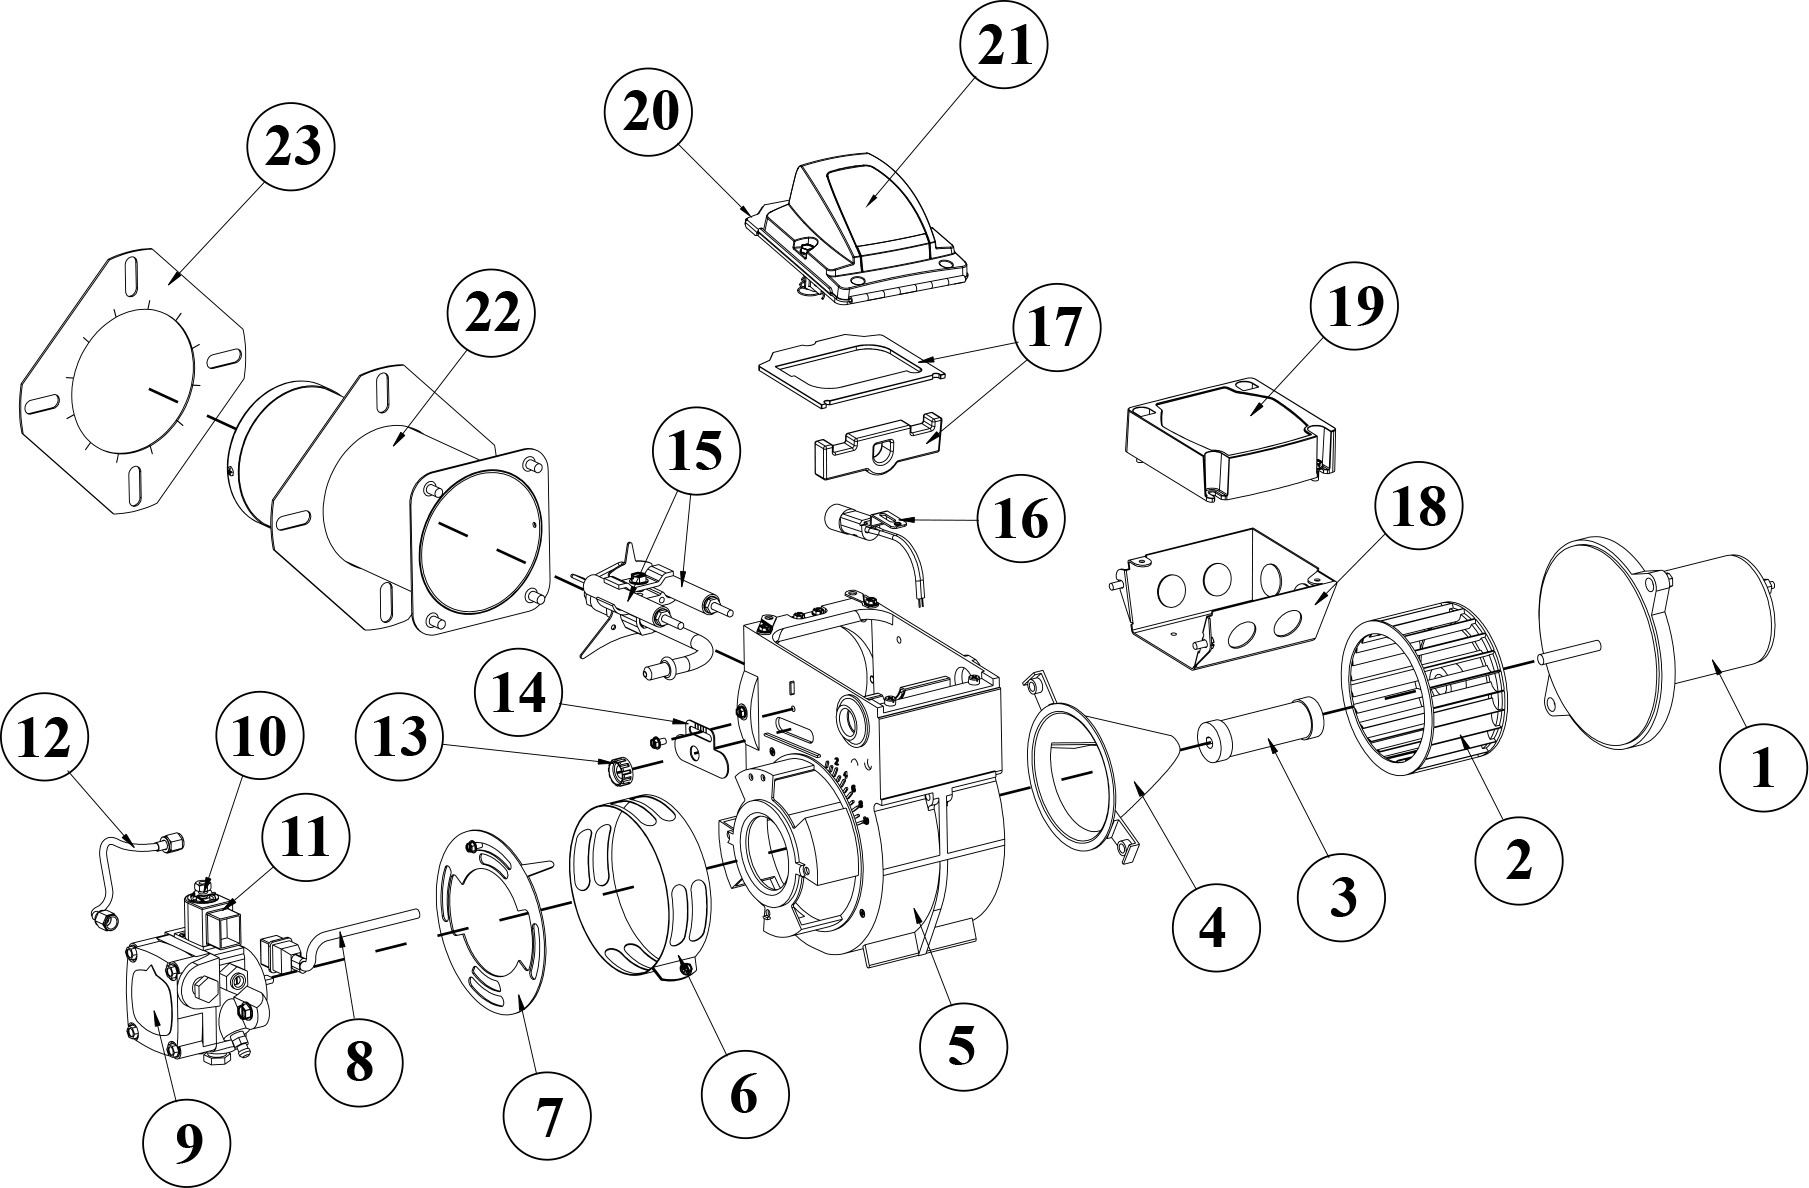
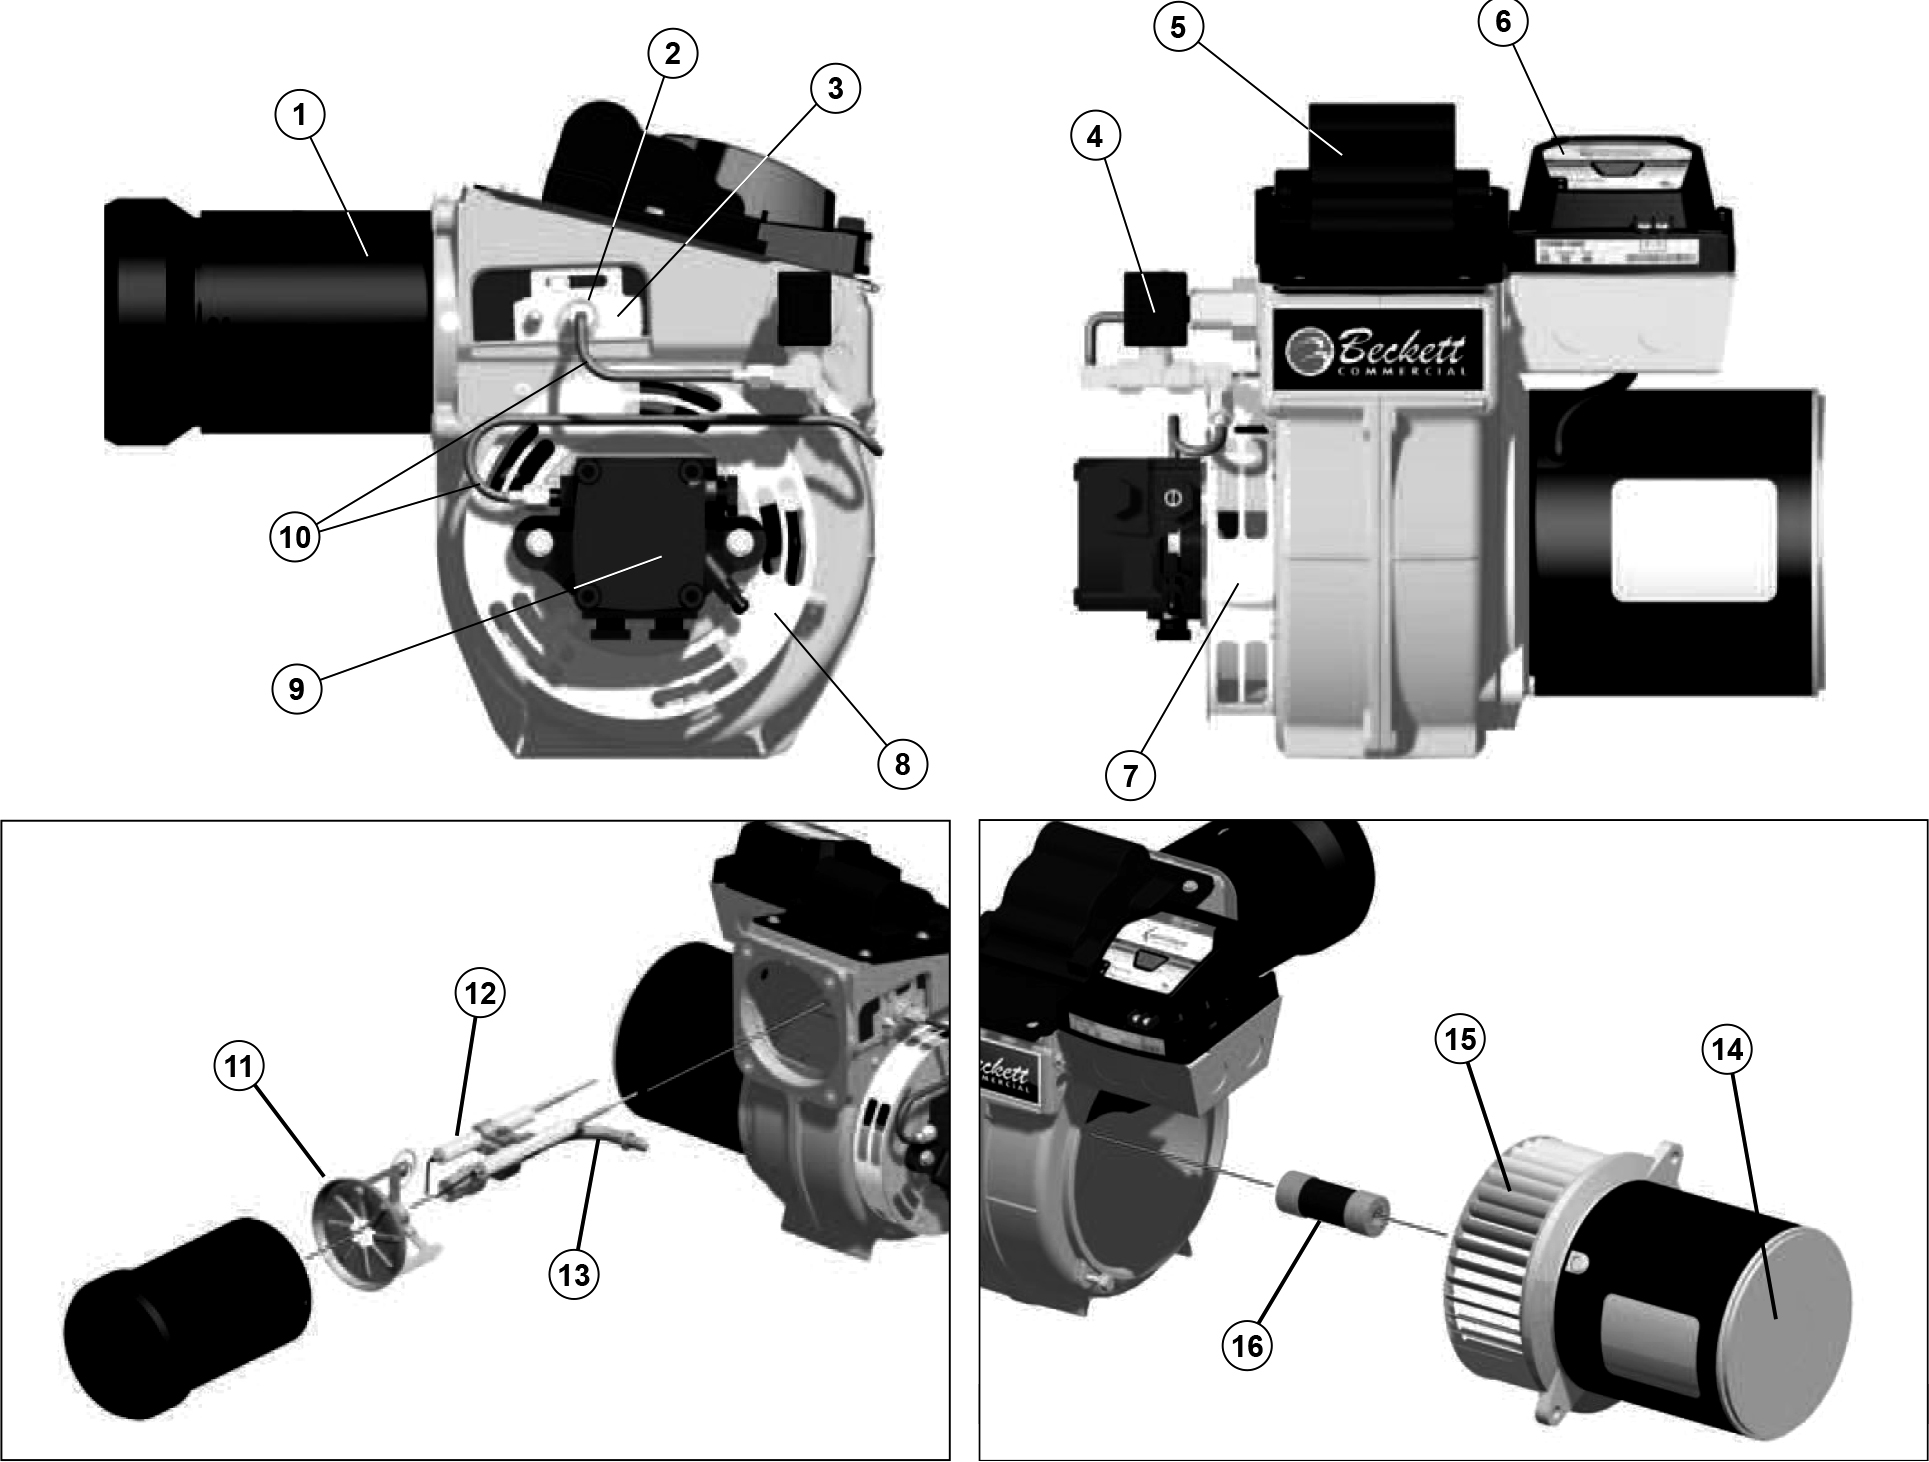
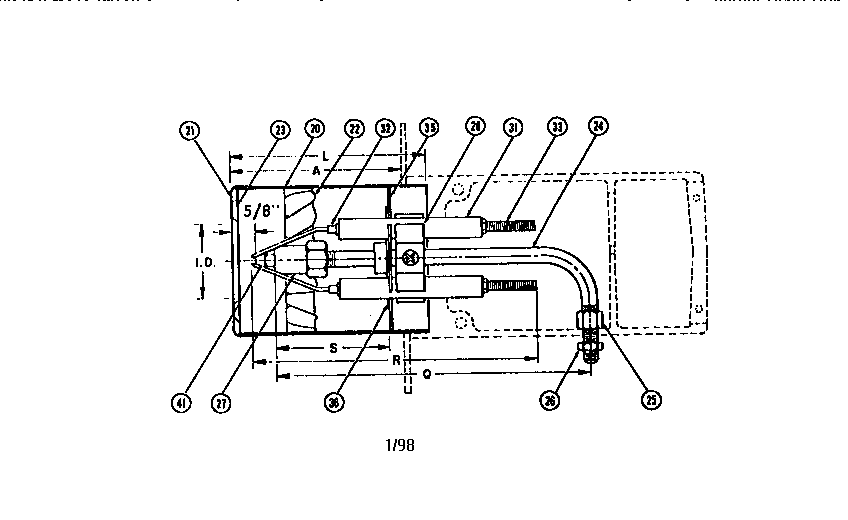
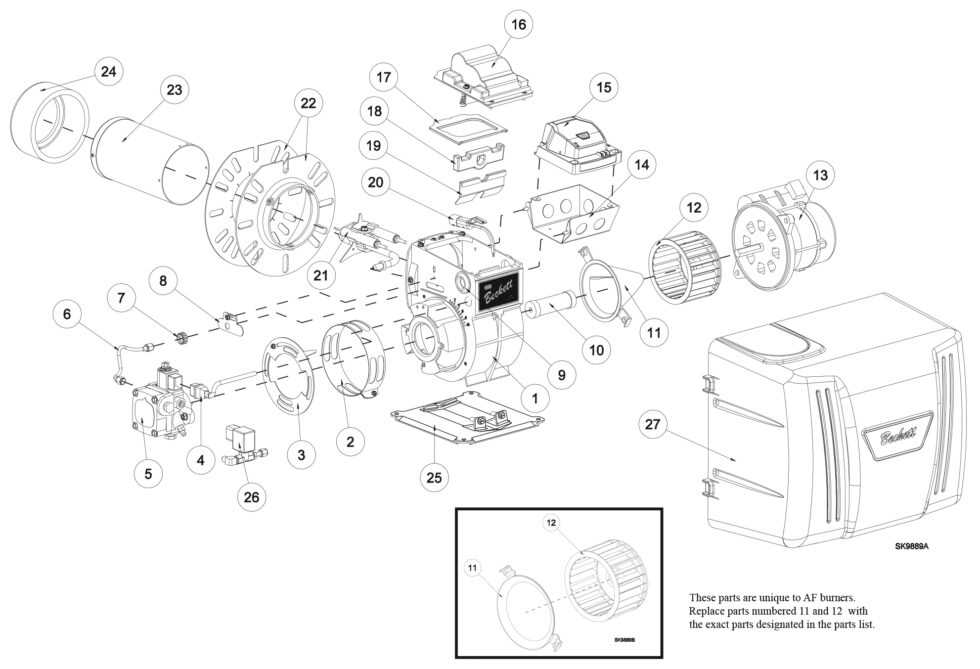
Beckett AFG Oil Burner Parts Diagram (Simplified)
While a full parts diagram is often complex, understanding the location of key components can aid in visual inspection. Here's a highly simplified representation:
Imagine the Beckett AFG burner as a rectangular box. Looking at the front, you'd typically see:
- On the right side (usually): The motor housing, often cylindrical.
- In the center, partially obscured by the motor: The blower fan, drawing air in.
- Extending forward from the center: The blast tube, containing the nozzle and electrodes inside.
- Mounted on the burner's side (or sometimes the top): The primary control box, with the reset button.
- Near the bottom: The fuel pump, connected to the oil lines.
This is a highly simplified representation. Consult a proper parts diagram for accurate identification before attempting any repairs requiring part replacement. You can often find parts diagrams online by searching for "Beckett AFG parts diagram." Always use the correct part number for your specific burner model.
Final Thoughts
Troubleshooting a Beckett AFG oil burner can seem daunting, but by following these steps, you can often identify and resolve common issues. Remember to prioritize safety and call a professional when needed. Regular maintenance will help keep your burner running smoothly and efficiently for years to come.