Beckett Oil Burner Nozzle Size Chart
Have you noticed your home feeling colder than usual, even with the thermostat cranked up? Or perhaps your oil burner seems to be running constantly, but without a noticeable increase in temperature? A poorly performing oil burner can lead to frustrating heating problems, increased energy bills, and even potential safety hazards. One often overlooked, yet critical, component is the nozzle. This tiny piece plays a crucial role in atomizing the oil for efficient combustion. Understanding your Beckett oil burner nozzle size chart and troubleshooting related issues can save you time, money, and a lot of frustration.
Diagnosing the Problem: A Step-by-Step Approach
Before diving into the nozzle, let's take a methodical approach to diagnosing the root cause of your heating woes. This will help ensure you're focusing on the right problem.
Step 1: The Initial Assessment (No Tools Required)
First, conduct a thorough visual inspection and gather some basic information:
- Check the thermostat: Is it set to the correct temperature and mode (heat)? Are the batteries fresh? A simple mistake here can often be the culprit.
- Observe the burner's operation: Does the burner start normally? Does it cycle on and off frequently (short cycling)? Does it produce excessive smoke or unusual noises? Note any irregularities.
- Check the oil tank gauge: Ensure you have sufficient oil in the tank. Running out of oil is a common problem, especially during peak heating season.
- Inspect the area around the burner: Look for any signs of oil leaks, spills, or unusual odors. These could indicate a fuel supply issue.
- Listen carefully: Are there any strange noises coming from the burner unit, such as sputtering, hissing, or grinding sounds?
Step 2: Investigating Basic Components (Minimal Tools)
If the initial assessment doesn't reveal the problem, you'll need a few basic tools, such as a flashlight and potentially a multimeter (for more advanced checks). Remember to turn off the power to the burner at the breaker box before proceeding! This is crucial for your safety.
- Check the reset button: Most oil burners have a reset button on the control box. If the burner has shut down due to a fault, pressing this button may restart it. However, only press the reset button once. Repeatedly pressing it without addressing the underlying issue can damage the burner. If it trips again immediately, there is a serious issue.
- Inspect the air filter: A dirty air filter can restrict airflow, leading to inefficient combustion. Locate the air filter (usually near the burner fan) and replace it if it's clogged with dust and debris.
- Check the cad cell: The cad cell is a light sensor that detects the presence of a flame. If it's dirty or malfunctioning, it can prevent the burner from staying lit. It's a small, usually round, component located near the flame. You can gently clean it with a clean, dry cloth. Never use solvents or liquids.
Step 3: Diving into the Nozzle: Size and Condition (Requires Specific Tools)
If the previous steps haven't resolved the issue, it's time to investigate the nozzle. This step requires more caution and some specialized tools, including a wrench to remove the nozzle assembly. If you're uncomfortable working with fuel lines, it's best to call a qualified HVAC technician.
- Locate the nozzle assembly: The nozzle is located inside the burner tube, at the end of the oil line. It's usually housed in a small assembly that can be unscrewed.
- Turn off the oil supply: Before disconnecting any fuel lines, locate and close the oil shut-off valve near the tank. This will prevent oil from leaking out during the process.
- Carefully disconnect the oil line: Use a wrench to loosen the fitting connecting the oil line to the nozzle assembly. Have a rag ready to catch any drips.
- Remove the nozzle assembly: Unscrew the assembly from the burner tube.
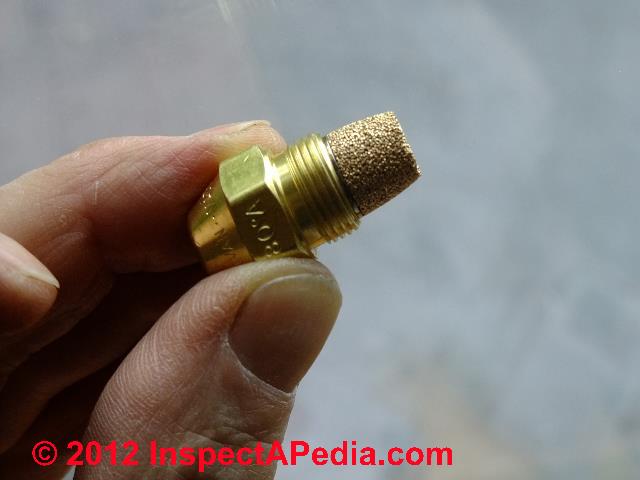
- Inspect the nozzle: Examine the nozzle for signs of damage, clogs, or wear. Look for cracks, corrosion, or buildup of deposits. A damaged or clogged nozzle will disrupt the spray pattern and affect combustion efficiency.
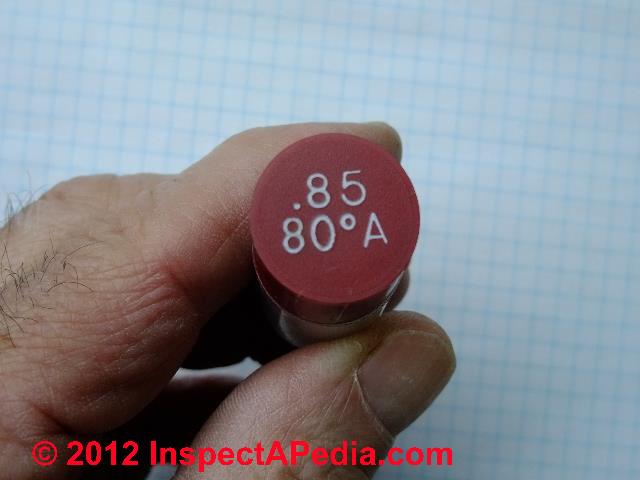
- Identify the nozzle size: The nozzle size is usually stamped on the side of the nozzle. It will be indicated by three numbers, such as "0.85 60H". This indicates the flow rate in gallons per hour (GPH), the spray angle in degrees, and the spray pattern (H for hollow, B for solid, etc.). This is where your Beckett oil burner nozzle size chart comes into play.
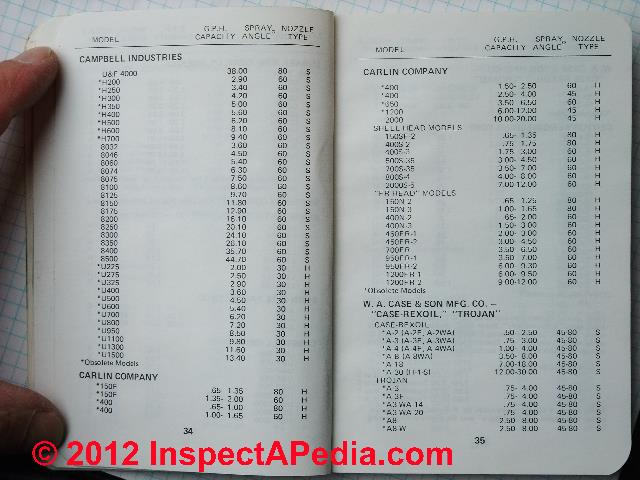
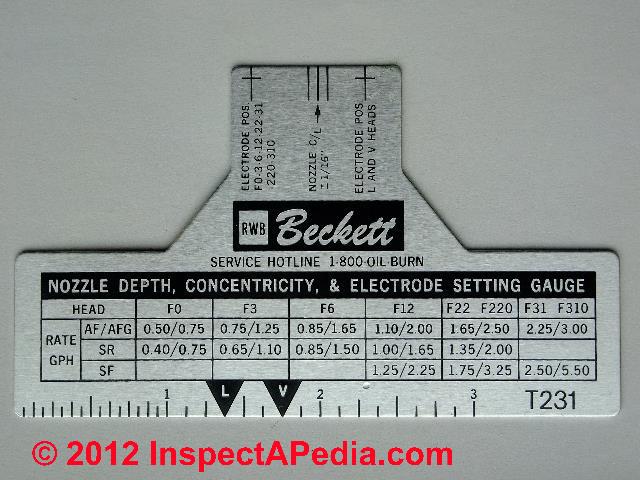
Understanding the Beckett Oil Burner Nozzle Size Chart
A Beckett oil burner nozzle size chart is a crucial resource for ensuring you have the correct nozzle installed in your burner. Using the wrong size nozzle can lead to a variety of problems, including:
- Inefficient combustion: An incorrectly sized nozzle can result in incomplete combustion, leading to wasted fuel and increased emissions.
- Soot buildup: Incomplete combustion can also cause soot to accumulate in the burner and chimney, which can reduce efficiency and pose a fire hazard.
- Puffbacks: Puffbacks are small explosions in the burner that can cause smoke and soot to be released into the home. They are often caused by improper air-fuel mixture due to the wrong nozzle.
- Burner failure: Using the wrong nozzle can put undue stress on the burner components, leading to premature failure.
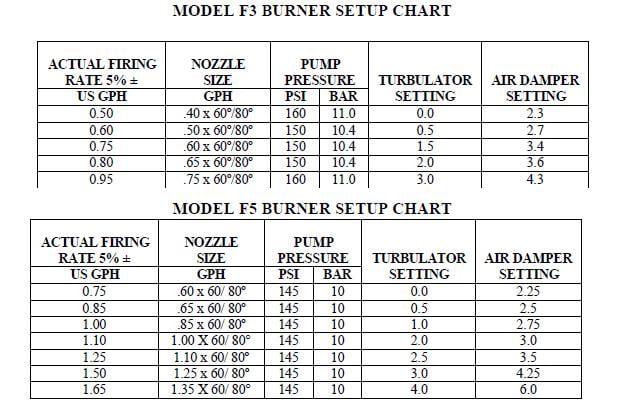
How to use the chart:
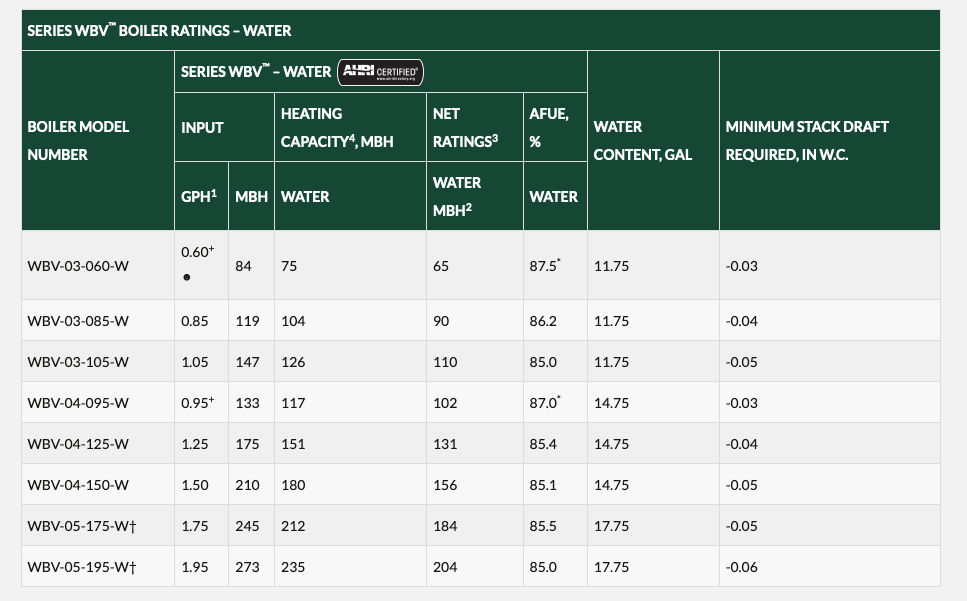
Beckett provides charts that specify the correct nozzle size based on the burner model, firing rate (BTU/hr), and oil pressure. These charts can usually be found in the burner's installation and operation manual or on the Beckett website.
To use the chart effectively, you'll need to know:
- Your burner model number: This is usually located on a label on the burner itself.
- The firing rate of your burner: This is usually expressed in BTU/hr (British Thermal Units per hour) and can be found on the burner's nameplate or in the manual.
- The oil pressure: This is usually pre-set by a technician but can be checked with a pressure gauge.
Once you have this information, you can consult the chart to determine the correct nozzle size for your application.
Example: Let's say your burner model is Beckett AFG, the firing rate is 105,000 BTU/hr, and the oil pressure is 100 PSI. According to a hypothetical Beckett nozzle chart, the recommended nozzle size might be 0.85 GPH with a 60-degree hollow cone spray pattern (0.85 60H).
Important Considerations:
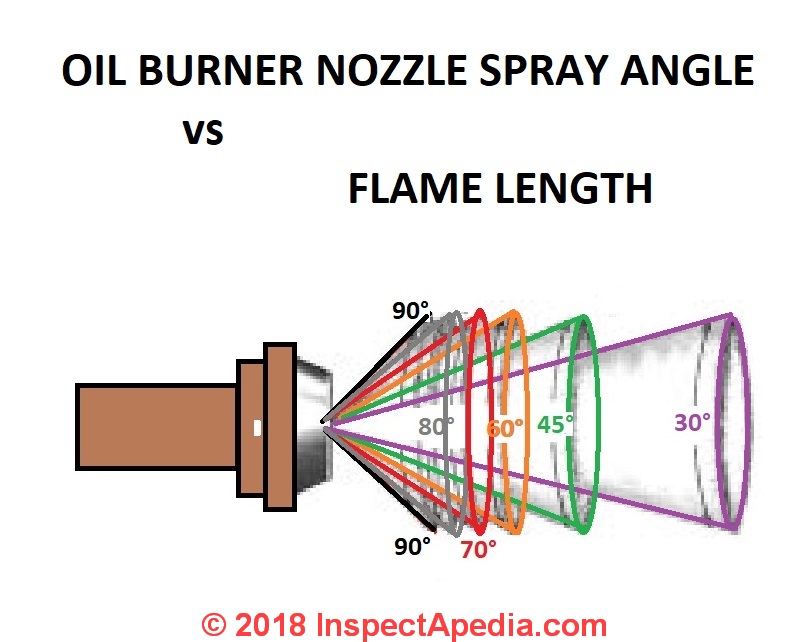
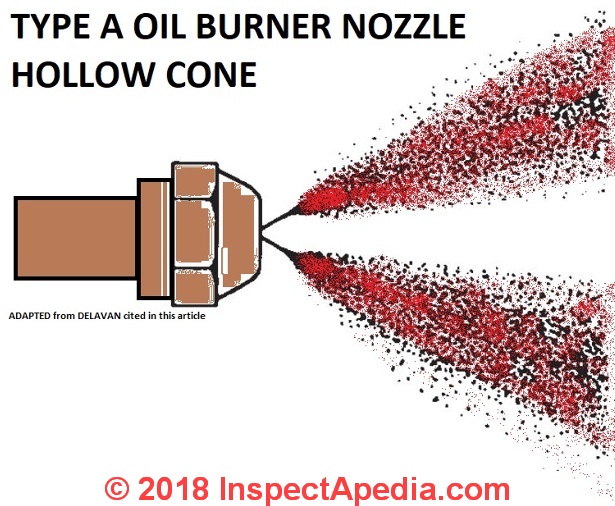
- Spray Angle: The spray angle (e.g., 60, 80 degrees) determines the cone shape of the oil spray. The correct angle depends on the combustion chamber design.
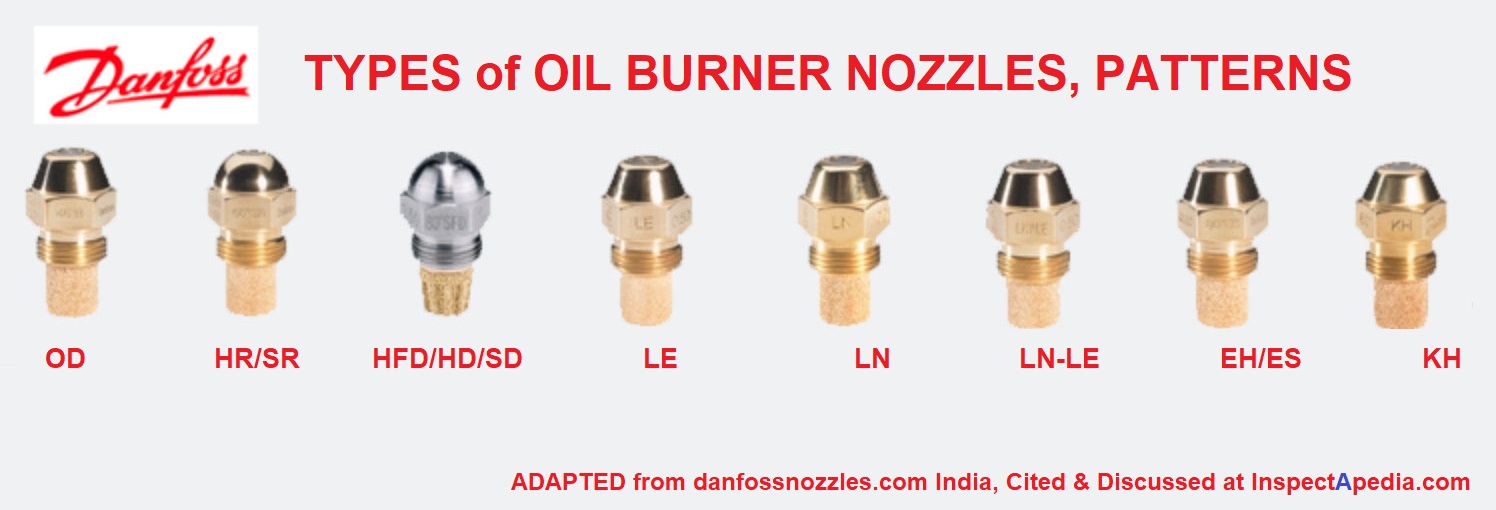
- Spray Pattern: The spray pattern (Hollow, Solid, or Semi-Solid) also affects combustion efficiency. Hollow cone patterns are common in residential burners.
- Altitude: At higher altitudes, the air is thinner, which can affect combustion. Some charts may have altitude correction factors.
DIY Actions: What You Can Do (Safely)
If you've identified that the nozzle is the wrong size or is damaged, here's what you can do yourself (assuming you're comfortable with basic mechanical tasks and safety precautions):
- Replace the nozzle: Purchase a new nozzle that matches the specifications recommended in the Beckett nozzle chart for your burner. Use a specialized nozzle wrench to avoid damaging the new nozzle during installation.
- Clean the nozzle assembly: While you have the assembly apart, clean any debris or sludge from the nozzle adapter and other components. Use a clean cloth and avoid using abrasive cleaners or solvents that could damage the parts.
- Reassemble and reconnect: Carefully reassemble the nozzle assembly, reconnect the oil line, and tighten the fittings securely.
- Bleed the oil line: After reconnecting the oil line, you may need to bleed the line to remove any air that may have entered. This usually involves opening a bleeder valve on the oil pump and allowing oil to flow until all air bubbles are gone. Refer to your burner's manual for specific instructions.
- Restart the burner: Turn the power back on to the burner and attempt to restart it. Observe the burner's operation carefully, listening for any unusual noises or signs of problems.
When to Call a Professional HVAC Technician
While some nozzle-related issues can be addressed with DIY efforts, there are situations where it's crucial to call a qualified HVAC technician. Your safety and the proper functioning of your heating system are paramount.
- You're uncomfortable working with fuel lines: Oil leaks can be dangerous and require specialized knowledge to handle safely.
- You suspect a fuel leak: If you smell oil or see any signs of a leak, immediately shut off the oil supply and call a professional.
- The burner continues to malfunction after replacing the nozzle: This could indicate a more serious problem, such as a faulty oil pump, control system, or ignition system.
- You're not confident in your ability to properly diagnose the problem: Guessing at the problem and making incorrect repairs can be costly and potentially dangerous.
- You need to adjust the burner's air-fuel mixture: Optimizing the air-fuel mixture requires specialized tools and expertise. A technician can use combustion analysis equipment to ensure the burner is operating efficiently and safely.
- You're unsure of the correct nozzle size for your burner: Consulting a Beckett nozzle chart and selecting the correct nozzle size requires specific knowledge. A technician can ensure you have the right nozzle for your application.
In conclusion, troubleshooting oil burner issues related to the nozzle can be a manageable task for some homeowners, but it's essential to approach it with caution and a clear understanding of your limitations. By following a methodical diagnostic process, consulting the Beckett oil burner nozzle size chart, and knowing when to call a professional, you can keep your heating system running efficiently and safely throughout the winter months.