Best Temperature To Keep House In Summer

Summer's here, and for many homeowners, that means battling a sweltering house and skyrocketing energy bills. A common problem is an inconsistent or uncomfortable indoor temperature, even with the AC running seemingly non-stop. Before you resign yourself to a summer of discontent, let's troubleshoot this issue step-by-step. We'll guide you through a simple diagnosis and provide some DIY fixes. Remember, safety first! If at any point you feel uncomfortable or unqualified, it's always best to call a professional HVAC technician.
Diagnosing the Too-Hot House: A Step-by-Step Approach
Let's break down the diagnosis into manageable steps. Start with the simplest checks and work your way towards more complex issues.
Step 1: Verify Thermostat Settings
This might seem obvious, but it's the most frequent culprit. Double-check your thermostat settings to ensure it's in Cool mode and that the desired temperature is set lower than the current room temperature. Many thermostats have a Hold setting which keeps the temperature constant. Make sure it's not set too high for your comfort.
Without Tools: Simply look at the thermostat screen and buttons. Cycle through the modes (Cool, Heat, Auto, Off) and adjust the temperature. Look for any error messages or unusual displays.
Step 2: Air Filter Inspection
A dirty air filter restricts airflow, making your AC unit work harder and less efficiently. This is a crucial step. A clogged filter can even damage your system in the long run.
Without Tools (Mostly): Locate your air filter (usually near the indoor air handler or furnace). Remove the filter and visually inspect it. If it's covered in dust and debris, it's time for a change. Note the size of the filter so you buy the correct replacement.
Minimal Tools: You might need a screwdriver to open the filter access panel. Most homeowners have this. If the panel is stuck, don't force it. Call an HVAC professional.
DIY Action: Replace the dirty air filter with a new one of the correct size and MERV rating (Minimum Efficiency Reporting Value). A higher MERV rating means better filtration, but it can also restrict airflow if it's too high for your system. Consult your AC unit's manual or a professional for recommendations.
Step 3: Check Air Vents and Registers
Make sure all air vents and registers are open and unobstructed. Furniture, rugs, or curtains blocking airflow can significantly reduce cooling efficiency.
Without Tools: Walk through your house and ensure all vents are open and that nothing is blocking them. Feel the airflow coming from each vent. Is it strong and cool?
DIY Action: Rearrange furniture, move rugs, and adjust curtains to allow for optimal airflow. Clean any dust or debris from the vent covers to ensure unobstructed airflow.
Step 4: Inspect the Outdoor Condenser Unit
The outdoor unit (condenser) is responsible for releasing heat from your home. If it's blocked or dirty, it won't function efficiently.
Without Tools: Visually inspect the condenser unit. Is it surrounded by bushes, weeds, or debris? Are the fins (the metal grates around the unit) clean?
DIY Action (Proceed with Caution): Carefully remove any debris (leaves, twigs, etc.) from around the unit. Use a garden hose to gently rinse the fins. Do not use a pressure washer, as this can damage the delicate fins. Turn off the power to the unit at the breaker box before rinsing, and allow it to dry completely before turning it back on. Be careful not to bend the fins. If they are already bent you can get a fin comb to straighten them. These are relatively inexpensive.
Warning: Never open the condenser unit or attempt to repair internal components. This can be dangerous and void your warranty.
Step 5: Check for Air Leaks
Air leaks allow hot air to enter your home, forcing your AC unit to work harder. Common sources of air leaks include windows, doors, and cracks in walls or ceilings.
Without Tools: On a sunny day, hold your hand near windows and doors. Can you feel any drafts? Inspect window and door frames for cracks or gaps.
Minimal Tools: Light a candle or incense stick and hold it near windows and doors. If the flame flickers or the smoke wafts, you have an air leak.
DIY Action: Seal air leaks with caulk or weather stripping. Apply caulk to cracks around window and door frames. Install weather stripping around doors to create a tighter seal. For larger gaps, use expanding foam insulation. You can purchase these materials at any hardware store. For large gaps use backer rod before applying caulk.
Step 6: Thermostat Calibration (if applicable)
Some thermostats, especially older models, can become miscalibrated, displaying an inaccurate temperature. This can lead to your AC unit running unnecessarily or not cooling effectively.
Minimal Tools: You'll need an accurate thermometer (digital is best). Place the thermometer near your thermostat and wait 15-20 minutes. Compare the readings.
DIY Action (Depending on Thermostat Type): Some thermostats have a calibration setting. Consult your thermostat's manual for instructions on how to adjust the calibration. If your thermostat doesn't have a calibration setting, consider replacing it with a newer, more accurate model.
Step 7: Check Ductwork (Visual Inspection - Limited DIY)
Leaky or poorly insulated ductwork can lose a significant amount of cool air before it reaches your living spaces. This is a more advanced check, but a visual inspection can reveal obvious problems.
Without Tools (Visual Inspection): If you have access to your ductwork (e.g., in an attic or crawl space), visually inspect it for obvious tears, gaps, or disconnected sections. Look for signs of condensation, which can indicate air leaks.
DIY Action (Limited): If you find small tears or gaps, you can seal them with duct tape (use foil duct tape, not cloth duct tape). However, for significant damage or disconnected sections, it's best to call a professional.
Warning: Never attempt to repair ductwork that is wrapped in asbestos. Contact a professional asbestos abatement company.
Step 8: Check for Refrigerant Leaks (Professional Required)
If your AC unit is running constantly but not cooling effectively, it could be a sign of a refrigerant leak. This is a serious issue that requires professional attention.
Signs of a Refrigerant Leak: Reduced cooling capacity, ice buildup on the evaporator coil (inside the indoor unit), a hissing sound near the AC unit.
No DIY Action: Refrigerant leaks require specialized equipment and training to repair. Do not attempt to handle refrigerant yourself. It's illegal and dangerous.
Step 9: Electrical Issues (Professional Required)
Electrical problems can prevent your AC unit from running properly. These issues can range from a tripped breaker to a faulty capacitor.
Check the Breaker: Go to your electrical panel and check the breaker for your AC unit. If it's tripped, reset it. If it trips again immediately, there's likely an electrical problem.
No DIY Action: Working with electricity can be dangerous. Do not attempt to diagnose or repair electrical issues yourself. Call a qualified electrician or HVAC technician.
When to Call a Professional
While some of these troubleshooting steps are simple and safe to perform yourself, others require specialized knowledge and equipment. Here's a summary of when it's best to call a professional HVAC technician:
- Refrigerant leaks: This is a serious issue that requires professional repair.
- Electrical problems: Never attempt to diagnose or repair electrical issues yourself.
- Major ductwork damage: Significant tears or disconnected sections require professional repair.
- Compressor issues: The compressor is the heart of your AC unit. If it's malfunctioning, it's best left to a professional.
- If you've tried the DIY solutions and your AC unit is still not cooling effectively: It's time to call in the experts.
The "Best" Temperature: Balancing Comfort and Savings
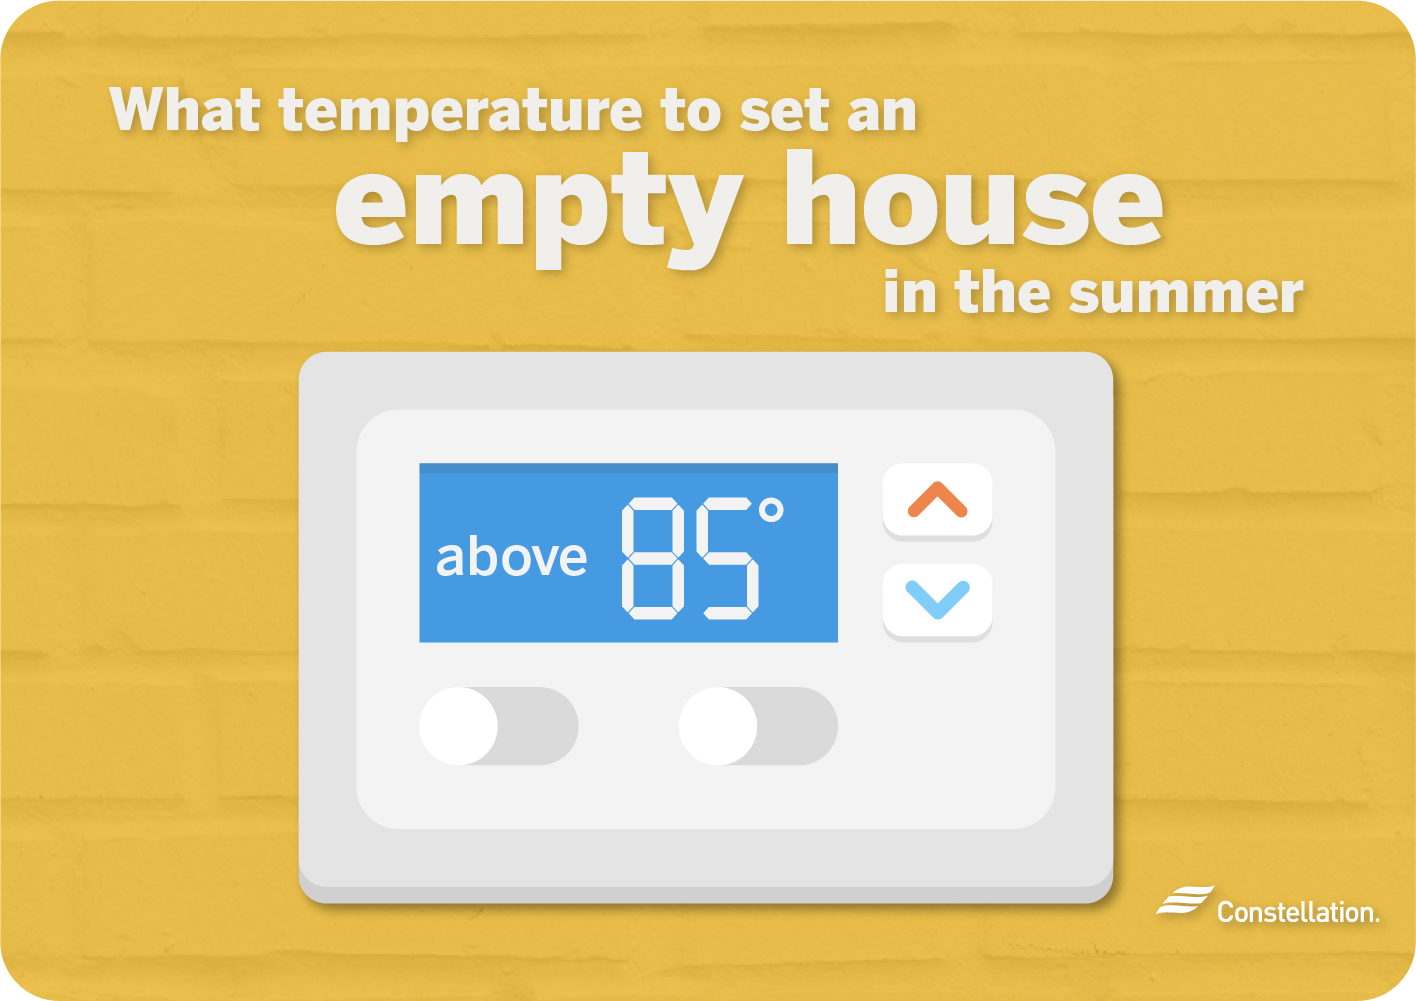
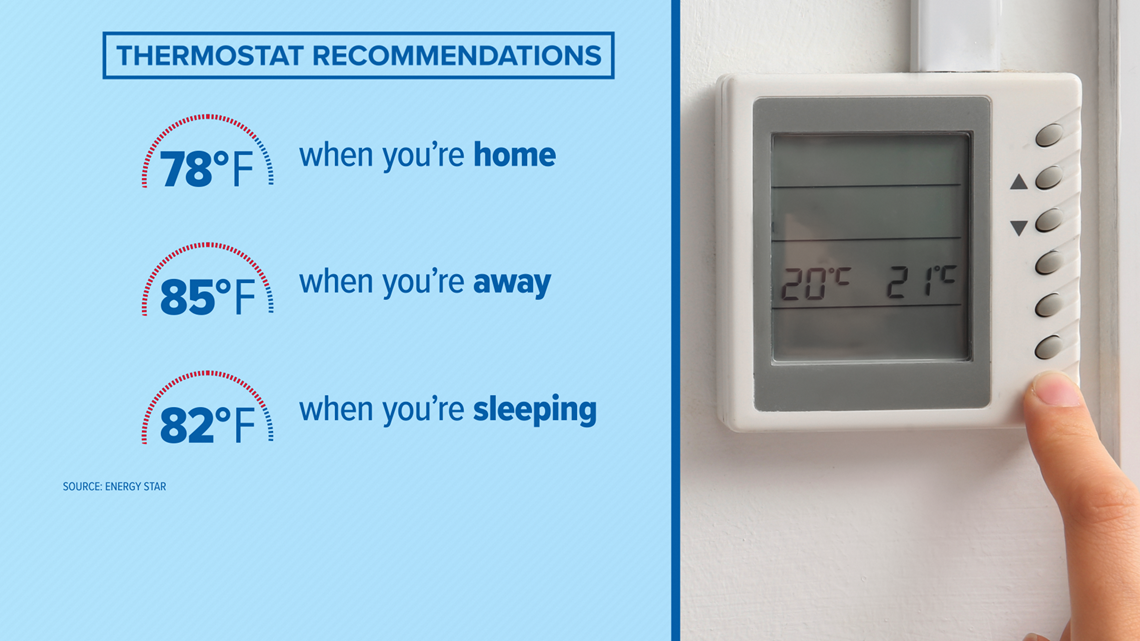
While troubleshooting is important, finding the right temperature is key. The "best" temperature for your house in the summer is a balance between comfort and energy savings. The U.S. Department of Energy recommends setting your thermostat to 78°F (26°C) when you're home and 85°F (29°C) or higher when you're away.
However, comfort is subjective. Some people prefer a cooler temperature, while others are comfortable at a warmer temperature. Experiment to find the temperature that works best for you and your family.
Programmable Thermostats: Consider investing in a programmable thermostat. This allows you to set different temperatures for different times of the day, saving energy when you're asleep or away from home.
Ceiling Fans: Use ceiling fans to circulate air and make the room feel cooler. Remember to turn them off when you leave the room, as they don't actually cool the air, they only create a wind chill effect.
Smart Thermostats: Smart thermostats learn your habits and automatically adjust the temperature to maximize energy savings. They can also be controlled remotely via a smartphone app.
By following these troubleshooting steps and finding the right temperature setting, you can keep your house cool and comfortable all summer long, without breaking the bank. Remember, safety first, and don't hesitate to call a professional when needed!