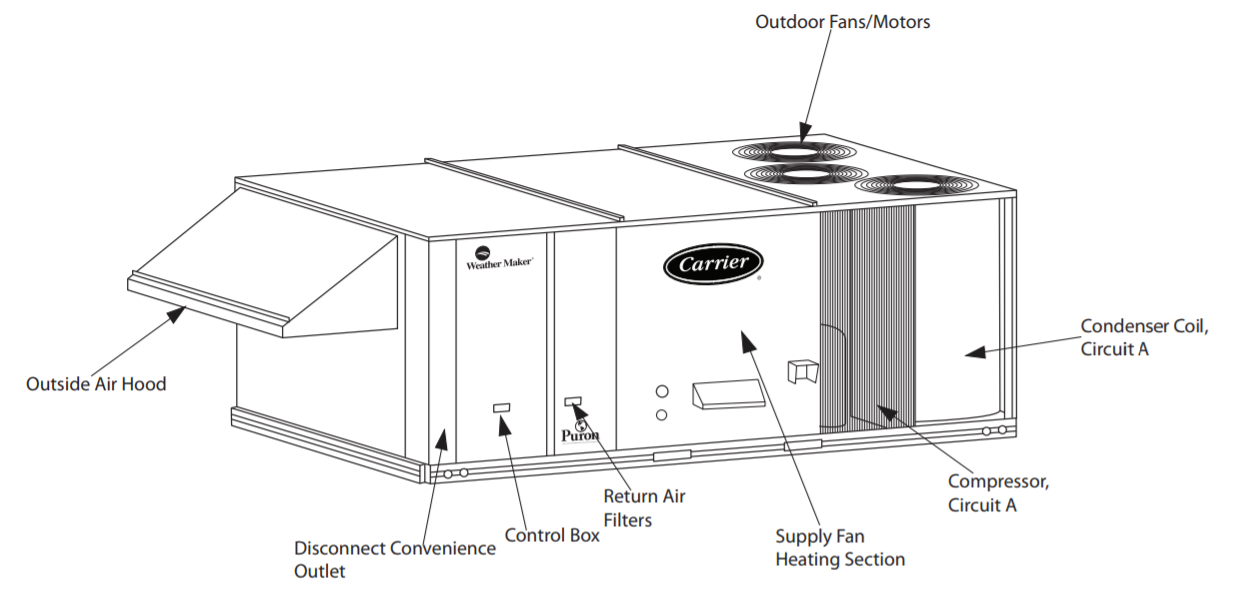
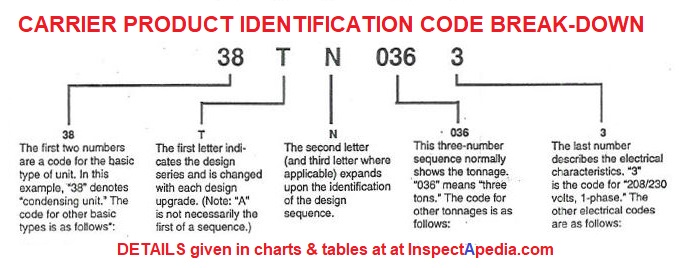
Carrier Package Unit Nomenclature
Understanding your HVAC equipment is crucial for proper maintenance, troubleshooting, and even getting accurate repair estimates. When it comes to Carrier package units, deciphering the model number is your first step. This alphanumeric code holds a wealth of information about your unit’s specifications, capacity, and features. This guide will help you break down the Carrier package unit nomenclature, empowering you to understand your system and communicate effectively with HVAC professionals.
Decoding the Carrier Package Unit Model Number
Carrier uses a specific naming convention for its package units. While the exact format can vary slightly depending on the unit’s age and model line, the core components remain consistent. Let's break down a typical model number into its individual segments and explore what each represents.
Consider a model number like: 48TC*14A3A5-A
Segment 1: Series Designation (48)
The first two digits typically indicate the *series* of the unit. This often relates to the type of unit (e.g., heat pump, air conditioner, gas pack) and its efficiency tier. Here’s a general overview, but always confirm with Carrier’s official documentation for your specific unit:
- 48: Often indicates a standard efficiency gas/electric package unit.
- 50: May signify a higher efficiency gas/electric package unit.
- 50PG: Typically a premium gas/electric unit with modulating technology
- 48HC: Standard heat pump package unit.
- 50HC: Higher efficiency heat pump package unit.
Segment 2: Unit Type (TC*)
The next two to three characters define the *type* of unit and specific features. This is where variations in Carrier nomenclature become apparent.
- TC*: Often signifies a gas/electric package unit. The asterisk usually represents additional features or efficiency levels within that series.
- H**: Typically indicates a heat pump package unit. Again, subsequent letters may denote specific features.
Segment 3: Cooling Capacity (14)
These two digits represent the *cooling capacity* of the unit in thousands of BTU/hour (BTUH). Multiply this number by 12,000 to get the BTUH. In this example, '14' means 14 x 1,000 = 14,000 BTUH. To convert to tons, divide by 12,000 (14,000 / 12,000 ≈ 1.17 tons). This unit is approximately a 1.17-ton unit. Be careful as cooling capacity is not always this straight forward as many models have been updated and use a different formula.
Segment 4: Design Series (A)
This single letter typically represents the *design series*. This indicates a revision or update to the unit’s design. As Carrier makes improvements, the design series letter advances (A, B, C, etc.). A higher letter usually signifies a newer model.
Segment 5: Voltage (3)
This digit indicates the *voltage* configuration of the unit. Common voltage codes include:
- 3: 208/230V, 1-Phase
- 4: 460V, 3-Phase
- 6: 208/230V, 3-Phase
- 5: 575V, 3-Phase
Important Safety Tip: Never work on electrical components without disconnecting power at the breaker. If you are unsure about electrical work, always call a qualified electrician or HVAC technician.
Segment 6: Evolution/Configuration (A5)
This part details specific internal components, performance features, and *internal configuration* of the system. It often refers to the blower motor type, heat exchanger material, and other technical specifications. This area requires the most specialized knowledge and can vary greatly between models. Refer to Carrier's official product data for detailed information.
Segment 7: Regional Designation (-A)
The final segment usually signifies the *regional designation* or specific modifications for a particular market or application. This may involve adjustments for altitude or special requirements.
Common Issues and Troubleshooting
Understanding your Carrier package unit model number can help you diagnose common problems. Here's a list of issues and how the model number can aid in troubleshooting:
- Unit Not Cooling/Heating: Knowing the unit type (gas/electric or heat pump) narrows down potential issues. For gas/electric, check the gas supply and ignition system. For heat pumps, investigate the reversing valve and defrost cycle.
- Insufficient Airflow: Use the model number to find the correct blower motor specifications when replacing it. An improperly sized motor can severely impact airflow.
- Strange Noises: Identify the unit type and components. Is the noise coming from the compressor, blower motor, or gas burner? Knowing the unit type helps you pinpoint the source.
- High Energy Bills: The model number helps determine the unit's efficiency rating. Compare this to its original rating. If efficiency has significantly decreased, consider maintenance or replacement.
DIY Maintenance and Repairs (With Caution)
Some maintenance tasks are suitable for DIYers, while others require professional expertise. Here's a breakdown:
DIY-Friendly Tasks:
- Changing Air Filters: A dirty air filter restricts airflow and reduces efficiency. Replace it regularly. Use the model number to find the correct filter size.
- Cleaning the Condenser Coils: Debris buildup on the condenser coils reduces cooling capacity. Gently clean the coils with a fin comb or garden hose.
- Clearing Debris Around the Unit: Ensure proper airflow around the unit by removing leaves, grass, and other obstructions.
Tasks Requiring a Professional:
- Refrigerant Leaks: Handling refrigerant requires specialized equipment and certifications.
- Compressor Repair: Compressors are complex and expensive. Leave repairs to a qualified technician.
- Gas Valve Replacement: Working with natural gas is dangerous. A professional should handle gas valve repairs.
- Electrical Repairs: Unless you are a licensed electrician, avoid electrical repairs beyond simple breaker resetting.
Finding Replacement Parts
When ordering replacement parts, always use the complete model number to ensure compatibility. Common parts you might need include:
- Air Filters: Ensure the correct size and MERV rating.
- Blower Motors: Match the voltage, horsepower, and RPM.
- Capacitors: Verify the microfarad (µF) and voltage rating.
- Contactors: Match the voltage and amperage rating.
- Igniters (for Gas Packs): Use the exact replacement specified for your unit.
Where to Find Parts:
- Local HVAC Supply Stores: Provide in-person assistance and expertise.
- Online Retailers: Offer a wide selection, but verify compatibility before ordering.
- Carrier Authorized Dealers: Ensure genuine Carrier parts.
Estimating Repair Costs
The Carrier package unit nomenclature also plays a role in estimating repair costs. The model number helps technicians determine the unit's age, complexity, and the cost of replacement parts. Generic estimates are useless, give the technician the model and serial number for the unit.
Factors Affecting Repair Costs:
- Type of Repair: Simple repairs like replacing a capacitor are less expensive than compressor replacements.
- Unit Age: Older units may require more expensive or harder-to-find parts.
- Technician's Labor Rate: Rates vary depending on location and experience.
- Refrigerant Costs: Refrigerant prices fluctuate.
Important Note: Getting multiple quotes from different HVAC professionals is always recommended. Provide them with your Carrier package unit model number for accurate estimates.
Conclusion
Understanding the Carrier package unit nomenclature is a valuable skill for homeowners and DIY enthusiasts. It empowers you to maintain your system, troubleshoot basic problems, and communicate effectively with HVAC professionals. While DIY repairs can save money, always prioritize safety and know your limits. When in doubt, call a qualified HVAC technician for assistance. Using this guide will help you get the most out of your unit and ensure its longevity.