Carrier Rtu Model Number Nomenclature

Many homeowners experience inconsistent heating or cooling in their homes. One common scenario is the furnace running, but the house remaining cold, or the air conditioner running, but the house staying warm. This can be frustrating and uncomfortable, and often the first step to resolving the issue is understanding your HVAC equipment. This article focuses on helping you troubleshoot your Carrier rooftop unit (RTU) by understanding its model number nomenclature, which can unlock vital information for diagnostics and potential DIY fixes.
Understanding Your Carrier RTU Model Number
The model number on your Carrier RTU is more than just a random string of characters. It's a code that reveals key details about the unit's specifications and capabilities. Finding and deciphering this number is crucial for identifying the correct replacement parts, troubleshooting guides, and system information. You'll typically find the model number on a metal nameplate located on the exterior of the RTU, often near the control panel or on the unit's casing. Common locations include the side, the front, or sometimes even inside the access panel. Grab a flashlight and a notepad (or your phone) and note down the entire model number. Make sure you also note down the serial number, as this will be useful when talking to HVAC professionals.
Deconstructing the Model Number: An Example
Let's break down a sample Carrier RTU model number to illustrate how it works. Keep in mind that the exact format can vary slightly depending on the unit's age and series, but the core principles remain consistent.
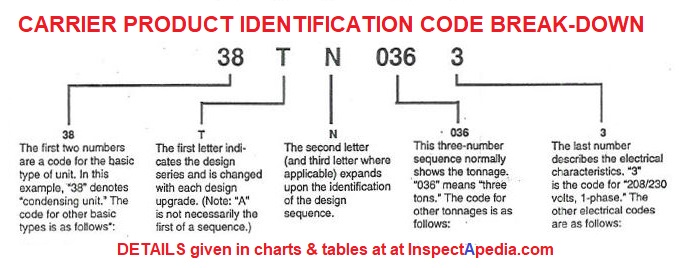
Example: 48TCB0181003--11
We'll go through a hypothetical breakdown of each section of this model number, explaining what each part generally signifies.
* 48: This often indicates the product family or series. "48" in this example, commonly refers to packaged rooftop units. * TCB: This signifies the unit type and efficiency. "TCB" often refers to a specific series within the 48 family, potentially denoting its cooling and heating capabilities (e.g., T could mean cooling, C combustion, B something else). Check Carrier documentation for exact definitions. * 018: This typically represents the cooling capacity in MBH (thousands of BTUs per hour). So, "018" would translate to 18,000 BTU/h. This number gives you a sense of the unit's cooling power. It’s the load on the unit to cool your house, typically matching the square footage of your house. * 100: These digits often represent design series or voltage. It is common for these numbers to denote the voltage and phase type. * 3: This can indicate a minor revision or design change within the specific model. * --11: This often indicates the voltage. "11" often translates to 208-230V, single phase. It is crucial to know your unit's voltage when selecting replacement parts.Important Note: This is a simplified example, and your specific model number may have slightly different meanings for each segment. Always refer to the official Carrier documentation or contact Carrier directly to confirm the exact meaning of each part of your model number. Carrier's website has the resources for model number break down. They can provide the definitive breakdown for your specific unit.
Troubleshooting: A Step-by-Step Guide
Now that you understand how to decipher your RTU model number, let's get into troubleshooting that common heating/cooling issue: the system runs, but the house isn't getting warm or cold.
Step 1: Basic Checks (No Tools Required)
* Thermostat Setting: This seems obvious, but double-check that your thermostat is set to the correct mode (heat or cool) and that the temperature is set appropriately. Make sure the batteries aren’t dead! Verify that the thermostat is actually calling for heat or cool. You should see a flame icon (for heat) or a snowflake icon (for cool) on the thermostat display. * Air Filter: A clogged air filter is one of the most common causes of HVAC problems. A dirty filter restricts airflow, which can cause the system to overheat or underperform. Remove the filter and hold it up to the light. If you can't see light through it, it's time to replace it. Replace the filter immediately, making sure you use the correct size and type for your unit (refer to your owner's manual or the filter itself). * Supply and Return Vents: Walk around your house and ensure that all supply and return vents are open and unobstructed. Furniture, rugs, or even closed doors can restrict airflow and impact system performance. * Outdoor Unit Obstructions: Check the outdoor unit (your RTU) for any obstructions, such as leaves, snow, ice, or debris. Clear away anything that could be blocking airflow around the unit. Make sure the unit is not covered.Step 2: Preliminary Electrical Checks (Basic Tools Required - Multimeter & Safety Glasses)
WARNING: Working with electricity can be dangerous. If you are not comfortable with electrical work, stop here and call a qualified HVAC technician. Always turn off the power to the unit at the breaker before performing any electrical checks. Verify the power is off with your multimeter before touching any wires. Wear safety glasses to protect your eyes.
* Breaker Check: Go to your electrical panel and check the breaker that supplies power to your RTU. Ensure that the breaker is not tripped (in the "off" or "middle" position). If it is tripped, reset it by flipping it fully to the "off" position and then back to the "on" position. If the breaker trips again immediately, there's likely a short circuit, and you need to call a professional. * Voltage Check (Basic Multimeter Required): After switching off the breaker, carefully open the access panel to the RTU's control box. Use your multimeter to check the voltage at the main power terminals of the unit. Ensure that you are reading the correct voltage for your unit (as indicated on the unit's nameplate or in your owner's manual). If you are not reading the correct voltage, there may be an issue with the power supply to the unit. If you are not comfortable doing this, then call a professional.Step 3: Component Inspection (Advanced – Professional Recommended)
The following checks require more advanced knowledge and potentially specialized tools. If you are not comfortable with these steps, it's best to call a qualified HVAC technician.
* Capacitor Check: Capacitors store energy and help start the motor. A faulty capacitor is a common cause of motor failures. Visually inspect the capacitors for any signs of bulging, leaking, or corrosion. If you see any of these signs, the capacitor needs to be replaced. This requires discharging the capacitor safely and using a multimeter to test its capacitance. *This can be dangerous and is best left to a professional.* * Contactor Check: The contactor is an electrical switch that controls power to the compressor and fan motors. Check the contactor for signs of damage, such as burnt or pitted contacts. Use a multimeter to test the contactor's continuity to ensure it is functioning correctly. * Blower Motor Check: The blower motor circulates air throughout your home. If the blower motor is not working, you will not get any airflow from your vents. Check the blower motor for any signs of damage, such as burnt wires or a seized motor. You can also try manually spinning the blower wheel to see if it spins freely. * Compressor Check: The compressor is the heart of the cooling system. If the compressor is not working, the unit will not cool. Checking the compressor requires specialized tools and knowledge and should only be performed by a qualified HVAC technician.Step 4: Understanding RTU-Specific Components (Requires Technical Manual)
Your Carrier RTU has several components specific to its design. To effectively troubleshoot these, you'll need to consult the unit's technical manual, often available online using your model number (a key reason for identifying and understanding it!).
* Gas Valve (for heating): If your RTU has a gas furnace, the gas valve controls the flow of gas to the burners. A faulty gas valve can prevent the furnace from igniting. Checking the gas valve requires specialized tools and knowledge and should only be performed by a qualified HVAC technician. * Ignition System (for heating): The ignition system is responsible for igniting the gas in the furnace. A faulty ignition system can prevent the furnace from igniting. Common ignition systems include spark ignition, hot surface ignition, and pilot light ignition. * Heat Exchanger (for heating): The heat exchanger transfers heat from the combustion gases to the air that is circulated throughout your home. A cracked heat exchanger can leak dangerous carbon monoxide into your home. Checking the heat exchanger requires specialized tools and knowledge and should only be performed by a qualified HVAC technician. * Refrigerant Charge (for cooling): The refrigerant charge is the amount of refrigerant in the cooling system. A low refrigerant charge can cause the unit to underperform. Checking the refrigerant charge requires specialized tools and knowledge and should only be performed by a qualified HVAC technician.DIY Actions and When to Call a Pro
Based on your troubleshooting efforts, here's a summary of DIY actions you can take and when it's time to call a professional:
DIY Actions (Safe and Simple): * Replacing a dirty air filter * Resetting a tripped breaker (if it doesn't immediately trip again) * Clearing obstructions from vents and the outdoor unit * Ensuring the thermostat is set correctly Call a Professional HVAC Technician If: * The breaker trips repeatedly * You suspect an electrical short or wiring issue * You are not comfortable working with electricity * You suspect a refrigerant leak * You need to replace a capacitor, contactor, or motor * You suspect a problem with the gas valve, ignition system, or heat exchanger * You are not comfortable troubleshooting the unit yourself * You have exhausted all DIY options and the problem persistsImportant Safety Precautions: Always turn off the power to the unit at the breaker before performing any maintenance or repairs. Never work on electrical components while the power is on. Wear safety glasses to protect your eyes. If you are not comfortable with any of the troubleshooting steps, call a qualified HVAC technician.
Conclusion: By understanding your Carrier RTU model number and following these troubleshooting steps, you can often diagnose and resolve common heating and cooling problems. Remember to prioritize safety and call a professional when needed. With a little knowledge and effort, you can keep your HVAC system running smoothly and efficiently, and keep your home comfortable all year round.