Central Air Conditioning How Does It Work
:max_bytes(150000):strip_icc()/what-are-central-air-conditioners-1152645_V2-390c6f1f6ca14b4ebc59426f226a78a8.png)
It's a sweltering summer day, and you walk into your house, expecting a cool and refreshing blast of air from your central air conditioning system. Instead, you're met with…nothing. Or worse, warm air. A malfunctioning central AC unit is a common household headache, but before you call a professional, let's explore some basic troubleshooting steps you can safely perform.
Understanding the Basics: How Central AC Works
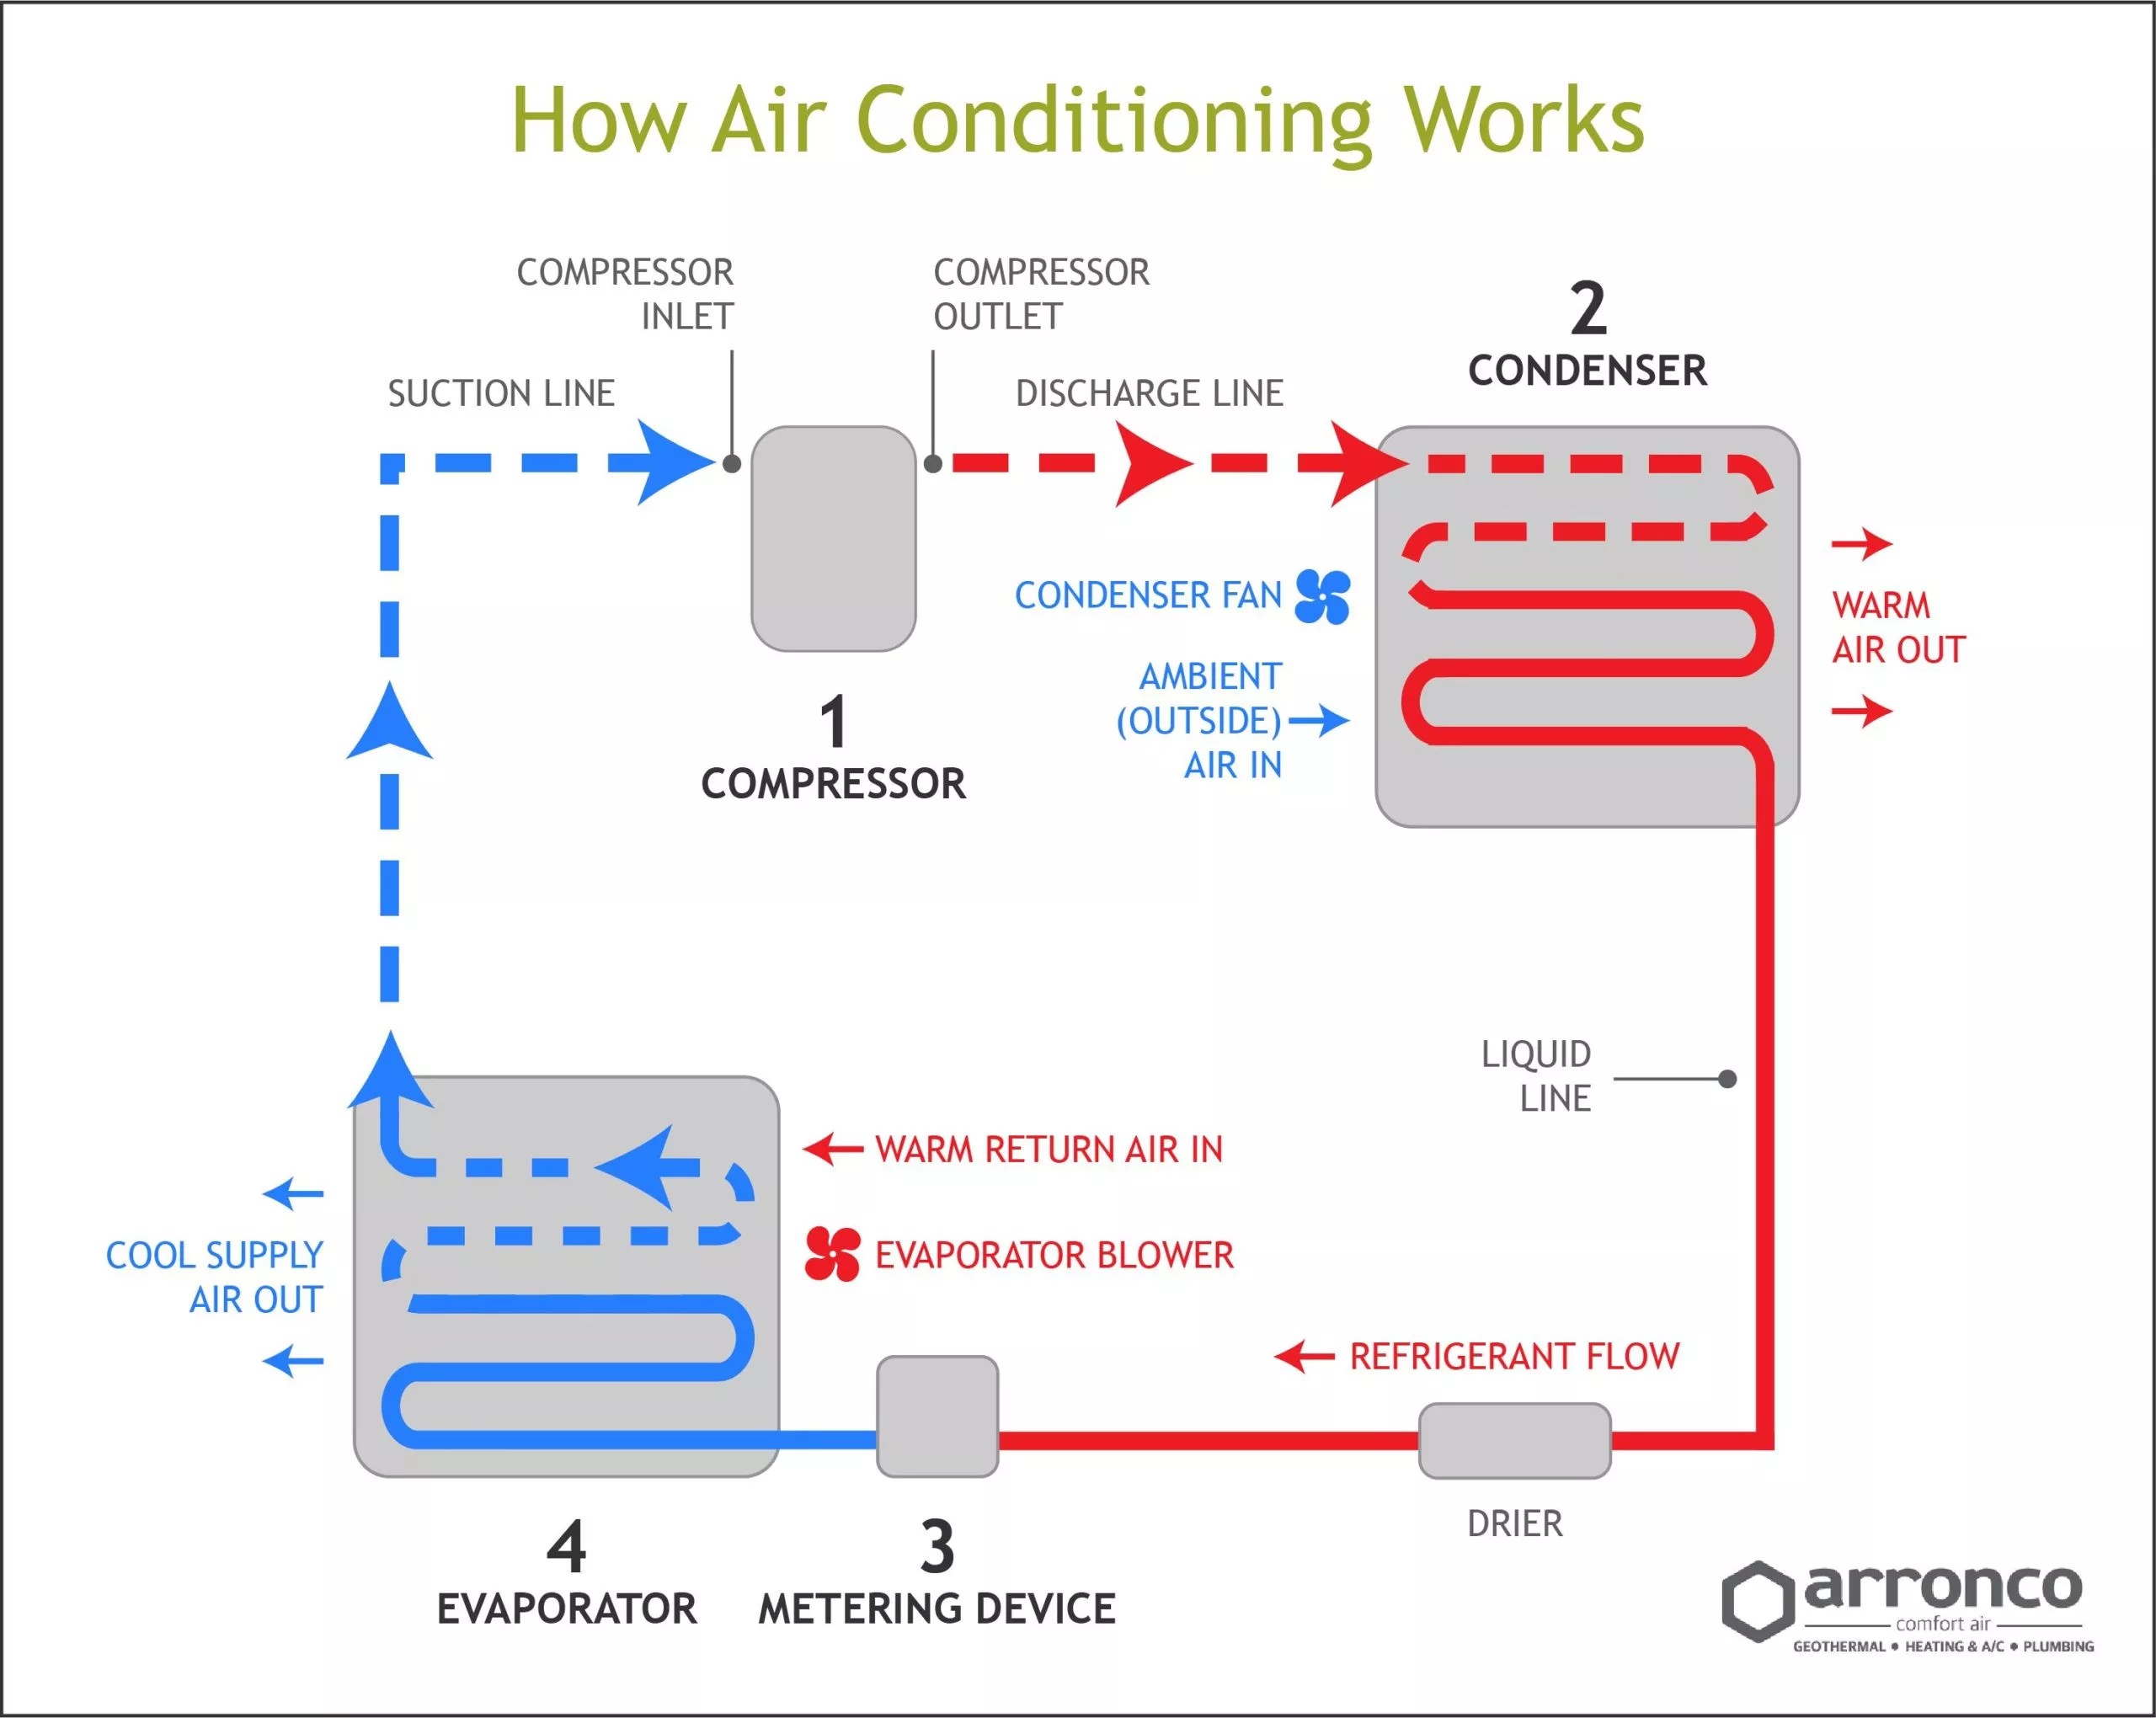
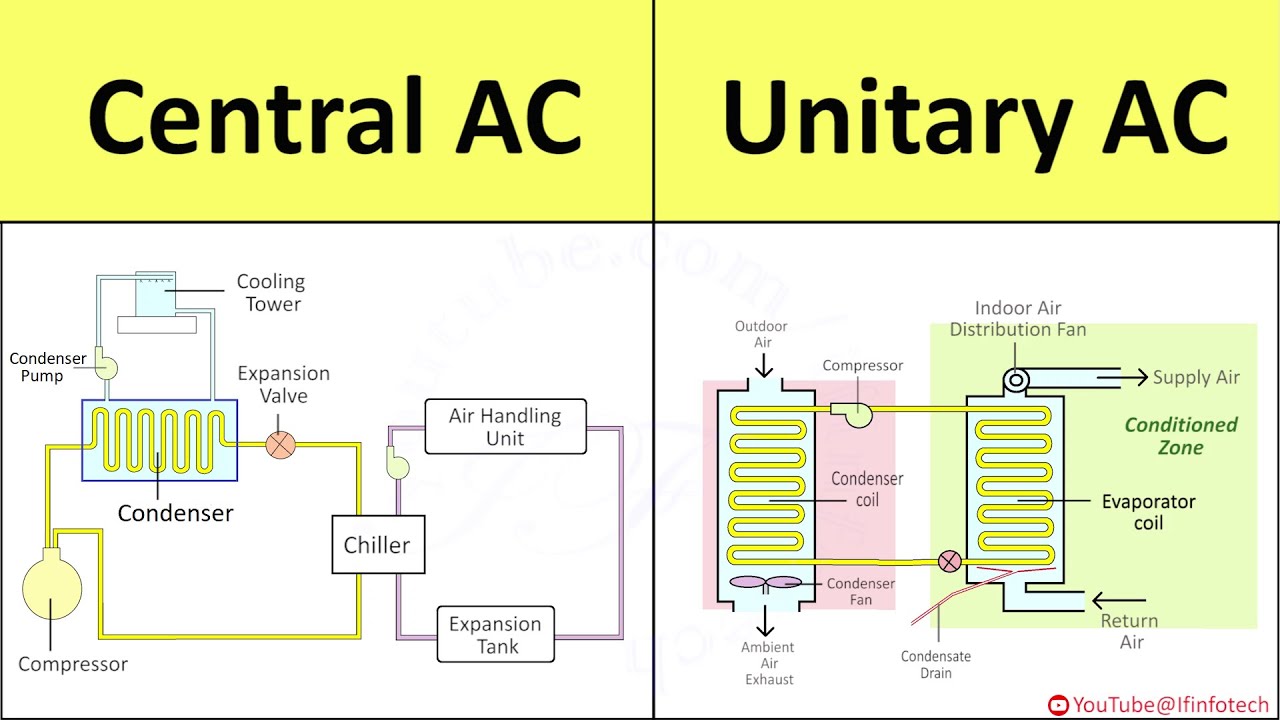
Before diving into the fixes, let's quickly review how a central AC system operates. Understanding the process will help you pinpoint potential problems. At its core, an AC unit uses refrigerant to cool your home through a cycle of:
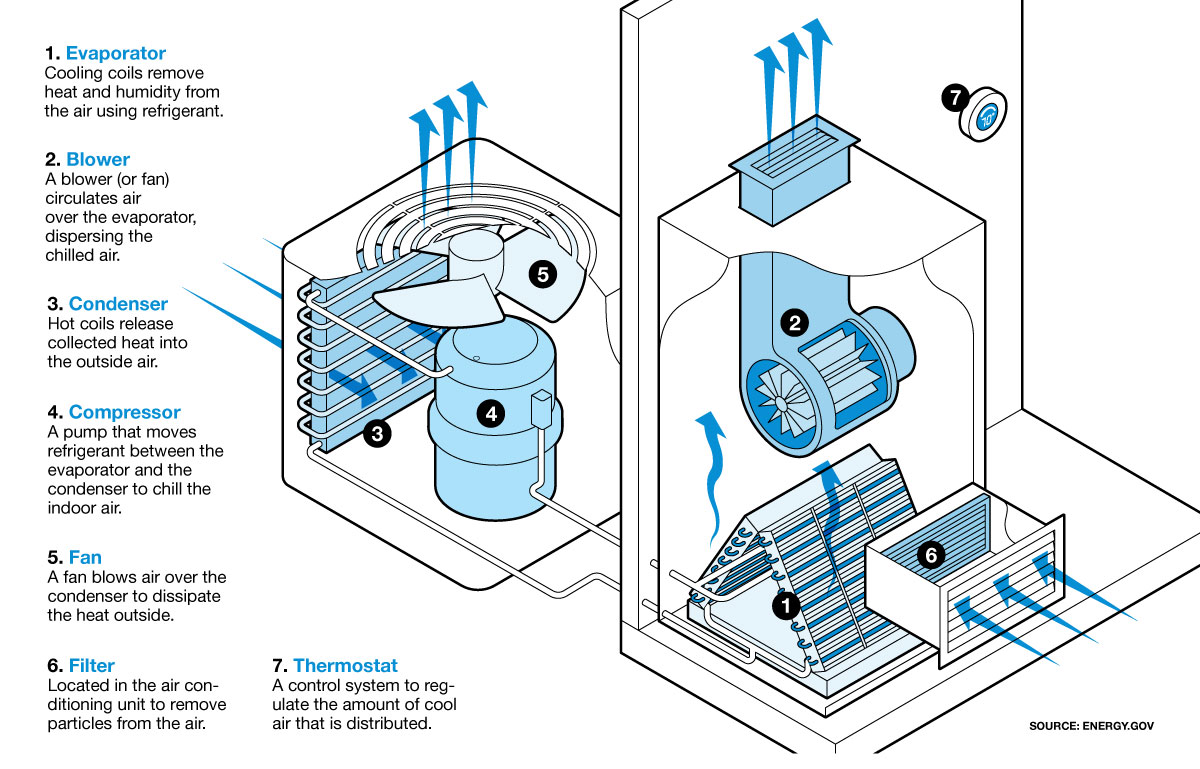
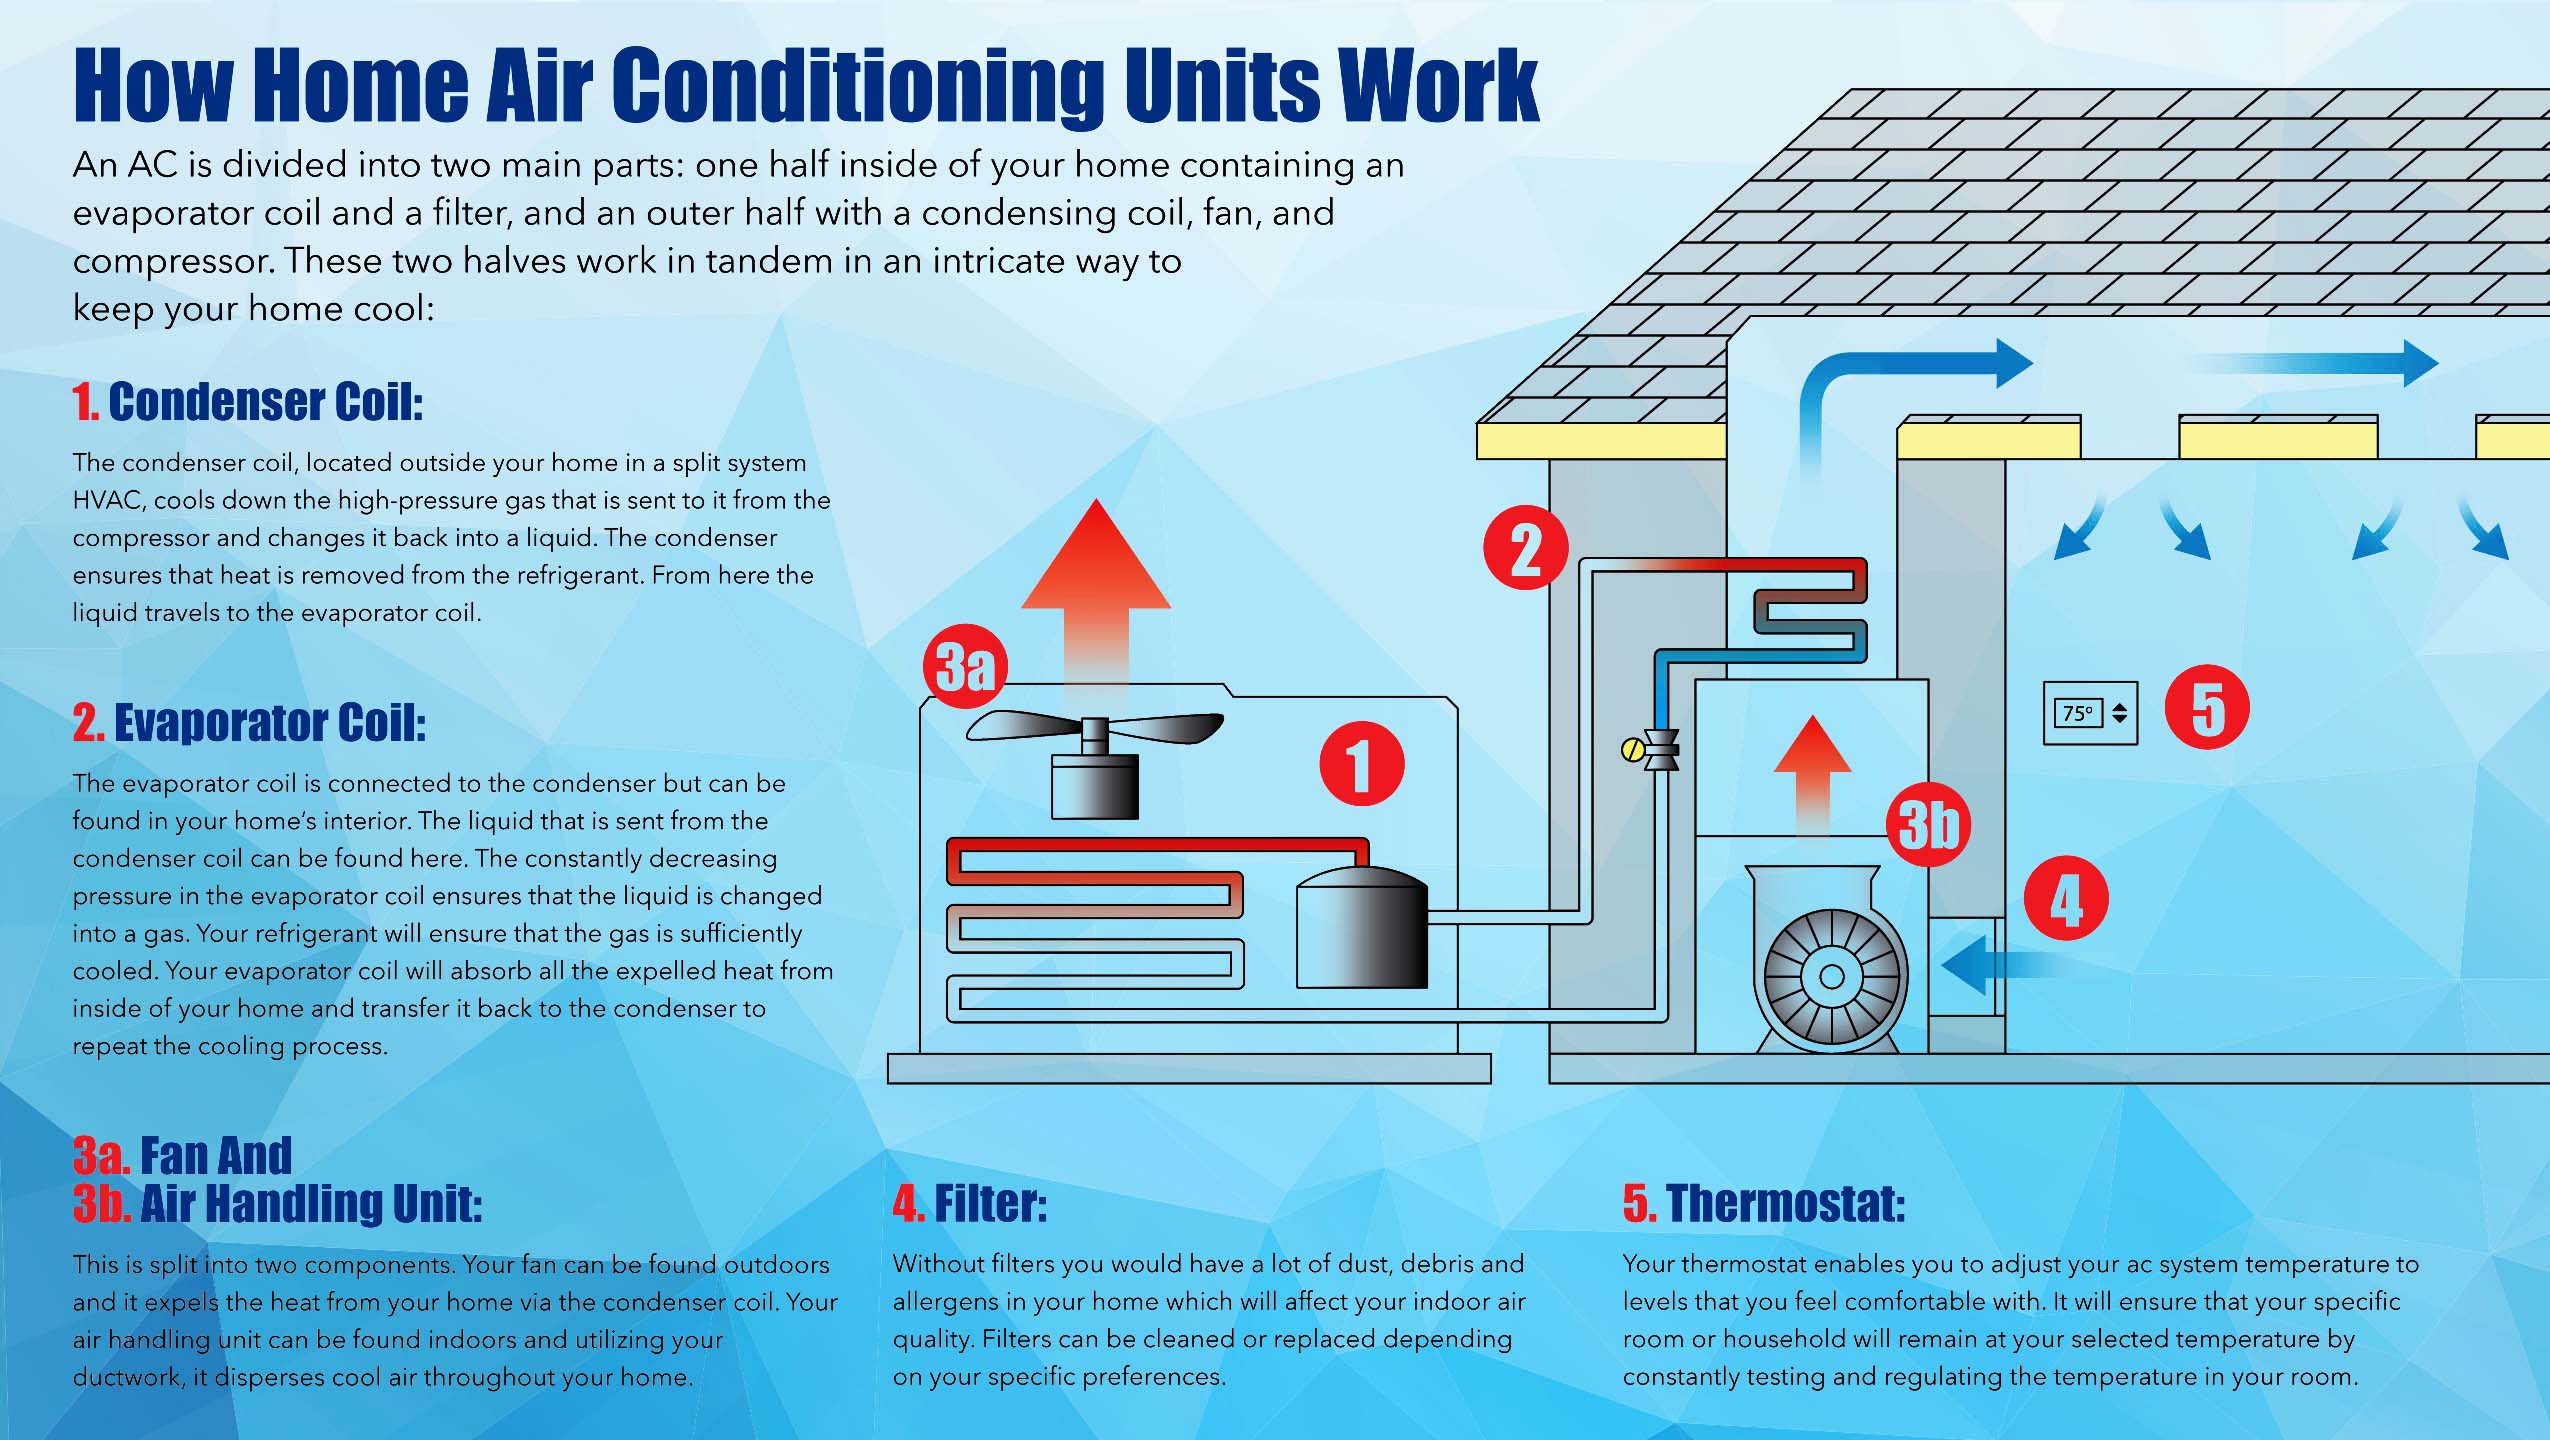
- Evaporation: Refrigerant absorbs heat from your indoor air in the evaporator coil (located inside your air handler or furnace). This changes the refrigerant from a liquid to a gas.
- Compression: The compressor (located in the outdoor unit) increases the pressure and temperature of the refrigerant gas.
- Condensation: The hot, high-pressure refrigerant gas releases heat to the outside air in the condenser coil (also in the outdoor unit). This changes the refrigerant back into a liquid.
- Expansion: The refrigerant flows through an expansion valve, which reduces its pressure and temperature, preparing it to absorb heat again in the evaporator coil.
This cycle repeats continuously, removing heat from your home and transferring it outside. The system also includes a blower fan (inside your air handler) that circulates the cooled air through your ductwork.
Troubleshooting: A Step-by-Step Guide
Step 1: The Obvious Checks – Power and Settings
Start with the simplest things first. Often, the solution is a quick fix.
- Thermostat Settings: Is the thermostat set to COOL and the temperature set lower than the current room temperature? Double-check that the fan is set to AUTO or ON, not just FAN ONLY. Sometimes, a simple programming error is the culprit.
- Power Supply: Check the circuit breaker for both the indoor unit (usually near your furnace or air handler) and the outdoor unit. Make sure the breakers are switched ON. If a breaker has tripped, reset it. If it trips again immediately, there's a short circuit, and you should call a qualified electrician.
- Air Filter: A clogged air filter is one of the most common causes of AC problems. A dirty filter restricts airflow, making the system work harder and potentially causing it to overheat. Replace your air filter every 1-3 months, or more often if you have pets or allergies.
- Outdoor Unit Obstructions: Ensure the outdoor unit is free of debris like leaves, grass clippings, and shrubs. Clear any obstructions that could be blocking airflow around the unit. Aim for at least 2-3 feet of clearance around the unit.
Step 2: Inspecting the Outdoor Unit
If the basic checks didn't solve the problem, move on to the outdoor unit. Before you touch anything, make sure the power to the unit is switched OFF at the breaker!
- Condenser Fins: The condenser fins (the metal fins surrounding the outdoor unit) can become bent or damaged, restricting airflow. Gently straighten any bent fins with a fin comb (available at most hardware stores). Be careful not to damage the fins further.
- Condenser Fan: Check the condenser fan. Ensure it's not blocked by debris and that it spins freely. If the fan motor is humming but not spinning, the capacitor might be faulty. Do NOT attempt to replace the capacitor yourself. This component stores a dangerous electrical charge, even when the power is off. Contact a qualified HVAC technician.
- Inspect for Ice: Look for ice buildup on the refrigerant lines or the outdoor unit itself. This could indicate a refrigerant leak or a frozen evaporator coil. If you see ice, turn off the AC system and let the ice melt completely. Once melted, try running the system again. If the icing returns, you likely have a refrigerant issue, and you'll need to call a professional.
Step 3: Checking the Indoor Unit
Next, focus on the indoor unit, usually located near your furnace or air handler. Again, ensure the power is OFF before inspecting any components.
- Evaporator Coil: While you likely can't directly access the evaporator coil without specialized tools, you can check for signs of ice buildup in the area around the coil. If you suspect a frozen evaporator coil (perhaps you noticed reduced airflow from your vents), turn off the AC and let it thaw completely.
- Blower Fan: Check the blower fan inside the air handler. Ensure it's clean and free of debris. A dirty blower fan can significantly reduce airflow. Consult your air handler's manual for instructions on cleaning the blower fan.
- Ductwork: Inspect your ductwork for any obvious leaks or disconnections. Leaks in the ductwork can cause significant air loss, reducing the efficiency of your AC system. Seal any small leaks with duct tape (though professional sealing is recommended for larger leaks).
Step 4: Simple Part Replacements (With Caution)
There are a couple of simple part replacements that some homeowners feel comfortable tackling. However, proceed with caution and only if you're comfortable working with electrical components. ALWAYS disconnect the power before working on any electrical parts. If you're unsure, call a professional.
- Capacitor (Blower Motor): WARNING: Capacitors store electricity and can deliver a dangerous shock even after the power is turned off. This replacement should only be attempted by individuals with experience working with electrical components and after properly discharging the capacitor. If you are confident and have the necessary skills, you can replace a faulty blower motor capacitor. First, discharge the capacitor using a screwdriver with an insulated handle (search online for instructions on how to safely discharge a capacitor). Then, carefully remove the wires from the old capacitor, noting their positions. Install the new capacitor, connecting the wires in the same order.
- Contactor: The contactor is an electrical switch that controls power to the outdoor unit. A faulty contactor can prevent the compressor and fan from running. WARNING: This replacement involves working with high voltage. ONLY attempt this if you are experienced and comfortable working with electricity. Disconnect the power and verify that the contactor is not receiving power before proceeding. Take a picture of the wiring before disconnecting anything. Carefully remove the wires from the old contactor and install the new one, connecting the wires in the same order.
When to Call a Professional
While many basic AC problems can be addressed with DIY troubleshooting, there are certain situations where it's crucial to call a qualified HVAC technician. Here are some red flags:
- Refrigerant Leaks: Handling refrigerant requires specialized equipment and training. If you suspect a refrigerant leak (e.g., icing, hissing sound, poor cooling), do not attempt to repair it yourself. Refrigerant is harmful to the environment, and improper handling can be dangerous.
- Compressor Problems: The compressor is the heart of your AC system. If you suspect a compressor problem (e.g., loud noises, no cooling), leave the repair to a professional. Compressor repairs are complex and expensive.
- Electrical Issues: If you're not comfortable working with electricity, do not attempt to repair any electrical components of your AC system. Improper wiring can lead to fires or electrocution.
- Complex Repairs: If you've tried the basic troubleshooting steps and your AC system is still not working, it's time to call a professional. They have the expertise and tools to diagnose and repair more complex problems.
- Gas Leaks: If your AC system is connected to a gas furnace and you suspect a gas leak (e.g., smell of gas), immediately evacuate your home and call your gas company or the fire department.
Preventive Maintenance: Avoiding Future Problems
The best way to avoid AC problems is to perform regular preventive maintenance. Here are some tips:
- Regular Air Filter Changes: As mentioned earlier, change your air filter every 1-3 months.
- Annual Professional Tune-Up: Schedule an annual tune-up with a qualified HVAC technician. They can inspect your system, clean the coils, check the refrigerant levels, and identify any potential problems before they become major issues.
- Clean Outdoor Unit: Regularly clean the outdoor unit to remove debris and ensure proper airflow.
- Maintain Ductwork: Inspect your ductwork for leaks and seal any that you find. Consider having your ductwork professionally cleaned every few years.
Safety First!
Working with electrical and mechanical equipment can be dangerous. Always take the following precautions:
- Disconnect the power before working on any electrical components.
- Wear safety glasses to protect your eyes.
- Wear gloves to protect your hands.
- Never work on your AC system when it's wet.
- If you're unsure about anything, call a professional.
By following these troubleshooting steps and performing regular maintenance, you can keep your central AC system running smoothly and efficiently for years to come. Remember to prioritize safety and call a professional when needed. With a little knowledge and effort, you can keep your home cool and comfortable all summer long!