Closed Loop Chilled Water System Treatment
Are you noticing inconsistent heating or cooling in your home despite your HVAC system running? One potential culprit, especially if you have a closed-loop chilled water system, is water treatment issues. This article will guide you through troubleshooting common problems related to water quality in your closed-loop system, helping you identify the source of the issue and potentially resolve it yourself. We’ll focus on practical steps you can take, but also highlight when professional help is necessary.
Understanding Closed-Loop Chilled Water Systems and Water Treatment
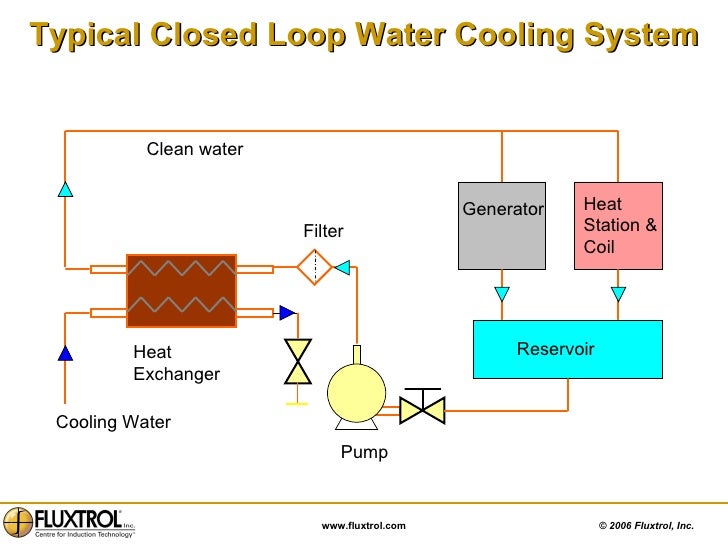
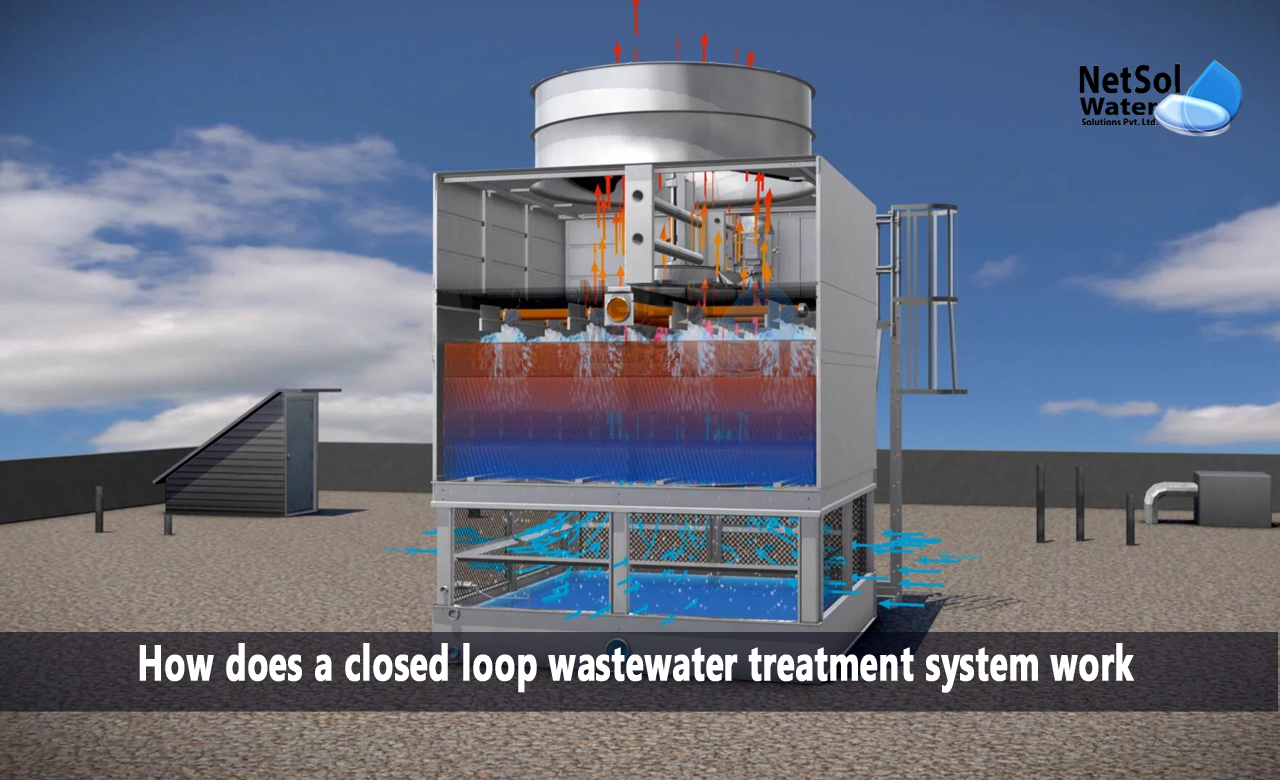
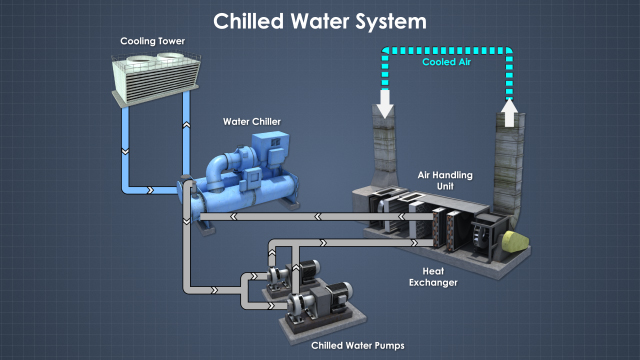
First, let's clarify what we're dealing with. A closed-loop chilled water system uses the same water repeatedly to transfer heat. This loop is *closed*, meaning the water ideally doesn't come into contact with the outside environment. However, over time, issues can develop due to:
- Corrosion: Metals within the system (pipes, coils, pumps) can corrode, releasing metal particles into the water.
- Scale Buildup: Minerals in the water can precipitate and form scale on heat transfer surfaces, reducing efficiency.
- Biological Growth: Bacteria and algae can thrive in the water, forming biofilms that further reduce efficiency and contribute to corrosion.
- Air Intrusion: Even small amounts of air entering the system can exacerbate corrosion.
Proper water treatment is crucial to prevent these problems. This typically involves adding chemicals to the water to inhibit corrosion, scale formation, and biological growth. When water treatment is neglected, you'll see decreased heating or cooling performance, increased energy bills, and potentially even equipment failure.
Troubleshooting: Is Water Treatment the Problem?
Before diving into specific checks, let's confirm that water treatment is likely the root cause of your heating/cooling issues. Ask yourself these questions:
- Has the system's performance gradually declined? A sudden failure is more likely a mechanical issue (e.g., pump failure).
- Are you experiencing reduced heating or cooling in specific zones or throughout the house? Localized problems might indicate blocked coils or valves in those zones. Widespread issues point to a system-wide problem.
- Has it been a long time since the system was last serviced or the water treatment chemicals were replenished? Neglected maintenance is a prime suspect.
- Are you noticing unusual noises from the pump or other system components? Corrosion and scale can damage pumps and other parts, leading to increased noise and wear.
If you answered "yes" to several of these questions, the following troubleshooting steps are relevant.
Step-by-Step Diagnosis: Checking Without Tools
Start with these simple checks that require no tools:
1. Visual Inspection of Accessible Components
Carefully examine any accessible parts of your closed-loop system, such as expansion tanks, air vents, and accessible piping (if any). Look for the following:
- Rust or Corrosion: Visible rust on pipes, fittings, or the expansion tank is a clear sign of corrosion within the system.
- Leaks: Even small leaks can introduce fresh water (and therefore minerals and oxygen) into the system, accelerating corrosion and scale buildup.
- Sediment or Discoloration in the Expansion Tank: If the expansion tank is accessible and has a clear section, look for sediment at the bottom or discoloration of the water. This suggests corrosion and scale particles are present.
- Calcification around Fittings: White, chalky deposits around fittings or connections indicate mineral scale buildup.
Document your findings! Take pictures or make notes of anything unusual. This information will be valuable for a professional if you need to call one.
2. Check the System Pressure
Most closed-loop systems have a pressure gauge. Note the pressure reading. Low pressure can indicate a leak or insufficient water in the system. Compare the reading to the system's design pressure (this information should be available in your system's manual or on a label near the equipment). If the pressure is significantly below the design pressure, you may have a leak. A gradual, slow pressure drop over time could also point to a leak.
3. Inspect Air Vents
Closed-loop systems have automatic or manual air vents to remove trapped air. Check these vents for signs of corrosion or blockage. Manually operate any manual air vents (if applicable) to release any trapped air. Be careful, as water may be released. If only air comes out that is a good sign. If only water comes out, the vent may be faulty or the system may be over-pressurized.
4. Observe System Noises
Listen carefully to the system while it's running. Unusual noises can indicate problems:
- Gurgling or Bubbling Sounds: This can indicate trapped air in the system.
- Pump Noise: A noisy pump might indicate cavitation (caused by low pressure or air in the system) or bearing failure (caused by corrosion or scale buildup).
Document these sounds. Describe them as precisely as possible (e.g., "high-pitched whine," "loud grinding").
Diagnosis: Checks Requiring Basic Equipment
These checks require some basic tools but can provide more insight:
1. Water Sample Analysis (pH and TDS)
This is the most important test, however, it requires you to safely drain a small water sample from the system. Locate a drain valve on the system and carefully collect a sample in a clean container. Consider wearing safety glasses and gloves. Do not attempt this if the system is pressurized and you are unfamiliar with proper drainage procedures.
You'll need a pH meter or pH test strips and a TDS (Total Dissolved Solids) meter. These are readily available online or at pool supply stores. Follow the instructions on the meters/strips to measure the pH and TDS of the water sample.
- pH: The ideal pH range for most closed-loop systems is between 7.0 and 8.5 (slightly alkaline). A pH below 7.0 indicates acidic conditions, which can accelerate corrosion. A pH above 8.5 can promote scale formation.
- TDS: High TDS levels indicate a high concentration of dissolved minerals and contaminants in the water. The acceptable TDS level depends on the specific system and the water treatment chemicals used. However, a general guideline is that TDS should be below 500 ppm (parts per million). Higher levels indicate a need for flushing and refilling the system.
Record the pH and TDS readings. These values are crucial for determining the appropriate course of action.
2. Visual Inspection with a Borescope (Optional)
If you suspect severe corrosion or scale buildup but can't see inside the pipes, a borescope (also known as an endoscope or inspection camera) can be helpful. These are relatively inexpensive and can be inserted into drain valves or other openings to visually inspect the interior of the pipes and coils. Look for:
- Extensive Rust: A large amount of rust indicates significant corrosion.
- Thick Scale Deposits: Thick, flaky deposits indicate scale buildup.
- Biofilm Growth: Slime or other organic matter indicates biological growth.
Document your findings (photos or videos).
DIY Actions (Proceed with Caution!)
Based on your diagnosis, here are some simple DIY actions you might be able to take. Always disconnect power to the system before performing any maintenance.
1. Purge Air from the System
If you suspect trapped air, manually operate any air vents until only water comes out. This may need to be done repeatedly over several days as air accumulates. If the air venting is incessant, and the system is maintaining proper pressure, there is likely a larger issue.
2. Adjust System Pressure (If Needed)
If the system pressure is low and you've identified a small leak that you've repaired, you may need to add water to the system to bring it back to the design pressure. Refer to your system's manual for instructions on how to add water properly. This usually involves opening a valve to allow water to flow from the domestic water supply into the closed loop. Be very careful not to over-pressurize the system.
3. Flush the System (If TDS is High)
If the TDS level is significantly above 500 ppm, flushing the system can help remove accumulated minerals and contaminants. This is a more involved process and should only be attempted if you're comfortable working with plumbing. Consult the manufacturer's documentation, or contact a professional HVAC service company.
4. Add Water Treatment Chemicals (If You Know What You're Doing!)
This is the most critical and potentially dangerous step. Only add water treatment chemicals if you:
- Know the exact type and concentration of chemicals required for your system. Using the wrong chemicals or the wrong concentration can damage the system.
- Have the proper safety equipment (gloves, eye protection, etc.). Water treatment chemicals can be corrosive or toxic.
- Know how to safely add the chemicals to the system. This usually involves injecting them into a designated point in the system.
If you're unsure about any of these points, DO NOT ADD CHEMICALS YOURSELF. It's best to leave this to a professional.
When to Call a Professional HVAC Service
The following situations warrant a call to a qualified HVAC technician:
- You're uncomfortable performing any of the DIY actions.
- You suspect a major leak.
- You don't know what type of water treatment chemicals to use or how to add them safely.
- The problem persists after performing the DIY actions.
- You observe physical damage to system components (e.g., a bulging expansion tank).
- The system pressure is fluctuating wildly.
- You suspect biological growth but can't address it yourself. Addressing biological growth may require special chemicals and procedures.
A professional can perform a more thorough inspection of the system, analyze the water quality in a laboratory, and recommend the appropriate treatment plan. They can also safely handle hazardous chemicals and perform more complex repairs.
Preventative Maintenance is Key
The best way to avoid water treatment problems is to implement a regular preventative maintenance program. This should include:
- Annual Water Analysis: Have a professional analyze the water quality to identify potential problems early on.
- Chemical Treatment: Replenish water treatment chemicals as needed, based on the water analysis results.
- System Flushing: Flush the system periodically to remove accumulated sediment and contaminants.
- Inspection of System Components: Inspect the expansion tank, air vents, and other components for signs of corrosion or damage.
By following these steps, you can keep your closed-loop chilled water system running efficiently and reliably for years to come.