Cost To Have Mini Split Installed

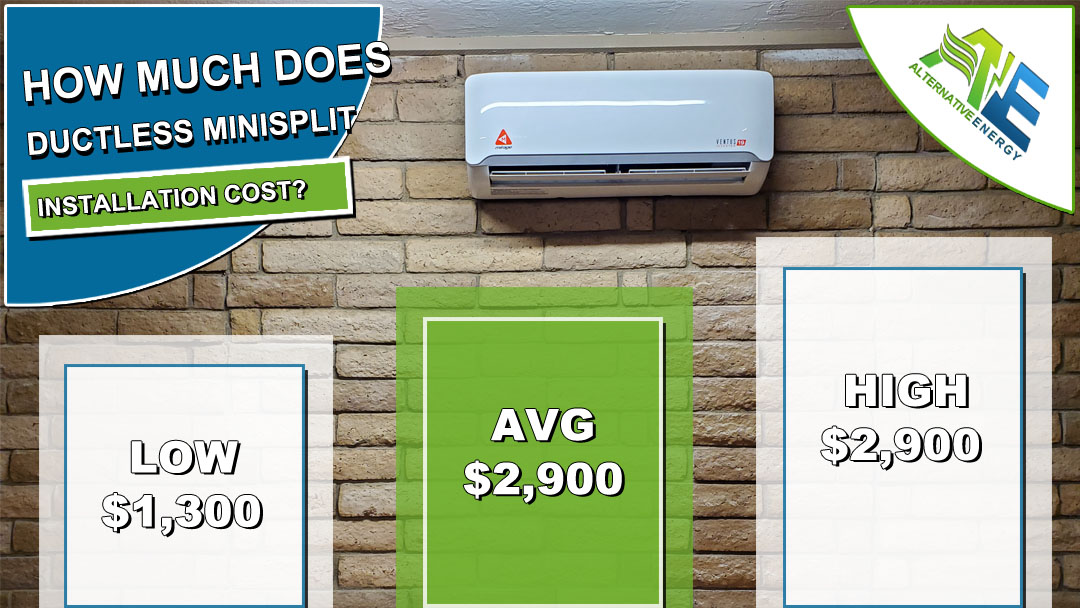
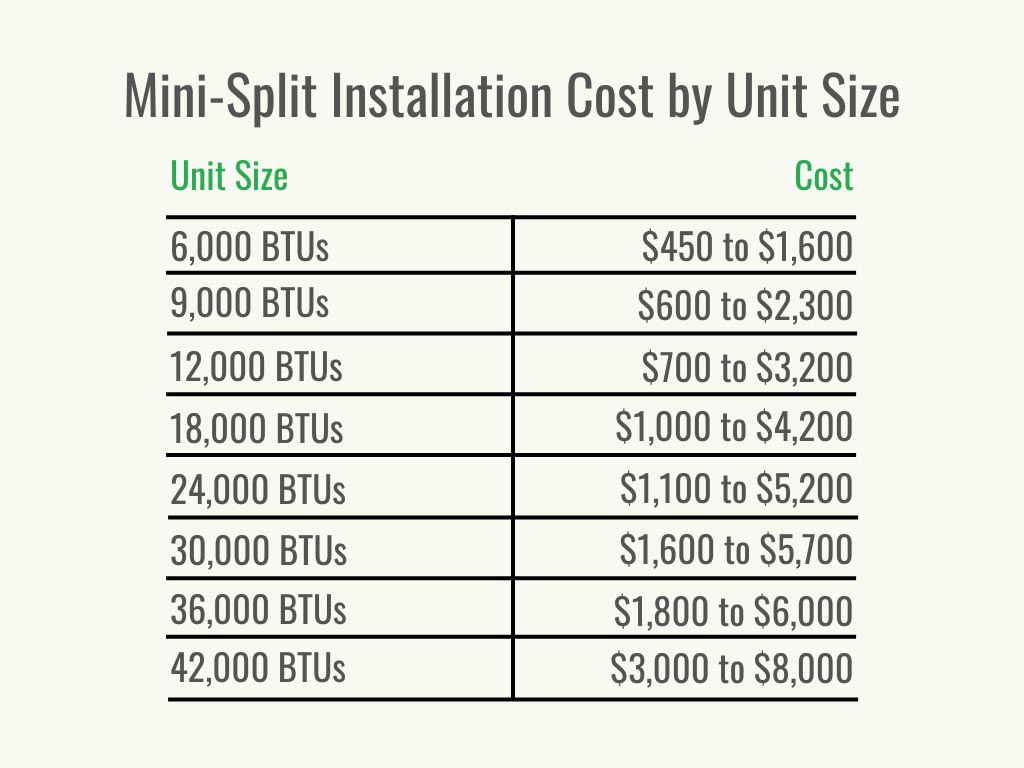
One of the most frustrating experiences for new mini-split owners is sticker shock when they start researching the true cost of installation. You see an attractive price on the unit itself, but then the quotes for installation come in and suddenly the project seems much more expensive. Many homeowners find themselves wondering: "Why is mini-split installation so expensive? Is there anything I can do to reduce the cost?" This article aims to help you understand the factors influencing mini-split installation costs, explore some potential DIY solutions, and, most importantly, identify when calling a professional is absolutely necessary.
Understanding the High Cost of Mini-Split Installation
Before diving into troubleshooting and cost-saving measures, it's important to understand the reasons behind the perceived high cost of professional mini-split installation. Several factors contribute:
- Refrigerant Handling: Mini-splits use refrigerant, a controlled substance. Technicians must be EPA-certified to handle and charge the system. Improper handling can be environmentally damaging and result in fines.
- Electrical Work: Most mini-splits require a dedicated electrical circuit. This often involves running new wiring from your electrical panel to the outdoor unit, which requires a licensed electrician.
- Mounting and Placement: Correctly mounting both the indoor and outdoor units is crucial for optimal performance and longevity. Incorrect installation can lead to leaks, noise, and reduced efficiency.
- Vacuuming and Pressure Testing: After connecting the refrigerant lines, the system must be evacuated (vacuumed) to remove air and moisture, and then pressure tested to ensure there are no leaks. This requires specialized equipment.
- System Commissioning: Once installed, the system needs to be properly commissioned to ensure all components are working correctly and that the refrigerant charge is optimal.
- Labor Costs: The installation process can take several hours, or even a full day, depending on the complexity of the installation and the accessibility of the location.
These factors combined mean that mini-split installation is not a simple DIY project for most homeowners. It requires specialized knowledge, tools, and certifications.
Diagnosis: Why is Your Installation Quote So High?
Before assuming you're being overcharged, take some time to understand the breakdown of your installation quote. Here's how to diagnose potential problem areas:
Step 1: Scrutinize the Quote Details
Ask for a detailed, itemized quote that breaks down the cost of labor, materials, and any permits required. Look for vague descriptions like "miscellaneous" or "installation fees." These should be explained further. Key areas to pay attention to include:
- Electrical Work: Is a new circuit being run? What is the estimated cost of the electrician's services?
- Refrigerant Line Set: How long is the line set? Longer line sets require more refrigerant and can increase costs.
- Mounting Brackets: What type of mounting bracket is being used for the outdoor unit? Wall-mounted brackets are typically more expensive than ground-mounted pads.
- Permits: Are any permits required by your local building codes? Permit fees can vary significantly.
Step 2: Gather Multiple Quotes
Never settle for the first quote you receive. Obtain at least three quotes from different HVAC contractors. This will give you a better understanding of the average cost in your area and help you identify any outliers.
Step 3: Question the Assumptions
Don't be afraid to ask questions about the assumptions made in each quote. For example:
- Line Set Length: Is the estimated line set length accurate? Could the outdoor unit be placed closer to the indoor unit to reduce the line set length?
- Electrical Panel Capacity: Is your electrical panel capable of handling the additional load? If not, an upgrade may be required, which can significantly increase the cost.
- Difficulty of Access: Is the installation location easily accessible? Difficult access can increase labor costs.
Step 4: Investigate Potential Hidden Costs
Ask each contractor to explicitly state whether the quote includes all necessary materials and labor, or if there are any potential hidden costs that could arise. Common hidden costs include:
- Core Drilling: Drilling through concrete or brick walls can be more expensive than drilling through drywall.
- Condensate Pump: If the indoor unit cannot drain by gravity, a condensate pump may be required.
- Electrical Panel Upgrade: As mentioned earlier, an electrical panel upgrade can be a significant expense.
DIY Fixes: Areas Where You Might Save Money (Cautiously)
While much of mini-split installation requires professional expertise, there are a few areas where you might be able to save money by doing some of the work yourself. However, proceed with extreme caution and only attempt these tasks if you are comfortable with basic DIY skills and understand the risks involved.
1. Clearing the Installation Area
Prepare the installation area by clearing any obstructions, such as furniture, landscaping, or debris. This can save the contractor time and reduce labor costs. Be sure to protect any delicate surfaces or items in the area.
2. Running Low-Voltage Wiring (Potentially)
Some mini-splits require low-voltage wiring for communication between the indoor and outdoor units. If you are comfortable working with low-voltage wiring, you may be able to run this wiring yourself. However, be sure to follow the manufacturer's instructions carefully and disconnect the power before working on any electrical components. *Incorrect wiring can damage the system.* If you are even slightly unsure, leave this to the professionals.
3. Building a Mounting Pad (For Ground-Mounted Units)
If you are installing a ground-mounted outdoor unit, you may be able to build the mounting pad yourself. This typically involves creating a level base of gravel or concrete. Ensure the pad is level and provides adequate support for the unit.
4. Researching Rebates and Incentives
Take the initiative to research any available rebates or incentives from your local utility company or government agencies. Many programs offer rebates for energy-efficient appliances, including mini-splits. This can significantly reduce the overall cost of the installation.
Important Disclaimer: Any DIY work that directly involves refrigerant lines, electrical connections to your main panel, or pressure testing *must* be performed by a licensed and certified professional. Tampering with these components can be dangerous and may void your warranty.
When to Call a Professional: Non-Negotiable Situations
There are several aspects of mini-split installation that should *always* be left to a qualified professional. Attempting these tasks yourself can be dangerous, illegal, and may void your warranty. Here are the non-negotiable situations:
1. Refrigerant Handling and Charging
Working with refrigerant requires EPA certification. Improper handling of refrigerant can damage the environment and result in fines. A professional will have the necessary equipment and expertise to safely handle and charge the system.
2. Electrical Connections to the Main Panel
Any electrical work involving your main electrical panel *must* be performed by a licensed electrician. This includes running a new circuit for the mini-split. Incorrect electrical work can be a fire hazard and can damage your electrical system.
3. Vacuuming and Pressure Testing
Evacuating the system and pressure testing requires specialized equipment and expertise. This process ensures that the system is free of air and moisture and that there are no leaks in the refrigerant lines. Improper vacuuming and pressure testing can lead to reduced efficiency and system failure.
4. System Commissioning
Proper system commissioning is essential for optimal performance and longevity. A professional will ensure that all components are working correctly, that the refrigerant charge is optimal, and that the system is properly calibrated.
5. Core Drilling Through Load Bearing Walls
If you must drill through a load bearing wall, you must have a qualified professional do this work. Failure to support the wall may have structural consequences.
Reducing Installation Costs: Strategic Approaches
Even if you need to hire a professional for most of the installation, there are still strategies you can use to potentially reduce the overall cost:
1. Choose the Right Mini-Split System
Selecting the right size and type of mini-split system for your needs is crucial. An oversized system will be less efficient and more expensive to install. A properly sized system will provide optimal comfort and efficiency.
2. Consider a Multi-Zone System
If you need to heat or cool multiple rooms, consider a multi-zone system with a single outdoor unit and multiple indoor units. This can be more cost-effective than installing separate single-zone systems.
3. Schedule Installation During Off-Peak Seasons
HVAC contractors are often less busy during the off-peak seasons (spring and fall). You may be able to negotiate a lower installation rate during these times.
4. Obtain All Necessary Permits Before Installation
Applying for and obtaining the required permits before the contractor arrives can save time and reduce labor costs.
5. Bundle the Installation with Other HVAC Services
If you need other HVAC services, such as duct cleaning or furnace maintenance, consider bundling them with the mini-split installation. This may allow you to negotiate a better overall price.
Long-Term Cost Considerations
While the upfront installation cost is a major concern, it's important to consider the long-term cost benefits of a mini-split system. Mini-splits are typically more energy-efficient than traditional HVAC systems, which can result in significant savings on your energy bills over time. Additionally, mini-splits offer zoned heating and cooling, allowing you to heat or cool only the rooms you are using, further reducing energy consumption.
In conclusion, understanding the factors influencing mini-split installation costs, identifying potential DIY solutions (within safe limits), and knowing when to call a professional are key to making informed decisions and potentially saving money. By following the steps outlined in this article, you can approach the installation process with confidence and ensure that your mini-split system is installed safely, efficiently, and cost-effectively.