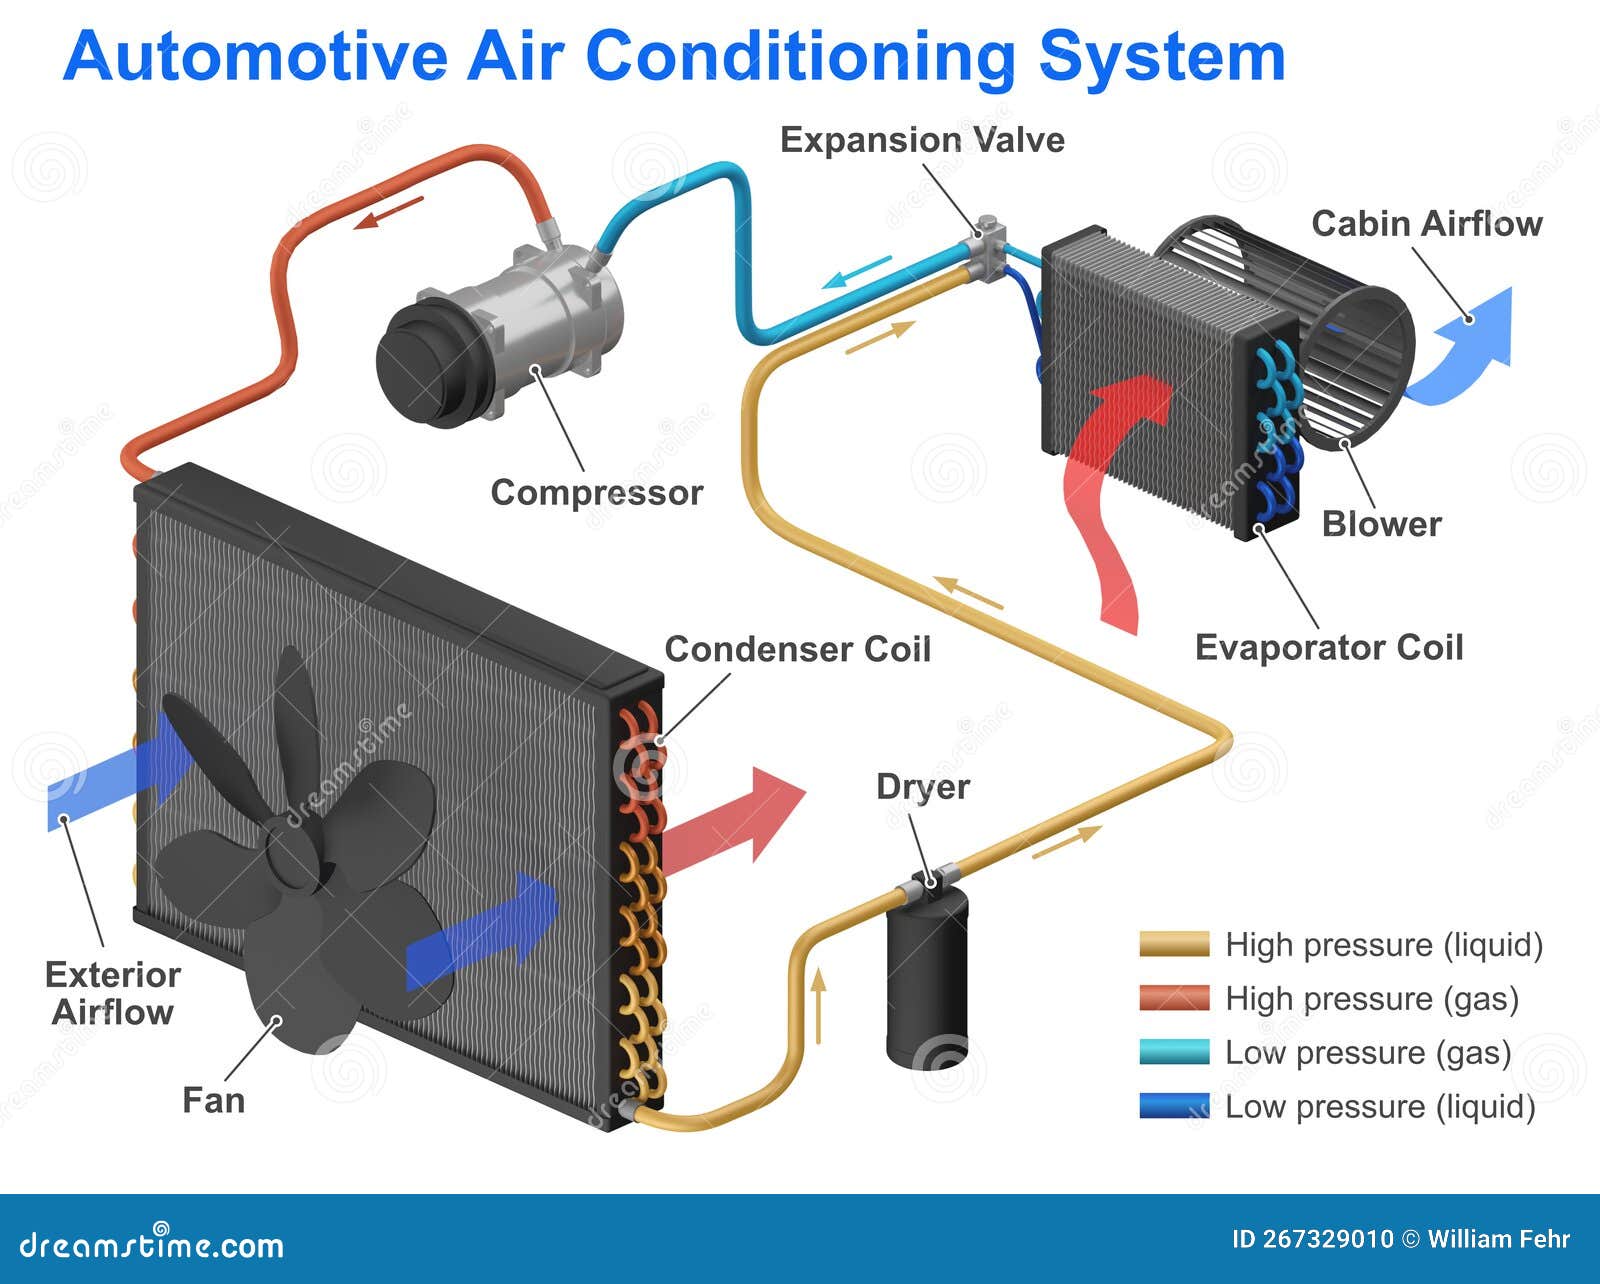
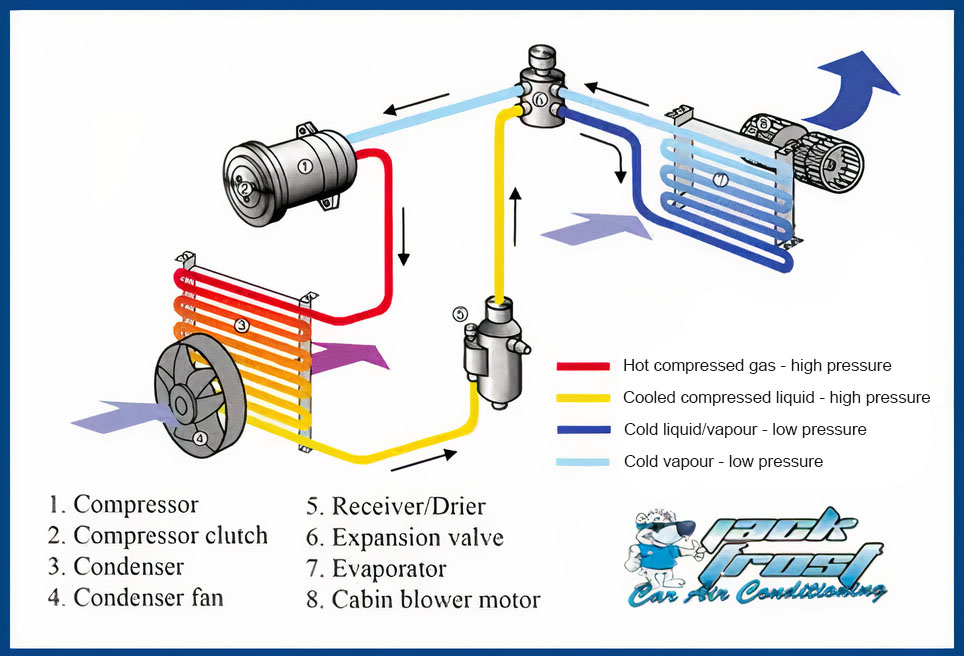
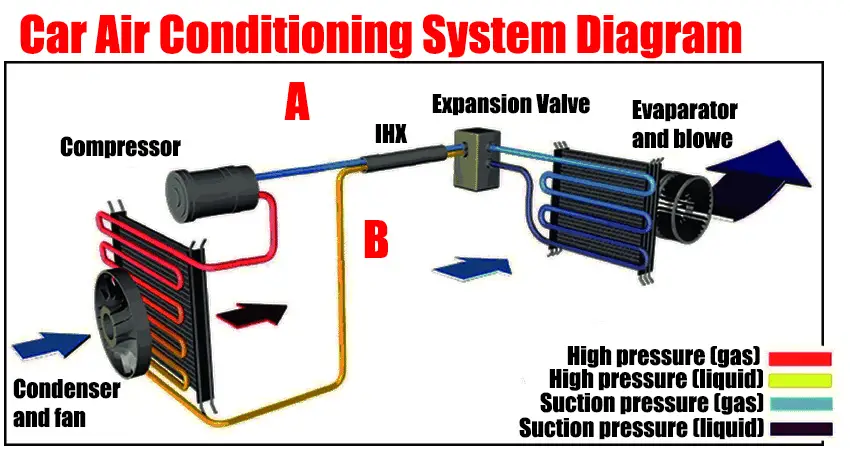
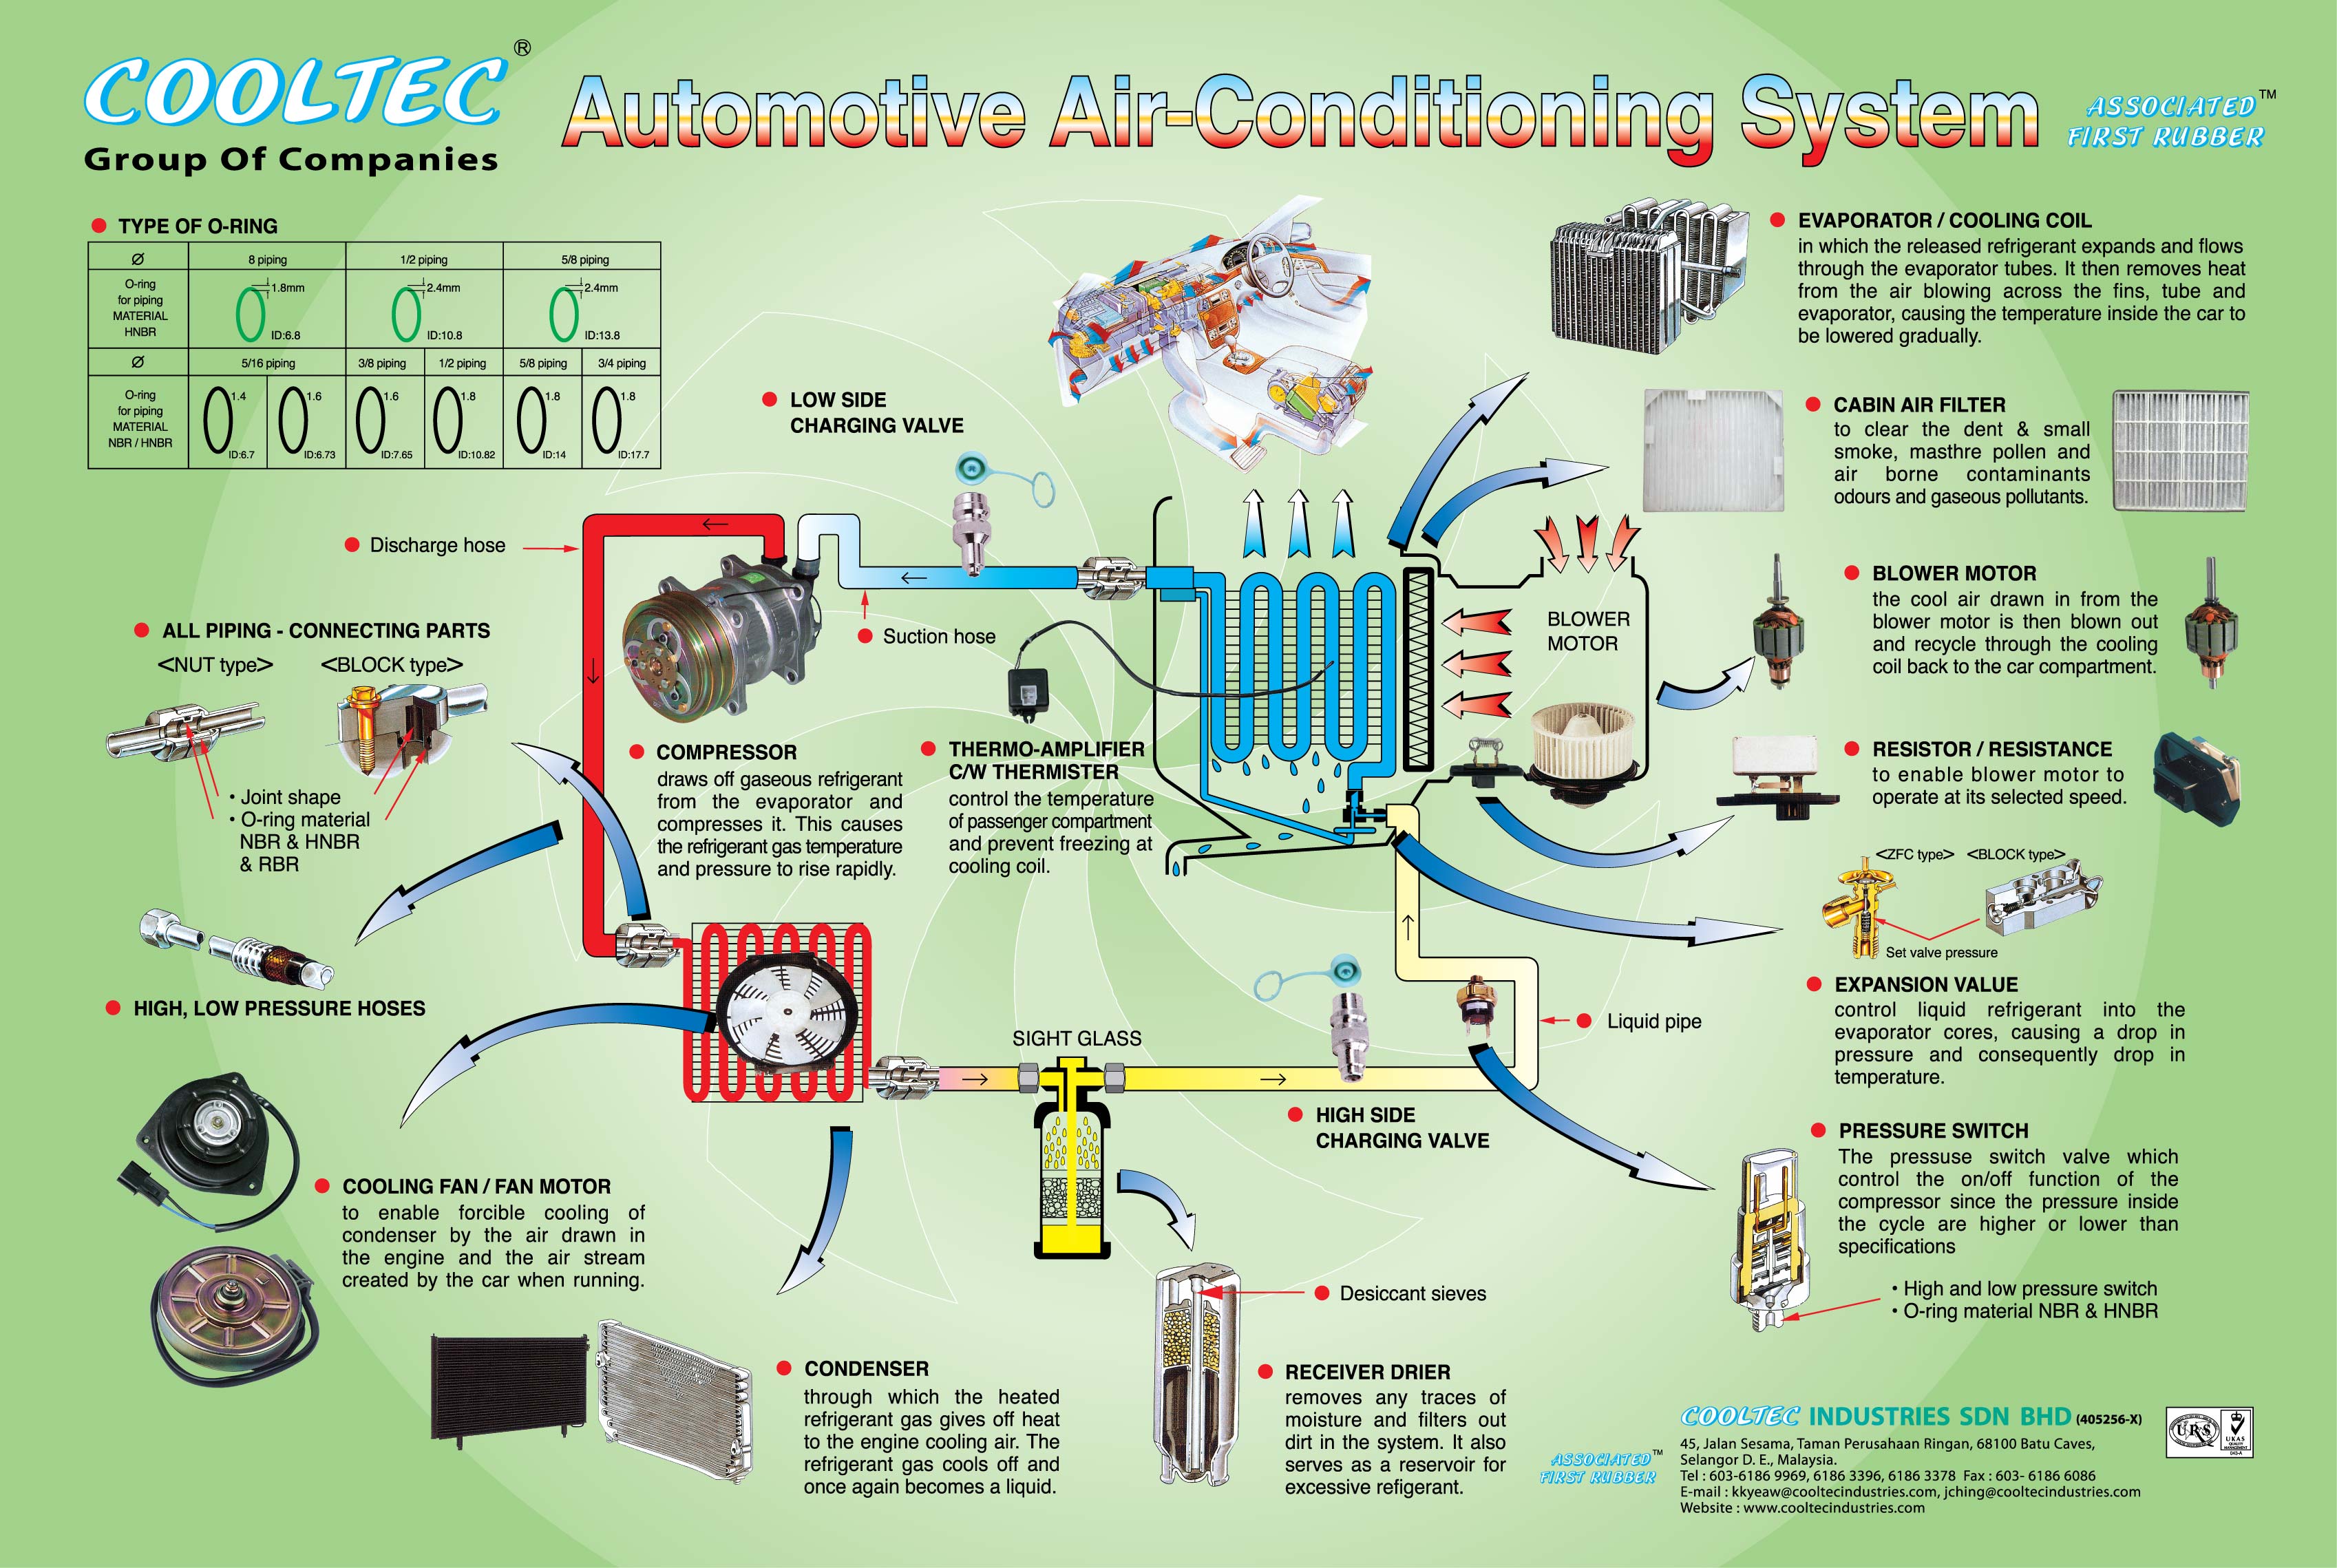
Diagram Car Air Conditioning System Components
Air conditioning in your car is no longer a luxury – it's essential for comfort and safety, especially during hot weather. But what happens when that cool air stops blowing? Before rushing to a mechanic, this guide will help you understand the components of your car's AC system and troubleshoot common problems. We'll focus on safe, basic checks you can perform yourself, and clearly identify when professional help is needed.
Understanding Your Car's AC System: A Diagrammatic Approach
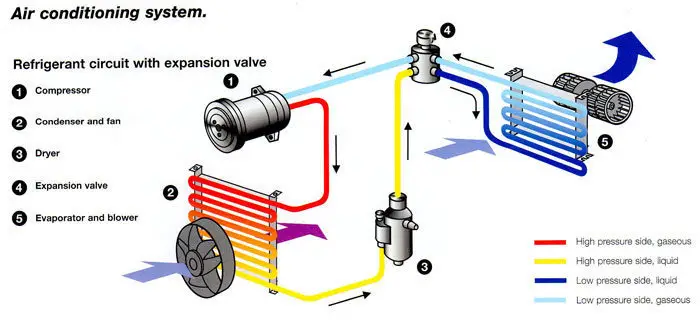
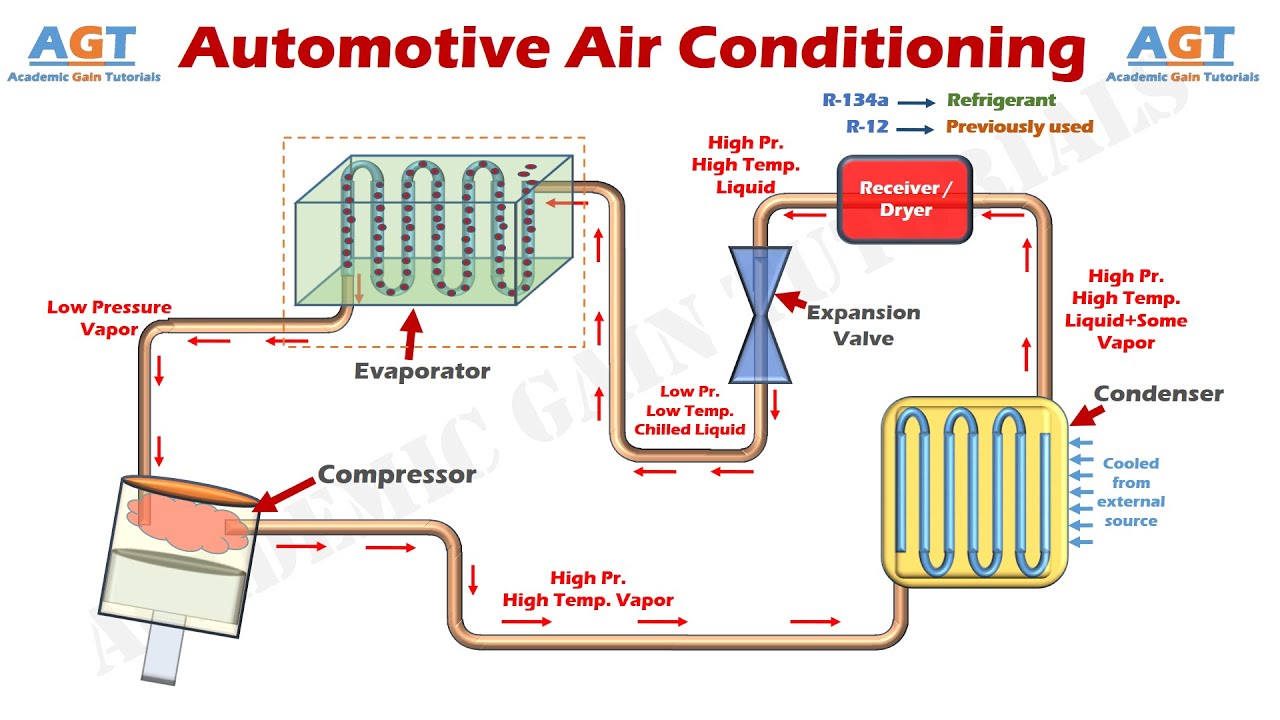
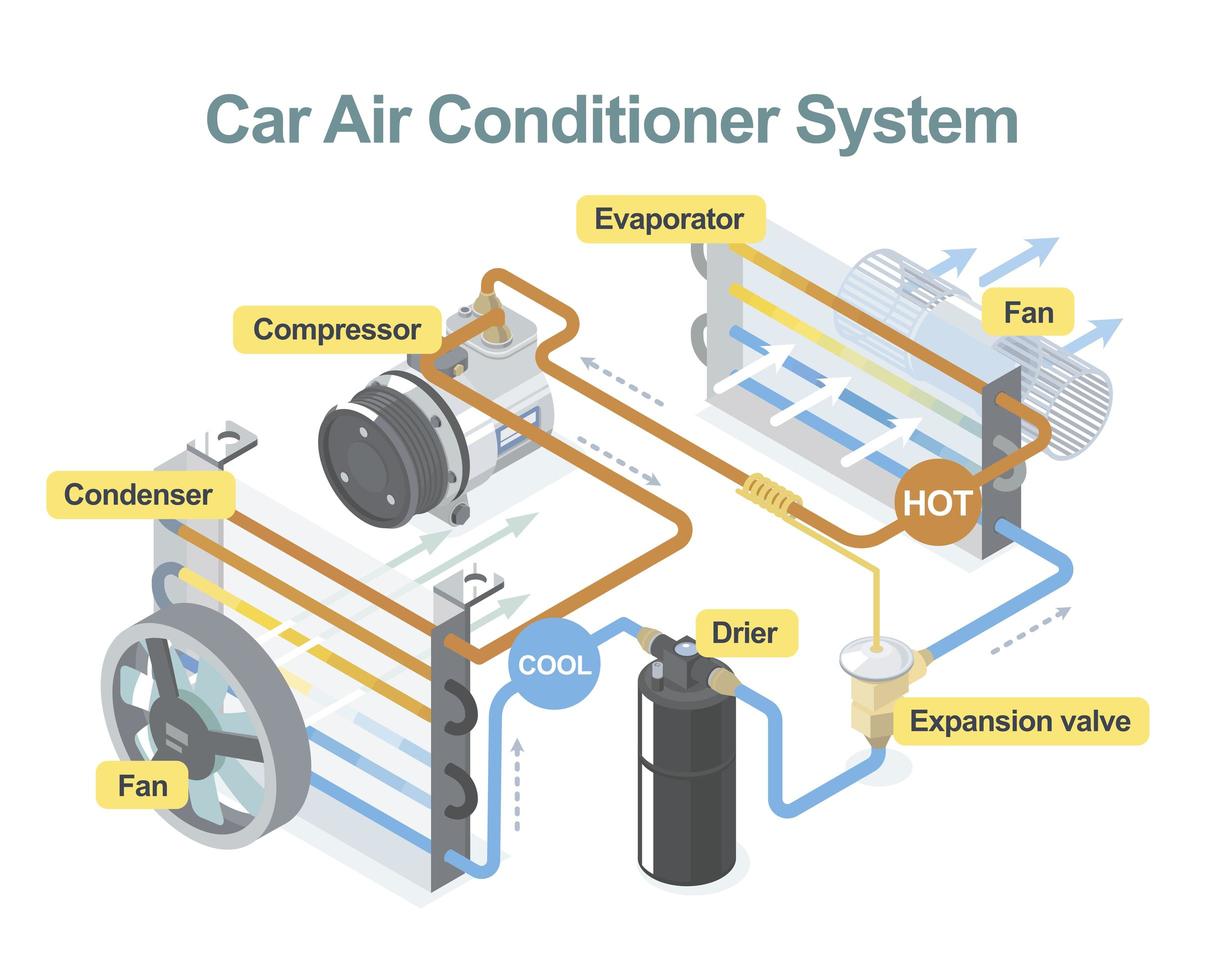
Think of your car's AC system as a closed loop with several key components working in harmony. Understanding these components is the first step in troubleshooting. Here’s a simplified diagram of the system and their individual roles:
The Components and Their Functions
- Compressor: The heart of the system. The compressor pressurizes the refrigerant, turning it into a hot, high-pressure gas. This process requires mechanical power from the engine, typically via a belt.
- Condenser: Located in front of the radiator, the condenser cools the hot, high-pressure refrigerant gas, causing it to condense into a high-pressure liquid. Airflow is crucial here.
- Receiver-Drier (or Accumulator): This component acts as a filter, removing moisture and debris from the refrigerant. It also stores liquid refrigerant. The receiver-drier is usually used with systems that use a TXV (Thermal Expansion Valve), while an accumulator is typically used with an orifice tube system.
- Expansion Valve (or Orifice Tube): This metering device regulates the flow of refrigerant into the evaporator. It also causes a pressure drop, which allows the refrigerant to expand and cool significantly.
- Evaporator: Located inside the dashboard, the evaporator is where the cold magic happens. The refrigerant absorbs heat from the air blowing across it, cooling the air that enters the cabin.
- Refrigerant: The working fluid of the system, circulating throughout the components and absorbing and releasing heat.
- Hoses and Lines: These transport the refrigerant between the various components.
- Control System: Includes the AC switch, temperature control, blower motor speed control, and potentially sensors and electronic control units (ECUs) to manage the system.
Troubleshooting Steps: A Logical Approach
Now that we understand the components, let's get to troubleshooting. Start with the simplest checks and work your way through the system.
Step 1: The Obvious – Check the Basics
- Engine Running: Is your engine running? The AC system depends on the engine for power.
- AC Button On: Make sure the AC button is pressed and illuminated. It sounds simple, but it's easily overlooked.
- Blower Fan Working: Can you hear and feel air blowing from the vents when the fan is on? If not, the problem might be with the blower motor or its resistor. This is separate from the AC system itself.
- Temperature Setting: Is the temperature dial set to the coldest setting?
- Recirculation Mode: Try turning the recirculation mode on and off. Sometimes, the system works better in recirculation mode, especially on hot days.
Step 2: Visual Inspection – Look for Clues
- Belt Condition: Open the hood (when the engine is off and cool!) and inspect the belt that drives the AC compressor. Is it cracked, frayed, or loose? A slipping or broken belt won't turn the compressor. A damaged belt needs replacing by a mechanic.
- Compressor Clutch: With the engine running and the AC on (exercise caution around moving parts), look at the front of the AC compressor. You should see the clutch engage, meaning the center part of the compressor pulley will spin with the outer part. If it's not spinning, the compressor might not be receiving power, or the clutch itself could be faulty. This often requires professional diagnosis.
- Condenser Obstruction: Check the condenser (located in front of the radiator) for obstructions like leaves, bugs, or debris. Clean it carefully with a soft brush and a hose. Good airflow is critical for the condenser to function properly.
- Refrigerant Leaks: Look for oily residue or staining around the AC components, especially the compressor, condenser, and hoses. This can indicate a refrigerant leak. Refrigerant leaks require professional attention to repair and recharge the system. Do not attempt to handle refrigerant yourself.
Step 3: Simple Electrical Checks (Proceed with Caution!)
Warning: Working with automotive electrical systems can be dangerous. Disconnect the negative terminal of the battery before performing any electrical checks to prevent shorts and electrical shock. If you're uncomfortable working with electricity, consult a qualified mechanic.
- Check Fuses and Relays: Consult your car's owner's manual to locate the fuses and relays related to the AC system. Use a multimeter or a test light to check if they are blown or faulty. Replace any blown fuses with the correct amperage rating. A faulty relay can often be swapped with another relay of the same type to see if the AC starts working.
- Compressor Clutch Connector: Locate the electrical connector on the AC compressor clutch. Use a multimeter to check if it's receiving voltage when the AC is turned on. If there's no voltage, the problem could be in the wiring, the pressure switch, or the control system. This requires more advanced electrical troubleshooting.
Step 4: Refrigerant Pressure Checks (Handle with extreme caution)
Important Safety Warning: Working with refrigerant can be extremely dangerous. Refrigerant can cause frostbite and blindness. It is also harmful to the environment. Only qualified technicians with the proper tools and training should handle refrigerant. Do not attempt to add or remove refrigerant yourself.
While you shouldn't handle refrigerant directly, observing some basic checks can give you clues. Most cars have a low-pressure switch and a high-pressure switch, which are safety devices to prevent the compressor from running if the refrigerant pressure is too low or too high.
- Visual Check of Refrigerant Levels: Some cars have a sight glass on the receiver-drier or accumulator. If you see bubbles in the sight glass when the AC is running, it could indicate low refrigerant, but this is not always accurate. A completely clear sight glass can also indicate a lack of refrigerant. Professional diagnosis is required for accurate assessment.
- Listen for Compressor Cycling: If the refrigerant is low, the compressor may cycle on and off rapidly. This is because the low-pressure switch is cutting off the compressor to protect it from damage. This cycling is often accompanied by weak or no cooling. This is a clear sign of a problem requiring professional attention.
Step 5: Diagnosing Potential Problems Based on Symptoms
- AC blows warm air: Could be low refrigerant, a faulty compressor, a clogged condenser, or a malfunctioning expansion valve.
- AC blows cool air intermittently: Could be a loose connection, a faulty pressure switch, or a compressor clutch issue.
- AC makes strange noises: Could be a failing compressor, a worn belt, or debris in the system.
- AC only works when the car is moving: Could be a problem with airflow across the condenser (e.g., a faulty radiator fan).
- AC smells musty: Could be mold or mildew in the evaporator core. This often requires cleaning or replacement of the evaporator core.
DIY Fixes You Might Be Able to Attempt (with caution!)
The scope of safe and effective DIY AC repair is limited. However, here are a few things you *might* be able to do yourself:
- Replace a Blown Fuse: If you've identified a blown fuse related to the AC system, replace it with a fuse of the correct amperage rating. Make sure you address the underlying cause if the fuse blows repeatedly.
- Clean the Condenser: As mentioned earlier, cleaning debris from the condenser can improve airflow and AC performance.
- Replace a Faulty Relay: If you've identified a faulty relay, you can replace it with a new one or swap it with another relay of the same type.
- Check and Tighten Connections: Look for loose or corroded electrical connections related to the AC system and clean and tighten them.
When to Call a Professional
Many AC repairs require specialized tools, training, and experience. Always consult a qualified mechanic if you encounter any of the following:
- Refrigerant Leaks: Handling refrigerant is dangerous and requires specialized equipment for recovery and recharge.
- Compressor Problems: Replacing or repairing a compressor is a complex task.
- Expansion Valve or Orifice Tube Issues: These components are difficult to access and require specialized tools for replacement.
- Evaporator Problems: Replacing the evaporator core requires removing the dashboard, which is a time-consuming and complex job.
- Electrical Problems: Complex electrical issues require advanced diagnostic skills and equipment.
- Any time you are uncomfortable or unsure about a repair.
Preventative Maintenance Tips
The best way to avoid AC problems is to perform regular preventative maintenance:
- Run the AC Regularly: Even during the winter months, run the AC for a few minutes each week to keep the seals lubricated and prevent them from drying out.
- Inspect Belts and Hoses: Regularly inspect the belts and hoses for cracks, wear, and leaks.
- Change the Cabin Air Filter: A dirty cabin air filter can restrict airflow and reduce AC performance. Replace it regularly according to your car's maintenance schedule.
- Professional AC Service: Have your AC system professionally inspected and serviced every few years to check refrigerant levels, inspect components, and ensure optimal performance.
By understanding the components of your car's AC system and following these troubleshooting steps, you can identify and potentially fix some common problems. Remember to prioritize safety and consult a qualified mechanic when necessary. With a little knowledge and effort, you can keep your car's AC system running smoothly and enjoy cool, comfortable driving for years to come.