Diagram Old Honeywell Mercury Thermostat Wiring
Imagine this: You wake up on a chilly morning, but your furnace hasn't kicked on. The house is getting colder, and you're starting to shiver. One of the first things you probably check is the thermostat. If you have an older home, chances are you might be dealing with a classic Honeywell mercury thermostat. While robust and reliable, these thermostats can sometimes have issues. This article will guide you through basic troubleshooting of your Honeywell mercury thermostat wiring and help you determine if it's something you can fix yourself or if it's time to call in a professional.
Understanding Your Honeywell Mercury Thermostat
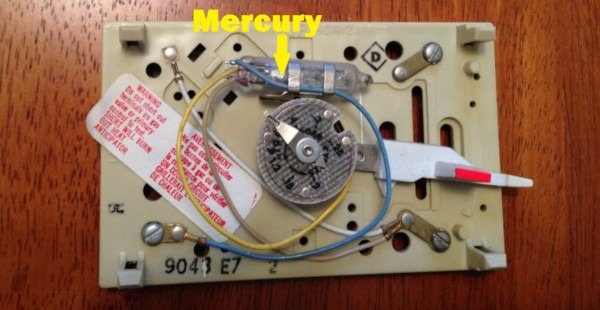
Before diving into troubleshooting, let's get a basic understanding of how these older thermostats work. Honeywell mercury thermostats are relatively simple. They use a bimetallic strip to sense temperature changes. As the temperature changes, the strip coils or uncoils, causing a small glass vial containing mercury to tilt. This mercury acts as a switch, completing the electrical circuit and signaling your furnace or air conditioner to turn on.
Important Note: Mercury is a hazardous material. Handle with care. If you suspect a mercury leak, DO NOT attempt to clean it up yourself. Contact your local environmental agency or a qualified professional for proper disposal.
Safety First!
Whenever you're working with electrical systems, safety is paramount:
- Turn off the power: Locate the circuit breaker that controls your furnace and thermostat and switch it off. This is absolutely crucial to prevent electrical shock.
- Double-check: Use a non-contact voltage tester to ensure the power is indeed off at the thermostat wires.
- Be careful: Even with the power off, treat all wires with respect.
- When in doubt, call a pro: If you're uncomfortable working with electricity, do not proceed. Contact a qualified HVAC technician.
Troubleshooting Step-by-Step
Here's a logical approach to troubleshooting your Honeywell mercury thermostat wiring issues:
1. The Obvious Checks
- Thermostat Setting: Is the thermostat set to "Heat" (or "Cool" depending on the season)? Is the temperature set higher (or lower) than the current room temperature? It sounds simple, but it's often the culprit!
- Furnace Power Switch: Ensure the main power switch on your furnace itself is turned ON. It’s often located on the side of the furnace.
- Circuit Breaker: Confirm that the circuit breaker for your furnace hasn't tripped. Reset it if necessary, but if it trips again immediately, call a professional. This could indicate a more serious electrical problem.
- Fresh Batteries (if applicable): Some older thermostats have batteries to maintain their programming. Check and replace them if needed. While mercury thermostats *primarily* operate mechanically, some models have electronic components.
2. Thermostat Condition and Level
- Check for Dust and Debris: Carefully remove the thermostat cover. Use a soft brush to gently clean any dust or debris that may be interfering with the mercury switch.
- Ensure Level: Mercury thermostats need to be perfectly level to function correctly. Use a small level to check if the thermostat is properly mounted. If not, carefully adjust the mounting screws until it is level. Even a slight tilt can prevent the mercury from making proper contact.
3. Inspecting the Wiring
Now, let's move on to the wiring. Remember to turn off the power before proceeding!
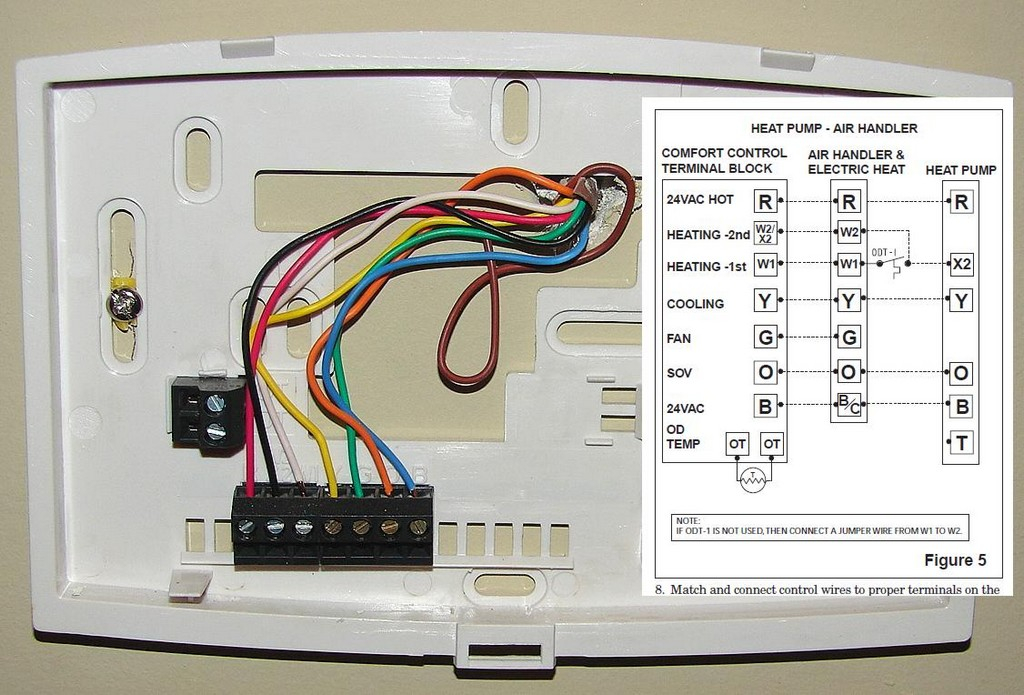
- Document the Wiring: Before disconnecting any wires, take a clear picture of the wiring configuration. This is crucial for reassembly. Note the color of each wire and the terminal it's connected to.
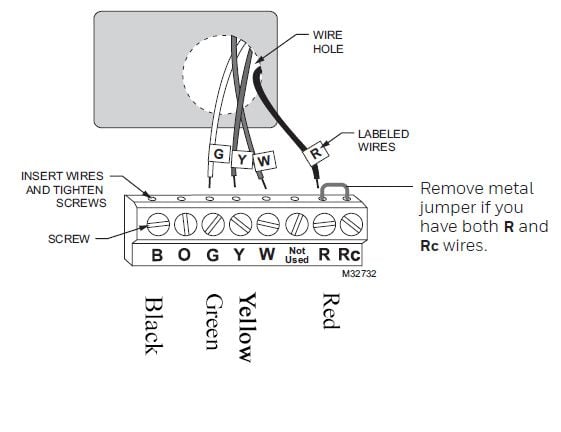
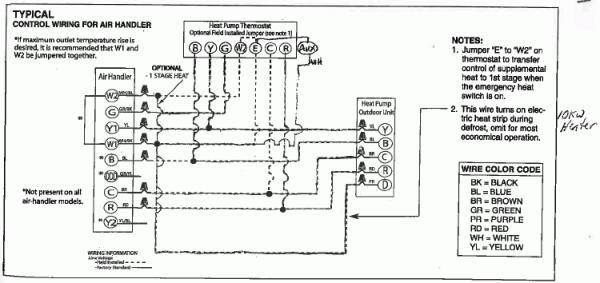
- Identify the Wires: Common Honeywell mercury thermostats typically have the following wires:
- R (Red): 24V power
- W (White): Heat
- Y (Yellow): Cool
- G (Green): Fan
- C (Common): May or may not be present; provides a stable voltage for newer features (if equipped)
- Check for Loose Connections: Gently tug on each wire to ensure it's securely connected to the terminal screw. If any are loose, tighten the screws.
- Look for Corrosion or Damage: Inspect the wires for any signs of corrosion, fraying, or damage. If you find any, you may need to replace the affected wire. *Replacing wires should only be done if you are comfortable and competent in doing so. Otherwise, contact a professional.*
4. Basic Wire Troubleshooting (Advanced - Proceed with Caution)
Warning: The following steps involve working with low-voltage electricity. If you are uncomfortable or unfamiliar with using a multimeter, DO NOT proceed. Contact a qualified HVAC technician.
A multimeter can help you diagnose wiring issues. You'll need to know how to safely use a multimeter to check for voltage.
- Check for 24V Power: After turning the power back on (briefly!), use a multimeter to check for 24V AC between the R (Red) wire and a known ground (like the metal casing of the furnace). If you don't get a reading, the problem could be with the transformer in your furnace, which is best left to a professional.
- Simulate a Call for Heat (or Cool): With the power off again, carefully disconnect the R (Red) and W (White) wires. Twist them together. Turn the power back on (briefly!). This simulates a call for heat. If your furnace turns on, the thermostat is likely the problem. Do NOT leave the wires twisted together for an extended period. Immediately disconnect them and turn the power back off. This is a test, not a solution.
- Repeat for Cooling (if applicable): Repeat the process above, twisting the R (Red) and Y (Yellow) wires together to simulate a call for cooling.
5. Common Issues and Solutions
- Thermostat Not Responding at All:
- Possible Cause: No power to the thermostat.
- Possible Solutions: Check the circuit breaker, transformer in the furnace (call a professional if needed), and wiring connections.
- Furnace Runs Constantly:
- Possible Cause: Stuck thermostat contacts or shorted wires.
- Possible Solutions: Clean the thermostat, check wiring for shorts, replace the thermostat if necessary.
- Furnace Not Turning On:
- Possible Cause: Loose wiring, faulty thermostat, or a problem with the furnace itself.
- Possible Solutions: Check wiring, test thermostat (as described above), call a professional to inspect the furnace.
- Fan Runs Constantly:
- Possible Cause: Wiring issue with the G (Green) wire.
- Possible Solutions: Check the wiring connections to the G wire and the fan control relay in the furnace.
When to Call a Professional
While these steps can help you troubleshoot basic wiring issues, there are situations where you should always call a qualified HVAC technician:
- You are uncomfortable working with electricity or gas.
- You suspect a mercury leak.
- You find damaged or frayed wires that you are not comfortable replacing.
- The circuit breaker trips repeatedly.
- You suspect a problem with the furnace itself (blower motor, gas valve, etc.).
- You've tried the troubleshooting steps and are still unable to resolve the issue.
- Your thermostat is very old and you suspect it may be nearing the end of its lifespan. Replacing it with a modern, programmable thermostat can often save you money on energy bills.
Replacing Your Old Thermostat
If your Honeywell mercury thermostat is beyond repair or you're looking to upgrade, consider replacing it with a modern, digital or programmable thermostat. These thermostats offer greater accuracy, energy savings, and convenience.
Before replacing the thermostat:
- Take a Picture: Take a clear picture of the existing wiring before disconnecting anything.
- Label the Wires: Use masking tape and a pen to label each wire according to its terminal (R, W, Y, G, C). This will make installation much easier.
- Read the New Thermostat's Instructions: Carefully read the instructions that come with your new thermostat. Wiring configurations can vary, so it's important to follow the manufacturer's instructions.
When installing the new thermostat, connect the wires to the corresponding terminals, based on your labels and the new thermostat's instructions.
Important: If your new thermostat requires a "C" (Common) wire and you don't have one, you may need to run a new wire from the furnace to the thermostat. This is a more complex task that is best left to a professional.
Conclusion
Troubleshooting your Honeywell mercury thermostat wiring can seem daunting, but by following these steps and prioritizing safety, you can often diagnose and resolve common issues. Remember to proceed with caution and call a professional when necessary. By understanding the basics of your thermostat and its wiring, you'll be better equipped to keep your home comfortable and efficient.
Good luck, and stay warm (or cool)!