Difference Between Ac Compressor And Condenser

It’s a sweltering summer afternoon, and your AC, your only refuge from the heat, is blowing warm air. Frustration mounts, and you start thinking about expensive repairs. But before you call a professional, let's explore a common confusion that often leads to unnecessary panic: the difference between the AC compressor and the AC condenser.
Understanding the Confusion: Compressor vs. Condenser
Many homeowners mistakenly use the terms "compressor" and "condenser" interchangeably, but they are distinct components with different functions within your air conditioning system. Knowing the difference is crucial for accurate troubleshooting and potentially saving money on repairs. Think of them as partners in a relay race, each playing a vital role in keeping your home cool.
This article will guide you through understanding these two vital parts of your AC system, help you identify potential problems, and offer simple troubleshooting steps you can safely perform. We'll also pinpoint when professional help is absolutely necessary.
What is the AC Compressor?
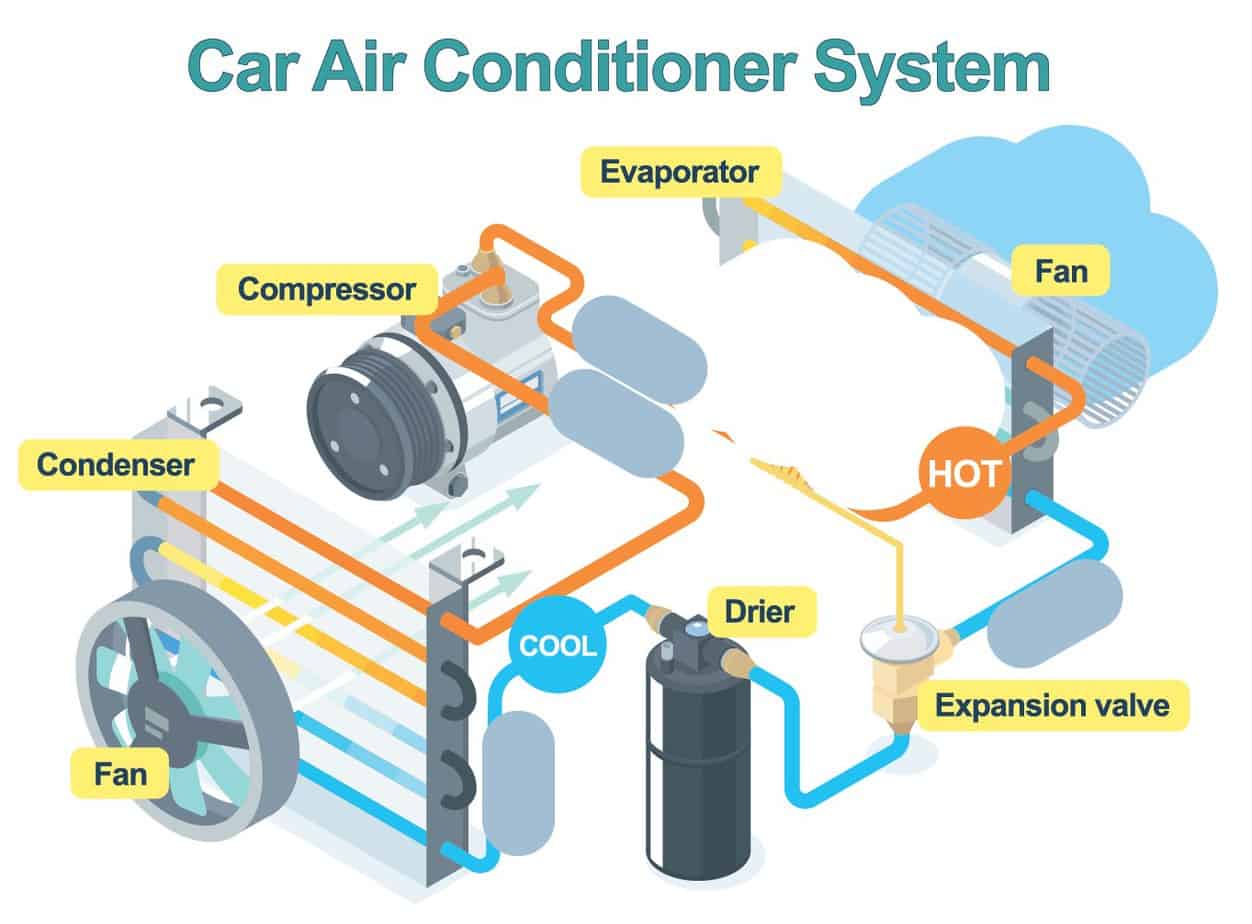
The compressor is the heart of your air conditioning system. Located within the outdoor unit, it's a mechanical pump responsible for compressing the refrigerant gas. This compression increases the refrigerant's pressure and temperature, preparing it for the next stage of the cooling cycle. Imagine it like squeezing a sponge – you’re making the water (refrigerant) more potent.
Key functions of the compressor:
- Compresses refrigerant: Increases the pressure and temperature of the refrigerant gas.
- Circulates refrigerant: Pumps the refrigerant throughout the entire AC system.
- Controls refrigerant flow: Regulates the amount of refrigerant circulating in the system.
What is the AC Condenser?
The condenser is also part of the outdoor unit, and it's what you typically see with the fan blowing air through it. Its job is to cool down the high-pressure, high-temperature refrigerant gas coming from the compressor. As the refrigerant flows through the condenser coils, the fan blows air across them, dissipating the heat and causing the refrigerant to condense back into a liquid. Think of it as releasing the squeezed sponge – the water (refrigerant) cools and becomes ready to absorb more heat.
Key functions of the condenser:
- Cools refrigerant: Reduces the temperature of the high-pressure refrigerant gas.
- Condenses refrigerant: Changes the refrigerant from a gas to a liquid.
- Dissipates heat: Releases the heat absorbed from inside your home to the outside air.
Troubleshooting: When the Air Isn't Cold
Let's say your AC is blowing warm air. Here's a step-by-step approach to diagnosing whether the problem lies with the compressor or the condenser (or something else entirely).
Step 1: Check the Thermostat
This might seem obvious, but it's the most common culprit. Ensure your thermostat is set to "Cool" and the temperature is set lower than the current room temperature. Also, check the batteries if it's a digital thermostat.
Step 2: Inspect the Air Filter
A clogged air filter restricts airflow, making it difficult for the AC to cool properly. A dirty filter can overwork both the compressor and the condenser. Locate your air filter (usually in the indoor unit or near the return vents) and check its condition. Replace it if it's dirty. This simple step can often resolve cooling issues.
Step 3: Examine the Outdoor Unit (Condenser)
Safety First! Turn off the power to the outdoor unit at the breaker box before inspecting it.
a. Visual Inspection: Look for debris like leaves, grass clippings, or branches blocking the condenser coils. These obstructions prevent proper airflow and reduce the condenser's efficiency. Clear away any debris.
b. Coil Cleaning: Over time, the condenser coils can become coated with dirt and grime. Use a garden hose (with a gentle spray nozzle) to carefully clean the coils from the inside out. Avoid using high pressure, as this can damage the delicate fins. Special coil cleaning solutions are also available, but follow the manufacturer's instructions carefully.
c. Fan Operation: With the power back on (and observing all safety precautions!), check if the condenser fan is running smoothly. If the fan isn't running, or is running erratically, it could indicate a problem with the fan motor or a related electrical component. This is usually a job for a professional.
Step 4: Listen to the Compressor
With the power on (and maintaining a safe distance), listen to the outdoor unit. A healthy compressor should produce a steady humming sound. Unusual noises like loud buzzing, clicking, grinding, or rattling could indicate a compressor problem.
Step 5: Feel the Copper Pipes
Locate the two copper pipes connecting the outdoor unit to the indoor unit. Exercise Caution: These pipes can be very hot or cold! One pipe (the larger, insulated one) should be cool to the touch, while the other (the smaller one) should be warm. If both pipes are at the same temperature, it could indicate a refrigerant leak or a compressor issue.
DIY Fixes (with Caution!)
The following fixes are only applicable if you are comfortable and confident in your ability to perform them safely. If you have any doubts, always call a qualified HVAC technician.
1. Cleaning the Condenser Coils: As mentioned earlier, cleaning the condenser coils is a safe and effective DIY task that can improve your AC's efficiency. Use a gentle spray from a garden hose and a soft brush to remove dirt and debris.
2. Replacing the Condenser Fan Motor Capacitor: Sometimes, a failing capacitor can prevent the condenser fan from starting. The capacitor is a small, cylindrical component usually located near the fan motor. However, working with capacitors can be dangerous, as they can store an electrical charge even when the power is off. Only attempt this repair if you have experience working with electrical components and know how to safely discharge a capacitor. Use a multimeter to test the capacitor, and replace it with an identical one if it's faulty. Turn off the power at the breaker box before working on it.
When to Call a Professional
There are several situations where DIY troubleshooting is not recommended, and professional help is essential:
- Refrigerant Leaks: Refrigerant is a controlled substance, and handling it requires specialized equipment and training. If you suspect a refrigerant leak, do not attempt to repair it yourself. Call a licensed HVAC technician to locate and repair the leak, and to recharge the system with refrigerant.
- Compressor Problems: The compressor is a complex and expensive component. Any suspected compressor issues (unusual noises, failure to start, etc.) should be diagnosed and repaired by a qualified technician. Compressor replacement requires specialized tools and knowledge.
- Electrical Issues: If you suspect an electrical problem within the AC system (e.g., faulty wiring, a tripped breaker that repeatedly trips), it's best to call a professional electrician or HVAC technician. Working with electricity can be dangerous.
- Lack of Expertise: If you're not comfortable working with electrical components or refrigerant, or if you're unsure about any aspect of the troubleshooting process, it's always best to err on the side of caution and call a professional.
- Frozen Coils: If you notice ice forming on the indoor or outdoor unit's coils, it indicates a serious problem, often related to airflow, refrigerant levels, or compressor function. A professional diagnosis is required.
Preventative Maintenance: Avoiding Future Problems
The best way to avoid AC problems is to schedule regular preventative maintenance. Here are some tips:
- Change Air Filters Regularly: Replace your air filter every 1-3 months, depending on usage and the type of filter.
- Clean Condenser Coils Annually: Clean the condenser coils at least once a year, preferably in the spring before the cooling season begins.
- Inspect Ductwork: Check your ductwork for leaks or damage, and seal any cracks or holes.
- Schedule Professional Tune-Ups: Have a qualified HVAC technician inspect and tune up your AC system annually. This includes checking refrigerant levels, lubricating moving parts, and inspecting electrical components.
Understanding the Costs
Knowing what to expect financially can help you prepare for potential repairs. Here’s a general overview:
- Air Filter Replacement: $5 - $30 (DIY)
- Condenser Coil Cleaning: $100 - $300 (Professional)
- Condenser Fan Motor Replacement: $200 - $500 (Professional)
- Compressor Replacement: $800 - $2500 (Professional) – This is a major repair.
- Refrigerant Recharge: $150 - $500 (Professional) – Depends on the amount and type of refrigerant.
These are just estimates, and the actual cost can vary depending on your location, the type of AC system you have, and the specific problem. Always get multiple quotes from qualified HVAC technicians before proceeding with any major repairs.
Final Thoughts
Understanding the difference between the AC compressor and condenser is a valuable first step in troubleshooting cooling problems. By following the steps outlined in this article, you can often identify simple issues and perform basic maintenance tasks yourself. However, it's crucial to recognize when professional help is needed. By being proactive and informed, you can keep your AC system running efficiently and avoid costly repairs.
Remember, a little knowledge and preventative maintenance can go a long way in keeping your home cool and comfortable all summer long!