Different Types Of Toilet Flush Valves

One of the most frustrating problems a homeowner can face is a toilet that won't flush properly. It's not just an inconvenience; it can quickly become a sanitation issue. Often, the culprit is a malfunctioning flush valve. This article will guide you through diagnosing and addressing common flush valve problems.
Understanding Toilet Flush Valves
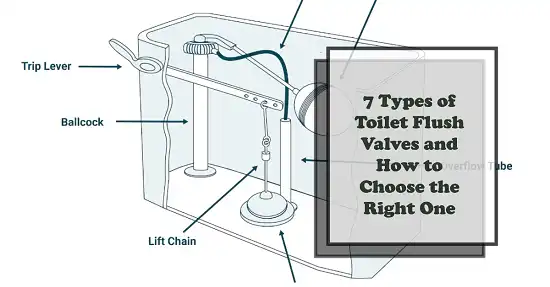
The flush valve is the heart of your toilet's flushing mechanism. It's the component that seals the tank, allowing it to fill with water, and then opens to release that water into the bowl when you flush. There are several different types of flush valves, each with its own set of potential problems.
Types of Flush Valves
Understanding the type of flush valve you have is crucial for effective troubleshooting. Here's a breakdown of the most common types:
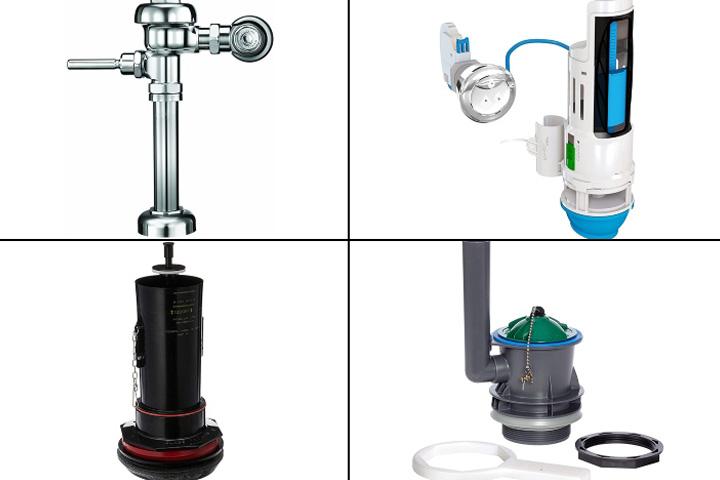
- Flapper Valves: These are the most common type. A rubber or silicone flapper seals against a valve seat at the bottom of the tank. When you flush, the lift chain pulls the flapper up, allowing water to rush into the bowl.
- Tank Ball Valves: Older toilets often use a tank ball. This is a large, typically rubber, ball connected to a lift rod. When you flush, the rod lifts the ball, opening the valve.
- Cylinder Flush Valves (Canister Valves): These valves use a large, hollow cylinder that lifts vertically to release water. They are becoming increasingly popular for their efficient flush and fewer moving parts.
- Dual Flush Valves: Found in dual flush toilets, these valves offer two flush options – a partial flush for liquid waste and a full flush for solid waste. They often use a more complex mechanism than standard flapper valves.
Diagnosing Flush Valve Problems
Before you start taking things apart, let's systematically diagnose the issue. Here's a step-by-step approach:
Step 1: Observe the Symptoms (Without Tools)
Carefully watch what happens when you flush. Does the toilet:
- Not flush at all? This suggests a complete blockage or failure of the valve to open.
- Flush weakly? This could indicate a partial blockage, a worn flapper, or low water level in the tank.
- Flush continuously (running toilet)? This almost always points to a faulty seal on the flush valve, allowing water to leak into the bowl.
- Refill slowly? This is often related to the fill valve, not the flush valve, but it's worth noting.
- Make unusual noises? Gurgling, hissing, or banging sounds can provide clues about the problem.
Step 2: Initial Inspection (Without Tools)
Perform a visual inspection of the toilet tank. Don't flush during this step.
- Water Level: Is the water level in the tank too low or too high? There should be a fill line marked inside the tank.
- Flapper/Tank Ball: Look at the flapper or tank ball. Is it visibly damaged, cracked, or warped? Is it properly seated over the valve seat? Is the chain connected and has some slack?
- Lift Chain: For flapper valves, check the lift chain. Is it tangled, too long, too short, or broken? Is it connected properly to the flush handle lever and the flapper?
- Overflow Tube: Is water constantly flowing into the overflow tube, even when the tank is full? This indicates a problem with the fill valve, not the flush valve.
- Debris: Is there any debris (mineral buildup, small objects) obstructing the flapper or valve seat?
Step 3: Basic Tests (Without Tools)
Try these simple tests to narrow down the problem:
- Flapper Test: With the tank full, gently press down on the flapper to ensure a tight seal. If the running stops, it confirms a leaky flapper.
- Chain Adjustment: Adjust the length of the lift chain. Too much slack and the flapper won't lift high enough; too little and the flapper might not seal properly.
- Flush Handle Test: Check the flush handle. Is it loose or stiff? A loose handle can prevent the flapper from lifting correctly.
Step 4: Further Inspection (With Basic Tools)
If the problem persists, you'll need some basic tools:
- Rubber Gloves: To protect your hands.
- Small Bucket or Sponge: To remove excess water.
- Adjustable Wrench or Pliers: For loosening and tightening connections.
- Screwdriver (Phillips and Flathead): For removing and adjusting components.
- Clean Cloth or Sponge: To clean surfaces.
Now, perform these additional checks:
- Valve Seat Condition: Carefully inspect the valve seat (the surface the flapper seals against). Is it corroded, cracked, or chipped? A damaged valve seat will prevent a proper seal. You may need to gently clean it with a non-abrasive pad.
- Flapper/Tank Ball Alignment: Ensure the flapper or tank ball is properly aligned with the valve seat. Sometimes, they can become misaligned over time.
- Cylinder Valve Inspection: For cylinder valves, check for any cracks or damage to the cylinder itself. Also, inspect the seals and O-rings for wear and tear.
- Dual Flush Valve Inspection: Dual flush valves are more complex. Carefully examine the linkage and buttons to ensure they are functioning correctly. Consult the toilet manufacturer's instructions for specific troubleshooting steps.
DIY Solutions
Based on your diagnosis, here are some DIY solutions you can try:
Replacing a Flapper Valve
- Turn off the water supply to the toilet (usually a valve located behind the toilet).
- Flush the toilet to remove as much water as possible from the tank. Use a sponge to remove any remaining water.
- Disconnect the lift chain from the old flapper.
- Detach the old flapper from the mounting posts. These might snap off or require a slight twist.
- Attach the new flapper to the mounting posts. Ensure it's properly seated.
- Connect the lift chain to the new flapper. Adjust the chain length to allow for a complete seal but enough lift for a full flush.
- Turn the water supply back on and allow the tank to fill.
- Test the flush several times to ensure the flapper seals properly and the toilet flushes correctly.
Replacing a Tank Ball
- Turn off the water supply to the toilet.
- Flush the toilet to empty the tank.
- Disconnect the lift rod from the old tank ball.
- Unscrew the old tank ball from the bottom of the lift arm.
- Screw the new tank ball onto the lift arm.
- Connect the lift rod to the tank ball.
- Adjust the lift rod so the ball seats properly.
- Turn the water supply back on and test the flush.
Cleaning the Valve Seat
- Turn off the water supply to the toilet.
- Flush the toilet to empty the tank.
- Use a non-abrasive pad or cloth to gently clean the valve seat, removing any mineral buildup or debris.
- Rinse the area with clean water.
- Turn the water supply back on and test the flush.
Adjusting the Lift Chain
The lift chain should have a small amount of slack when the flapper is seated. Too much slack and the flapper won't lift high enough; too little and the flapper might not seal properly. Experiment with different chain link positions until you achieve a proper flush and seal.
Addressing Mineral Buildup
Mineral buildup can prevent a proper seal. You can try soaking the flapper or tank ball in white vinegar for a few hours to dissolve the buildup. Be sure to rinse thoroughly before reinstalling.
When to Call a Professional Plumber
While many flush valve problems can be resolved with DIY solutions, some situations require the expertise of a professional plumber. Here are some red flags:
- Cracked Toilet Tank or Bowl: A cracked tank or bowl is a serious issue that requires immediate attention. Attempting to repair it yourself can lead to further damage and potential water leaks.
- Persistent Leaks: If you've tried replacing the flapper and cleaning the valve seat, but the toilet continues to run, there may be a more significant issue with the valve or plumbing.
- Complex Dual Flush Valve Problems: Dual flush valves can be intricate. If you're unsure about how to diagnose or repair the valve, it's best to call a professional.
- Inaccessible Plumbing: If the shut-off valve is corroded or inaccessible, don't force it. Call a plumber to safely shut off the water supply.
- You're Uncomfortable: If you're not comfortable working with plumbing or feel unsure about any aspect of the repair, it's always best to err on the side of caution and call a professional.
Remember, working with plumbing involves water and potential hazards. If you're not confident in your ability to safely and effectively repair the flush valve, don't hesitate to call a licensed plumber. Ignoring a plumbing problem can lead to more significant issues, such as water damage and mold growth.
By following these steps and knowing your limitations, you can confidently troubleshoot and address common toilet flush valve problems. Good luck!
:max_bytes(150000):strip_icc()/different-types-of-toilet-fill-valves-4094288-03-faf3c2bbea454c51b069d1d82aee47c1.jpg)


:max_bytes(150000):strip_icc()/different-types-of-toilet-fill-valves-4094288-05-32bed8ee17884f88b627974d91f086be.jpg)
:max_bytes(150000):strip_icc()/different-types-of-toilet-fill-valves-4094288-hero-36904464b8984347843e4311c6a26769.jpg)