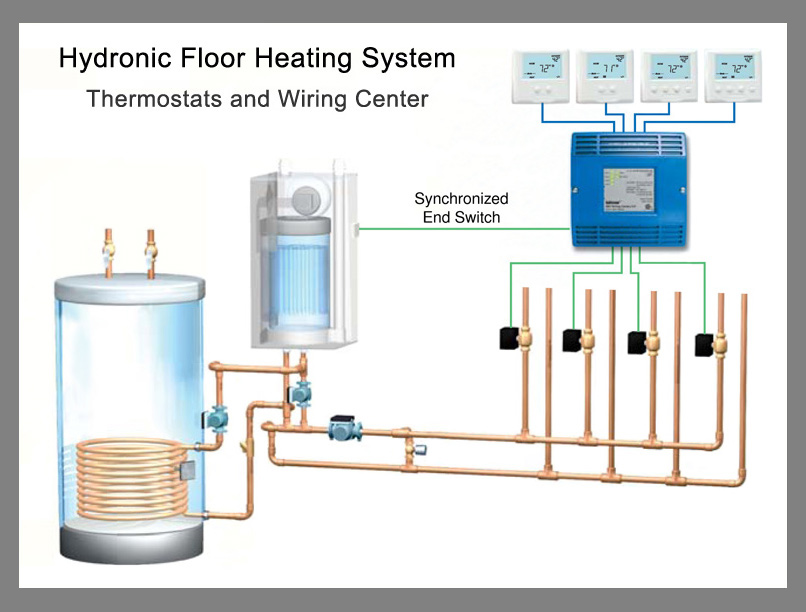
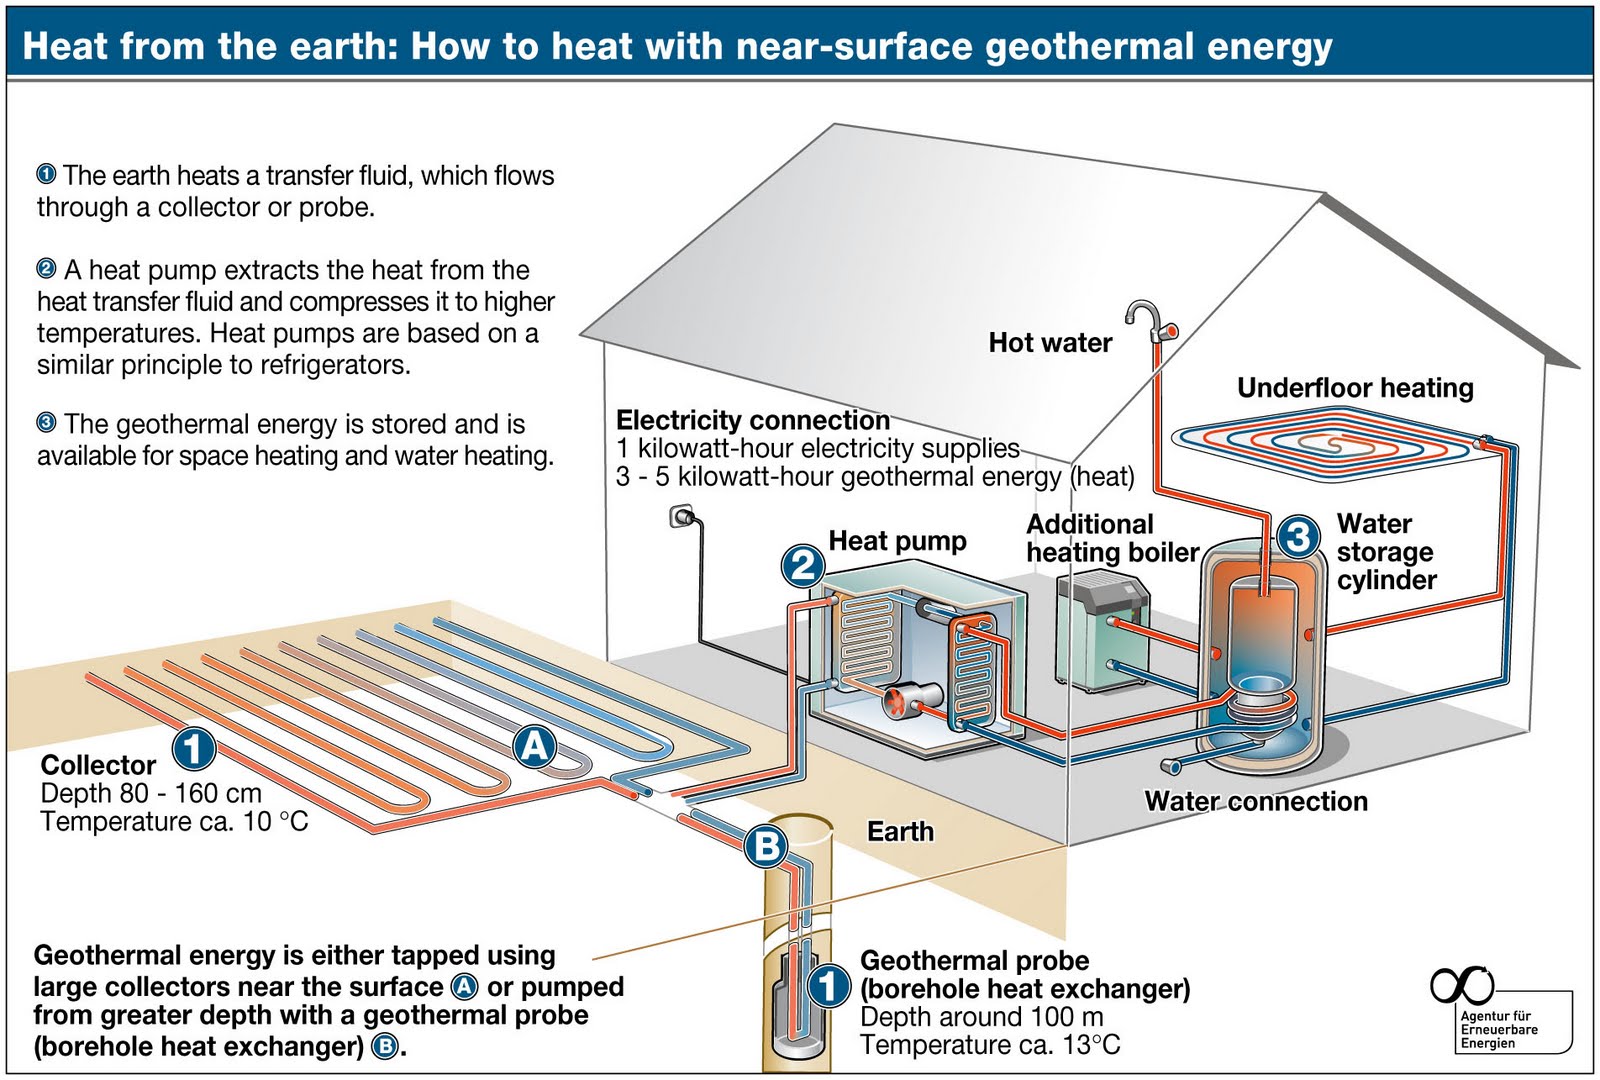
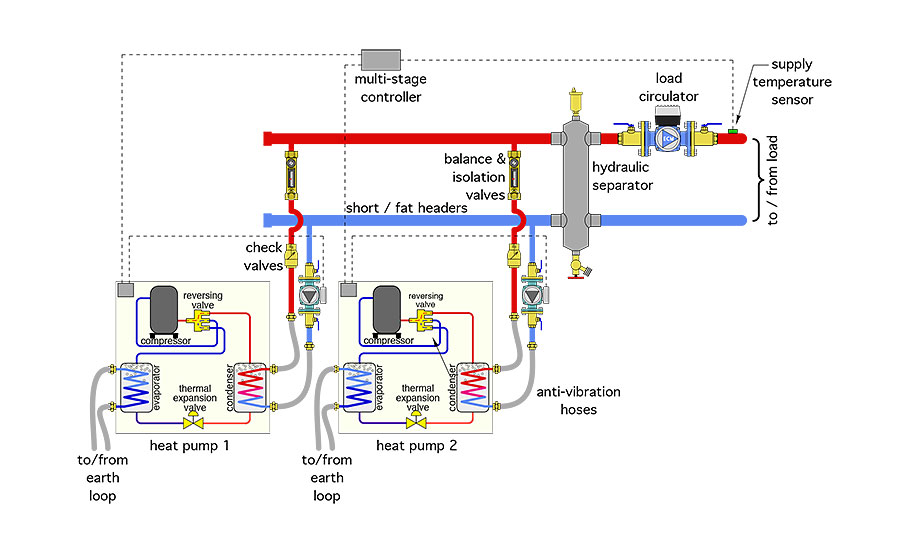
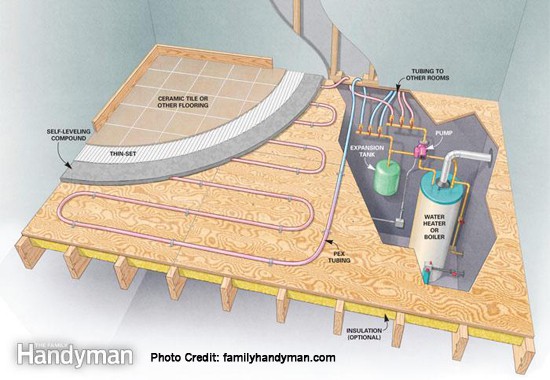
Diy Geothermal Heat Pump In Floor Heating Plumbing Diagram

Imagine this: the winter chill is setting in, you’re looking forward to the cozy warmth of your in-floor heating, powered by your DIY geothermal heat pump system, and…nothing. The floor remains stubbornly cold. Before you panic and call in a professional, let's explore some basic troubleshooting steps you can take to diagnose and potentially fix the problem. This guide focuses on the plumbing side of your DIY geothermal in-floor heating system, offering safe and practical DIY checks.
Understanding the Basics: Geothermal and In-Floor Heating
First, a quick recap. Geothermal systems use the earth's stable temperature to heat and cool your home. A heat pump transfers heat either from the ground into your home (in winter) or from your home into the ground (in summer). In-floor heating, also known as radiant floor heating, circulates warm water through pipes embedded in your floor, radiating heat upwards. The plumbing diagram is crucial for understanding how these components interact.
This article will focus primarily on the plumbing aspects of the system after the heat pump has done its job of heating the water. We will not be troubleshooting the heat pump itself.
Common Problems with In-Floor Heating (Plumbing Side)
Several plumbing-related issues can cause your in-floor heating to malfunction. These include:
- Circulation Problems: Water isn't flowing properly through the pipes.
- Air Trapped in the System: Air pockets can block water flow.
- Pressure Issues: Too little or too much pressure in the system.
- Valve Problems: Valves might be stuck open or closed.
- Leaks: Loss of water can reduce system efficiency and potentially cause damage.
- Sediment Buildup: Over time, minerals and debris can accumulate in the pipes.
Troubleshooting Your In-Floor Heating Plumbing: A Step-by-Step Guide
Important Safety Note: Before starting any troubleshooting, always turn off the power to your heat pump system at the circuit breaker. Work with water always presents a slip hazard. Be mindful of any potential leaks and clean up spills immediately.
Step 1: Visual Inspection
The first step is a thorough visual inspection. Look for the following:
- Leaks: Check around all pipe connections, manifolds, valves, and the heat pump itself. Look for drips, dampness, or signs of corrosion.
- Corrosion: Examine pipes and fittings for rust or corrosion.
- Damaged Pipes: Look for any signs of physical damage to the pipes.
- Valve Positions: Are the valves in the correct positions (open or closed) according to your system's design? (Refer to your DIY plumbing diagram).
- Manifold Condition: Check the manifold (the distribution point for the in-floor heating loops) for leaks, damage, or sediment buildup.
Step 2: Check the Circulation Pump
The circulation pump is responsible for moving the heated water through your in-floor heating system. If it's not working, the water won't circulate, and your floors will stay cold.
- Power: Ensure the pump is receiving power. Check the circuit breaker for the pump specifically. Reset the breaker if it has tripped.
- Pump Operation: Listen to the pump. Is it running? If it's silent, it may be faulty. If it’s making unusual noises (grinding, rattling), it may be failing.
- Pump Housing Temperature: Carefully touch the pump housing. Is it hot? A hot pump motor that isn’t circulating water likely indicates a problem.
- Basic Pump Test: Some circulation pumps have a small screw on the front. Carefully remove the screw (expect a small amount of water to leak out) and use a screwdriver to try and manually turn the pump shaft. If it's seized, the pump needs to be replaced. This is a relatively inexpensive DIY repair.
When to Call a Pro: Replacing a circulation pump involves electrical wiring and plumbing connections. If you're uncomfortable working with electricity or plumbing, it's best to call a qualified HVAC technician or plumber.
Step 3: Bleeding Air from the System
Air trapped in the pipes can prevent water from circulating properly. Bleeding the system removes this air.
- Locate Bleeder Valves: Most in-floor heating systems have bleeder valves at the manifold and at high points in the piping. Refer to your DIY plumbing diagram.
- Bleeding Procedure: Attach a hose to the bleeder valve and direct the other end into a bucket. Slowly open the valve. You should hear air hissing out, followed by water. Once a steady stream of water is flowing without any air bubbles, close the valve.
- Repeat: Repeat this process at all bleeder valves in the system.
Pro Tip: Bleeding the system is often best done with two people; one to monitor the pressure gauge (see Step 4) and the other to operate the bleeder valves.
Step 4: Checking Water Pressure
Proper water pressure is essential for the efficient operation of your in-floor heating system.
- Locate the Pressure Gauge: The pressure gauge is usually located near the manifold or the heat pump.
- Check the Pressure Reading: Refer to your system's documentation (or contact the manufacturer of your heat pump) to determine the correct pressure range. A typical range is between 12 and 15 PSI, but this can vary.
- Low Pressure: If the pressure is too low, you may have a leak in the system. Continue to carefully inspect all connections and pipes. You may also need to add water to the system. Many systems have an automatic fill valve that does this. If not, you'll need to manually add water, following the manufacturer's instructions.
- High Pressure: If the pressure is too high, it could indicate a problem with the expansion tank (see below) or a blockage in the system.
When to Call a Pro: If you consistently have low water pressure despite adding water, or if you have excessively high pressure, it's time to call a professional. These issues can indicate more serious problems within the system.
Step 5: Inspecting the Expansion Tank
The expansion tank accommodates the expansion and contraction of water as it heats and cools. A faulty expansion tank can cause pressure fluctuations and system inefficiencies.
- Location: The expansion tank is usually a small, pre-charged tank located near the heat pump or boiler.
- Checking the Tank: Tap on the tank. It should sound hollow at the top and solid at the bottom. If it sounds full of water throughout, the bladder inside the tank may have ruptured.
- Pressure Check (Advanced): You can check the pre-charge pressure of the tank using a tire pressure gauge. There’s a valve similar to a tire valve on the top or bottom of the tank. The pre-charge pressure should match the system's static pressure (when the system is off).
When to Call a Pro: Replacing an expansion tank requires draining part of the system and making plumbing connections. If you're not comfortable with this, call a plumber.
Step 6: Checking Valves
Valves control the flow of water through different parts of your in-floor heating system. A stuck or malfunctioning valve can restrict flow and cause uneven heating.
- Manual Valves: Ensure that all manual valves are in the correct positions (open or closed) according to your system's design. Refer to your DIY plumbing diagram.
- Zone Valves: If your system has zone valves (valves that control the flow of water to different zones in your home), check that they are opening and closing properly when the thermostat calls for heat in that zone. You should be able to hear them click open and closed.
When to Call a Pro: Replacing zone valves often involves electrical wiring and plumbing connections. It's best to leave this to a qualified technician.
Step 7: Flushing the System (Preventative Maintenance)
Over time, sediment and mineral buildup can accumulate in the pipes, reducing the efficiency of your in-floor heating system. Flushing the system removes this buildup. This is best done as preventative maintenance every 3-5 years.
- Connect a Flushing Pump: You'll need a special flushing pump designed for hydronic heating systems. These pumps connect to the system at the manifold and circulate a cleaning solution through the pipes.
- Use a Cleaning Solution: Add a cleaning solution specifically designed for hydronic heating systems to the flushing pump.
- Circulate the Solution: Circulate the cleaning solution through the system for several hours, following the instructions on the cleaning solution.
- Rinse the System: After circulating the cleaning solution, thoroughly rinse the system with clean water.
When to Call a Pro: Flushing the system requires specialized equipment and knowledge of hydronic heating systems. If you're not comfortable with this process, it's best to call a professional.
DIY vs. Professional Help: Knowing Your Limits
This guide has provided several DIY troubleshooting steps you can take to diagnose and potentially fix problems with your in-floor heating plumbing. However, it's important to know your limits.
DIY-Friendly Tasks:
- Visual inspections.
- Checking and resetting circuit breakers.
- Bleeding air from the system.
- Checking water pressure (and adding water if necessary).
- Checking valve positions.
- Replacing a circulation pump (if you're comfortable with basic electrical and plumbing work).
Tasks Best Left to Professionals:
- Repairing leaks in pipes or fittings (especially if it involves soldering or welding).
- Replacing zone valves.
- Replacing an expansion tank (if you're not comfortable with plumbing).
- Flushing the system.
- Any work on the heat pump itself.
- Troubleshooting complex electrical problems.
- Any gas-related work.
Prevention is Key
Regular maintenance can help prevent problems with your in-floor heating system.
- Annual Inspection: Have a professional inspect your system annually.
- Bleeding: Bleed the system regularly to remove air.
- Flushing: Flush the system every 3-5 years to remove sediment.
- Monitor Pressure: Regularly monitor the water pressure.
By following these troubleshooting steps and preventative maintenance tips, you can keep your DIY geothermal in-floor heating system running smoothly and enjoy the cozy warmth it provides for years to come. Remember to always prioritize safety and don't hesitate to call a professional when needed.