Do Radiant Barriers Work In Attics
Is your attic turning into a scorching oven in the summer, making your air conditioner work overtime? You're not alone. Many homeowners face this problem, and one solution often touted is installing a radiant barrier. But do radiant barriers *really* work in attics? Let's dive in and find out.
What is a Radiant Barrier?
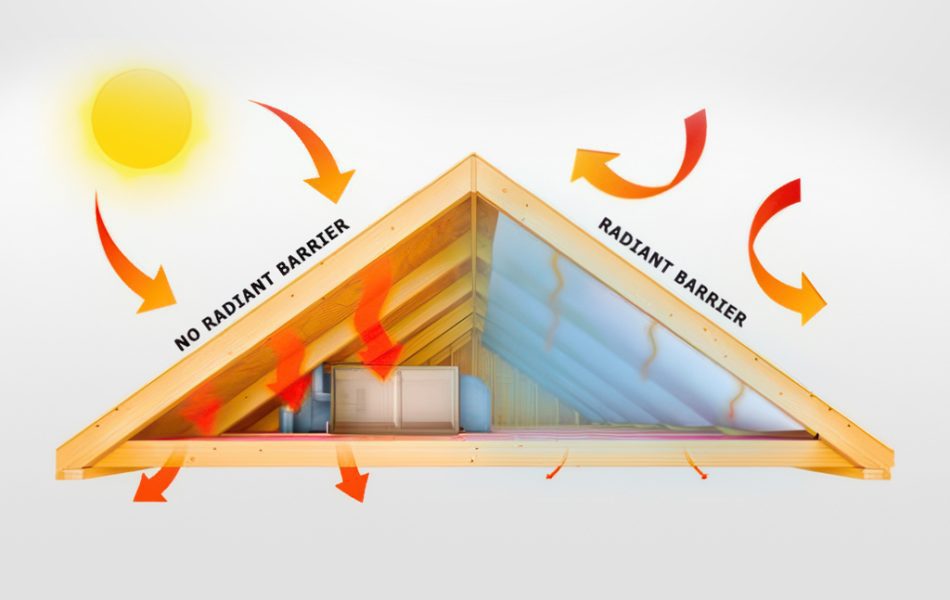
A radiant barrier is a material, typically a thin sheet of aluminum foil, designed to reflect radiant heat. Unlike insulation, which slows down conductive heat transfer, a radiant barrier targets radiant heat – the heat that travels in waves, like the sun's rays. Think of it like sunscreen for your attic, reflecting away those intense solar rays before they can heat up your home.
How Radiant Barriers Work in Attics
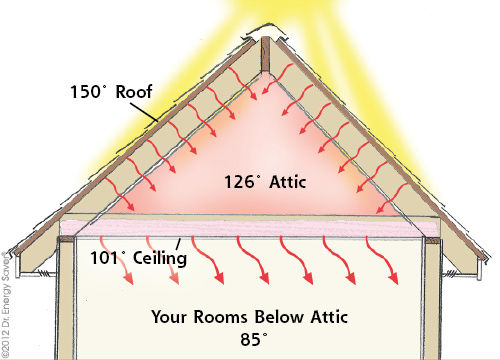
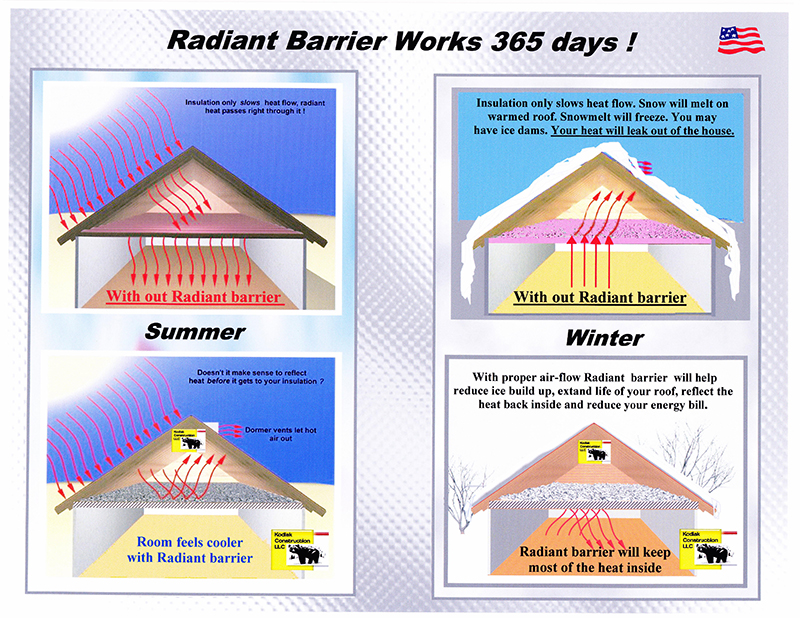
During a hot summer day, the sun beats down on your roof, heating it up significantly. This heat radiates downwards into your attic. Without a radiant barrier, this radiant heat is absorbed by your attic's structure, insulation, and everything else in the space. This absorbed heat then conducts into your home, forcing your air conditioner to work harder and longer. A radiant barrier, installed correctly, reflects a significant portion of this radiant heat before it can be absorbed, thus reducing the overall heat gain in your attic.
Benefits of Radiant Barriers
- Reduced Attic Temperature: This is the primary benefit. Studies have shown that radiant barriers can reduce attic temperatures by as much as 20-30 degrees Fahrenheit.
- Lower Energy Bills: By reducing the heat load on your air conditioner, a radiant barrier can lead to noticeable savings on your cooling bills.
- Increased HVAC System Lifespan: Less strain on your AC unit means it won't have to work as hard, potentially extending its lifespan and reducing the need for frequent repairs.
- Improved Home Comfort: A cooler attic contributes to a more comfortable living space, especially on the upper floors.
Types of Radiant Barriers
Radiant barriers come in several forms, each with its own installation process and effectiveness:
- Foil-faced Sheathing: This is plywood or OSB sheathing with a layer of reflective foil laminated to one side. It's commonly used during new construction or when replacing roof sheathing.
- Foil-faced Insulation: Some insulation products, like fiberglass batts or rigid foam boards, have a layer of foil facing. This provides both insulation and radiant barrier benefits.
- Reflective Spray Coatings: These are paint-like coatings containing reflective particles that can be sprayed onto the underside of your roof deck.
- Radiant Barrier Foil: This is a thin, flexible sheet of aluminum foil. It’s the most common type for retrofitting existing attics. It can be single-sided or double-sided (reflective on both sides).
Installation: DIY or Call a Pro?
Installing radiant barrier foil is a project many homeowners can tackle themselves, but it's important to understand the process and potential challenges. Other types of radiant barrier installations are best left to professionals.
DIY Radiant Barrier Foil Installation
Before you start, gather your materials and tools:
- Radiant barrier foil (measure your attic to determine how much you need)
- Staple gun and staples (heavy-duty is recommended)
- Utility knife
- Measuring tape
- Safety glasses
- Gloves
- Dust mask or respirator
- Ladder
Steps:
- Safety First: Turn off the power to any electrical wiring in the attic. Wear safety glasses, gloves, and a dust mask. Work during cooler parts of the day to avoid heatstroke. Have a buddy nearby to assist if possible.
- Measure and Cut: Measure the distance between rafters or trusses. Cut the radiant barrier foil to the appropriate length, leaving a few inches of overlap.
- Attach the Foil: Staple the foil to the underside of the rafters or trusses, ensuring the reflective side faces down into the attic space. Overlap the edges of each strip by a few inches.
- Secure the Overlaps: Staple the overlapping edges together to create a continuous barrier.
- Ventilation: Ensure you are not blocking any attic ventilation, such as soffit vents or ridge vents. Radiant barriers work best with proper attic ventilation.
Important Considerations:
- Accessibility: Attics can be cramped and awkward. If you're not comfortable working in tight spaces or on a ladder, it's best to hire a professional.
- Wiring: Be extremely careful around electrical wiring. Never staple through wires. If you're unsure about anything, consult a qualified electrician.
- Ventilation: Blocking attic ventilation can lead to moisture buildup and other problems. Ensure your ventilation system is working correctly before and after installation.
- Insulation: Make sure you have adequate insulation in your attic before installing a radiant barrier. Insulation is crucial for slowing conductive heat transfer, while the radiant barrier addresses radiant heat.
When to Call a Professional
Consider hiring a professional for:
- Complex Attic Layouts: If your attic has many obstructions or is difficult to access.
- Electrical Issues: If you're concerned about electrical wiring or need to relocate any wiring.
- Roof Repairs: If you notice any signs of roof damage, such as leaks or rot. These should be addressed before installing a radiant barrier.
- Spray-on Radiant Barriers: The application of spray-on radiant barriers requires specialized equipment and knowledge.
- Foil-faced Sheathing or Insulation: Installation of these products is often part of a larger roofing or insulation project.
Cost of Radiant Barrier Installation
The cost of installing a radiant barrier can vary depending on the type of material, the size of your attic, and whether you hire a professional. Here's a general cost breakdown:
- DIY Radiant Barrier Foil: $0.15 - $0.50 per square foot for materials.
- Professional Installation of Radiant Barrier Foil: $0.50 - $1.50 per square foot, including materials and labor.
- Foil-faced Insulation: Cost varies widely depending on the type of insulation.
- Spray-on Radiant Barrier: $1.00 - $3.00 per square foot, including materials and labor.
These are just estimates, and actual costs may vary. Get quotes from multiple contractors to compare prices.
Radiant Barriers and Climate Considerations
Radiant barriers are most effective in hot, sunny climates where cooling costs are high. In colder climates, their benefits are less pronounced, as the primary concern is retaining heat, not reflecting it. However, even in colder climates, a radiant barrier can offer some benefits by reflecting heat back into the living space during the winter.
Do Radiant Barriers Really Work? The Verdict
Yes, radiant barriers can be effective in reducing attic temperatures and lowering energy bills, especially in hot climates. However, their effectiveness depends on proper installation, adequate attic ventilation, and sufficient insulation. They are not a magic bullet, but they can be a valuable addition to a comprehensive energy-saving strategy for your home.
Common Issues and Troubleshooting
- No noticeable difference in temperature: Check for proper installation. Ensure the reflective side is facing down and that there are no gaps or tears in the material. Verify adequate attic ventilation.
- Condensation problems: This can occur if the radiant barrier is not properly ventilated. Ensure soffit and ridge vents are clear and functioning correctly.
- Increased utility bills: This is unlikely, but double-check for any other energy-wasting issues in your home, such as air leaks around windows and doors. Ensure your insulation is adequate and your HVAC system is functioning efficiently.
HVAC System and Radiant Barrier Synergy
While a radiant barrier can help reduce the workload on your HVAC system, it's essential to ensure your HVAC system itself is properly maintained. Schedule regular maintenance checks, including cleaning or replacing air filters, inspecting ductwork for leaks, and verifying refrigerant levels. A well-maintained HVAC system will work more efficiently and last longer, complementing the benefits of a radiant barrier.
By understanding how radiant barriers work, their benefits and limitations, and the importance of proper installation and maintenance, you can make an informed decision about whether they are right for your home. Remember, safety is paramount, and when in doubt, consult a qualified HVAC professional.