Does Running The Ac Fan Use A Lot Of Electricity

One sweltering afternoon, your air conditioner is blasting, but instead of a refreshing chill, a wave of warm air greets you. You check the thermostat – it's set low. You listen closely – the compressor seems to be running outside. But the air coming from the vents remains stubbornly lukewarm. Sound familiar? One of the most common culprits for this issue is a problem with your AC fan – specifically, whether it's running efficiently, or at all. Many homeowners wonder: Does running the AC fan use a lot of electricity? This article will help you troubleshoot AC fan issues and understand their energy consumption.
Understanding AC Fan Electricity Usage
Let's tackle the core question first. Running your AC fan does use electricity. The amount depends on several factors, including the fan motor's wattage, the fan speed, and how often you run it. However, it's important to distinguish between two scenarios:
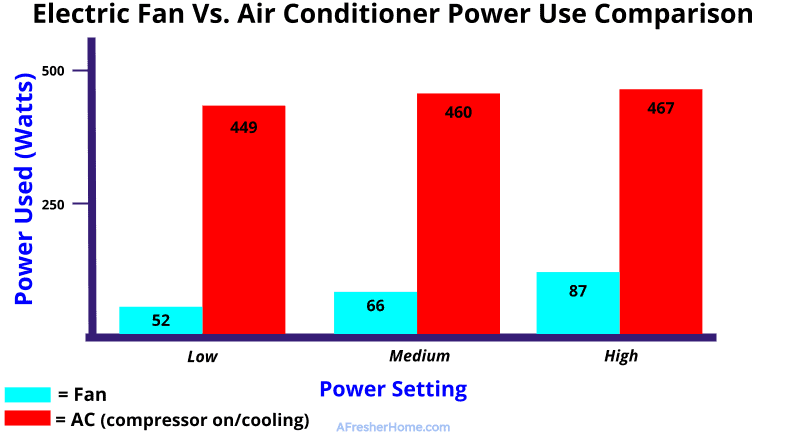
- Fan running *with* the compressor: This is the typical AC operation. The fan circulates the air cooled by the compressor. The energy usage is higher because both components are running.
- Fan running *alone* (in "Fan Only" mode): In this mode, the compressor is off, and only the fan is running. This uses significantly less electricity because it's only circulating existing air, not actively cooling it.
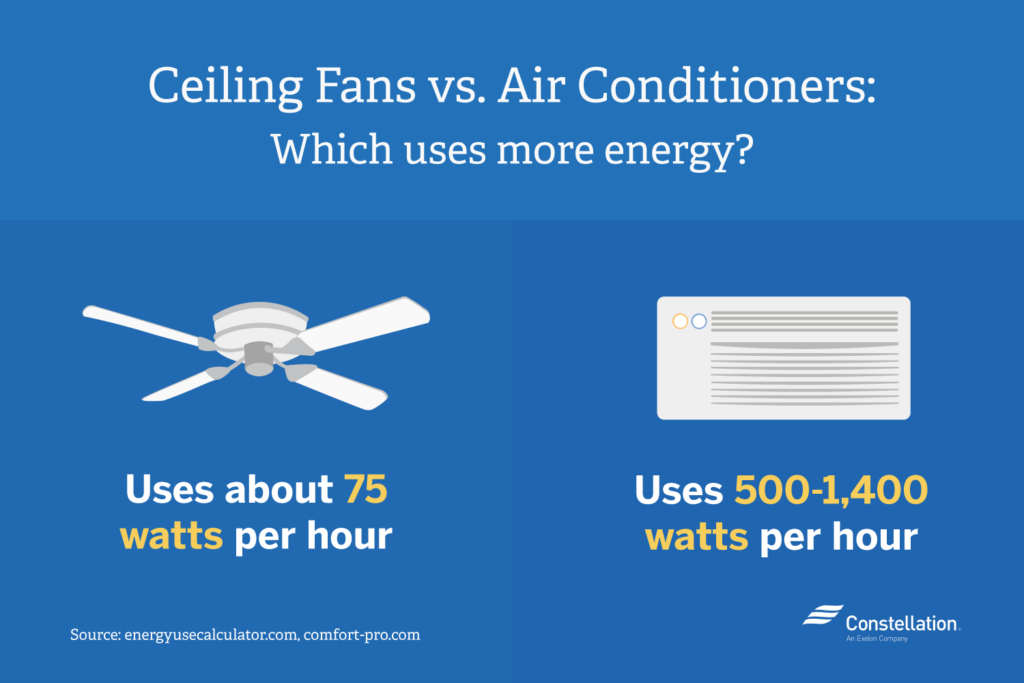
Generally, running the fan alone consumes around 50-500 watts, depending on the fan's size and speed. This is far less than the compressor, which can draw several thousand watts. So, while not free, running the fan alone is considerably cheaper than running the entire AC system.
Troubleshooting a Faulty AC Fan: A Step-by-Step Guide
Before calling a technician, you can try some basic troubleshooting steps. Safety first! Always turn off the power to your AC unit at the breaker box before attempting any repairs.
Step 1: Checking the Power Supply
The most basic, but often overlooked, step is ensuring the unit is receiving power.
- Check the breaker: Locate the circuit breaker for your AC unit in the breaker box. Make sure it hasn't tripped (flipped to the "off" position). If it has, flip it fully to the "off" position and then back to the "on" position.
- Inspect the disconnect switch: Most outdoor AC units have a disconnect switch (a small box near the unit) for safety. Ensure this switch is in the "on" position.
- Test the voltage (if you're comfortable): This step involves working with electricity and should only be attempted by someone comfortable and knowledgeable about electrical safety. Use a multimeter to test the voltage at the disconnect switch. You should read approximately 220-240 volts (for a typical residential unit). If there's no voltage, there's a problem with the electrical supply, and you should call an electrician.
Step 2: Examining the Thermostat Settings
Believe it or not, incorrect thermostat settings are a frequent cause of perceived AC fan problems.
- Verify the mode: Ensure the thermostat is set to "Cool" and not "Heat" or "Off."
- Check the fan setting: Most thermostats have options for "Auto" or "On" for the fan.
- "Auto" means the fan only runs when the compressor is running.
- "On" means the fan runs continuously, even when the compressor is off.
- Set the temperature: Ensure the set temperature is lower than the current room temperature. If the set temperature is higher, the AC (including the fan in "Auto" mode) won't turn on.
Step 3: Inspecting the Outdoor Unit (Condenser)
The outdoor unit houses the condenser fan, which is crucial for dissipating heat. If this fan isn't working, the AC won't cool effectively.
- Visual inspection: Carefully examine the fan blades for any obstructions (leaves, branches, debris). Remove any blockages.
- Listen for humming: If you hear a humming sound but the fan isn't spinning, the motor might be seized or the capacitor might be faulty. Do not attempt to manually spin the fan blades while the unit is powered on. This is dangerous!
- Check the capacitor: The capacitor is a small, cylindrical component that helps start the fan motor. A bulging or leaking capacitor is a sign of failure. Capacitors can store an electrical charge even after the power is turned off. It's crucial to discharge the capacitor before handling it. This is best left to a professional.
- Clean the condenser fins: Over time, the condenser fins can become clogged with dirt and debris, reducing airflow. Gently clean the fins with a fin comb or a soft brush and a garden hose. Do not use a pressure washer, as it can damage the fins.
Step 4: Checking the Indoor Unit (Evaporator)
The indoor unit houses the blower fan, which circulates the cooled air throughout your home.
- Inspect the air filter: A clogged air filter restricts airflow, putting a strain on the blower motor and reducing cooling efficiency. Replace the air filter regularly (typically every 1-3 months).
- Listen for unusual noises: Grinding, squealing, or rattling noises from the indoor unit could indicate a problem with the blower motor or fan assembly.
- Check the blower motor: Similar to the outdoor fan motor, the blower motor can fail. If you suspect a faulty blower motor, it's best to call a professional.
Step 5: Simple Part Replacements (Proceed with Caution)
While many AC repairs are best left to professionals, there are a couple of simple part replacements that some homeowners may be comfortable attempting. Again, safety is paramount. Always disconnect the power before working on the unit.
- Start Capacitor Replacement (Outdoor Unit): This requires discharging the capacitor! Only attempt if you are comfortable with electrical work and have the proper tools (insulated screwdriver, multimeter).
- Turn off the power to the AC unit.
- Discharge the capacitor using an insulated screwdriver. Touch both terminals of the capacitor simultaneously with the screwdriver shaft.
- Take a photo of the wiring configuration before disconnecting the wires.
- Disconnect the wires from the old capacitor.
- Connect the wires to the new capacitor, matching the wiring configuration from the photo.
- Install the new capacitor.
- Restore power to the AC unit and test.
- Air Filter Replacement (Indoor Unit): This is the easiest and most common DIY task. Simply remove the old air filter and replace it with a new one of the correct size.
When to Call a Professional
While some AC fan problems can be resolved with basic troubleshooting and DIY repairs, certain situations require the expertise of a qualified HVAC technician.
- Working with Refrigerant: Refrigerant is a hazardous substance, and handling it requires specialized equipment and training. Never attempt to add or remove refrigerant yourself.
- Complex Electrical Issues: If you suspect a wiring problem, a faulty compressor, or any other complex electrical issue, call an electrician or HVAC technician.
- Gas Leaks: If you smell gas near your AC unit, evacuate the area immediately and call your gas company or a qualified HVAC technician.
- Motor Replacement: Replacing the outdoor or indoor fan motor can be complex, requiring specialized tools and knowledge.
- You're Uncomfortable: If you're not comfortable working with electricity or handling mechanical components, it's always best to err on the side of caution and call a professional.
Tips for Saving Energy with Your AC Fan
Here are some tips to minimize the electricity usage of your AC fan:
- Use the "Auto" fan setting: This ensures the fan only runs when the compressor is cooling, saving energy.
- Raise the thermostat temperature: Even a small increase in the thermostat setting can significantly reduce energy consumption.
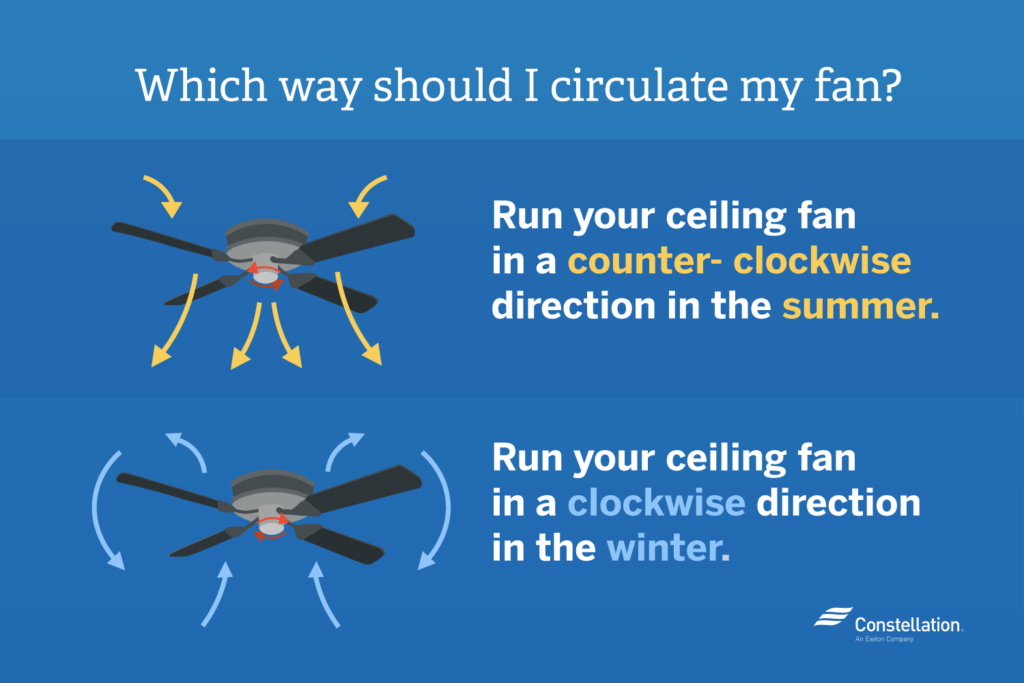
- Use ceiling fans: Ceiling fans help circulate air, allowing you to raise the thermostat temperature without sacrificing comfort.
- Seal air leaks: Seal any air leaks around windows, doors, and ductwork to prevent cool air from escaping.
- Regular maintenance: Schedule regular maintenance for your AC unit to ensure it's running efficiently.
By understanding how your AC fan works and following these troubleshooting steps, you can potentially resolve minor issues yourself, save money on repair costs, and better understand your AC system's energy consumption. Remember, when in doubt, always consult a qualified professional. Good luck!