Electric Tankless Water Heater Installation Diagram
One of the most frustrating experiences for any homeowner is stepping into the shower only to be greeted by a lukewarm dribble instead of a hot, invigorating spray. If you've recently installed an electric tankless water heater, or have been relying on one for some time, and you're experiencing inconsistent heating, this article is for you. We'll walk you through a step-by-step troubleshooting process, referencing a typical electric tankless water heater installation diagram, to help you diagnose and potentially resolve the issue. Remember, safety is paramount. If you're ever uncomfortable or unsure about any step, contact a qualified electrician or plumber.
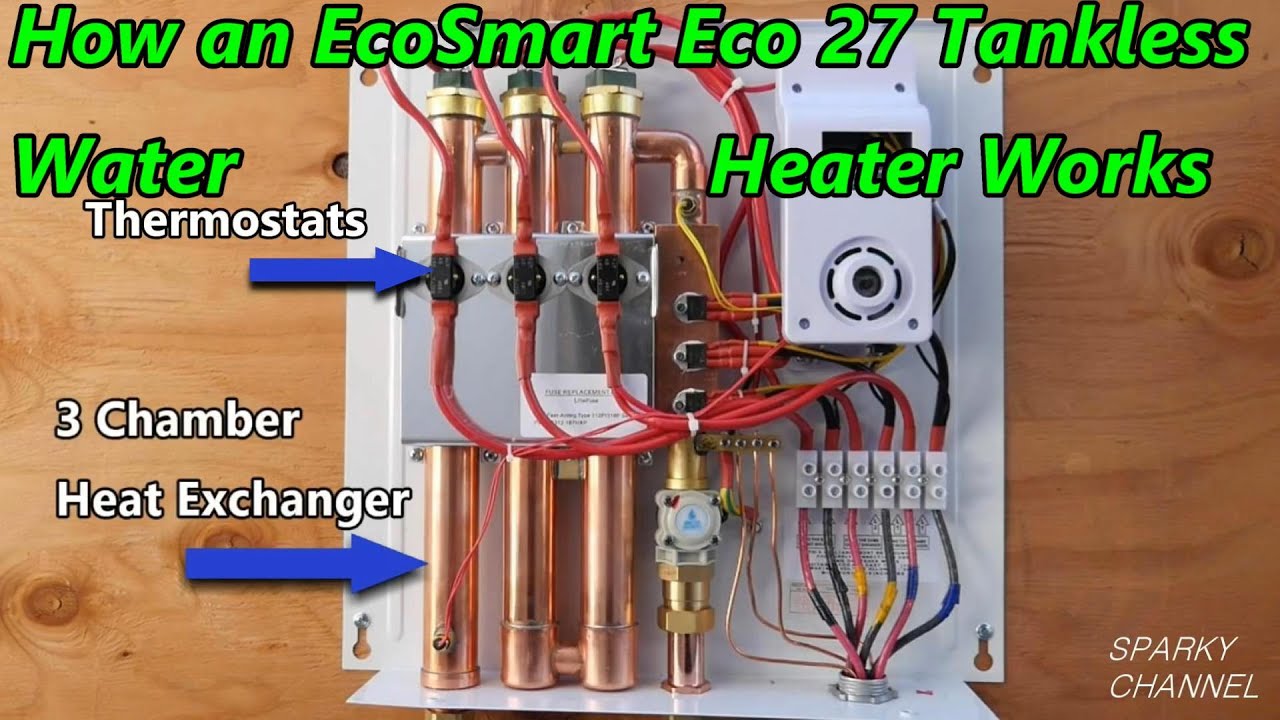
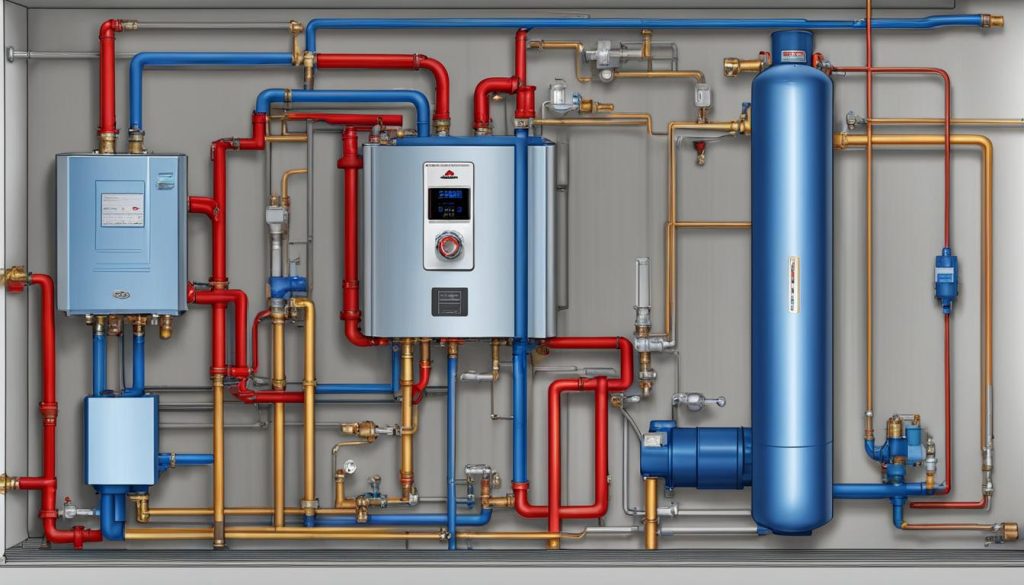
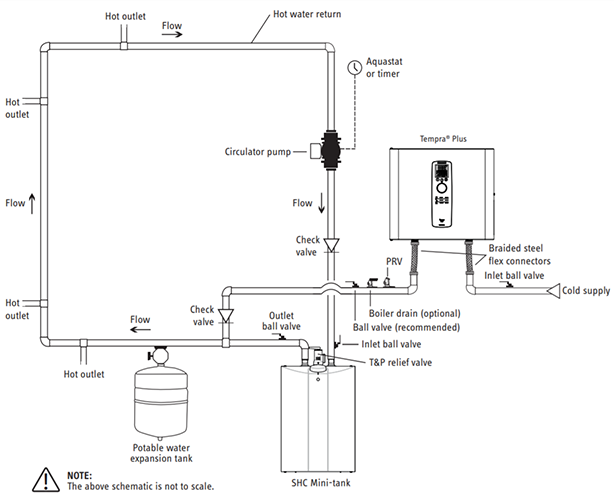
Understanding the Installation Diagram: A Visual Guide
Before we dive into troubleshooting, let's briefly discuss why understanding your installation diagram is crucial. The diagram, usually found in your unit's manual, is a blueprint of how your tankless water heater is connected to your electrical system, cold water supply, and hot water outlets. Knowing the location of key components like the circuit breaker(s), cold water inlet, hot water outlet, and wiring connections is essential for effective troubleshooting. Keep this diagram handy; you'll be referring to it often.
Step 1: Preliminary Checks (No Tools Required)
Let's start with the easiest checks, requiring no tools. These simple steps can often reveal the most common culprits.
- Confirm Power: Is the unit receiving power? Check the dedicated circuit breaker(s) in your electrical panel. Make sure the breaker(s) are switched to the "ON" position. If the breaker is tripped (in the "OFF" or "MIDDLE" position), reset it by switching it fully to the "OFF" position and then back to "ON". If the breaker trips repeatedly, do not keep resetting it. This indicates a serious electrical problem requiring a professional electrician.
- Check the Display Panel: Many tankless heaters have a display panel that shows error codes. Consult your manual to decipher any error codes displayed. This can pinpoint the exact problem area. Write down the error code for reference.
- Flow Rate: Tankless heaters require a minimum flow rate to activate. Open a hot water faucet fully. Is the flow rate adequate? If the flow is weak, the heater may not be activating. Check for any kinks or obstructions in the supply lines (we'll get to this in more detail later).
- Other Appliances: Are other high-demand appliances running simultaneously? Running multiple appliances like a washing machine, dishwasher, and the water heater at the same time can overload the electrical circuit, potentially causing the heater to underperform. Try turning off other appliances and running the hot water alone.
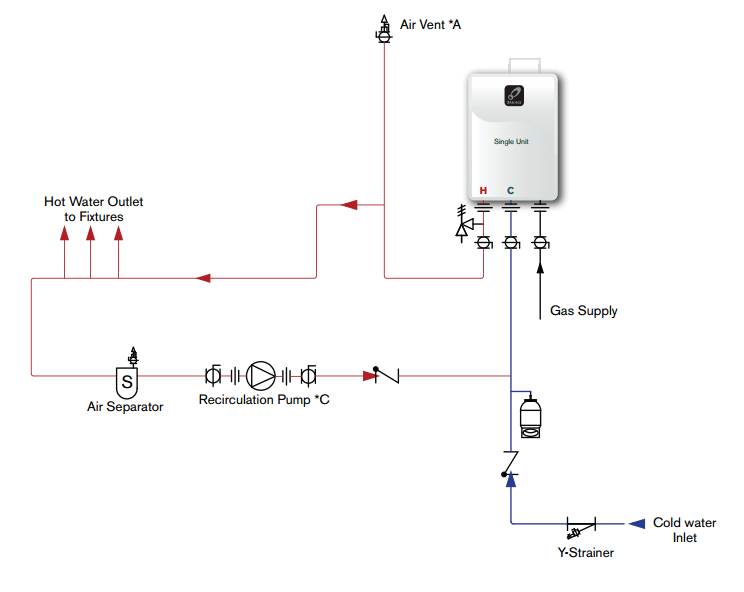
Step 2: Checking the Water Supply (Simple Tools May Be Needed)
A restricted water supply can prevent the heater from functioning correctly. You might need a bucket and a wrench for this section.
- Inlet Water Valve: Locate the cold water inlet valve to the heater. Ensure it is fully open. Sometimes these valves can become partially closed accidentally.
- Water Filter (if applicable): Some tankless heaters have an inline water filter. A clogged filter restricts water flow. Consult your manual to locate the filter. To check, carefully shut off the cold water supply before removing the filter. You'll likely need a wrench to loosen the filter housing. Inspect the filter. If it's dirty, clean or replace it according to the manufacturer's instructions. Have a bucket handy to catch any water spillage.
- Kinked or Damaged Supply Lines: Inspect the cold and hot water supply lines for any kinks, dents, or damage. Kinks can severely restrict water flow. Replace damaged lines as needed.
- Aerators and Showerheads: Mineral buildup in faucet aerators and showerheads can restrict water flow. Unscrew the aerator or showerhead and clean them thoroughly. Soaking them in vinegar can help dissolve mineral deposits.
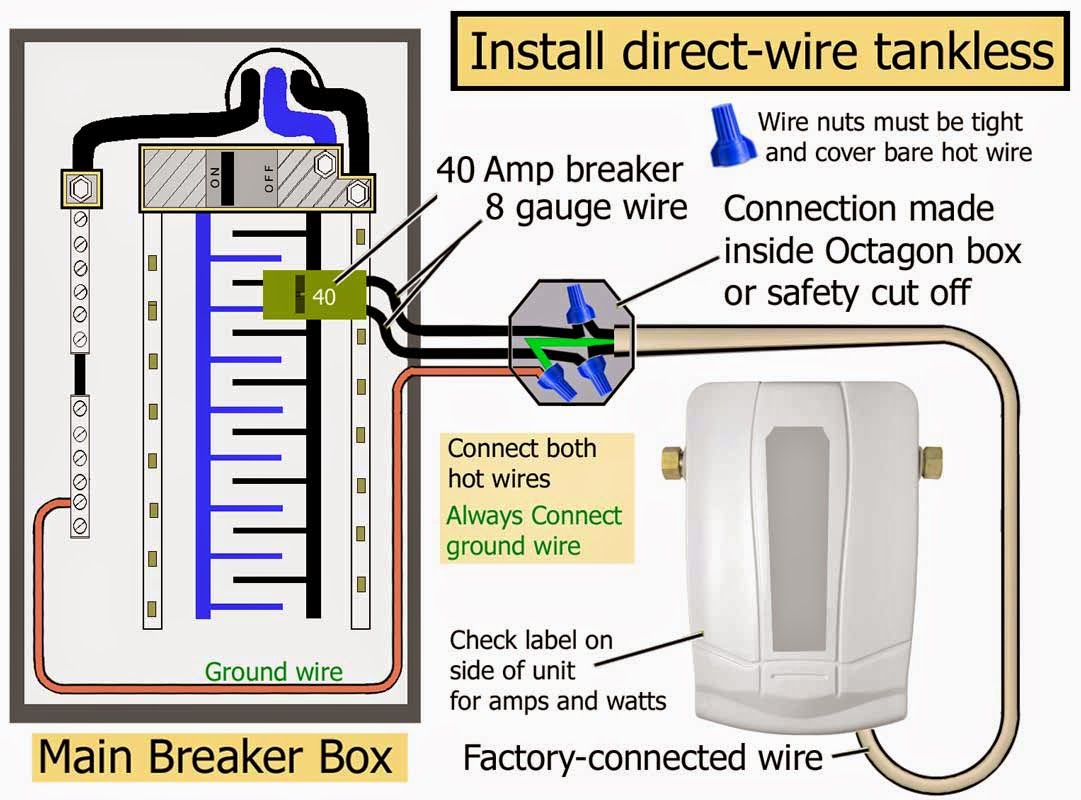
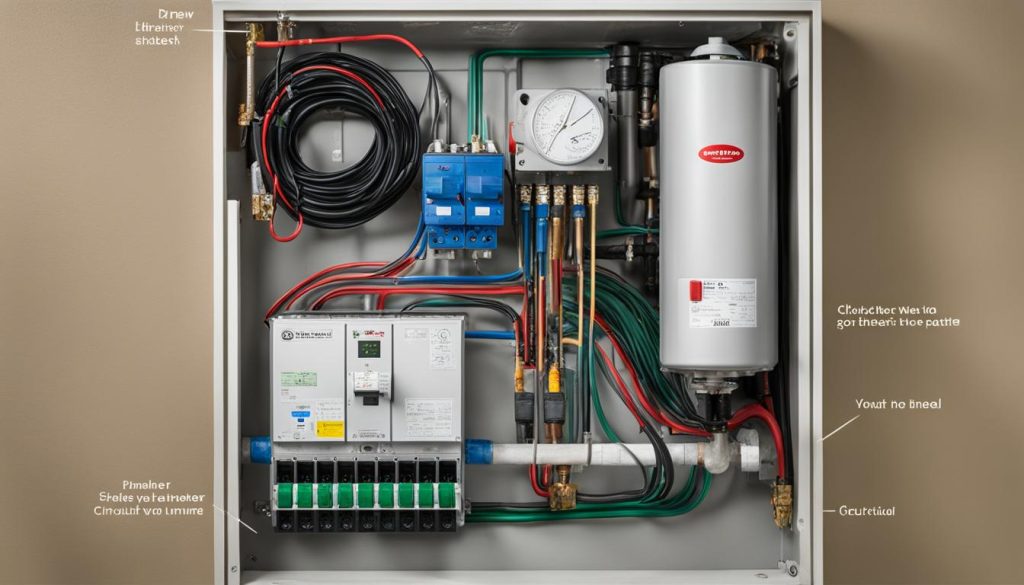
Step 3: Electrical Connections (Tools Required – Exercise Extreme Caution!)
WARNING: Working with electricity can be dangerous. If you're not comfortable working with electrical wiring, consult a qualified electrician. Ensure the circuit breaker for the water heater is turned OFF before proceeding. Verify it's off with a non-contact voltage tester.
This step requires a multimeter and a screwdriver.
- Voltage Check: Using a multimeter, check the voltage at the heater's electrical terminals. Refer to your installation diagram for the correct voltage specifications. An incorrect voltage reading indicates a problem with the electrical supply. This is a job for a qualified electrician. DO NOT proceed further if the voltage is incorrect.
- Wiring Connections: Carefully inspect the wiring connections inside the heater's electrical panel. Ensure all connections are tight and secure. Loose connections can cause overheating and malfunction. Use a screwdriver to tighten any loose connections. Look for signs of corrosion or burning. If you find any, consult an electrician.
- Ground Wire: Ensure the ground wire is properly connected and secured. A faulty ground can cause electrical issues and is a safety hazard.
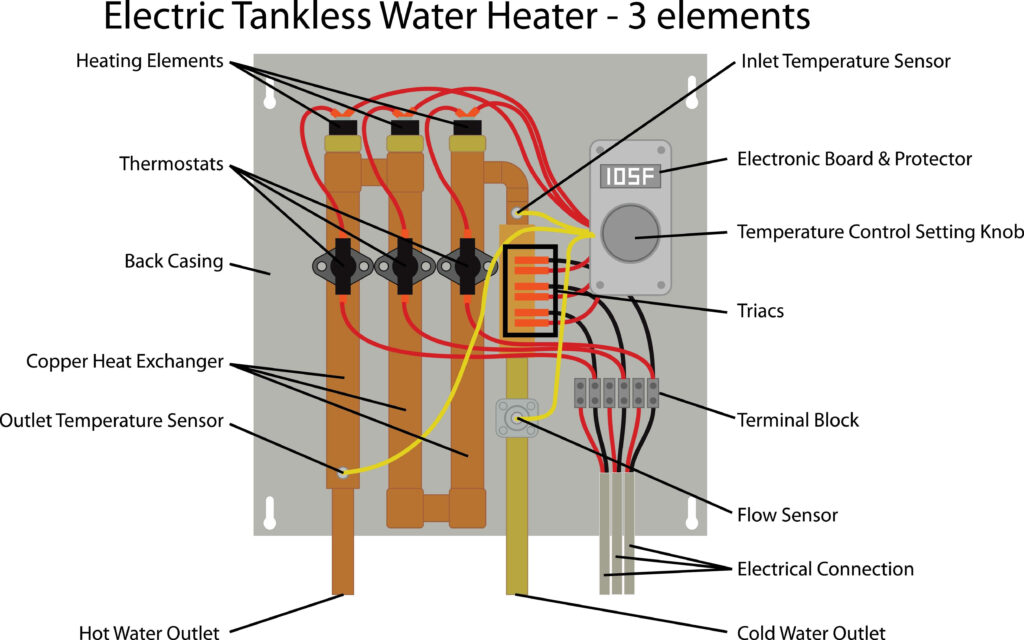
Step 4: Checking the Heating Element (Tools Required – Advanced Troubleshooting)
This step is more advanced and involves checking the heating element. Proceed only if you have experience with electrical testing and are comfortable working with a multimeter.
WARNING: Ensure the circuit breaker for the water heater is turned OFF and verified with a non-contact voltage tester before proceeding.
- Continuity Test: Use a multimeter to perform a continuity test on the heating element. Refer to your unit's service manual for the correct testing procedure. If the heating element shows no continuity (an open circuit), it is likely burned out and needs to be replaced. This is often a job best left to a qualified technician.
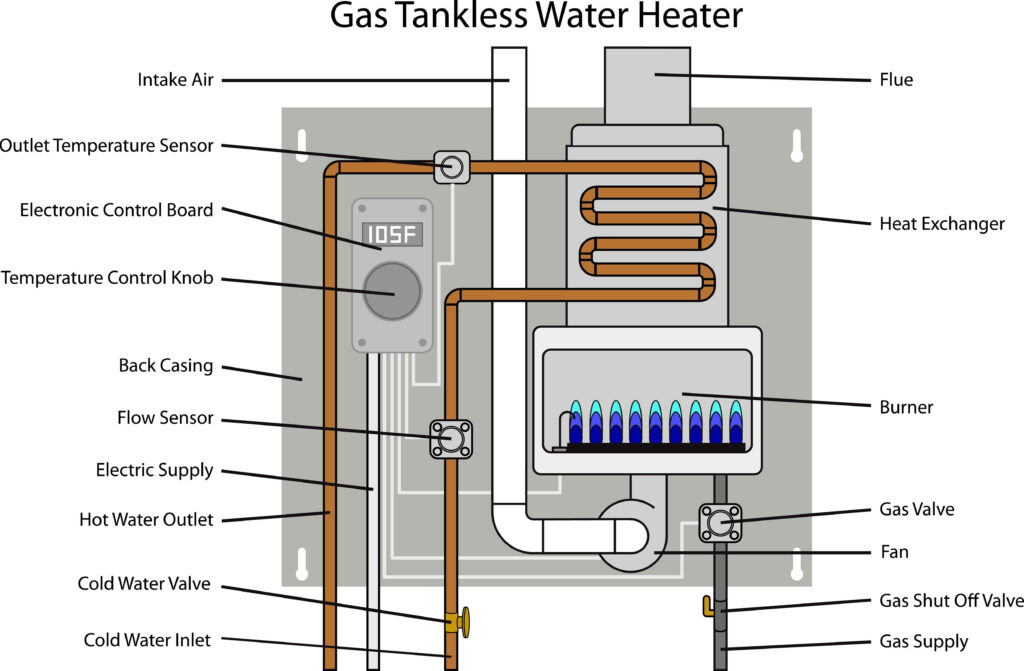
Step 5: Understanding Flow Sensor and Temperature Sensors
Tankless water heaters rely on flow sensors and temperature sensors to function correctly. These sensors tell the unit when to activate and how much power to use to heat the water.
- Flow Sensor Malfunction: If the heater isn't activating even with adequate water flow, the flow sensor might be faulty. Unfortunately, testing a flow sensor often requires specialized equipment and expertise. Consult your manual for specific troubleshooting steps or contact a technician.
- Temperature Sensor Issues: If the water is overheating or not heating to the set temperature, a temperature sensor might be the problem. These sensors can sometimes be tested with a multimeter, but the process varies depending on the model. Refer to your service manual for instructions. Replacement is usually straightforward, but ensure you purchase the correct replacement part.
DIY Actions: What You Can Safely Attempt
Based on the troubleshooting steps above, here's a summary of what you can safely attempt yourself:
- Resetting the Circuit Breaker: If the breaker trips, you can try resetting it once. However, if it trips repeatedly, call an electrician.
- Checking and Cleaning the Water Filter: Maintaining a clean water filter is crucial for optimal performance.
- Cleaning Aerators and Showerheads: Removing mineral buildup can improve water flow.
- Inspecting for Kinks and Damage in Supply Lines: Replacing damaged supply lines is a relatively simple task.
- Tightening Wiring Connections (with extreme caution and power OFF): Ensure all connections are secure, but don't overtighten them.
When to Call a Professional
There are situations where DIY troubleshooting is not recommended and a professional should be called immediately:
- Repeatedly Tripping Circuit Breaker: This indicates a serious electrical problem.
- Incorrect Voltage Readings: This also points to a major electrical issue.
- Suspected Heating Element Failure: While replacing a heating element is possible, it's often a complex and potentially dangerous task.
- Flow Sensor or Temperature Sensor Issues: Diagnosing and repairing these issues often requires specialized knowledge and equipment.
- Any Time You Feel Uncomfortable or Unsure: Your safety is the top priority. If you're not confident in your abilities, don't hesitate to call a qualified professional.
- Error Codes You Don't Understand: Some error codes indicate problems that only a trained technician can address.
Preventative Maintenance: Avoiding Future Problems
Regular preventative maintenance can help extend the life of your tankless water heater and prevent many of the issues we've discussed.
- Annual Inspection: Schedule an annual inspection by a qualified plumber or electrician.
- Flush the Unit: Minerals can build up inside the heater over time. Refer to your manual for instructions on how to flush the unit. This typically involves using a descaling solution.
- Clean the Water Filter Regularly: As mentioned earlier, a clean filter is essential for optimal performance.
- Monitor Water Pressure: Consistent water pressure is important for proper operation.
By following these troubleshooting steps and performing regular maintenance, you can keep your electric tankless water heater running smoothly and enjoy reliable hot water for years to come. Remember to always prioritize safety and consult a professional when needed. Good luck!