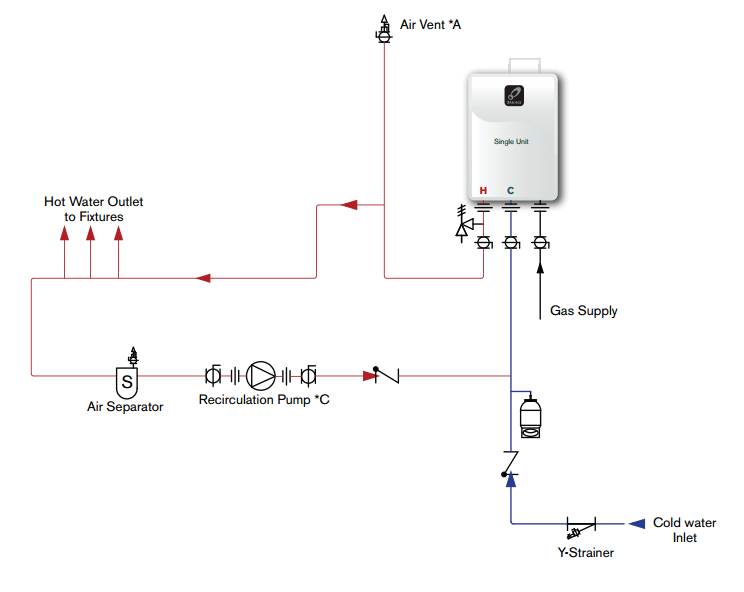
Electric Tankless Water Heater Piping Diagram

Imagine stepping into the shower expecting a cascade of warm water, only to be greeted by a chilling stream. A malfunctioning tankless water heater is a common household woe, leaving you in the cold. Before you panic, let's walk through some basic troubleshooting steps. Remember, safety first! If at any point you feel uncomfortable or unsure, especially when dealing with electricity or gas, stop immediately and call a qualified professional.
Understanding Your Tankless Water Heater System
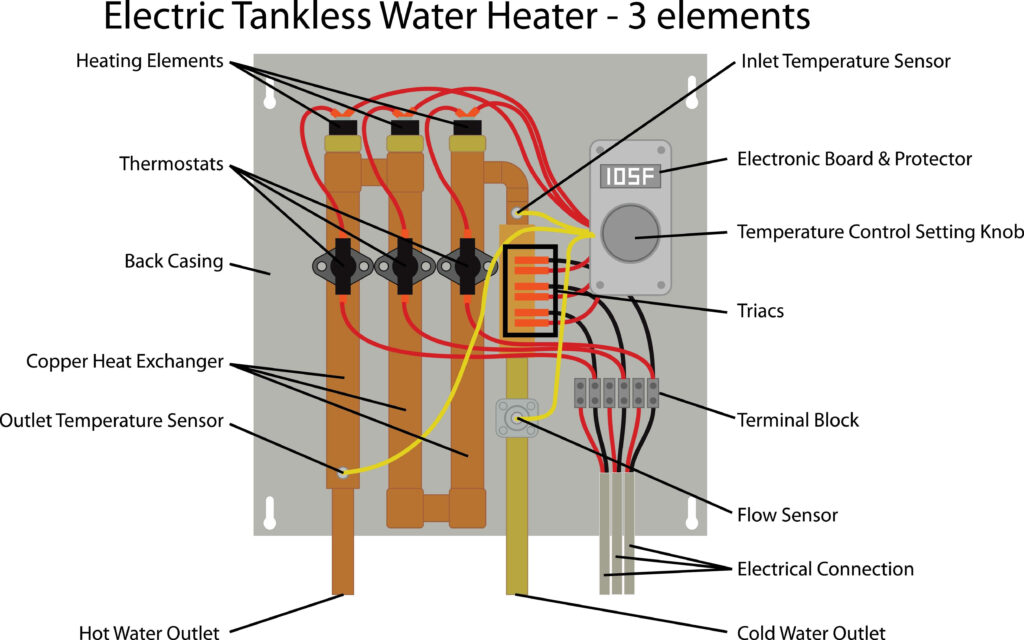
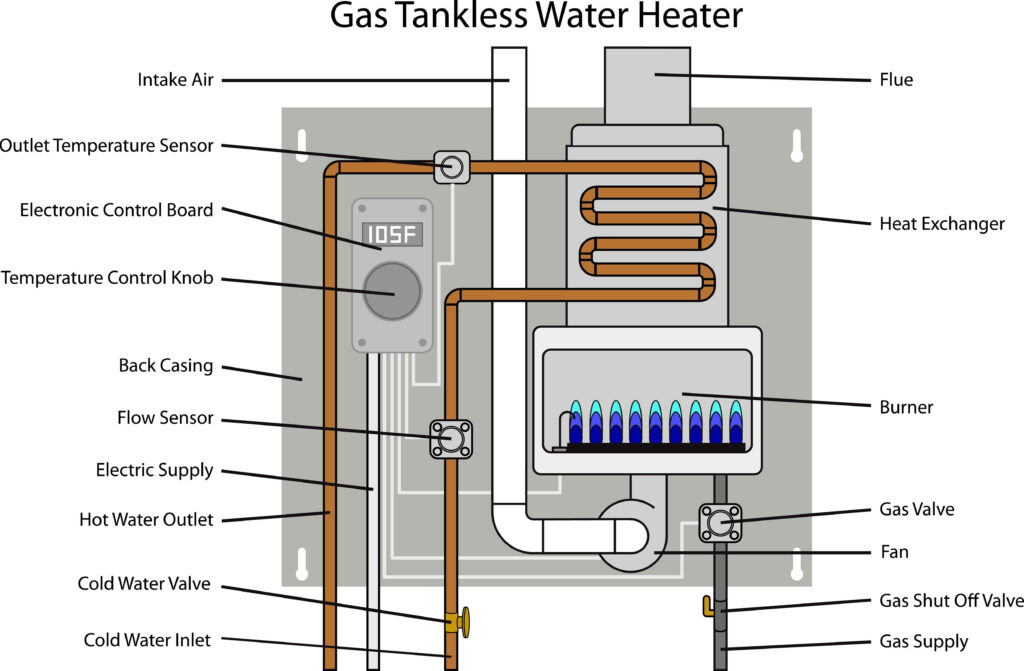
Before diving into the troubleshooting, it's crucial to understand the basic plumbing and electrical components involved. Tankless water heaters, also known as on-demand water heaters, heat water directly without the use of a storage tank. Cold water travels through a pipe into the unit, and when a hot water tap is turned on, a flow sensor activates the heater. A high-powered heating element (electric models) or a gas burner (gas models) heats the water as it passes through. Knowing this basic principle helps you understand where problems might arise.
Basic Piping Diagram Overview:
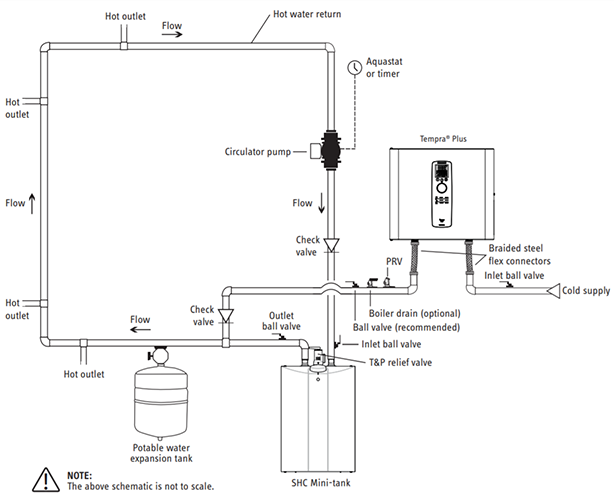
Here's a simplified overview of a typical electric tankless water heater piping diagram:
- Cold Water Inlet: Pipe bringing cold water into the unit. Typically a ¾ inch or 1 inch pipe. Includes a shut-off valve.
- Hot Water Outlet: Pipe carrying heated water out of the unit to your fixtures. Typically a ¾ inch or 1 inch pipe. Includes a shut-off valve.
- Pressure Relief Valve (PRV): A safety device that releases pressure if it gets too high. It has a discharge pipe that leads to a safe drain location. *Important: This pipe should never be capped or blocked.*
- Drain Valve: Located near the bottom of the unit, used for flushing and draining the system for maintenance or repairs.
- Electrical Connection: Heavy gauge wiring that provides power to the heating element. *This is where extreme caution is needed.*
Troubleshooting Guide: No Hot Water or Insufficient Hot Water
Let's tackle the most common problem: lack of hot water or insufficient hot water. We'll start with the simplest checks and gradually move towards more complex areas.
Step 1: Check the Power Supply (Electric Models)
This is the first and most crucial step. Never work on electrical components without first turning off the breaker at the main electrical panel.
- Check the Breaker: Locate the breaker for the water heater in your electrical panel. Ensure it's in the "ON" position. If it's tripped (in the middle or "OFF" position), reset it by flipping it fully to "OFF" and then back to "ON". If it trips again immediately, do not keep resetting it. This indicates a serious electrical fault that requires a qualified electrician.
- Test the Voltage: After turning off the breaker, and *only if you are comfortable and experienced with using a multimeter*, carefully check the voltage at the water heater's electrical connection point. The voltage should match the heater's specifications (usually 220V or 240V in North America). *If you are not comfortable with this step, skip it and call an electrician.*
Step 2: Verify the Water Heater Settings
Sometimes, the issue isn't a malfunction, but simply incorrect settings.
- Temperature Setting: Check the temperature setting on the water heater's control panel. Ensure it's set to a comfortable and appropriate temperature (typically between 120°F and 140°F). A setting that is too low will result in lukewarm water.
- Flow Rate Setting: Some tankless heaters have adjustable flow rate settings. Ensure it's not set too low. A low flow rate can result in the heater shutting off prematurely, especially if you're trying to run multiple hot water fixtures simultaneously.
- Error Codes: Check the display panel for any error codes. Consult your owner's manual to understand the meaning of the code and the recommended troubleshooting steps. Often, the manual provides specific solutions for common error codes.
Step 3: Inspect the Water Flow
Tankless heaters require a certain flow rate to activate the heating element. A blocked or restricted water flow can prevent the heater from turning on.
- Check the Faucets: Make sure the hot water faucets are fully open. Sometimes, a partially open faucet can restrict flow enough to prevent the heater from activating.
- Check for Leaks: Look for any leaks in the hot water pipes or connections. Leaks can reduce water pressure and flow, affecting the heater's performance.
- Check the Water Filter (if applicable): Some tankless heaters have a built-in water filter. A clogged filter can significantly restrict water flow. Consult your owner's manual for instructions on how to locate, remove, and clean or replace the filter.
- Check the Showerhead and Aerators: Scale build-up can restrict water flow in showerheads and faucet aerators. Remove and clean them thoroughly. Soak them in vinegar to dissolve mineral deposits.
Step 4: Examine the Inlet and Outlet Valves
- Ensure Valves are Fully Open: Check the cold water inlet valve and hot water outlet valve on the tankless unit. Make sure they are fully open. A partially closed valve will restrict water flow.
- Inspect for Leaks Around Valves: Look for any signs of leaks around the valves. Even small leaks can indicate a problem and reduce water pressure.
Step 5: Flushing the System (Mineral Build-up)
Over time, mineral deposits can accumulate inside the tankless water heater, reducing its efficiency and potentially blocking water flow. Flushing the system removes these deposits.
Important: Consult your owner's manual for specific flushing instructions for your model. The general process involves:
- Turn off the power to the water heater.
- Close the cold water inlet valve and the hot water outlet valve.
- Connect a pump and hoses to the drain valves on the unit.
- Circulate a descaling solution (usually white vinegar or a commercially available descaling solution) through the system for a specified period (typically 30-60 minutes).
- Flush the system with clean water until all traces of the descaling solution are gone.
- Reconnect the water lines and turn the power back on.
Step 6: Checking for Air Lock
Sometimes, air can get trapped in the water heater, causing an air lock that prevents water from flowing properly.
- Open a Hot Water Faucet: Open a hot water faucet at the highest point in your house. Let it run for several minutes. This can help to release any trapped air.
- Purge Valve (if applicable): Some tankless heaters have a purge valve specifically designed to release trapped air. Consult your owner's manual for the location and operation of the purge valve.
When to Call a Professional
While many of these troubleshooting steps are relatively simple, some problems require the expertise of a qualified professional. Here's when you should call a plumber or electrician:
- Electrical Issues: Any time you suspect an electrical problem, such as a tripped breaker that repeatedly trips, or if you are uncomfortable working with electricity. Incorrect wiring or faulty electrical components can be dangerous.
- Gas Leaks (Gas Models): If you smell gas, immediately evacuate the area and call your gas company or a qualified plumber. Gas leaks are extremely dangerous.
- Complex Part Replacements: Replacing internal components like the heating element, flow sensor, or circuit board requires specialized knowledge and tools.
- Persistent Problems: If you've tried the troubleshooting steps above and the problem persists, it's likely a more complex issue that requires professional diagnosis and repair.
- Warranty Issues: If your water heater is still under warranty, attempting repairs yourself may void the warranty. Contact the manufacturer or a qualified service technician authorized to perform warranty repairs.
Preventative Maintenance
Regular maintenance can help prevent many of the problems discussed above and extend the life of your tankless water heater.
- Annual Flushing: Flush the system annually to remove mineral deposits.
- Inspect Connections: Regularly inspect all water and electrical connections for leaks or corrosion.
- Replace Water Filter: Replace the water filter (if applicable) according to the manufacturer's recommendations.
Empowerment and Caution
By understanding the basic principles of your tankless water heater and following these troubleshooting steps, you can often resolve simple issues yourself. However, always prioritize safety and do not hesitate to call a professional when needed. This guide is intended to empower you with knowledge, but it is not a substitute for professional expertise. A cautious and informed approach will ensure the longevity and safe operation of your tankless water heater.