Function Of Evaporator In Refrigeration System
Understanding your home's air conditioning system can empower you to troubleshoot minor issues and make informed decisions when professional help is needed. A crucial component in this system is the evaporator coil. This article will delve into its function, common problems, and what you can do to keep it running efficiently.
What is the Evaporator Coil and How Does it Work?
The evaporator coil, typically located inside your indoor air handler (often part of your furnace), is responsible for absorbing heat from your home's air. It's a key player in the refrigeration cycle that makes cooling possible.
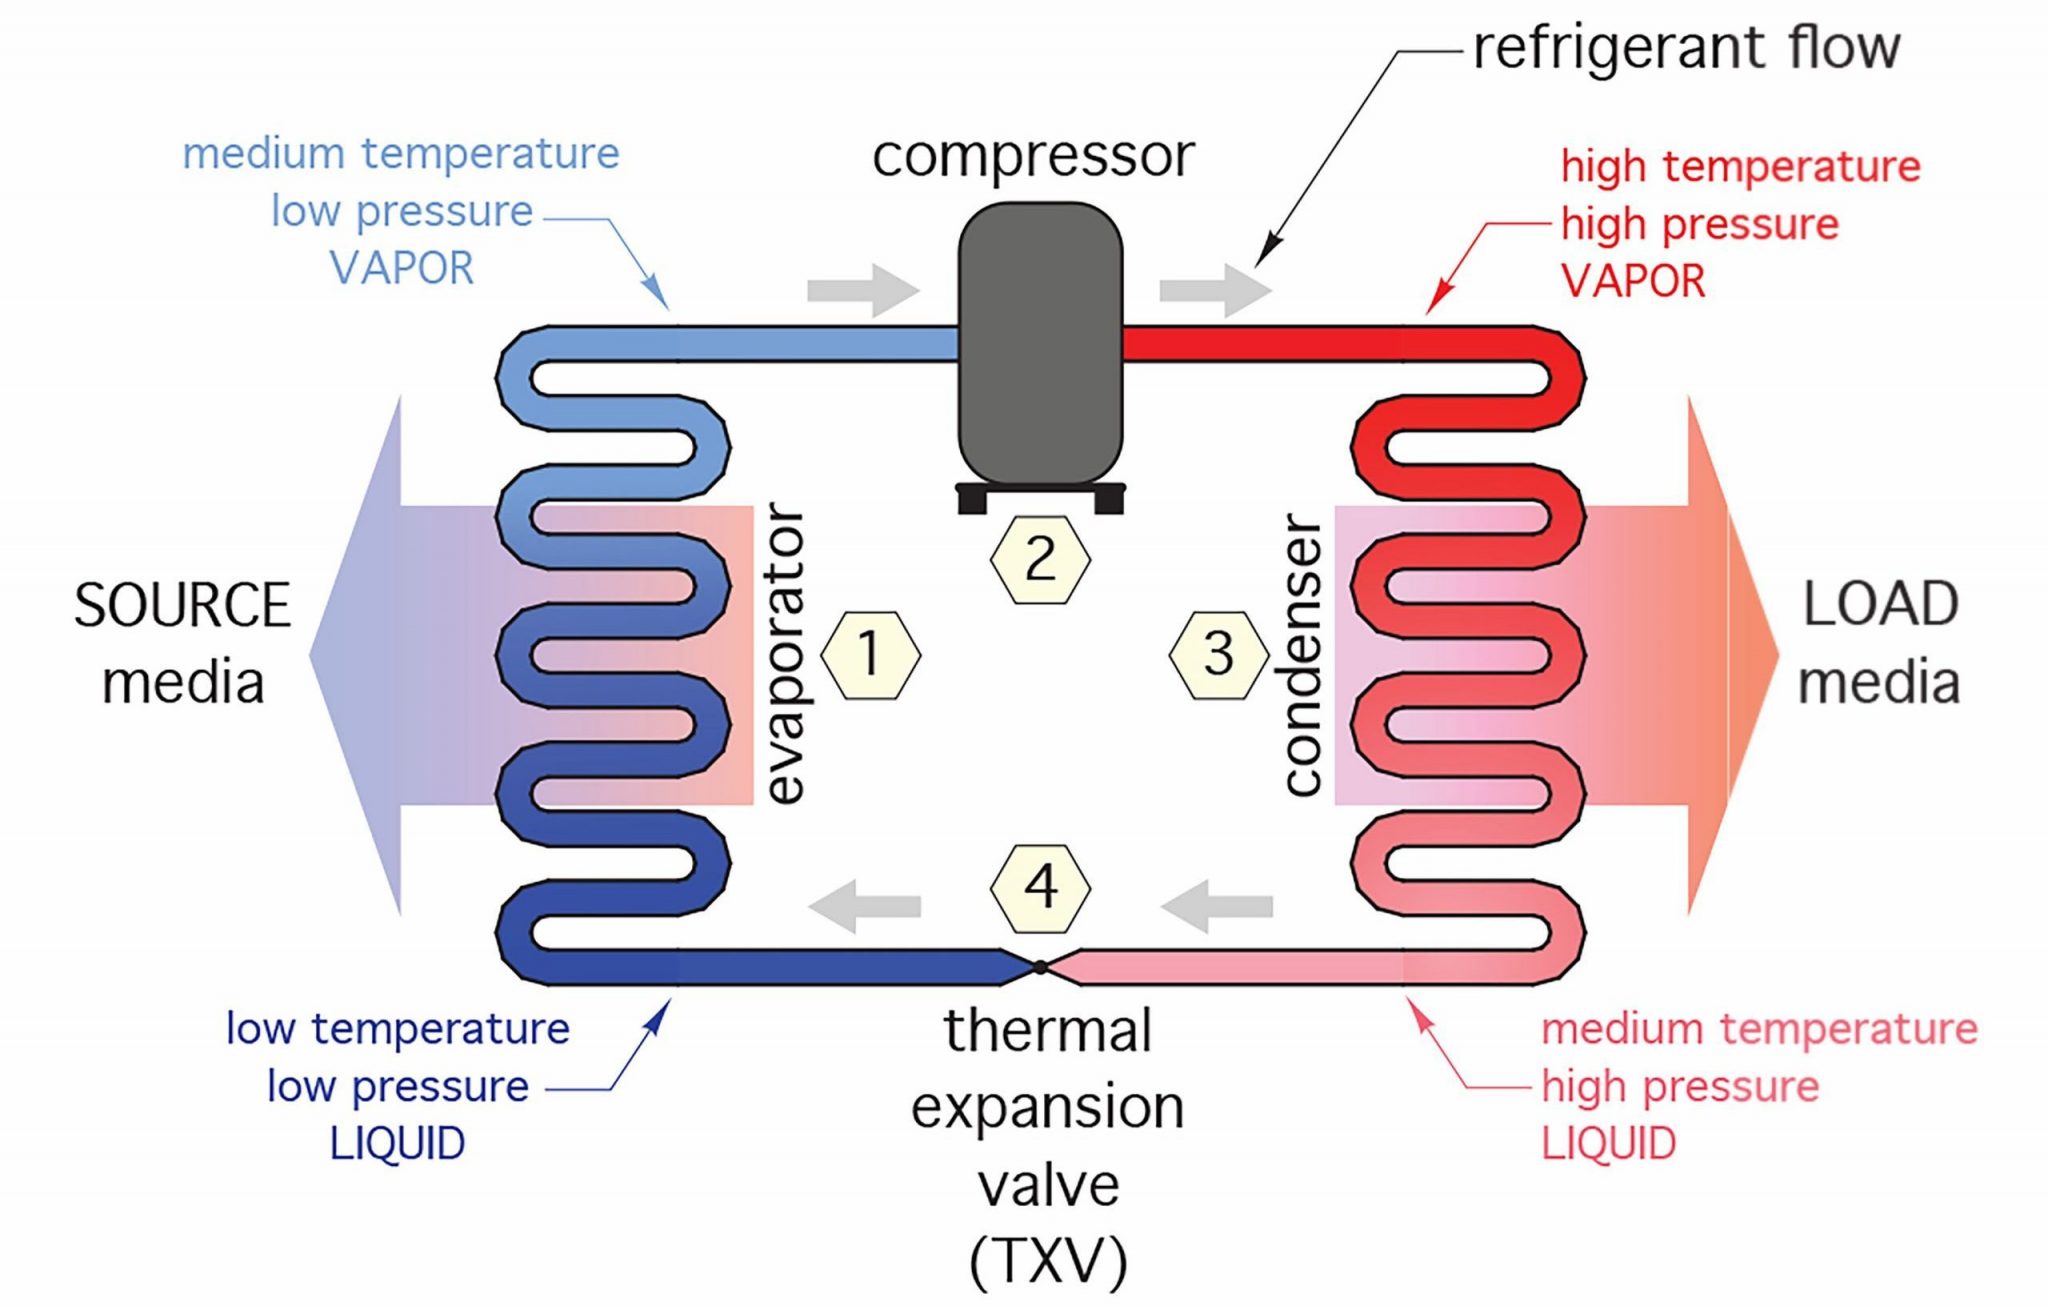
Here's a simplified breakdown of the process:
- Refrigerant Arrives: Liquid refrigerant, under low pressure and low temperature, flows into the evaporator coil.
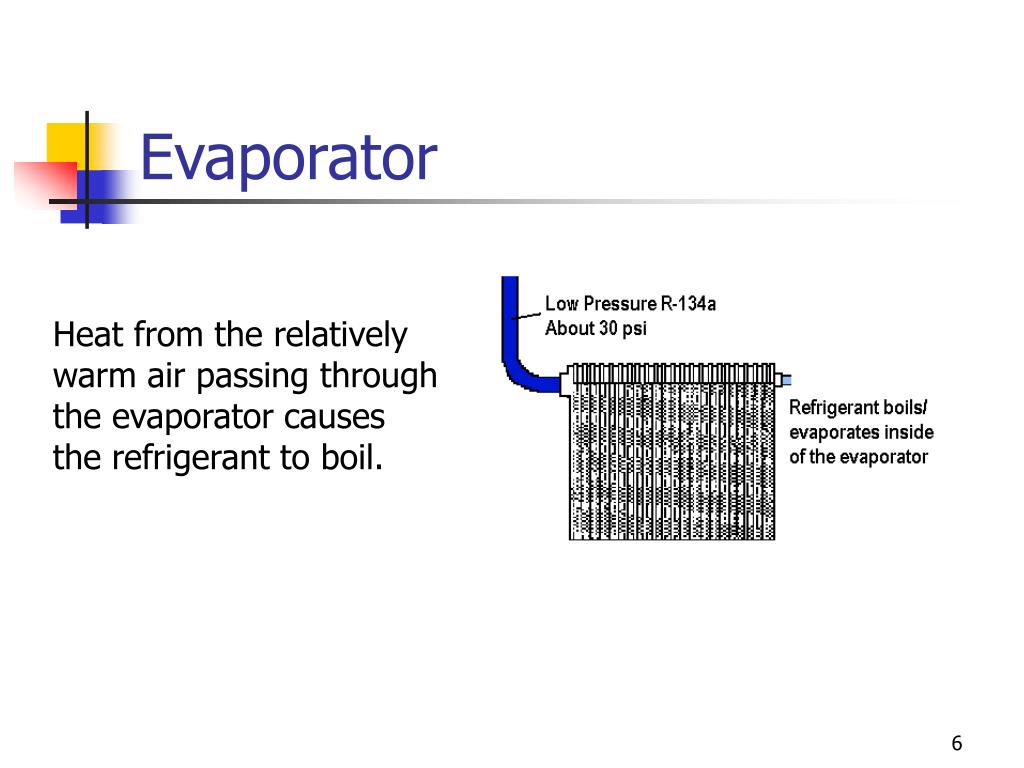
- Heat Absorption: Warm air from your house is blown across the cold evaporator coil. The refrigerant absorbs this heat, causing it to change from a liquid to a gas.
- Cool Air Circulates: As the air passes over the cold coil, it cools down. This cooled air is then blown back into your home through the vents.
- Refrigerant Returns: The now gaseous refrigerant travels back to the compressor, located in the outdoor unit, to begin the cycle anew.
Think of the evaporator coil as the "cold" part of your AC system, while the condenser coil (located outside) is the "hot" part. This continuous cycle of evaporation and condensation is what keeps your home comfortable.
Common Evaporator Coil Problems: Causes and Solutions
A malfunctioning evaporator coil can lead to reduced cooling capacity, higher energy bills, and even system failure. Here are some common issues and how to address them:
1. Dirty Evaporator Coil
Cause: Dust, dirt, and debris accumulate on the coil, reducing its ability to absorb heat efficiently. This is the most frequent culprit.
Symptoms:
- Reduced cooling performance
- Increased energy bills
- Ice buildup on the coil (discussed later)
DIY Solution:
- Safety First: Turn off the power to your HVAC system at the breaker box.
- Access the Coil: Locate the evaporator coil within your indoor air handler. This usually involves removing an access panel. Consult your system's manual for specific instructions.
- Cleaning: Use a soft brush or vacuum with a brush attachment to gently remove loose dirt and debris. You can also use a commercially available evaporator coil cleaner, following the manufacturer's instructions carefully. Be sure to wear gloves and eye protection.
- Rinse (if applicable): Some cleaners require rinsing with water. If so, ensure proper drainage to avoid water damage.
- Reassemble: Replace the access panel and restore power.
When to Call a Pro: If the coil is heavily soiled or difficult to reach, it's best to call a professional. They have specialized tools and expertise to clean the coil thoroughly without damaging it.
2. Frozen Evaporator Coil
Cause: A frozen evaporator coil restricts airflow and prevents proper heat absorption.
Symptoms:
- No cool air coming from vents
- Visible ice on the evaporator coil
- Water leaks around the indoor air handler (as the ice melts)
Possible Causes and DIY Solutions:
- Restricted Airflow: A dirty air filter is the most common cause. Replace your air filter with a clean one. Ensure vents are not blocked by furniture or other objects.
- Low Refrigerant: This requires professional attention. Do not attempt to add refrigerant yourself, as it requires specialized equipment and knowledge. Low refrigerant is often a sign of a leak.
- Faulty Blower Motor: If the blower motor isn't circulating air properly, the coil can freeze. Check if the blower motor is running. If not, it may need to be replaced by a professional.
- Low Ambient Temperature: Running your AC when the outside temperature is too low can cause the coil to freeze. Avoid running your AC if the outdoor temperature is below 60°F (15°C).
DIY Steps to Thaw a Frozen Coil:
- Turn off the AC at the thermostat.
- Switch the fan setting to "On" to circulate air over the coil and speed up the thawing process.
- Check and replace the air filter.
- Wait several hours for the coil to thaw completely.
- Once thawed, turn the AC back on and monitor its performance. If the coil freezes again, call a professional.
When to Call a Pro: If the coil freezes repeatedly, or if you suspect a refrigerant leak or blower motor issue, contact a qualified HVAC technician.
3. Refrigerant Leaks
Cause: Leaks in the refrigerant lines connecting the evaporator coil and condenser can lead to low refrigerant levels and reduced cooling capacity.
Symptoms:
- Poor cooling performance
- Higher energy bills
- Ice buildup on the evaporator coil
- Hissing sound near the indoor or outdoor unit
DIY Solutions:
There are no DIY solutions for refrigerant leaks. This requires specialized tools and knowledge to locate the leak, repair it, and recharge the system with refrigerant. Attempting to repair a refrigerant leak yourself is illegal and dangerous.
When to Call a Pro: Immediately contact a licensed HVAC technician if you suspect a refrigerant leak. They will use specialized equipment to detect the leak and repair it safely and effectively.
4. Corrosion
Cause: Over time, the evaporator coil can corrode due to exposure to moisture and chemicals in the air.
Symptoms:
- Reduced cooling performance
- Leaks in the coil
- Unusual odors coming from the vents
DIY Solutions:
Minor surface corrosion may be cleaned with a specialized coil cleaner, but extensive corrosion usually requires coil replacement. This is best left to a professional.
When to Call a Pro: If you notice significant corrosion on your evaporator coil, contact a qualified HVAC technician to assess the damage and recommend the best course of action. Replacing the coil is often the most cost-effective solution in the long run.
Preventative Maintenance for Your Evaporator Coil
Regular maintenance is crucial for keeping your evaporator coil in good condition and preventing problems.
Here are some tips:
- Change your air filter regularly: This is the most important thing you can do. A clean filter ensures proper airflow and prevents dust and debris from accumulating on the coil. Check it monthly and change it every 1-3 months, depending on usage and air quality.
- Schedule professional HVAC maintenance: A yearly tune-up by a qualified technician includes cleaning the evaporator coil, checking refrigerant levels, and inspecting other system components.
- Keep the area around the indoor and outdoor units clean: Clear away any debris, vegetation, or obstructions that could restrict airflow.
Tools and Parts for Evaporator Coil Maintenance (DIY Only)
If you're comfortable performing basic DIY maintenance, here's a list of tools and parts you might need:
- Screwdrivers (Phillips and flathead)
- Vacuum with brush attachment
- Soft brush
- Evaporator coil cleaner (follow manufacturer's instructions)
- Gloves
- Eye protection
- Replacement air filter
Estimated Repair Costs
Here's a general idea of potential repair costs. Keep in mind that these are estimates, and the actual cost may vary depending on your location, the complexity of the repair, and the HVAC technician's rates.
- Evaporator coil cleaning: $75 - $200
- Refrigerant leak repair: $200 - $600 (plus the cost of refrigerant)
- Evaporator coil replacement: $800 - $2500+ (includes labor and parts)
- Blower motor replacement: $300 - $800
When to Call a Professional HVAC Technician
While some evaporator coil maintenance can be done yourself, certain situations require the expertise of a qualified HVAC technician.
Call a pro if:
- You suspect a refrigerant leak.
- The evaporator coil is frozen repeatedly.
- You are not comfortable working with electrical components.
- You are unsure about any aspect of the repair process.
- You lack the necessary tools or expertise.
By understanding the function of your evaporator coil and performing regular maintenance, you can ensure optimal cooling performance, lower energy bills, and extend the life of your HVAC system. Remember to prioritize safety and call a professional when needed.