Furnace Flue Height Above Roof
Many homeowners encounter heating problems during the colder months, and one often-overlooked culprit is the furnace flue height above the roof. An improperly sized or positioned flue can lead to a range of issues, from inefficient heating to dangerous carbon monoxide buildup. This article will guide you through troubleshooting this problem, offering practical DIY fixes where possible, and highlighting when it's essential to call in a professional.
Understanding the Problem: Why Flue Height Matters
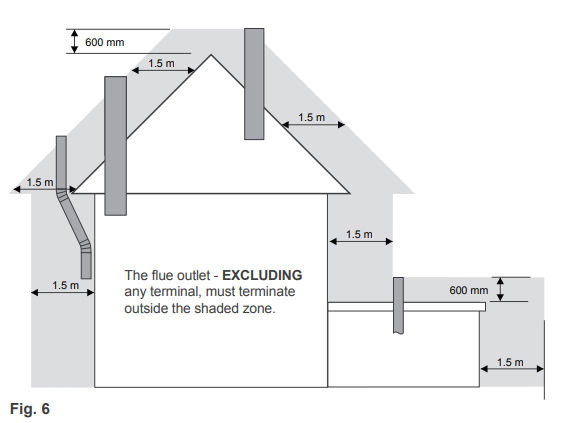
The furnace flue, or vent, is responsible for expelling combustion gases – including carbon monoxide – safely away from your home. If the flue isn't tall enough above the roofline, several problems can occur:
- Backdrafting: Wind can push exhaust gases back down the flue and into your home. This is especially dangerous with carbon monoxide.
- Inefficient Heating: Poor venting can cause the furnace to cycle on and off frequently, reducing its efficiency and increasing energy bills.
- Corrosion: Combustion gases contain moisture. If they don't vent properly, this moisture can condense in the flue and furnace, leading to corrosion and premature failure of components.
- Draft problems: Incorrect flue height can also negatively impact the draft within the chimney or vent, making it difficult for the furnace to exhaust fumes properly.
Step-by-Step Diagnosis: Is Your Flue the Right Height?
Before you can fix anything, you need to determine if your flue height is actually the problem. Here's a methodical approach:
Step 1: Safety First!
Before you do anything, ensure your safety:
- Turn off the furnace at the breaker.
- Wear gloves and eye protection.
- Never work on a roof in wet, icy, or windy conditions. If the weather is unfavorable, wait for a clear day or call a professional.
Step 2: Gather Your Tools
You'll need:
- A measuring tape (at least 25 feet).
- A level.
- A ladder that is tall enough to safely access your roof.
- A camera or smartphone to take pictures.
Step 3: Determine the Roof Pitch
The roof pitch is the angle of your roof, and it affects the required flue height. You don't need to be exact, but a good estimate is crucial.
- For shallow roofs (nearly flat): The roof is nearly horizontal.
- For moderate roofs: You can walk on it carefully without special equipment (but always prioritize safety).
- For steep roofs: Very difficult or impossible to walk on.
Step 4: Measure Flue Height Relative to the Roof
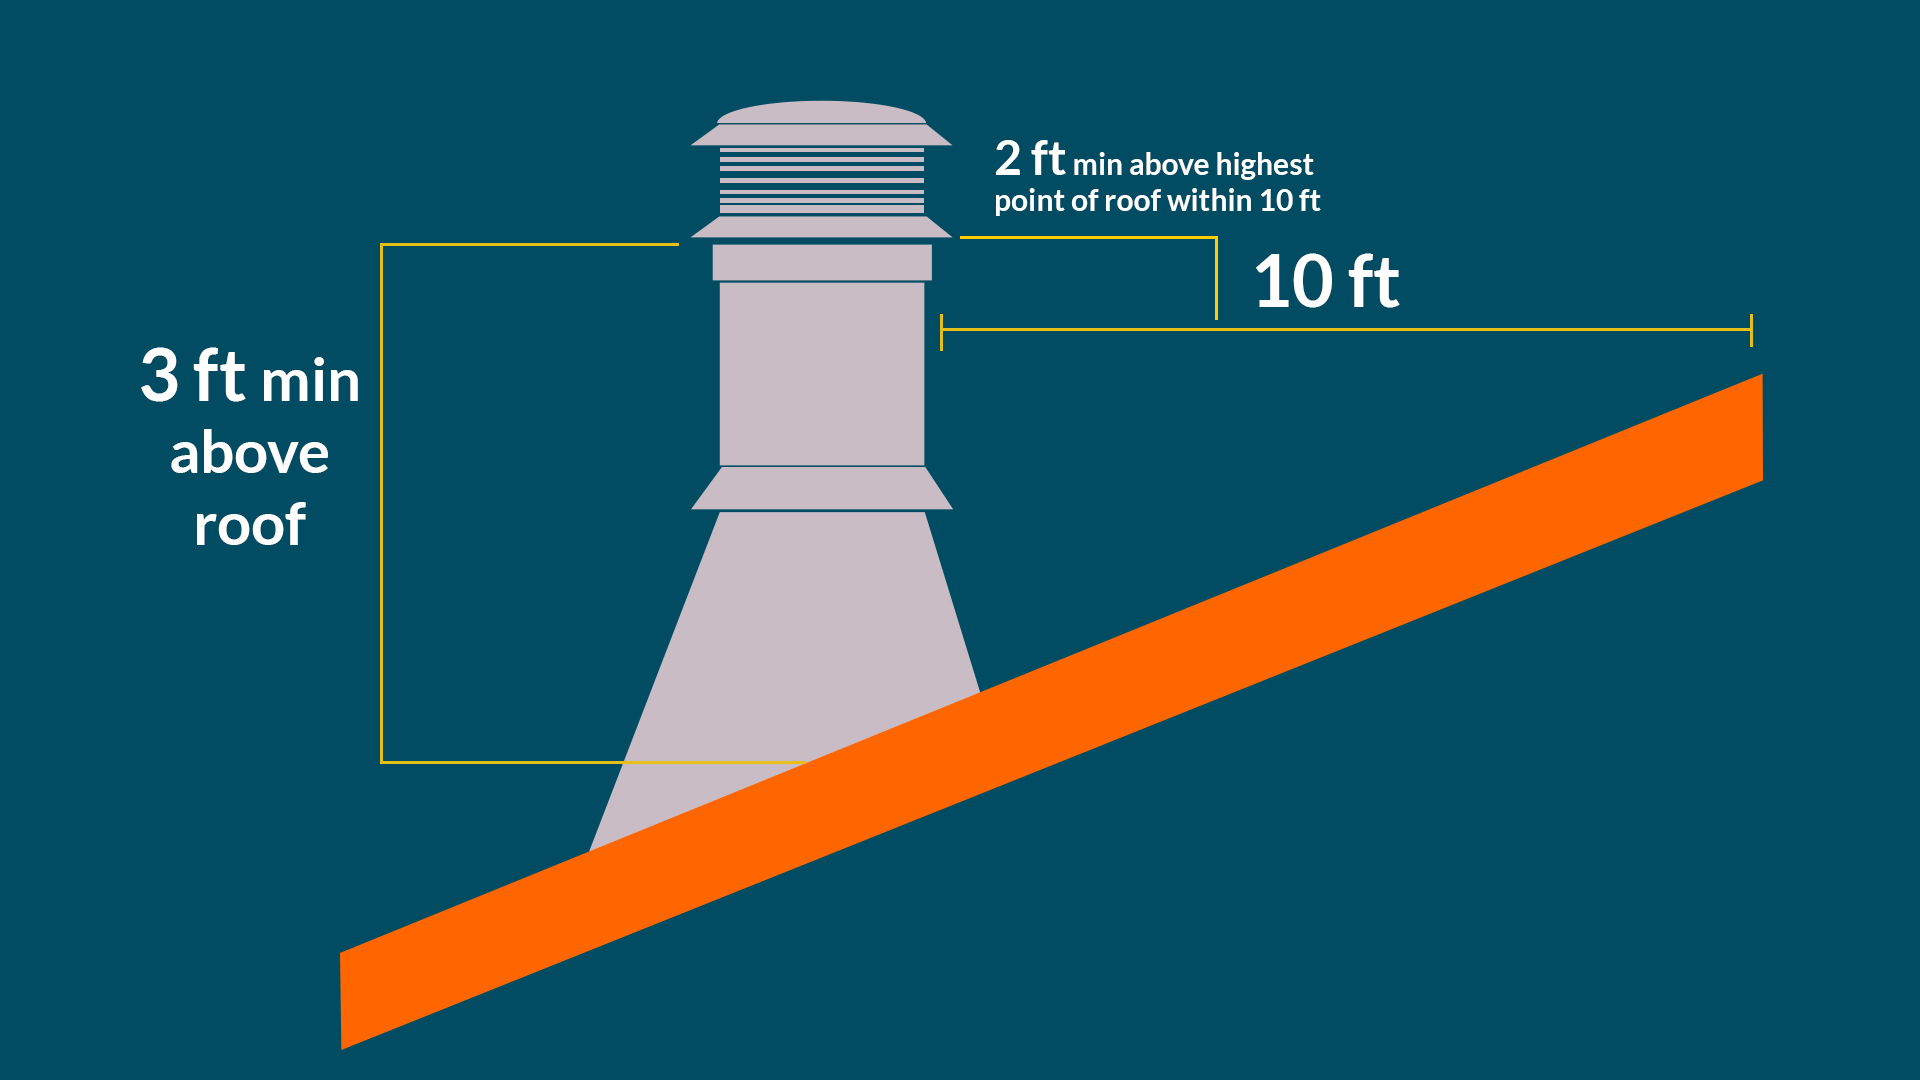
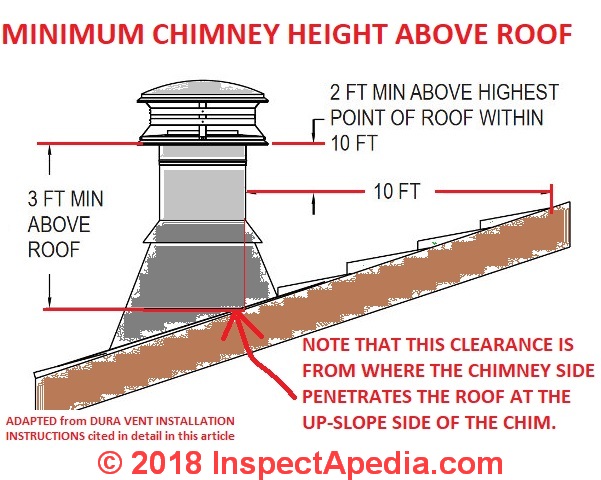
This is the most important step. Here's how to determine if your flue meets the "3-2-10 rule":
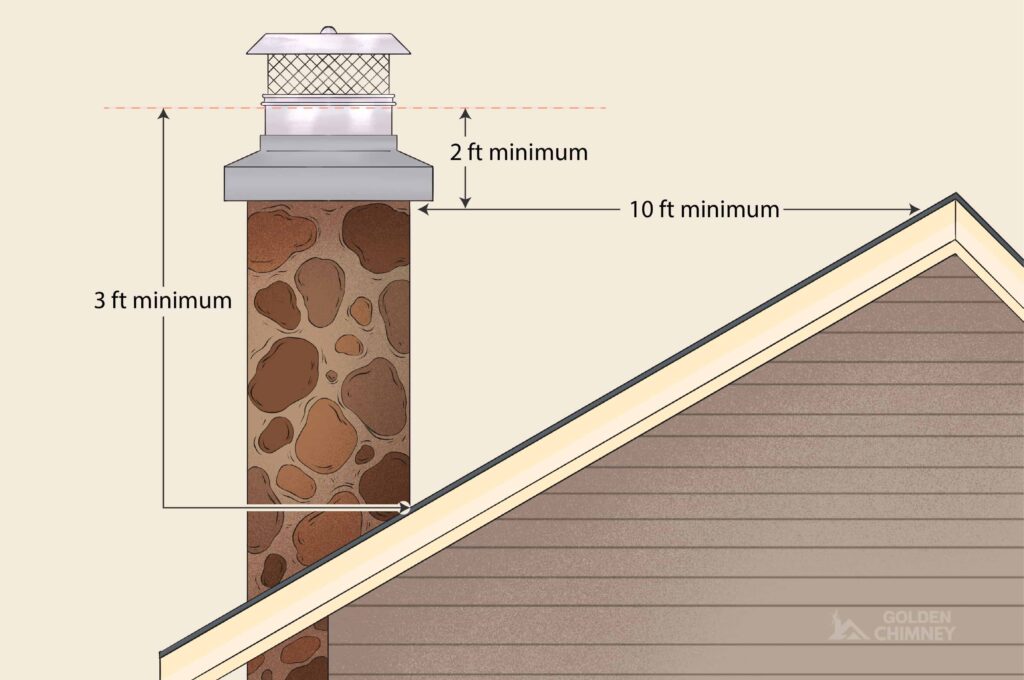
The "3-2-10 Rule": This is a commonly used guideline for determining proper flue height.
- The flue must extend at least 3 feet above the highest point where it penetrates the roof.
- The flue must be at least 2 feet higher than any part of the roof within a 10-foot radius.
Here's how to apply the rule:
- Find the highest point on your roof within a 10-foot radius of the flue. This might be the peak of the roof, another vent, or a chimney.
- Measure the distance from the base of the flue (where it exits the roof) to the highest point identified in step 1.
- Measure the height of the flue above the roof penetration point.
- Consider the 10 foot radius. Imagine a 10-foot circle around the flue. Is any part of the roof higher than the point where the flue exits the roof? If so, the flue must be at least 2 feet higher than that point.
Example:
Imagine the highest point on your roof within 10 feet of the flue is the roof's peak. Let's say the roof peak is 5 feet higher than the base of your flue. The flue itself is 2.5 feet tall above the roof. In this case, your flue does *not* meet the 3-2-10 rule. It needs to be at least 3 feet above the roof penetration, and 2 feet higher than the peak of the roof (within 10 feet of the flue).
Important considerations:
- Nearby structures: The 3-2-10 rule also applies to nearby structures like trees, sheds, or even your neighbor's house if they are within 10 feet and higher than your flue's penetration point on the roof.
- Wind direction: Prevailing winds can impact the effectiveness of the flue. If your home is frequently subjected to strong winds from a specific direction, this should be considered.
Step 5: Inspect the Flue for Damage and Obstructions
While you're on the roof, carefully examine the flue for any signs of damage:
- Cracks or holes: These can allow exhaust gases to leak into your attic or home.
- Corrosion: Rust or other signs of corrosion indicate that the flue is deteriorating and needs to be replaced.
- Loose connections: Make sure all joints are securely connected.
- Obstructions: Look for bird nests, leaves, or other debris that could be blocking the flue. A flashlight can be helpful for this.
Step 6: Document Your Findings
Take detailed photos of the flue, the surrounding roof area, and any damage or obstructions you find. Note the measurements you took. This documentation will be helpful if you need to consult with a professional later.
DIY Fixes: What You Can (Safely) Do
If you've identified a problem with your flue height or condition, here are a few simple DIY fixes you might be able to handle:
1. Clearing Obstructions
If you find bird nests or other debris blocking the flue, you can carefully remove them. Use gloves and eye protection, and be careful not to damage the flue itself.
2. Securing Loose Connections
If you find any loose connections, you may be able to tighten them with a screwdriver or wrench. Make sure the connections are snug but not overtightened. Use appropriate sealant or tape designed for high-temperature applications if needed, after cleaning the connection area thoroughly.
3. Minor Sealant Application
For very small cracks or gaps, you *might* be able to use a high-temperature sealant designed for flues. However, this is only a temporary fix and should not be used as a substitute for replacing damaged sections. Consult the sealant instructions carefully and ensure it's compatible with your flue material. Be sure the area is clean and dry before application.
When to Call a Professional: Crucial Warning Signs
Never attempt repairs beyond your skill level or if you encounter any of the following situations. These require immediate professional attention:
- Any signs of carbon monoxide poisoning: Symptoms include headache, dizziness, nausea, and confusion. Evacuate the house immediately and call 911. Install carbon monoxide detectors on every level of your home.
- Significant corrosion or damage to the flue: This indicates a serious problem that requires replacement of the damaged sections.
- Difficulty accessing the roof safely: Working on a roof is inherently dangerous. Don't risk injury.
- Uncertainty about the correct flue height: If you're unsure whether your flue meets code requirements, a professional can assess the situation and recommend the appropriate solution.
- Backdrafting: If you suspect backdrafting, do not attempt to fix it yourself. Backdrafting is a serious safety hazard.
- You have a high-efficiency furnace: These furnaces often require specialized venting systems. A professional should handle any repairs or modifications.
- You smell gas: If you smell a gas odor, immediately leave the house and call your gas company from a safe location.
Specifically, a professional HVAC technician or chimney sweep should be contacted if:
- The flue requires replacement of sections or the entire system.
- The flue needs to be extended to meet code requirements.
- You suspect issues with the draft within the flue or chimney.
- You're unsure about the safety of your heating system.
Finding a Qualified Professional
When choosing a professional, look for:
- Licensing and insurance: Verify that the contractor is properly licensed and insured in your area.
- Experience: Choose a contractor with experience in furnace flue repair and replacement.
- References: Ask for references from previous customers.
- Written estimate: Get a detailed written estimate before any work begins.
Preventative Maintenance: Keeping Your Flue Healthy
Regular maintenance can help prevent problems with your furnace flue and ensure the safety and efficiency of your heating system:
- Annual inspections: Have your furnace and flue inspected by a professional at least once a year.
- Clear debris: Regularly check the flue for obstructions and remove any debris.
- Monitor for corrosion: Inspect the flue for signs of corrosion and address any problems promptly.
Conclusion
Troubleshooting furnace flue height issues requires a methodical approach and a focus on safety. By following the steps outlined in this article, you can diagnose potential problems, perform simple DIY fixes where appropriate, and know when to call in a professional. Remember that your safety and the proper functioning of your heating system are paramount. When in doubt, always err on the side of caution and seek professional help.