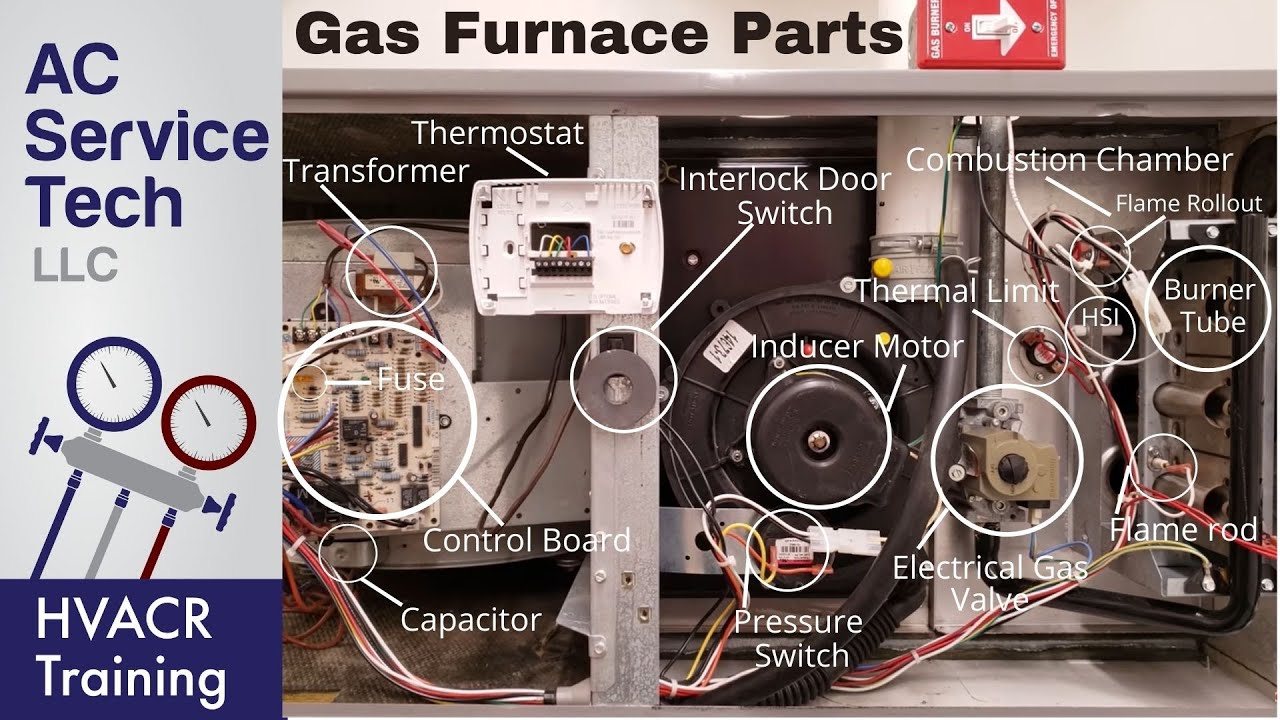
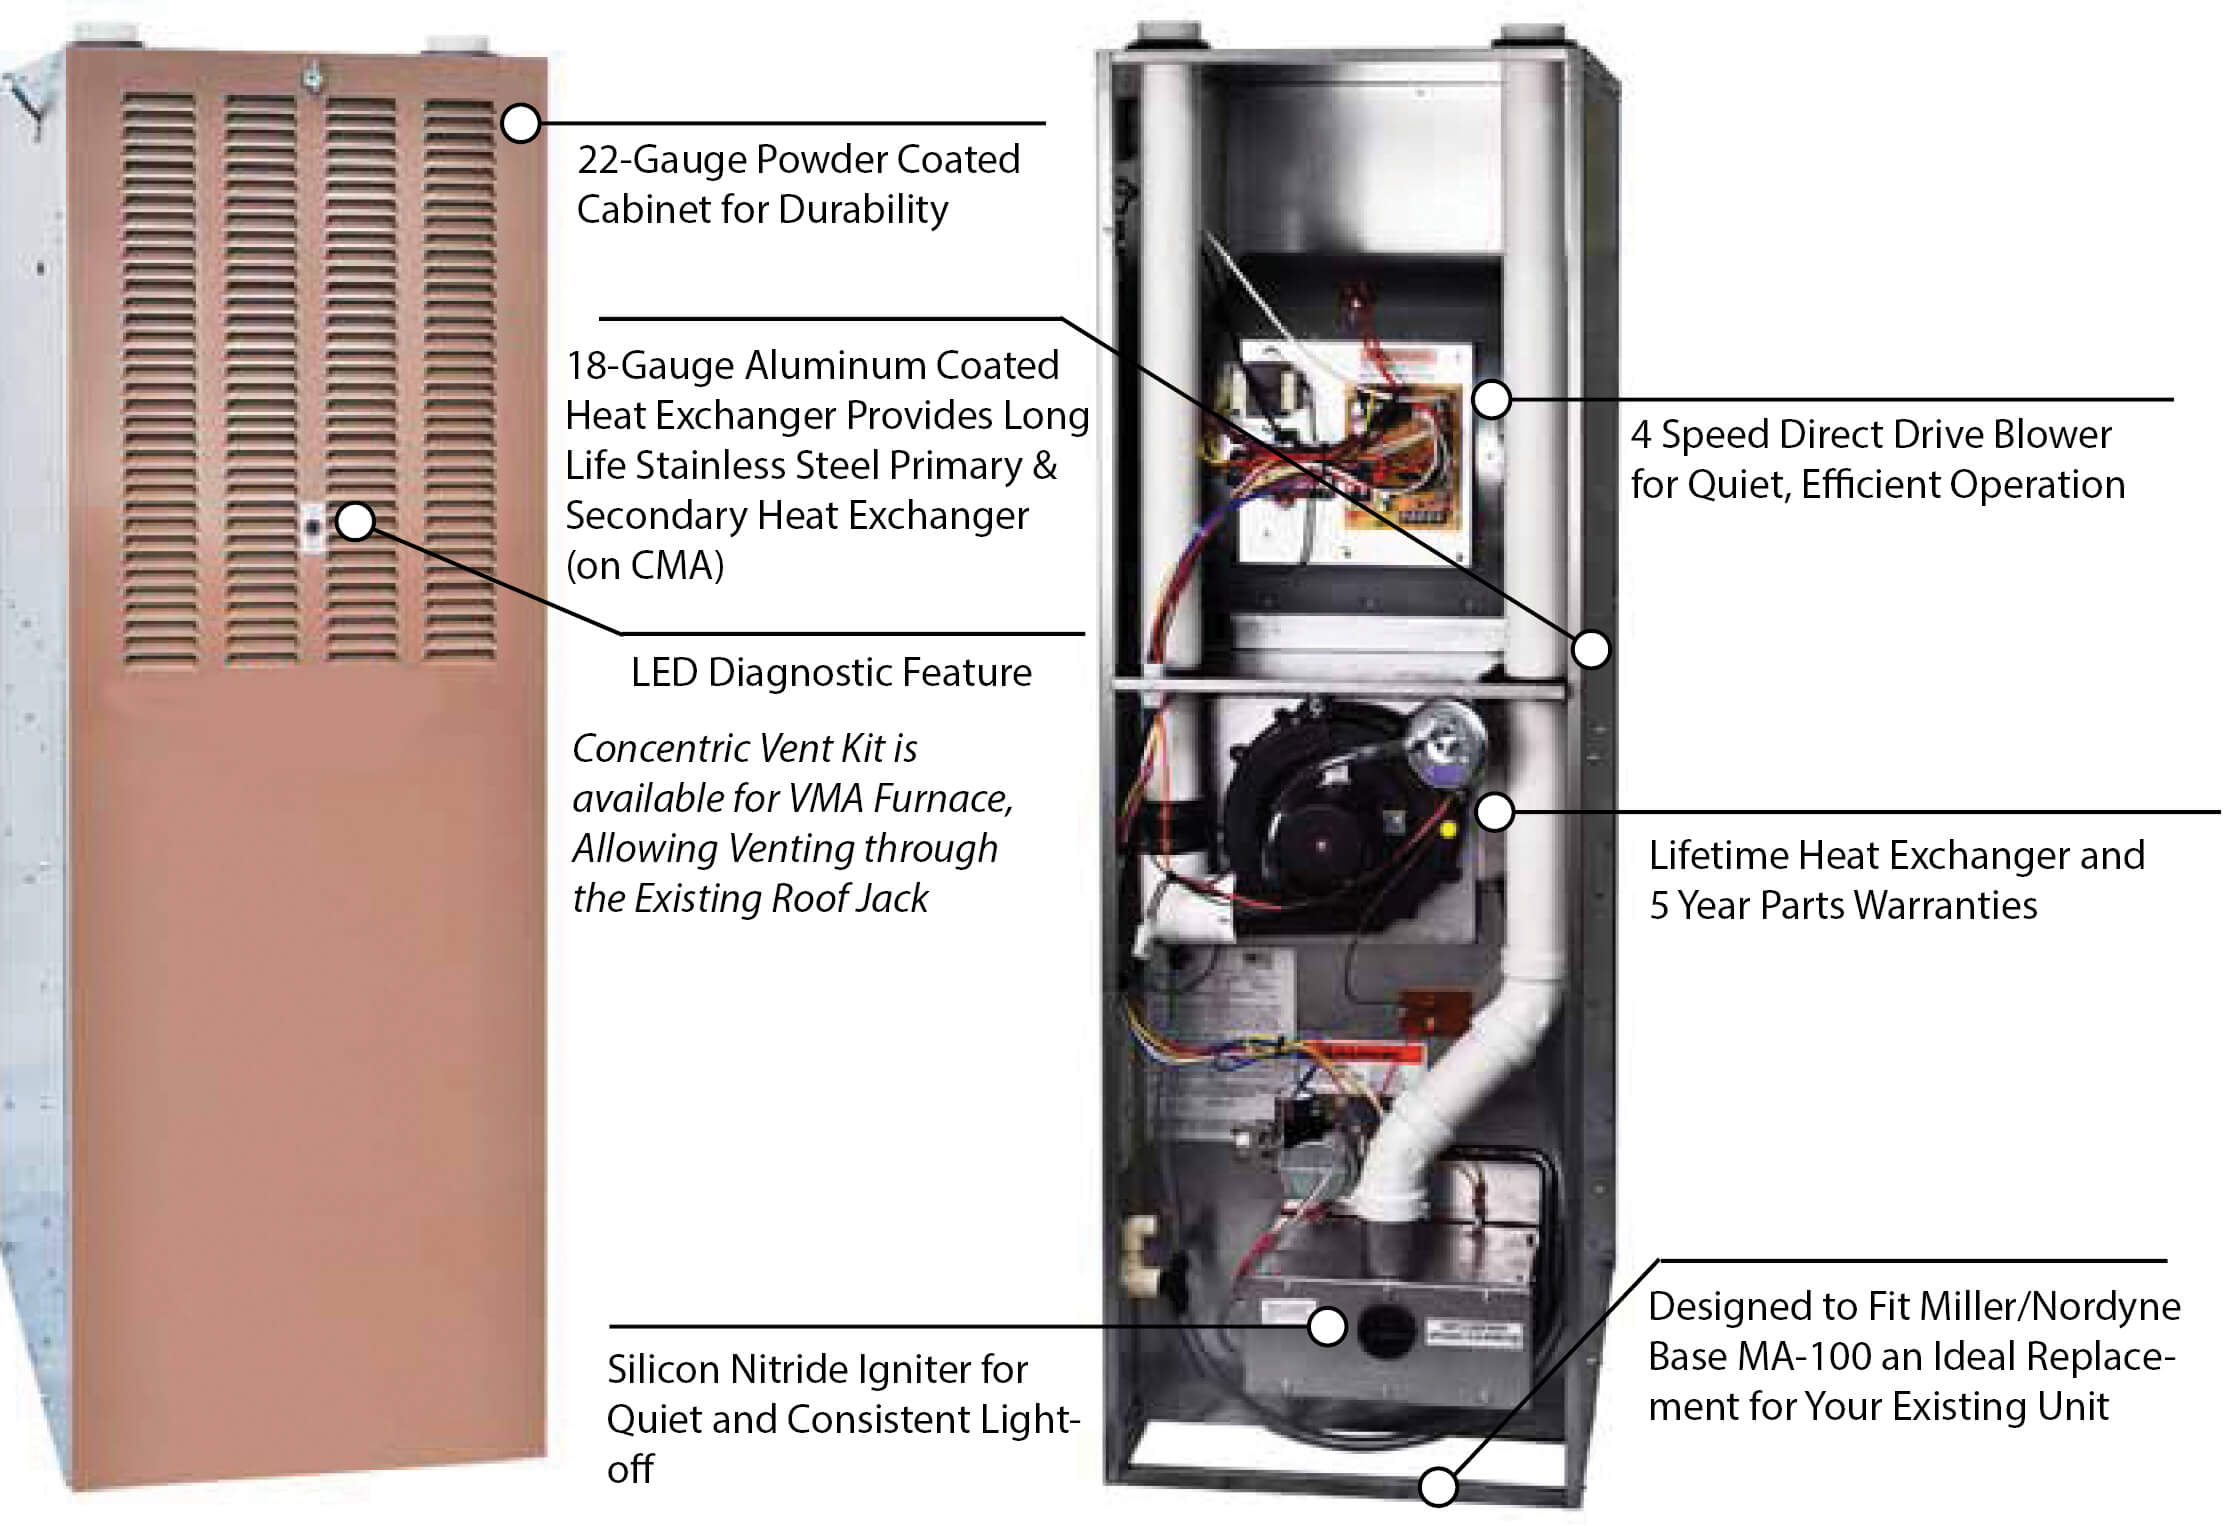
Furnace Replacement Parts

Facing a chilly home despite a running furnace? One of the most common frustrations homeowners experience is a furnace that simply isn't producing enough heat, or isn't producing heat at all. Before you resign yourself to a costly and potentially unnecessary furnace replacement, let's explore some common culprits and how to troubleshoot them. Remember, your safety is paramount. Always turn off the power to your furnace at the breaker box before performing any inspection or repair.
Step 1: Check the Obvious – Thermostat and Power
It sounds simple, but overlooking the basics is surprisingly common. Let’s start with the easy stuff.
Is Your Thermostat Set Correctly?
This might seem insulting, but double-check! Ensure your thermostat is set to "heat," is at a temperature higher than the current room temperature, and that the batteries are fresh (if applicable). A low battery can cause erratic behavior, even preventing the furnace from turning on.
Troubleshooting:
- Increase the thermostat temperature 5 degrees above the current room temperature.
- Replace the thermostat batteries, even if they appear to have some charge.
- If you have a programmable thermostat, ensure it's not in "vacation" mode or set to an overly low temperature for the current time. Consult your thermostat's manual for instructions.
Is the Furnace Getting Power?
Head to your breaker box and confirm that the breaker controlling your furnace hasn't tripped. A tripped breaker indicates an electrical overload, often a sign of a more serious problem. However, sometimes a breaker trips for no immediately apparent reason.
Troubleshooting:
- Flip the breaker completely off, then back on. Listen for any unusual sounds from the furnace as it attempts to start.
- If the breaker trips again immediately, do not keep resetting it. This likely indicates a short circuit and requires professional attention.
Step 2: Inspect the Air Filter
A dirty air filter is the silent enemy of furnace efficiency and lifespan. It restricts airflow, forcing the furnace to work harder, which can lead to overheating and component failure. A clogged filter is one of the most frequent causes of heating problems.
Diagnosis:
- Locate your furnace's air filter. It's usually in a slot near the blower motor.
- Remove the filter and hold it up to the light. If you can't easily see through it, it's dirty.
DIY Fix:
- Replace the dirty filter with a new one of the correct size and type. Refer to your furnace's manual or the old filter for the correct specifications. Using the wrong filter can be as bad as using a dirty one.
- Make a note to replace your air filter regularly – typically every 1-3 months, depending on the type of filter and the air quality in your home.
Professional Intervention: If replacing the air filter doesn't significantly improve the furnace's performance, proceed to the next steps.
Step 3: Check the Pilot Light or Igniter
For older furnaces, a pilot light is used to ignite the gas. Newer furnaces use an electronic igniter. If either is not working correctly, the furnace won't produce heat.
Pilot Light Issues (Older Furnaces)
A pilot light that's out, weak, or flickering can prevent the main burner from igniting.
Diagnosis:
- Locate the pilot light assembly. Consult your furnace's manual if needed.
- Observe the pilot light. Is it lit? Is it a strong, blue flame? Or is it weak, yellow, or flickering?
DIY Fix (Relighting the Pilot Light):
- Turn off the gas supply to the furnace at the gas valve.
- Wait 5 minutes for any residual gas to dissipate.
- Locate the pilot light reset button. It's usually near the pilot light assembly.
- Turn the gas valve knob to the "pilot" position.
- Press and hold the pilot light reset button while simultaneously using a long lighter or match to light the pilot light.
- Continue holding the reset button for 20-30 seconds after the pilot light ignites. This allows the thermocouple (a safety device) to heat up.
- Release the reset button. The pilot light should remain lit. If it goes out, repeat steps 5-7.
- Turn the gas valve knob to the "on" position.
Professional Intervention: If the pilot light repeatedly goes out, or if you're uncomfortable relighting it yourself, contact a qualified HVAC technician. A faulty thermocouple, gas valve, or other component may be to blame.
Igniter Problems (Newer Furnaces)
Newer furnaces use an electronic igniter to ignite the gas. These igniters can fail over time.
Diagnosis:
- Turn the furnace on and listen carefully. You should hear a clicking sound as the igniter attempts to spark.
- If you don't hear any clicking, the igniter may be faulty.
DIY Fix (Visual Inspection Only):
Do not attempt to repair or replace the igniter yourself unless you are experienced in electrical work. A faulty igniter requires specialized knowledge and tools.
- Visually inspect the igniter for any cracks or damage. It's usually a small, fragile ceramic or silicon carbide rod.
Professional Intervention: A faulty igniter is a common repair, but it requires a professional. They can safely diagnose and replace the igniter, ensuring proper installation and operation.
Step 4: Blower Motor Issues
The blower motor circulates heated air throughout your home. If it's not working correctly, you might feel some heat coming from the furnace, but it won't reach the vents effectively.
Diagnosis:
- Turn on your furnace and listen for the blower motor to start. It usually kicks in a minute or two after the burner ignites.
- If you don't hear the blower motor running, or if it sounds unusually loud or strained, there might be a problem.
DIY Fixes (Limited):
- Check the Blower Motor Capacitor: The capacitor helps start the blower motor. A bulging or leaking capacitor is a sign of failure. Warning: Capacitors can store an electrical charge even when the power is off. Discharge the capacitor with an insulated screwdriver before handling it. If you are not comfortable doing this, call a professional.
- Lubricate the Blower Motor Bearings: Some older blower motors have oil ports. Apply a few drops of electric motor oil to these ports. Do not over-lubricate.
Professional Intervention: Blower motor problems can range from a faulty capacitor to a burned-out motor. Diagnosing the specific issue and replacing the motor requires specialized skills and tools. Call a professional.
Step 5: Gas Valve Problems
The gas valve controls the flow of gas to the burner. If it's malfunctioning, the furnace may not receive enough gas to operate properly.
Diagnosis:
Diagnosing gas valve problems is difficult and potentially dangerous for homeowners. Do not attempt to disassemble or repair the gas valve yourself.
Professional Intervention: If you suspect a problem with the gas valve, immediately contact a qualified HVAC technician. Gas leaks are a serious safety hazard.
Step 6: Flame Sensor Issues
The flame sensor is a safety device that detects the presence of a flame. If it doesn't sense a flame, it shuts off the gas supply to prevent gas from building up inside the furnace.
Diagnosis:
- Turn on your furnace and observe the burner. Does it ignite briefly and then shut off after a few seconds? This is a common symptom of a faulty flame sensor.
DIY Fix (Cleaning the Flame Sensor):
- Locate the flame sensor. It's usually a small metal rod located near the burner.
- Remove the flame sensor.
- Use a piece of fine-grit sandpaper or steel wool to gently clean the rod. This removes any carbon buildup that might be interfering with its ability to sense the flame.
- Reinstall the flame sensor.
Professional Intervention: If cleaning the flame sensor doesn't resolve the issue, the sensor itself may be faulty and need to be replaced by a professional.
When to Call a Professional – A Recap
While some furnace troubleshooting and repairs are within the realm of DIY, it's crucial to recognize when you're out of your depth. Call a qualified HVAC technician immediately if you encounter any of the following:
- Gas Leaks: If you smell gas, evacuate your home immediately and call your gas company and the fire department.
- Electrical Problems: Repeatedly tripping breakers, exposed wires, or any other electrical hazards.
- Gas Valve Issues: Never attempt to repair the gas valve yourself.
- Complex Component Failures: Blower motor problems, heat exchanger issues, or any other situation where you're not comfortable with the diagnosis or repair.
- Unfamiliar Sounds: Loud banging, screeching, or other unusual noises coming from your furnace.
- You're Unsure: If you're uncomfortable or unsure about any step in the troubleshooting process, it's always best to err on the side of caution and call a professional.
By following these steps, you can often diagnose and resolve common furnace problems yourself, saving time and money. But remember, your safety is always the top priority. When in doubt, call a professional. A properly functioning furnace is essential for a comfortable and safe home.