Gas Or Electric Heating Which Is Cheaper
Every winter, homeowners face the age-old question: "Is my gas or electric heating system costing me an arm and a leg?" Figuring out which is truly cheaper can be a complex puzzle, especially when you're battling drafts, uneven heating, or a system that seems to be running non-stop. This article will help you diagnose potential issues impacting your heating costs, explore simple DIY checks, and understand when it's time to call in the pros. We'll focus on getting to the bottom of whether your heating costs are genuinely excessive or simply reflect a larger, easily addressable problem.
Step 1: Identifying the Real Problem – Is It Efficiency or Something Else?
Before diving into the gas vs. electric debate, let's ensure your high heating bills aren't stemming from readily fixable issues. Start by considering this: Is your heating system actually less efficient than it used to be, or are you experiencing a different problem?
Common Symptoms of Inefficient Heating:
- Unusually High Bills: Compare your current bills to those from previous years for the same months. Adjust for any changes in fuel or electricity prices in your area.
- Uneven Heating: Some rooms are significantly colder than others, even when the thermostat is set high.
- System Runs Constantly: The furnace or heat pump seems to be running almost non-stop to maintain the set temperature.
- Drafts: Noticeable cold air entering your home, especially around windows, doors, and poorly insulated areas.
- Strange Noises: Unusual banging, rattling, or whistling sounds coming from your heating system.
Step 2: DIY Checks – What You Can Inspect Yourself (Without Tools)
Now, let's get our hands dirty – metaphorically, for now. These initial checks require no tools and can reveal quite a bit.
1. The Thermostat Check:
This is the easiest starting point. Ensure your thermostat is set correctly and that it's functioning properly.
- Check the Setting: Make sure the thermostat is set to "Heat" and at a reasonable temperature. Avoid setting it too high, as this only increases energy consumption. A difference of a few degrees can significantly impact your bill.
- Programmed Schedules: If you have a programmable thermostat, review the schedule. Are the set temperatures appropriate for when you're home and away? Ensure there are no conflicting settings.
- Battery Check: For digital thermostats, check the batteries. Low batteries can cause inaccurate readings and erratic behavior. Replace them with fresh ones.
- Basic Functionality: Manually raise and lower the thermostat temperature. Do you hear the furnace or heat pump turn on and off accordingly? If not, there may be a problem with the thermostat itself.
2. Visual Inspection – Drafts and Insulation:
Even the most efficient heating system will struggle if your home is poorly insulated or plagued by drafts.
- Draft Detection: On a cold, windy day, walk around your home and feel for drafts around windows, doors, electrical outlets, and where pipes enter walls. Use your hand to feel for cold air.
- Window and Door Seals: Check the weather stripping around windows and doors. Is it cracked, brittle, or missing? If so, it needs to be replaced.
- Insulation Assessment (Visual): If possible, visually inspect the insulation in your attic and crawl spaces. Is it adequately thick and evenly distributed? Are there any signs of water damage or rodent activity? (Note: Be cautious when entering attics and crawl spaces. Wear protective gear and be aware of potential hazards.)
- Exterior Wall Inspection: Check for cracks or gaps in the exterior walls of your home. Seal any visible openings with caulk or weather-resistant sealant.
3. Air Filter Inspection (For Forced-Air Systems):
A dirty air filter restricts airflow, forcing your furnace to work harder and reducing its efficiency.
- Locate the Filter: The air filter is usually located near the furnace or in the return air vent. Consult your furnace manual if you're unsure where to find it.
- Visual Inspection: Remove the filter and hold it up to the light. If you can barely see through it, it's dirty and needs to be replaced.
- Replacement Frequency: A good rule of thumb is to replace your air filter every 1-3 months, depending on the type of filter and the amount of dust and allergens in your home.
Step 3: DIY Checks – What You Can Inspect with Basic Equipment
These checks require a few inexpensive tools that you likely already own or can easily purchase.
1. Outlet Temperature Check (Forced-Air Systems) with a Thermometer:
This helps gauge the effectiveness of your furnace by measuring the temperature difference between the air entering and exiting the system.
- Equipment: You'll need a basic thermometer.
- Procedure: Turn on your furnace and let it run for about 15 minutes. Then, measure the temperature of the air entering the return air vent (where the air filter is located). Next, measure the temperature of the air exiting a supply vent (the vents in your floors or walls).
- Temperature Difference: Calculate the difference between the two temperatures. A healthy furnace should have a temperature rise of 15-25 degrees Fahrenheit. If the temperature rise is significantly lower or higher, it could indicate a problem with the furnace.
2. Smoke Test for Drafts with Incense or a Lighter:
This provides a more precise way to identify air leaks around windows, doors, and other potential sources of drafts.
- Equipment: You'll need a stick of incense, a lighter, or a lit candle (exercise extreme caution with open flames).
- Procedure: Light the incense or candle and slowly move it around the edges of windows, doors, electrical outlets, and other areas where you suspect drafts. Observe the smoke or flame. If it wavers or is pulled towards a specific direction, it indicates a draft.
- Documentation: Mark the locations of significant drafts with tape or a pen so you can address them later.
3. Testing Outlet Voltage (Electric Heating) with a Multimeter:
This is for electric baseboard heaters. It ensures they are receiving the correct voltage.
- Equipment: You'll need a multimeter, which can be purchased at most hardware stores. Safety Note: Working with electricity can be dangerous. If you are not comfortable using a multimeter, do not attempt this test. Turn off the breaker to the heater before any testing.
- Procedure: After turning off the breaker to the heater, carefully remove the cover plate from the outlet. Set your multimeter to measure AC voltage. Following multimeter's instruction manual, touch the probes to the appropriate terminals in the outlet (typically the two slotted openings). Turn the breaker back on.
- Voltage Reading: The voltage reading should be approximately 120 volts for standard outlets. If the voltage is significantly lower or zero, it could indicate a wiring problem. Turn the breaker off immediately if there is a problem.
Step 4: Simple DIY Fixes You Can Undertake
Based on your findings from the previous steps, you can often tackle some simple repairs yourself.
- Replace Weather Stripping: Replace worn or damaged weather stripping around windows and doors. This is an inexpensive and easy way to eliminate drafts.
- Caulk Gaps and Cracks: Use caulk to seal gaps and cracks around windows, doors, pipes, and other openings in your home's exterior.
- Install Door Sweeps: Install door sweeps at the bottom of exterior doors to prevent drafts from entering under the door.
- Insulate Electrical Outlets: Install foam outlet gaskets behind electrical outlet covers to reduce drafts.
- Replace Air Filter: As mentioned earlier, regularly replace your air filter to maintain proper airflow and improve heating efficiency.
- Add Window Film: Apply clear window film to your windows to improve their insulation and reduce heat loss.
- Bleed Radiators (If Applicable): If you have a hot water radiator system, bleed the radiators to remove trapped air. This will improve their heating efficiency. (Consult your system's manual for proper bleeding procedures.)
Step 5: When to Call a Professional HVAC Technician
While DIY checks and simple fixes can address many common heating problems, some issues are too technical or risky to handle yourself. It's crucial to know when to call in a qualified HVAC technician.
- Gas Leaks: If you suspect a gas leak (smell of gas, hissing sound), immediately evacuate your home and call your gas company or the fire department. Do not attempt to locate or repair the leak yourself.
- Carbon Monoxide Concerns: If you have a carbon monoxide detector that is alarming, evacuate your home and call the fire department. Carbon monoxide is a deadly, odorless gas that can be produced by malfunctioning furnaces.
- Furnace Malfunctions: If your furnace is making strange noises, won't turn on, or cycles on and off frequently, it likely needs professional attention. Do not attempt to repair the furnace yourself, as this could be dangerous.
- Heat Pump Issues: Heat pumps are complex systems that require specialized knowledge and equipment to repair. If your heat pump is not heating properly, is making strange noises, or is icing up excessively, call a qualified HVAC technician.
- Electrical Problems: If you suspect an electrical problem with your heating system (e.g., tripped breakers, sparks, burning smells), do not attempt to repair it yourself. Call a qualified electrician.
- Refrigerant Leaks (Heat Pumps): Refrigerant leaks in heat pumps require specialized equipment to detect and repair. Do not attempt to handle refrigerant yourself.
- Uncertainty: If you've performed the DIY checks and are still unsure about the cause of your heating problem, it's best to err on the side of caution and call a professional.
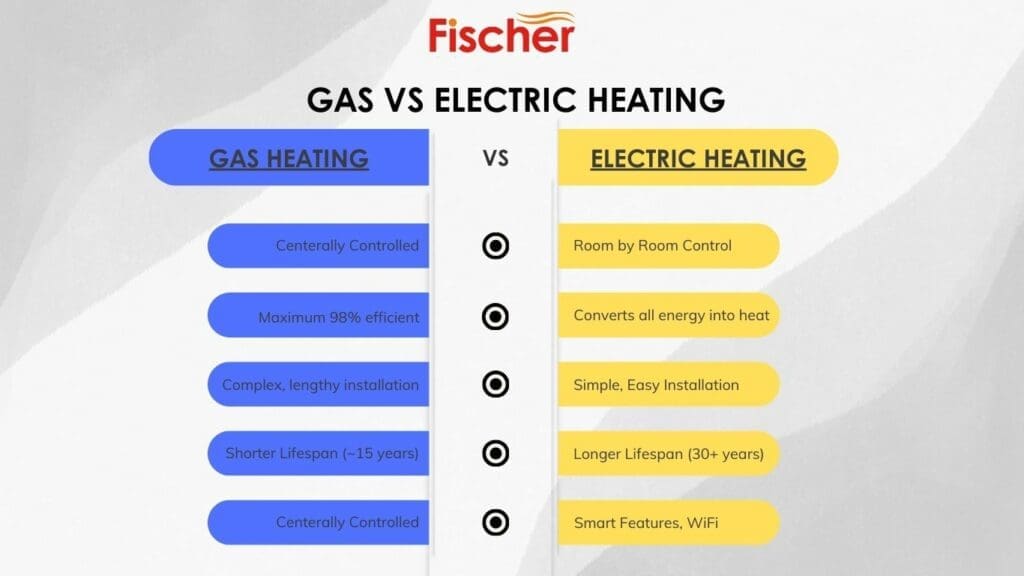
Gas vs. Electric – The Bottom Line and What Affects Cost
Now, let's address the core question: gas vs. electric, which is cheaper? There's no simple answer, as it depends on several factors:
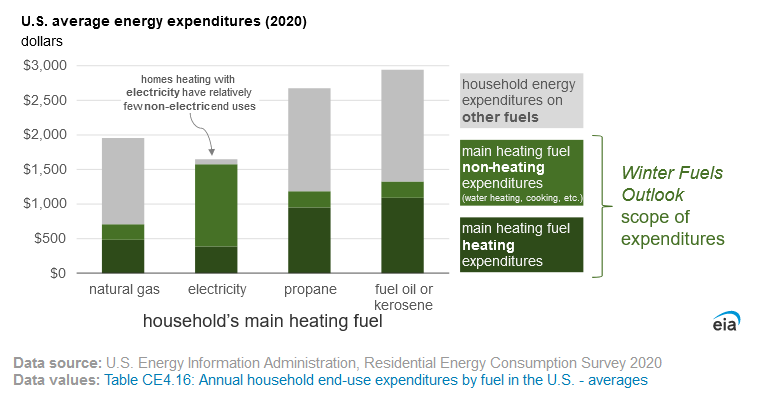
- Local Energy Prices: The price of natural gas and electricity varies significantly from region to region. Check your local utility rates to compare costs.
- Heating System Efficiency: The efficiency of your furnace or heat pump plays a crucial role. Look for Energy Star-rated appliances, as they are more energy-efficient. Gas furnaces are rated by AFUE (Annual Fuel Utilization Efficiency), while heat pumps are rated by HSPF (Heating Seasonal Performance Factor). Higher ratings indicate greater efficiency.
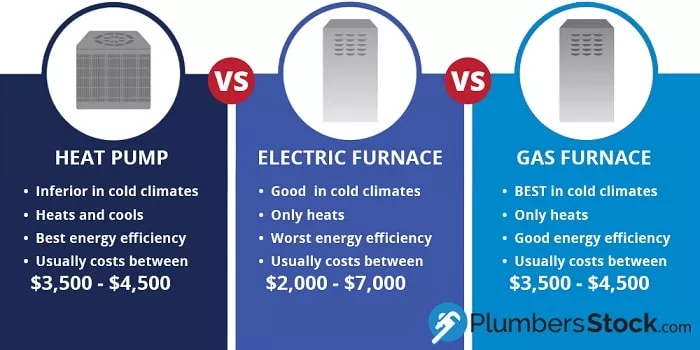
- Climate: In colder climates, gas furnaces are generally more cost-effective than electric resistance heating (e.g., electric baseboard heaters). However, in milder climates, heat pumps can be a more efficient option.
- Insulation: As we've emphasized throughout this article, good insulation is essential for minimizing heat loss and reducing heating costs, regardless of the fuel source.
- Home Size and Layout: The size and layout of your home can also affect heating costs. Larger homes typically require more energy to heat, and homes with poor layouts may experience uneven heating.
General Guidelines:
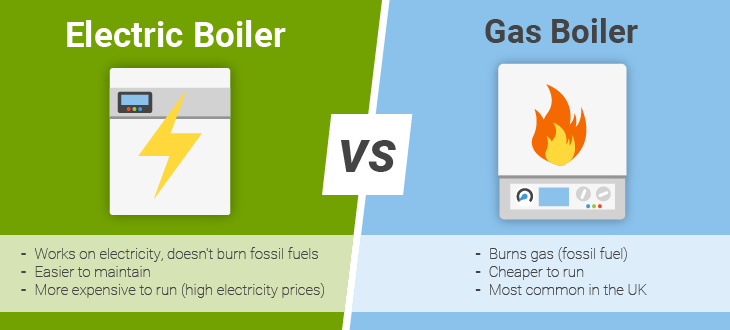
- Natural gas is often cheaper than electricity in many areas for heating, *especially* in colder climates, but this is becoming less true with modern heat pump technology.
- Heat pumps are generally *more* efficient than electric resistance heating but less efficient than high-efficiency gas furnaces in *very* cold climates.
- Electric resistance heating (baseboard heaters) is typically the *most* expensive option.
To make an informed decision, compare the cost per BTU (British Thermal Unit) of heat produced by each fuel source in your area. Your local utility company can often provide this information.
Ultimately, determining whether gas or electric heating is cheaper requires careful consideration of your local energy prices, the efficiency of your heating system, your climate, and the insulation of your home. By performing the DIY checks outlined in this article and addressing any readily fixable problems, you can significantly improve your heating efficiency and reduce your energy bills. And, of course, don't hesitate to call a qualified HVAC technician when you need expert assistance.