Grounding Above Ground Propane Tanks

Many homeowners experience frustrating fluctuations in their home's temperature, even when their propane-fueled heating or cooling system seems to be running fine. You might notice some rooms are much colder or warmer than others, the system cycles on and off frequently, or your energy bills are surprisingly high. One often overlooked, but crucial, aspect of propane system efficiency and safety is proper grounding. While it might seem unrelated, a poorly grounded propane tank can contribute to these heating and cooling inconsistencies. Let's explore how.
Diagnosing Potential Grounding Issues
Before diving into potential grounding problems, it's important to rule out common HVAC issues. Check the following easy, no-tool items:
- Air Filters: A dirty air filter restricts airflow, making your system work harder. Replace it regularly (usually every 1-3 months).
- Vents: Ensure all vents are open and unobstructed by furniture or rugs.
- Thermostat Settings: Verify your thermostat is set correctly for heating or cooling and that the program schedule matches your needs.
- Pilot Light (for older systems): If you have an older furnace with a pilot light, check that it's lit. Follow the manufacturer's instructions to relight it if necessary.
If these basic checks don't solve the problem, then it's time to consider grounding, as it's a significant safety feature to prevent static electricity buildup and potential sparks near flammable propane gas.
Understanding Grounding
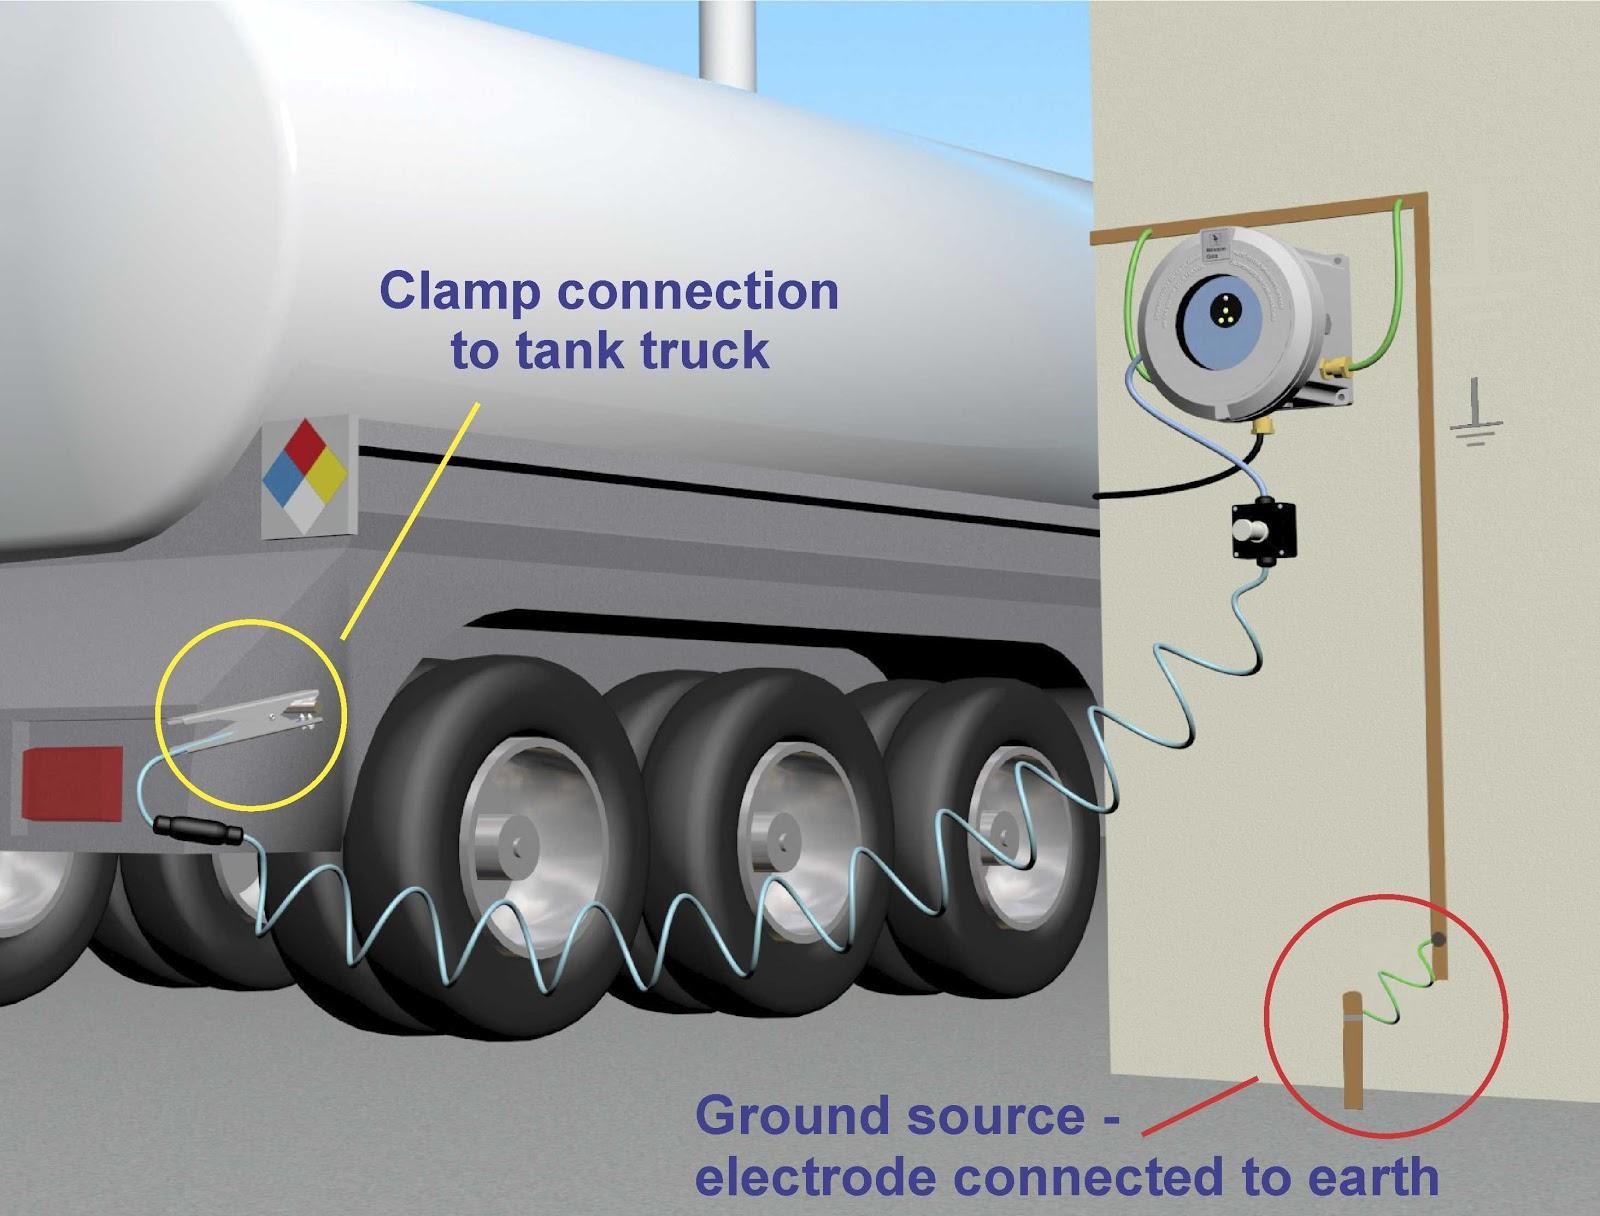
Grounding provides a path for stray electrical charges to safely dissipate into the earth. Without proper grounding, static electricity can build up on the propane tank, especially in dry conditions. A spark from this static electricity could ignite propane gas, creating a fire or explosion hazard. Also, even if it does not cause a fire, it may interfere with the controls on the gas tank or cause premature failure of the appliance connected to the tank.
Preliminary Visual Inspection (No Tools Needed)
Start with a visual inspection of the grounding system. This can often reveal obvious problems.
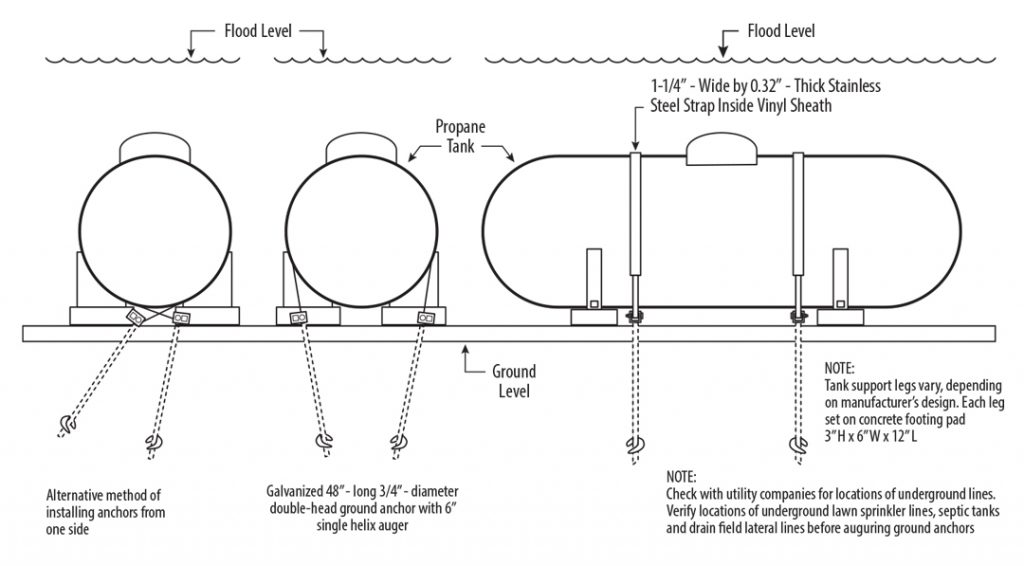
- Locate the Grounding Rod: Typically, a grounding rod (usually made of copper or galvanized steel) is driven into the ground near the propane tank. Look for a thick wire (often copper) connected to the tank and running to the rod.
- Check for Corrosion: Examine the grounding rod, the wire, and the connection points for signs of corrosion. Green or white deposits on copper wires indicate corrosion. Rust on steel components is also a concern.
- Inspect the Wire: Look for any breaks, cuts, or fraying in the grounding wire. Ensure it's securely connected to both the tank and the grounding rod.
- Assess the Ground: Is the soil around the grounding rod dry and cracked? Extremely dry soil is a poor conductor of electricity and can reduce the effectiveness of the grounding system.
- Tank Placement: Is the tank in contact with any other metal structures? It is generally best practice to keep the tank from contacting metal buildings, fences, etc.
If you find any of these issues during your visual inspection, proceed to the next section for DIY troubleshooting steps.
DIY Troubleshooting and Solutions
Here are some simple and safe DIY actions you can take to address grounding problems. Remember to exercise caution and turn off the propane supply at the tank if you feel uncomfortable at any point.
Addressing Corrosion (Basic Tools Required)
If you find corrosion on the grounding rod, wire, or connections, you can attempt to clean them.
- Gather Supplies: You'll need wire brush, sandpaper, and a corrosion inhibitor spray (available at most hardware stores).
- Clean the Connections: Use the wire brush and sandpaper to remove corrosion from the grounding rod, wire, and connection points. Ensure you expose clean metal.
- Apply Corrosion Inhibitor: Spray the cleaned connections with a corrosion inhibitor to prevent future corrosion.
- Reassemble Securely: Ensure the connections are tight and secure. Use a wrench if necessary, but be careful not to overtighten.
Improving Ground Contact (Basic Tools & Supplies Required)
If the soil around the grounding rod is dry, you can improve ground contact by:
- Watering the Ground: Slowly pour water around the grounding rod to moisten the soil. This will improve its conductivity. Repeat this process regularly, especially during dry periods.
- Adding Grounding Enhancer: Consider using a grounding enhancer (available at electrical supply stores). These products are designed to improve the conductivity of the soil and are particularly useful in areas with poor soil conditions. Follow the manufacturer's instructions for application.
Replacing Damaged Wire (Basic Tools & Supplies Required)
If the grounding wire is damaged (broken, cut, or severely frayed), it needs to be replaced.
- Gather Supplies: You'll need a new grounding wire of the same gauge and type (usually copper), wire strippers, wire connectors (crimp connectors or screw-on connectors), and a crimping tool (if using crimp connectors).
- Turn Off Propane Supply: For added safety, turn off the propane supply at the tank.
- Disconnect the Old Wire: Carefully disconnect the old grounding wire from both the tank and the grounding rod.
- Prepare the New Wire: Use the wire strippers to remove the insulation from the ends of the new wire.
- Connect the New Wire: Securely connect the new wire to the tank and the grounding rod using wire connectors. Ensure the connections are tight and properly crimped (if using crimp connectors).
- Inspect the Connection: Give the wire a gentle tug to make sure everything is connected properly.
Checking Grounding Rod Depth (Basic Tools & Possible Digging Required)
While less common, the grounding rod might be too shallow. Regulations generally require the top of the grounding rod to be at least eight feet below the surface of the ground, though this may vary by local code. This requires digging to inspect.
- Dig Carefully: Using a shovel, carefully dig around the grounding rod to expose it.
- Measure: Measure the length of the rod that is driven into the ground.
- Address Insufficient Depth: If the rod is not deep enough, you have two options:
- Drive Deeper: If possible, drive the existing rod deeper into the ground using a hammer and a driving rod (a metal rod used to protect the grounding rod from damage during hammering).
- Install a New Rod: If driving the existing rod deeper is not feasible, you may need to install a new, longer grounding rod.
When to Call a Professional
While many grounding issues can be addressed with simple DIY solutions, some situations require the expertise of a qualified HVAC technician or electrician. Do not attempt to diagnose or repair the following issues yourself:
- If you suspect a gas leak: Immediately evacuate the area and call your propane supplier or the fire department. Do not attempt to locate or repair the leak yourself.
- If you are unsure about any of the steps involved in grounding a propane tank.
- If you are uncomfortable working with electrical components or propane gas.
- If your visual inspection reveals severe corrosion or damage to the tank itself.
- If you have tried the DIY solutions and the problem persists. This could indicate a more complex issue with your propane system or electrical wiring.
- If local codes require professional installation or inspection of propane systems.
Signs that a professional is needed include:
- The smell of propane, no matter how faint.
- Visible damage to the tank, regulator, or gas lines.
- Any sparking or electrical arcing near the tank or gas lines.
- Malfunctioning propane-fueled appliances, especially if accompanied by unusual odors or noises.
- You are not confident in your ability to safely perform the necessary repairs.
Safety should always be your top priority. A qualified professional has the knowledge, experience, and equipment to diagnose and repair propane system problems safely and effectively.
Maintenance and Prevention
Once you've addressed any existing grounding issues, it's important to implement a regular maintenance schedule to prevent future problems.
- Annual Visual Inspection: Conduct a visual inspection of the grounding system at least once a year, checking for corrosion, damage, and loose connections.
- Soil Moisture Monitoring: Regularly check the soil around the grounding rod, especially during dry periods. Water the ground as needed to maintain adequate moisture levels.
- Professional Inspection: Consider having your entire propane system inspected by a qualified technician every few years. They can identify potential problems before they become serious.
By taking these preventative measures, you can ensure the safety and efficiency of your propane system and avoid costly repairs down the road.
Remember, proper grounding is crucial for both the safety and efficiency of your propane system. By understanding the basics of grounding and performing regular maintenance, you can ensure that your system is operating safely and effectively, providing you with reliable heating and cooling for years to come. If in doubt, always seek the advice of a qualified professional.