Heat Pump Compressor Troubleshooting
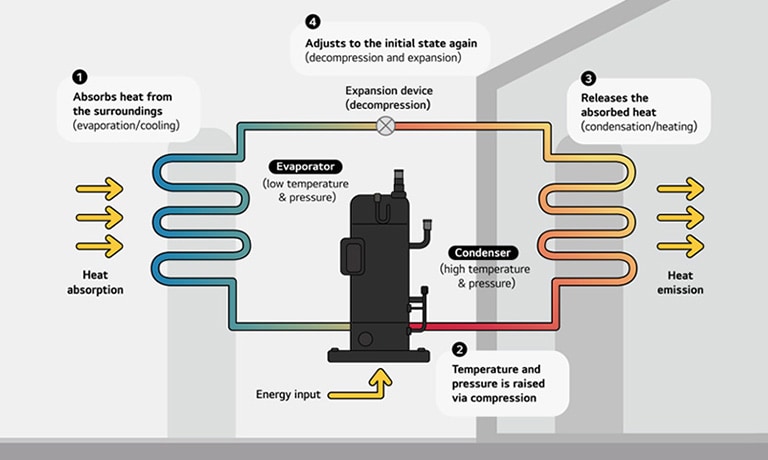
A heat pump is a fantastic appliance that efficiently heats and cools your home. But like any mechanical system, components can fail. The compressor is the heart of your heat pump, responsible for circulating refrigerant. If it malfunctions, your system won't heat or cool properly. Here’s how to troubleshoot common compressor problems, along with safety precautions and when to call a professional.
Safety First!
Before you begin any troubleshooting, it’s crucial to prioritize safety:
- Turn off the power: Locate the disconnect switch near your outdoor unit and switch it off. Also, turn off the breaker for the HVAC system in your electrical panel.
- Wait before touching: Give the unit time to discharge any stored electricity.
- Use insulated tools: Avoid electrical shock.
- Don't work in wet conditions: Water and electricity don't mix.
- If in doubt, call a professional: Electrical and refrigerant work can be dangerous and requires specialized knowledge and equipment.
Tools and Equipment You May Need
Depending on the issue, you might need the following tools:
- Multimeter
- Screwdrivers (various sizes)
- Wrench set
- Voltage tester
- Amp clamp meter
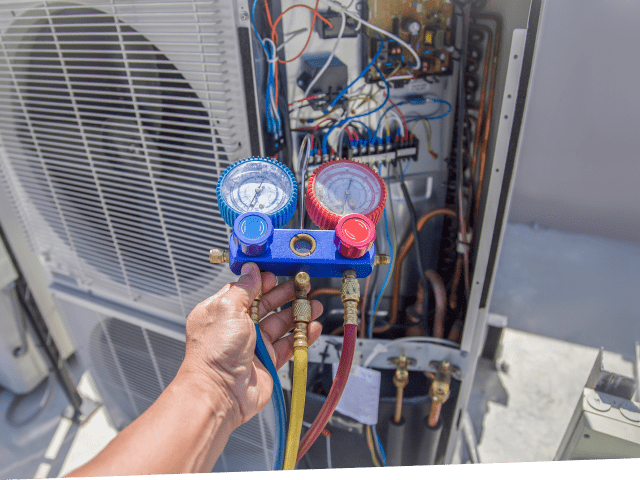
- HVAC gauges (for refrigerant pressure, use with caution)
- Capacitor tester
- Wire strippers
- Pliers
- Safety glasses
- Gloves
Common Heat Pump Compressor Problems and Troubleshooting Steps
1. Compressor Not Starting (Humming Sound)
If you hear a humming sound but the compressor isn't starting, it could be a few issues.
- Check the Capacitor: A faulty capacitor is a common cause. The capacitor provides the initial jolt of electricity to start the compressor.
- Discharge the capacitor with a screwdriver (carefully!). Short across the terminals.
- Use a capacitor tester or a multimeter with capacitance testing capability.
- Compare the reading to the capacitor's rated microfarad (µF) value. If the reading is significantly lower (e.g., more than 10% off), the capacitor likely needs replacement.
- Visually inspect the capacitor for bulging, leaking, or other signs of damage.
- Hard Starting Kit: If the capacitor is fine, consider installing a hard starting kit. This provides an extra boost to the compressor during startup.
- Locked Rotor: The compressor motor may be seized (locked rotor). This is a more serious issue. Use an amp clamp meter to check the compressor's amperage draw during startup. If the amperage is excessively high and doesn't drop, the compressor is likely locked. This often requires compressor replacement.
How to check the capacitor:
2. Compressor Not Starting (No Sound)
If there's no sound at all, the issue could be electrical or a total compressor failure.
- Check the Power Supply: Use a voltage tester to ensure the compressor is receiving power. Check the wiring connections for looseness or corrosion.
- Check the Contactor: The contactor is an electrical relay that switches power to the compressor. Inspect it for burnt or damaged contacts. Use a multimeter to check for continuity across the contactor when it's engaged (when the thermostat is calling for cooling or heating).
- Check the Overload Protector: The overload protector is a safety device that shuts off the compressor if it overheats. It may have tripped. Allow the compressor to cool down, then try resetting the overload protector (if it has a reset button).
- Internal Wiring: Internal wiring within the compressor itself could be damaged. This requires specialized testing and is best left to a professional.
3. Compressor Running But Not Cooling/Heating
If the compressor is running but your home isn't being cooled or heated effectively, the problem is likely refrigerant-related.
- Refrigerant Leak: The most common cause is a refrigerant leak. Look for oily residue on the refrigerant lines or connections. Refrigerant leaks require a professional to locate and repair, followed by recharging the system.
- Low Refrigerant Charge: Even without a visible leak, the refrigerant charge may be low due to slow leaks over time. A professional can check the refrigerant pressure and add refrigerant as needed.
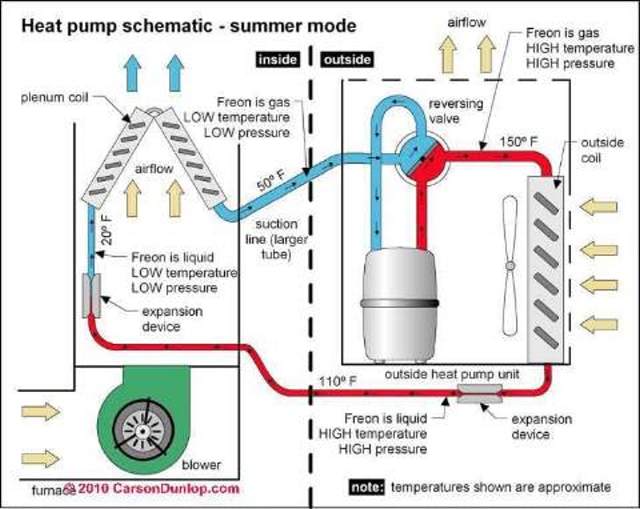
- Bad Reversing Valve: The reversing valve switches the flow of refrigerant between heating and cooling modes. If it's faulty, the system may not be able to switch modes properly. This requires professional diagnosis and replacement.
4. Compressor Short Cycling
Short cycling means the compressor turns on and off frequently, reducing efficiency and potentially damaging the unit.
- Dirty Air Filter: A dirty air filter restricts airflow, causing the compressor to overheat and shut down. Replace your air filter regularly (every 1-3 months).
- Frozen Evaporator Coil: If the evaporator coil (inside the air handler) is frozen, it can restrict airflow and cause short cycling. Turn off the system and allow the coil to thaw completely. Check for airflow restrictions and refrigerant leaks.
- Oversized Unit: If the heat pump is too large for your home, it may cool the space too quickly and then shut off prematurely. This is a design issue and may require replacing the unit with a smaller one.
5. Noisy Compressor
Unusual noises from the compressor can indicate mechanical problems.
- Loose Components: Check for loose mounting bolts or refrigerant lines that may be vibrating.
- Worn Bearings: Grinding or squealing noises can indicate worn compressor bearings. This usually requires compressor replacement.
- Refrigerant Issues: Strange hissing or gurgling sounds might indicate refrigerant leaks or restrictions.
When to Call a Professional
While some troubleshooting steps are DIY-friendly, several situations require a qualified HVAC technician:
- Refrigerant Leaks: Handling refrigerant requires EPA certification.
- Compressor Replacement: This is a complex and expensive repair.
- Electrical Issues: If you're uncomfortable working with electricity.
- Suspected Internal Compressor Damage: Requires specialized diagnostic tools.
- Any Doubt: If you're unsure about any step, it's always best to err on the side of caution.
Estimated Repair Costs
Here's a general idea of repair costs, but prices can vary based on your location and the specific issue:
- Capacitor Replacement: $100 - $300
- Contactor Replacement: $150 - $400
- Hard Start Kit Installation: $200 - $400
- Refrigerant Leak Repair and Recharge: $300 - $1000+ (depending on the leak location and refrigerant type)
- Compressor Replacement: $1500 - $4000+ (includes labor and refrigerant)
- Reversing Valve Replacement: $400 - $1000
Preventative Maintenance
Regular maintenance can help prevent compressor problems:
- Change air filters regularly.
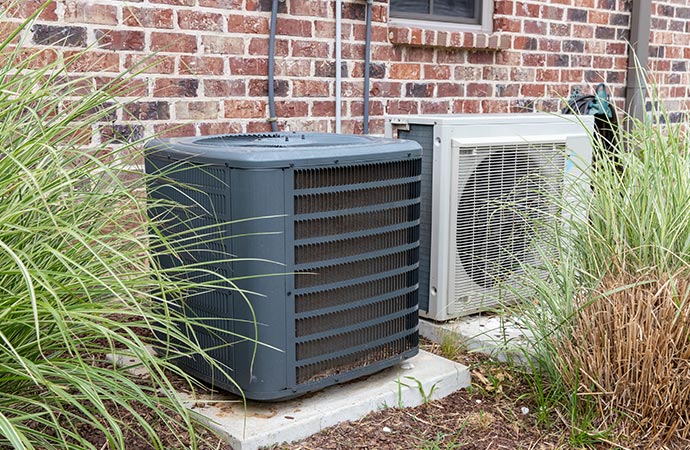
- Clean the outdoor unit coils annually.
- Schedule professional HVAC tune-ups.
- Keep the area around the outdoor unit clear of debris.
By following these troubleshooting steps and understanding when to call a professional, you can keep your heat pump running efficiently and avoid costly repairs.