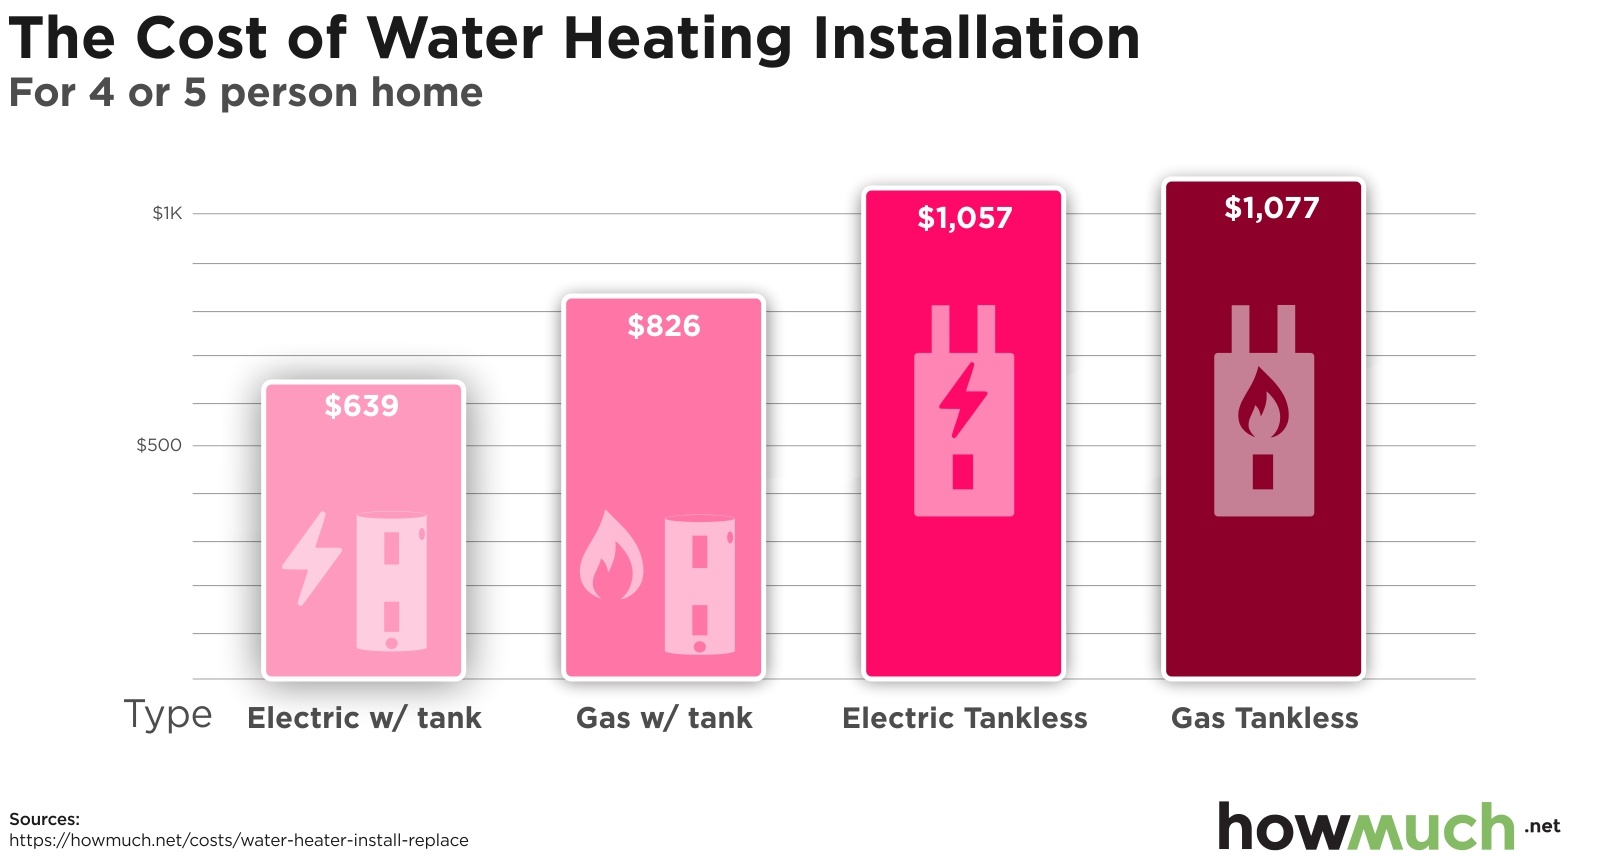
Heat Pump Water Heater Installation Cost

Let's face it: waking up to a cold shower because your water heater has decided to quit working is never a good start to the day. While traditional water heaters often fail due to sediment buildup or a faulty heating element, heat pump water heaters (HPWHs) offer greater efficiency but can sometimes present different troubleshooting challenges. This guide will help you diagnose and address common issues with your HPWH, empowering you to potentially resolve minor problems yourself while recognizing when it's time to call in a professional.
Understanding Your Heat Pump Water Heater
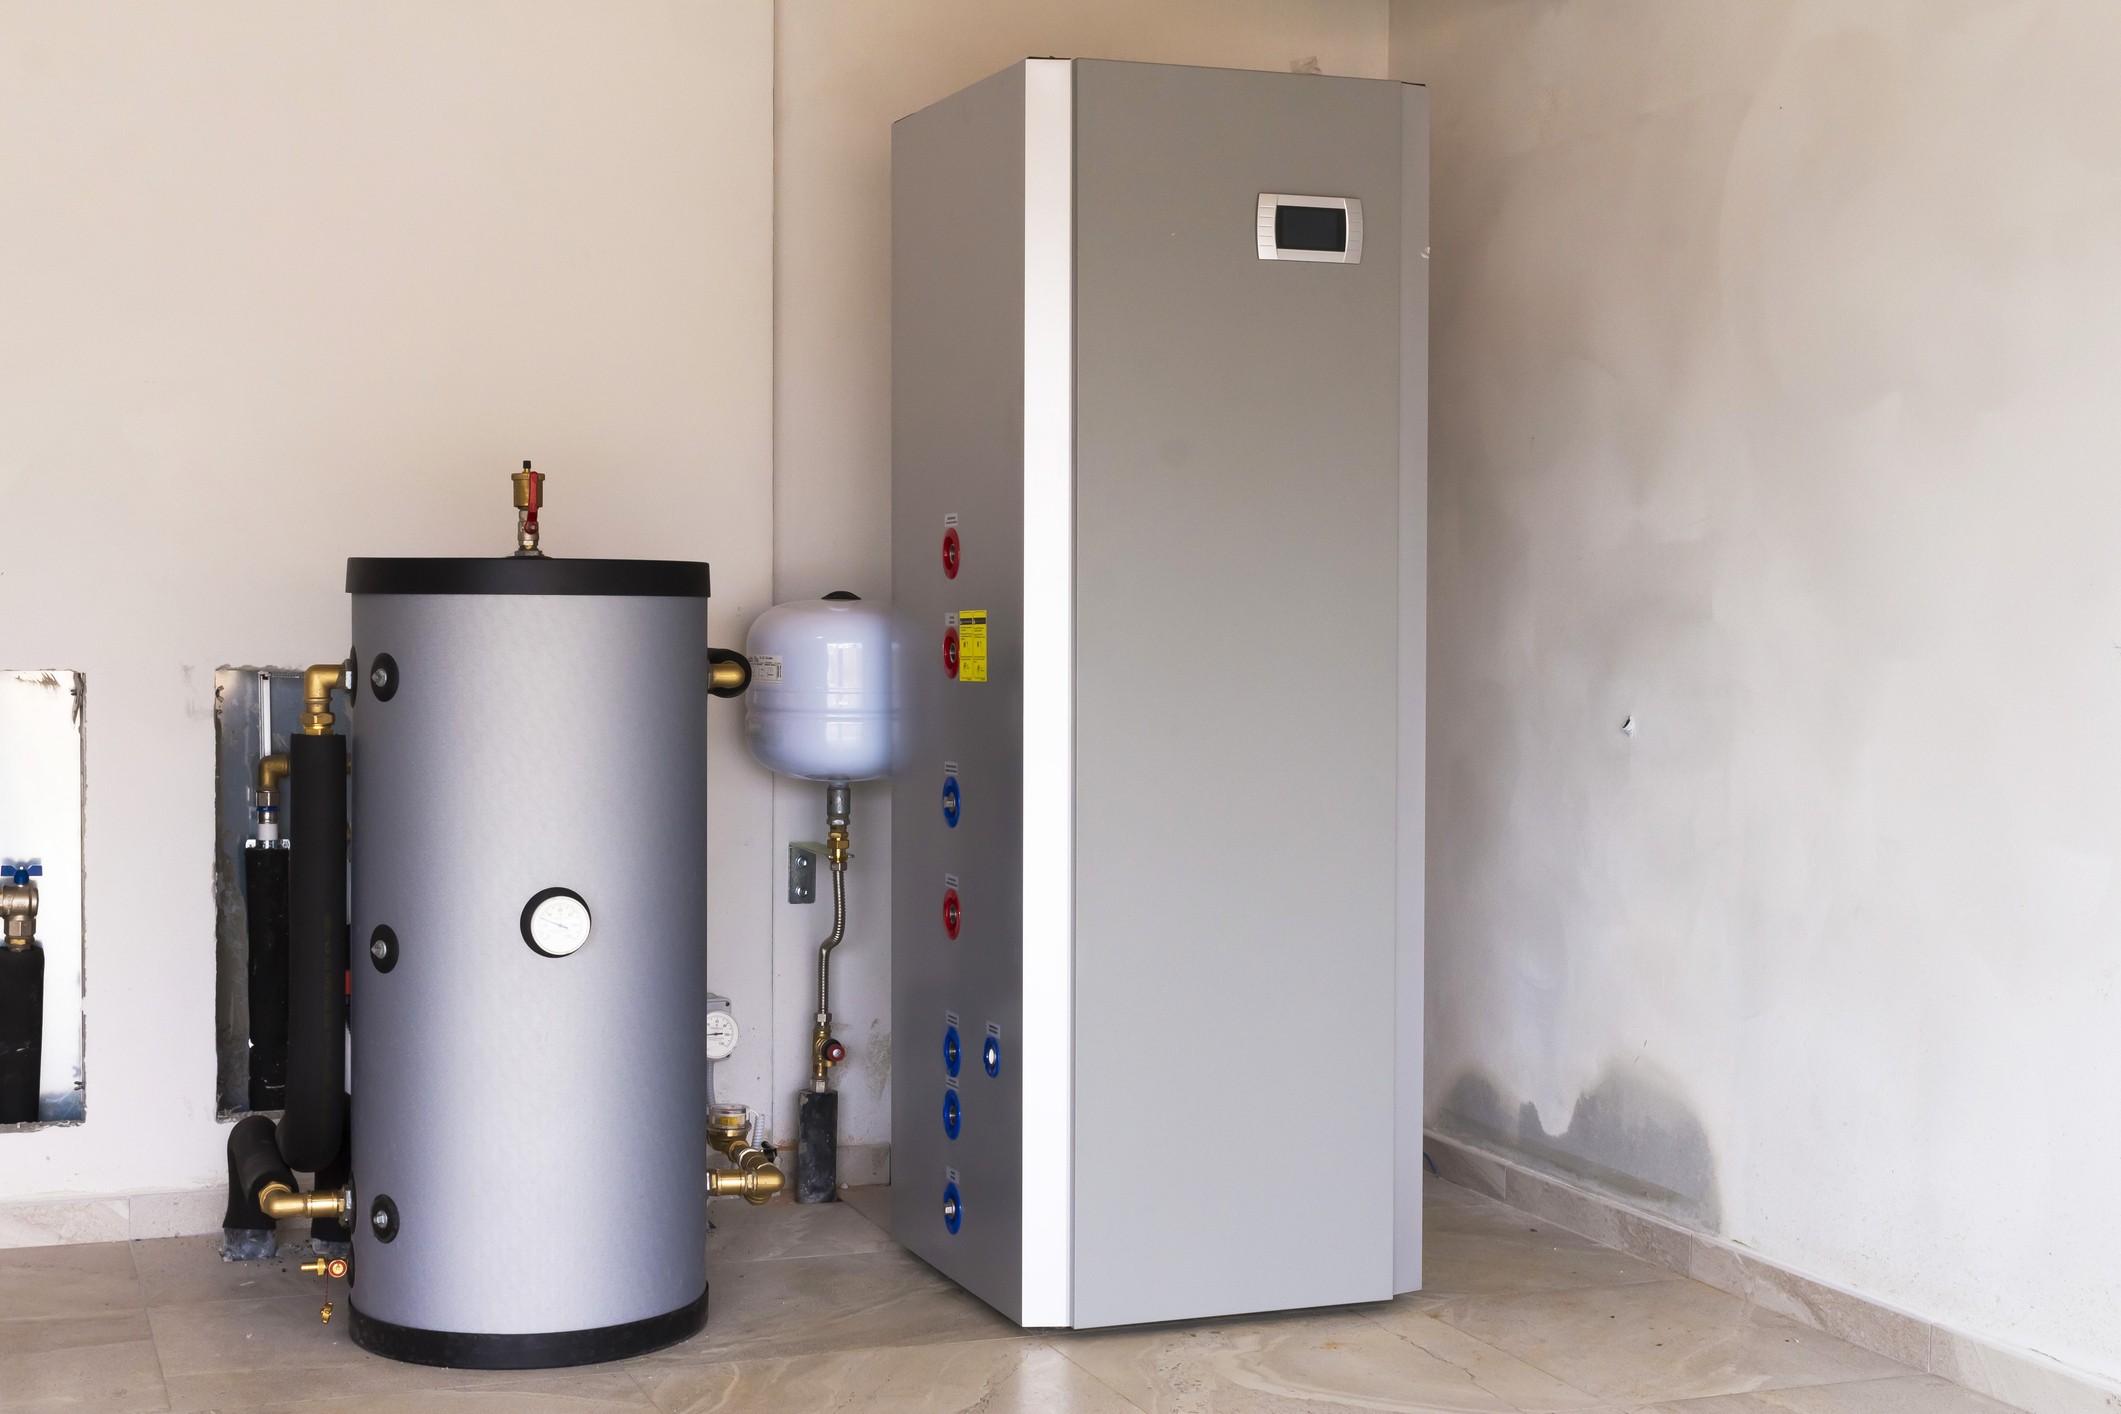
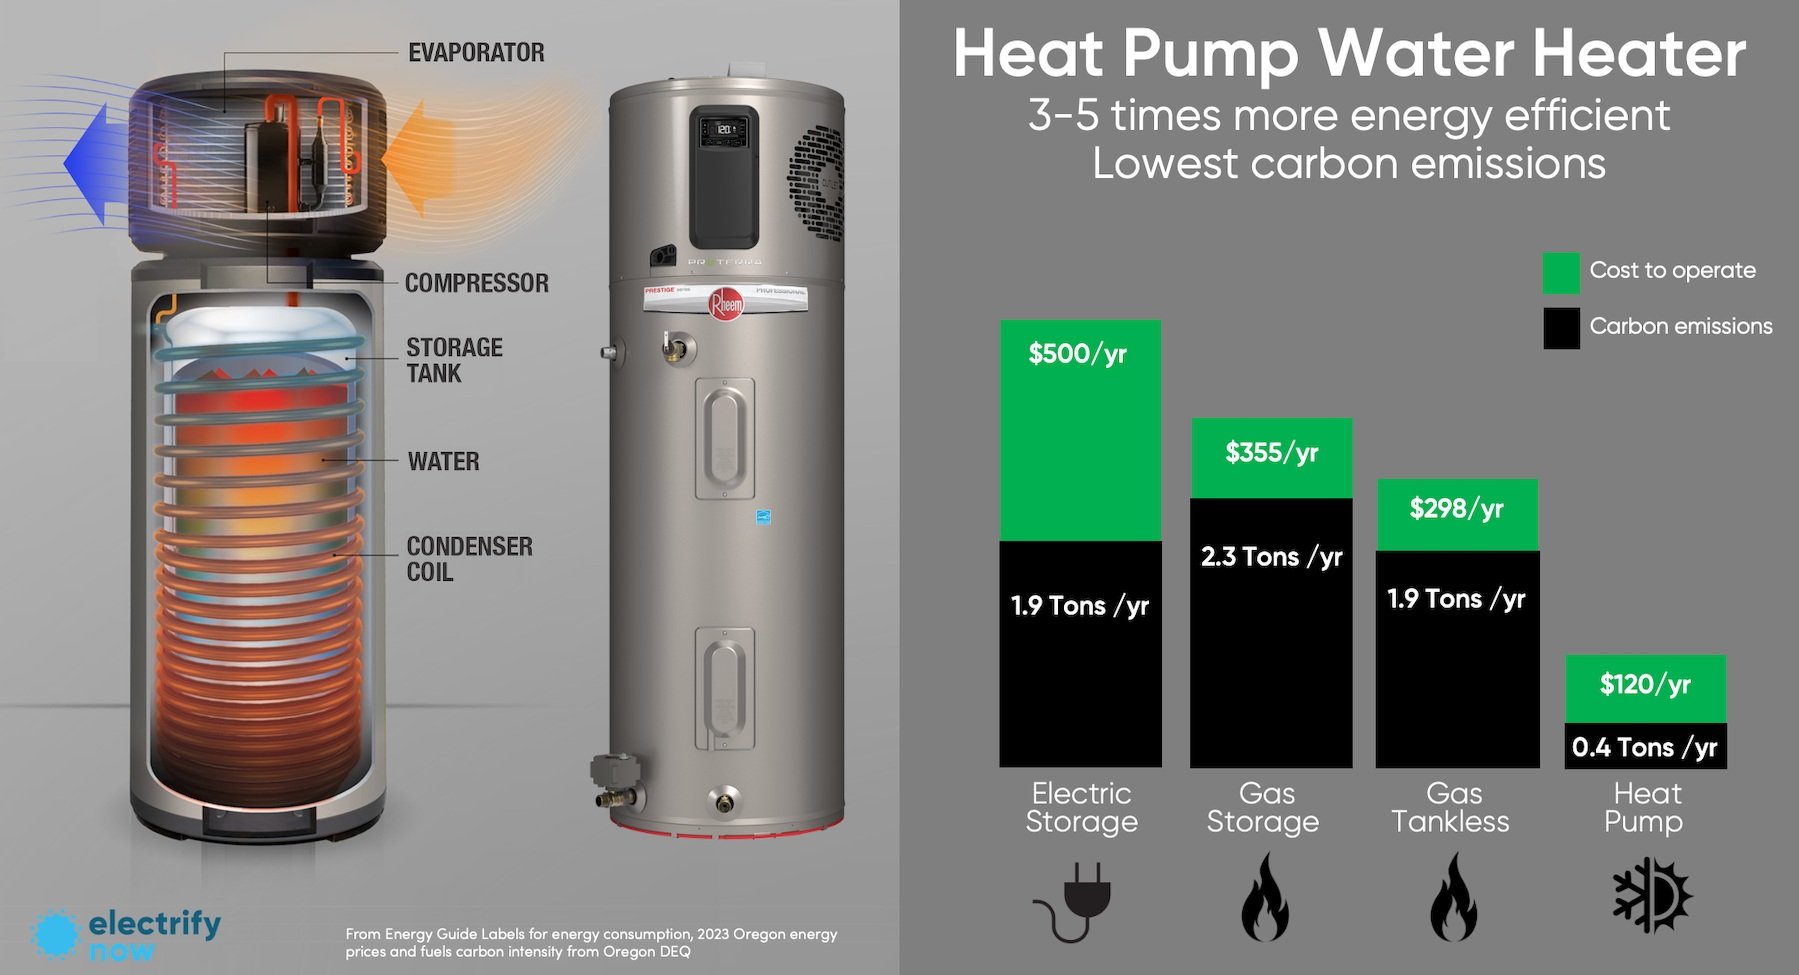
Before diving into troubleshooting, it's important to understand how an HPWH works. Unlike traditional water heaters that directly heat water using electricity or gas, an HPWH extracts heat from the surrounding air and transfers it to the water. This makes them significantly more energy-efficient.
Common failure indicators: Cold water, lukewarm water, unusual noises, error codes on the display panel, and water leaks.
Troubleshooting Guide: No Hot Water from Your HPWH
This guide is designed to help you systematically identify and address potential problems with your heat pump water heater. Remember to always prioritize safety when dealing with appliances, especially those involving electricity and water.
Step 1: Check the Power Supply
This is the most basic, yet often overlooked, step. Ensure your HPWH is receiving power.
- Circuit Breaker: Locate the circuit breaker dedicated to your water heater in your electrical panel. Is it tripped (in the "off" or middle position)? If so, reset it by switching it fully to the "off" position, then back to the "on" position. If it trips again immediately, do not keep resetting it. This indicates a more serious electrical problem that requires a qualified electrician.
- Power Cord: If your HPWH is plugged into an outlet, ensure the plug is securely inserted. Try plugging another appliance into the same outlet to confirm the outlet is working.
Step 2: Examine the Control Panel and Settings
Modern HPWHs come equipped with control panels that display settings, error codes, and operating modes.
- Operating Mode: Check the operating mode. Is it set to "Vacation," "Heat Pump Only," "Electric Resistance Only," or "Hybrid?" "Vacation" mode typically drastically reduces water heating. "Electric Resistance Only" bypasses the energy-efficient heat pump and relies on less efficient electric heating elements, which might struggle to keep up with demand. Set the mode to "Hybrid" or "Heat Pump Only" for optimal efficiency and hot water availability (depending on your model and ambient temperature).
- Temperature Setting: Ensure the water temperature setting is appropriate. A setting of 120°F (49°C) is generally recommended for safety and energy efficiency.
- Error Codes: Note any error codes displayed on the panel. Consult your owner's manual to understand what the code signifies and any recommended troubleshooting steps. Some common errors might relate to sensor failures, refrigerant leaks (requiring professional repair), or blocked air filters.
- Reset Button: Some models have a reset button (often red) located on the control panel or near the heating elements. Pressing this button might clear minor errors. However, if the error recurs immediately after resetting, it indicates a more persistent problem.
Step 3: Inspect the Air Filter (if applicable)
Many HPWHs have an air filter that protects the internal components from dust and debris. A clogged filter can significantly reduce the efficiency of the heat pump and even cause it to overheat and shut down.
- Location: Consult your owner's manual to locate the air filter. It's usually located near the top or sides of the unit.
- Inspection: Remove the filter and inspect it. If it's visibly dirty or clogged, clean it thoroughly with a vacuum cleaner or wash it with mild soap and water. Ensure the filter is completely dry before reinstalling it.
- Replacement: If the filter is damaged or cannot be effectively cleaned, replace it with a new filter of the same type.
Step 4: Check for Leaks
Water leaks can damage your home and indicate a serious problem with your HPWH.
- Inspect Connections: Carefully examine all water connections to the HPWH for signs of leaks. This includes the inlet and outlet pipes, pressure relief valve, and drain valve.
- Pressure Relief Valve: The pressure relief valve is designed to release excess pressure from the tank. If it's constantly dripping, it could indicate a problem with the tank pressure or a faulty valve. A small amount of discharge is normal during the heating cycle, but continuous dripping is not.
- Tank Corrosion: Look for signs of rust or corrosion on the tank itself. This could indicate a leak or impending failure of the tank.
- Pooling Water: Check the area around the HPWH for any signs of pooling water.
If you find a leak, immediately turn off the water supply to the HPWH and contact a qualified plumber.
Step 5: Listen for Unusual Noises
Unusual noises coming from your HPWH can indicate various problems.
- Banging or Popping: This could be caused by sediment buildup in the tank. While flushing the tank can help, this process is complex and should ideally be done by a professional, especially if you're unfamiliar with plumbing.
- Hissing: A hissing sound could indicate a refrigerant leak, which requires immediate professional attention. Refrigerant is hazardous and should only be handled by certified technicians.
- Grinding or Whirring: These sounds could indicate a problem with the heat pump's compressor or fan motor. These are complex components that require professional repair.
Step 6: Basic Component Check (Proceed with extreme caution and only if comfortable)
Warning: This step involves electrical components. If you are not comfortable working with electricity, skip this step and contact a qualified technician. Ensure the power to the water heater is completely shut off at the circuit breaker before proceeding.
- Heating Elements (Electric Resistance Models): If your HPWH has electric resistance heating elements (often used in "Electric Resistance Only" or "Hybrid" mode), you can test them with a multimeter to check for continuity. Consult your owner's manual for the location of the heating elements and instructions on how to safely test them. A lack of continuity indicates a faulty element that needs to be replaced. Replacement should only be done if you have experience with electrical repairs and understand the risks involved.
- Thermocouple/Flame Sensor (Gas-Powered HPWH - Rare): While less common, some hybrid models might use a small gas burner for supplemental heating. If the thermocouple (or flame sensor) is dirty or faulty, it can prevent the burner from lighting. Clean the thermocouple with fine-grit sandpaper or steel wool. If it's damaged, it needs to be replaced. Working with gas requires extreme caution and should generally be left to a qualified technician.
When to Call a Professional
While this guide can help you troubleshoot common problems, some issues require the expertise of a qualified technician. Here's when it's time to call a professional:
- Electrical Problems: Any persistent electrical issues, such as a repeatedly tripping circuit breaker or exposed wiring.
- Gas Leaks: Any suspected gas leak (if your unit uses gas).
- Refrigerant Leaks: Any suspected refrigerant leak (indicated by a hissing sound or reduced cooling performance).
- Complex Component Failures: Problems with the compressor, fan motor, or other major components of the heat pump.
- Tank Leaks or Corrosion: Any leaks from the tank itself or significant corrosion.
- Lack of Knowledge or Confidence: If you are uncomfortable performing any of the troubleshooting steps or lack the necessary knowledge or tools.
- Warranty Concerns: Before attempting any repairs, check your warranty. Some repairs might void the warranty if performed by someone other than an authorized technician.
Preventative Maintenance
Preventative maintenance can help extend the life of your HPWH and prevent costly repairs.
- Regularly Clean the Air Filter: Clean the air filter every 1-3 months, depending on the air quality in your home.
- Inspect for Leaks: Periodically inspect the HPWH and surrounding area for any signs of leaks.
- Flush the Tank (If Comfortable): While complex, flushing the tank periodically can help remove sediment buildup. If you're not comfortable doing this yourself, hire a professional.
- Professional Inspection: Consider scheduling a professional inspection of your HPWH every few years to identify and address potential problems before they become major issues.
DIY Tips for HPWH Installation Cost Savings
While professional installation is highly recommended for ensuring safety and optimal performance, there are a few steps homeowners can take to potentially reduce installation costs:
- Prepare the Installation Area: Ensure the area where the HPWH will be installed is clear, accessible, and meets the manufacturer's specifications regarding space and ventilation. Clearing clutter and ensuring easy access for the installer can save time and labor costs.
- Upgrade Electrical Service (If Needed) Beforehand: If your existing electrical service is inadequate for the HPWH's power requirements, consider having an electrician upgrade it before the HPWH installer arrives. This can often be done separately and potentially at a lower cost.
- Research Available Rebates and Incentives: Many utility companies and government agencies offer rebates and incentives for installing energy-efficient appliances like HPWHs. Thoroughly research available programs and ensure you meet the eligibility requirements. This can significantly reduce the overall cost of the installation.
- Obtain Multiple Quotes: Get quotes from several different qualified installers. Compare their prices, services offered, and customer reviews to ensure you're getting the best value for your money. Don't just focus on the lowest price; consider the installer's experience and reputation.
- Dispose of the Old Water Heater Responsibly: Some installers charge a fee for removing and disposing of the old water heater. You can potentially save money by disposing of it yourself at a local recycling center or landfill. Check local regulations for proper disposal methods.
By following these troubleshooting steps and preventative maintenance tips, you can keep your heat pump water heater running efficiently and reliably for years to come. Remember to prioritize safety and don't hesitate to call a professional when needed.