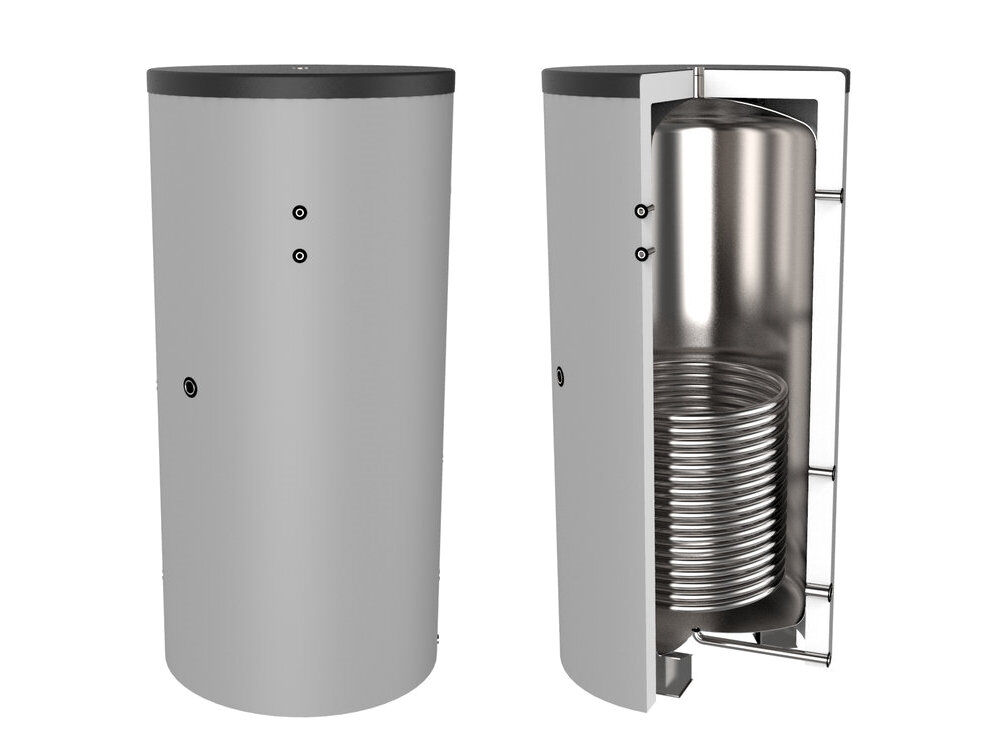
Hot Water Storage Tank With Heat Exchanger
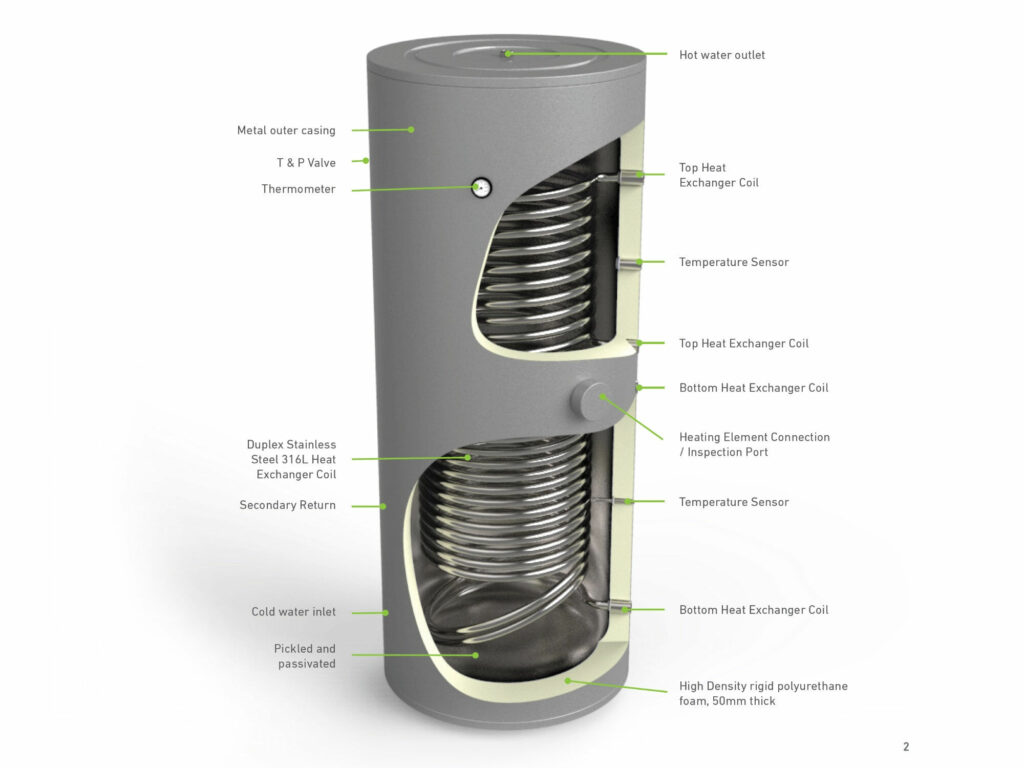
Hot water storage tanks with heat exchangers are a fantastic way to efficiently heat your domestic water, leveraging the existing heating system in your home (like a boiler or solar thermal system). However, they can sometimes present challenges. One of the most common issues homeowners face is inconsistent hot water, or a complete lack of it, despite the boiler or primary heating source working fine. This can be frustrating, but often, the problem is diagnosable and even fixable with a little troubleshooting.
Troubleshooting Inconsistent or No Hot Water
Before we begin, remember to always exercise caution when working with plumbing and electrical components. If you are uncomfortable at any point, or unsure about a step, it's always best to call a qualified plumber or HVAC technician.
Step 1: Verify the Primary Heating System is Operational
First, confirm that your boiler or primary heating system is working correctly. This is the most crucial first step. Check the following:
- Is the boiler turned on and reaching its target temperature? Look for error codes or unusual behavior on the boiler's display.
- If using solar thermal, is the solar pump running when the sun is shining? Are the solar panels exposed and clear of snow or debris?
- Are the supply and return pipes leading to the hot water tank from the boiler (or solar thermal system) hot? Carefully touch the pipes (if safe to do so) to check for heat. If they're cold, the problem likely lies with the primary heating system itself.
If your boiler isn't firing up or the solar system isn't circulating, address that issue first. These are separate problems that need to be resolved before you can troubleshoot the hot water tank.
Step 2: Check the Hot Water Tank's Temperature Setting
Most hot water tanks with heat exchangers have a thermostat to control the water temperature. Verify that the thermostat is set to a reasonable temperature (typically between 120°F and 140°F or 49°C and 60°C).
To adjust the thermostat:
- Locate the thermostat. It's usually behind an access panel on the side of the tank.
- Remove the access panel (after turning off the power to the tank at the breaker, if applicable, for electric-assisted models).
- Use a screwdriver to adjust the temperature setting.
- Replace the access panel and turn the power back on (if applicable).
Allow some time for the water to heat up after adjusting the thermostat and then re-check the water temperature at a faucet.
Step 3: Inspect the Mixing Valve (If Equipped)
Some hot water tanks are equipped with a mixing valve. This valve blends hot water from the tank with cold water to deliver a consistent, safe temperature at your fixtures. If the mixing valve malfunctions, it can cause inconsistent or lukewarm water.
To inspect the mixing valve:
- Locate the mixing valve. It's typically located on the outlet pipe of the hot water tank.
- Check for any visible damage or leaks.
- Try adjusting the mixing valve setting. There's usually a dial or lever that allows you to adjust the outlet temperature.
- If adjusting the valve doesn't solve the problem, the mixing valve itself may be faulty and need replacement. This often requires a professional.
Step 4: Check for Air Lock in the System
Air trapped in the heat exchanger or connecting pipes can prevent proper heat transfer. This is especially common after the system has been drained or worked on.
To bleed air from the system:
- Locate the air bleed valves (also called purge valves). These are small valves, often similar to those on radiators, located on the pipes connecting the boiler to the hot water tank, or sometimes directly on the tank itself.
- Place a bucket or towel under the bleed valve to catch any water.
- Carefully open the bleed valve using a screwdriver or wrench. You should hear air hissing out.
- Once water starts flowing steadily without air bubbles, close the bleed valve.
- Repeat this process for all air bleed valves in the system.
Step 5: Inspect the Circulator Pump (If Equipped on the Heating Loop)
If your boiler system uses a dedicated circulator pump to circulate water through the heat exchanger, make sure it's working properly. A failing pump can significantly reduce heat transfer.
To inspect the circulator pump:
- Visually inspect the pump for any signs of damage or leaks.
- Carefully place your hand on the pump housing. You should feel a slight vibration indicating that the motor is running. (Be careful, the pump can get hot.)
- Listen to the pump. A healthy pump should make a quiet humming noise. Loud grinding or rattling noises could indicate a problem.
- If the pump isn't running or is making unusual noises, it may need to be replaced. This is best left to a professional.
Step 6: Examine the Heat Exchanger for Scaling or Fouling
Over time, mineral deposits (scaling) can build up inside the heat exchanger, reducing its efficiency and potentially blocking the flow of heat transfer fluid. Fouling from debris can also have a similar effect. This is more common in areas with hard water.
Unfortunately, inspecting the heat exchanger directly is usually not a DIY task. It often requires specialized equipment and knowledge to disassemble and clean the unit without damaging it.
Signs of a scaled or fouled heat exchanger include:
- Gradual decrease in hot water availability over time.
- The boiler or primary heating system runs longer than usual to heat the water.
- The hot water tank feels unusually hot to the touch, indicating that the heat isn't being efficiently transferred to the water inside.
If you suspect scaling or fouling, contact a professional for descaling or flushing of the heat exchanger.
Step 7: Check for Leaks
Even small leaks can reduce the efficiency of the system and eventually lead to larger problems. Carefully inspect all pipes, fittings, and connections for any signs of leaks. Pay particular attention to the connections between the boiler and the hot water tank, and around the heat exchanger itself.
If you find a leak:
- Tighten any loose fittings (carefully, without over-tightening and damaging the fitting).
- If the leak persists, you may need to replace the fitting or section of pipe. For anything beyond minor fitting tightening, it's best to call a plumber.
When to Call a Professional
While many of these troubleshooting steps are DIY-friendly, there are situations where professional help is essential. Call a qualified plumber or HVAC technician if:
- You are uncomfortable working with plumbing or electrical components.
- You suspect a problem with the boiler or primary heating system itself.
- You suspect scaling or fouling of the heat exchanger.
- You need to replace the circulator pump or mixing valve.
- You are unable to locate the source of the problem.
- You encounter any issues beyond simple tightening of fittings.
Attempting to repair complex problems without the proper knowledge and tools can be dangerous and can potentially void warranties. It's always better to err on the side of caution and call a professional when in doubt.
Preventative Maintenance
Regular maintenance can help prevent many of the problems discussed above. Consider the following:
- Annual Boiler Service: Have your boiler or primary heating system serviced annually by a qualified technician. This will ensure that it's running efficiently and identify any potential problems before they become major issues.
- Flush the Tank: Periodically flush the hot water tank to remove sediment buildup. Consult your tank's manual for specific instructions.
- Water Softener: If you live in an area with hard water, consider installing a water softener to prevent scaling.
- Regular Inspections: Periodically inspect the system for leaks, corrosion, or other signs of damage.
By following these troubleshooting steps and performing regular maintenance, you can keep your hot water storage tank with heat exchanger running smoothly and efficiently for years to come.