How A Geothermal Heat Pump Works
Imagine waking up on a chilly morning, expecting the warm embrace of your home's heating system, only to be met with a blast of cold air. Your geothermal heat pump, usually a reliable source of comfort, has failed. Before calling a professional, there are several simple checks you can perform to potentially diagnose and even fix the problem yourself. This guide will walk you through the basics of how a geothermal system works and offer a step-by-step troubleshooting approach.
Understanding Your Geothermal System: The Basics
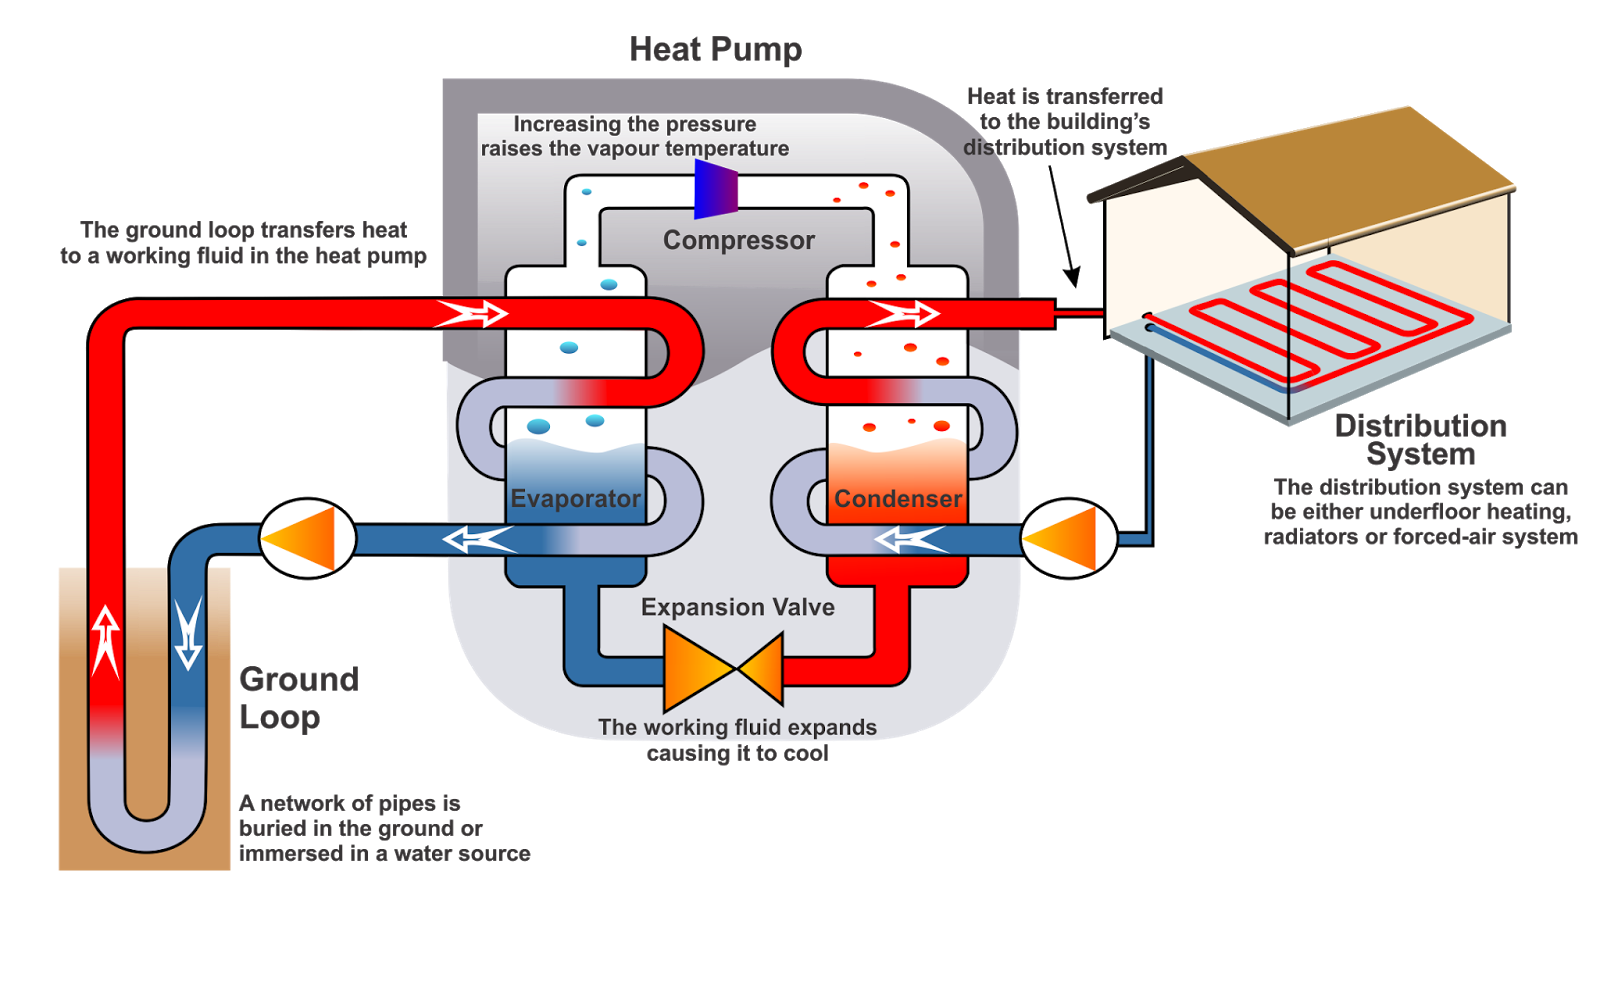
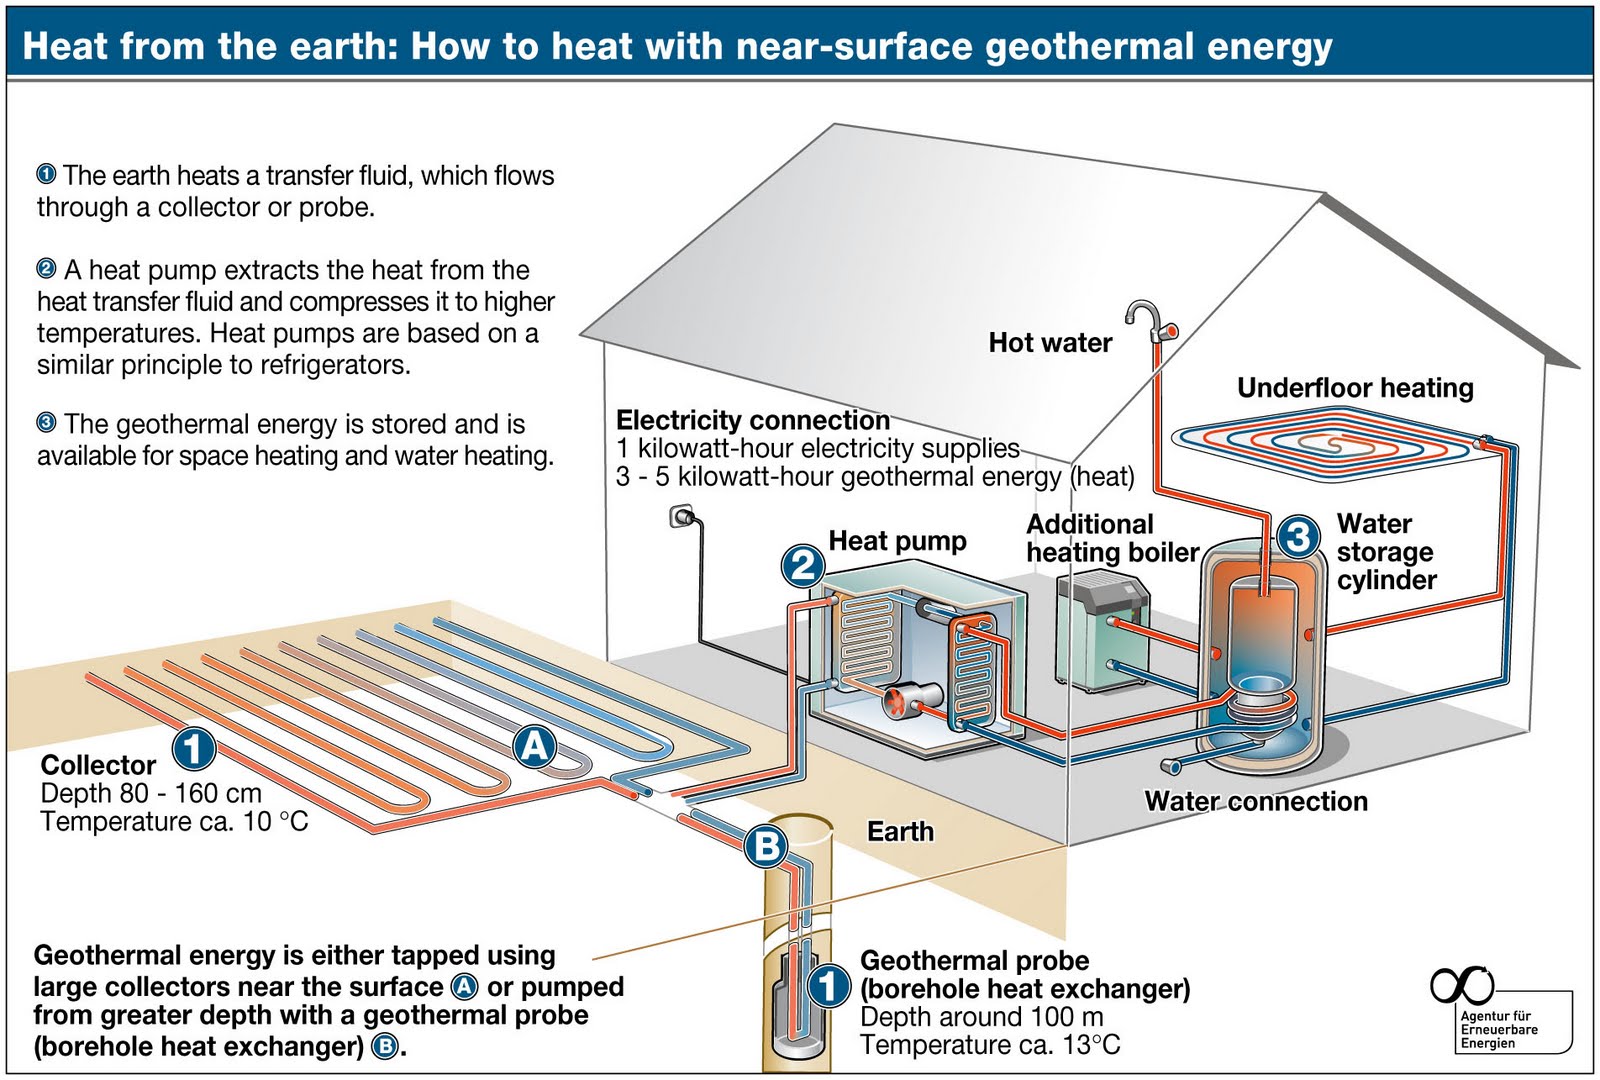
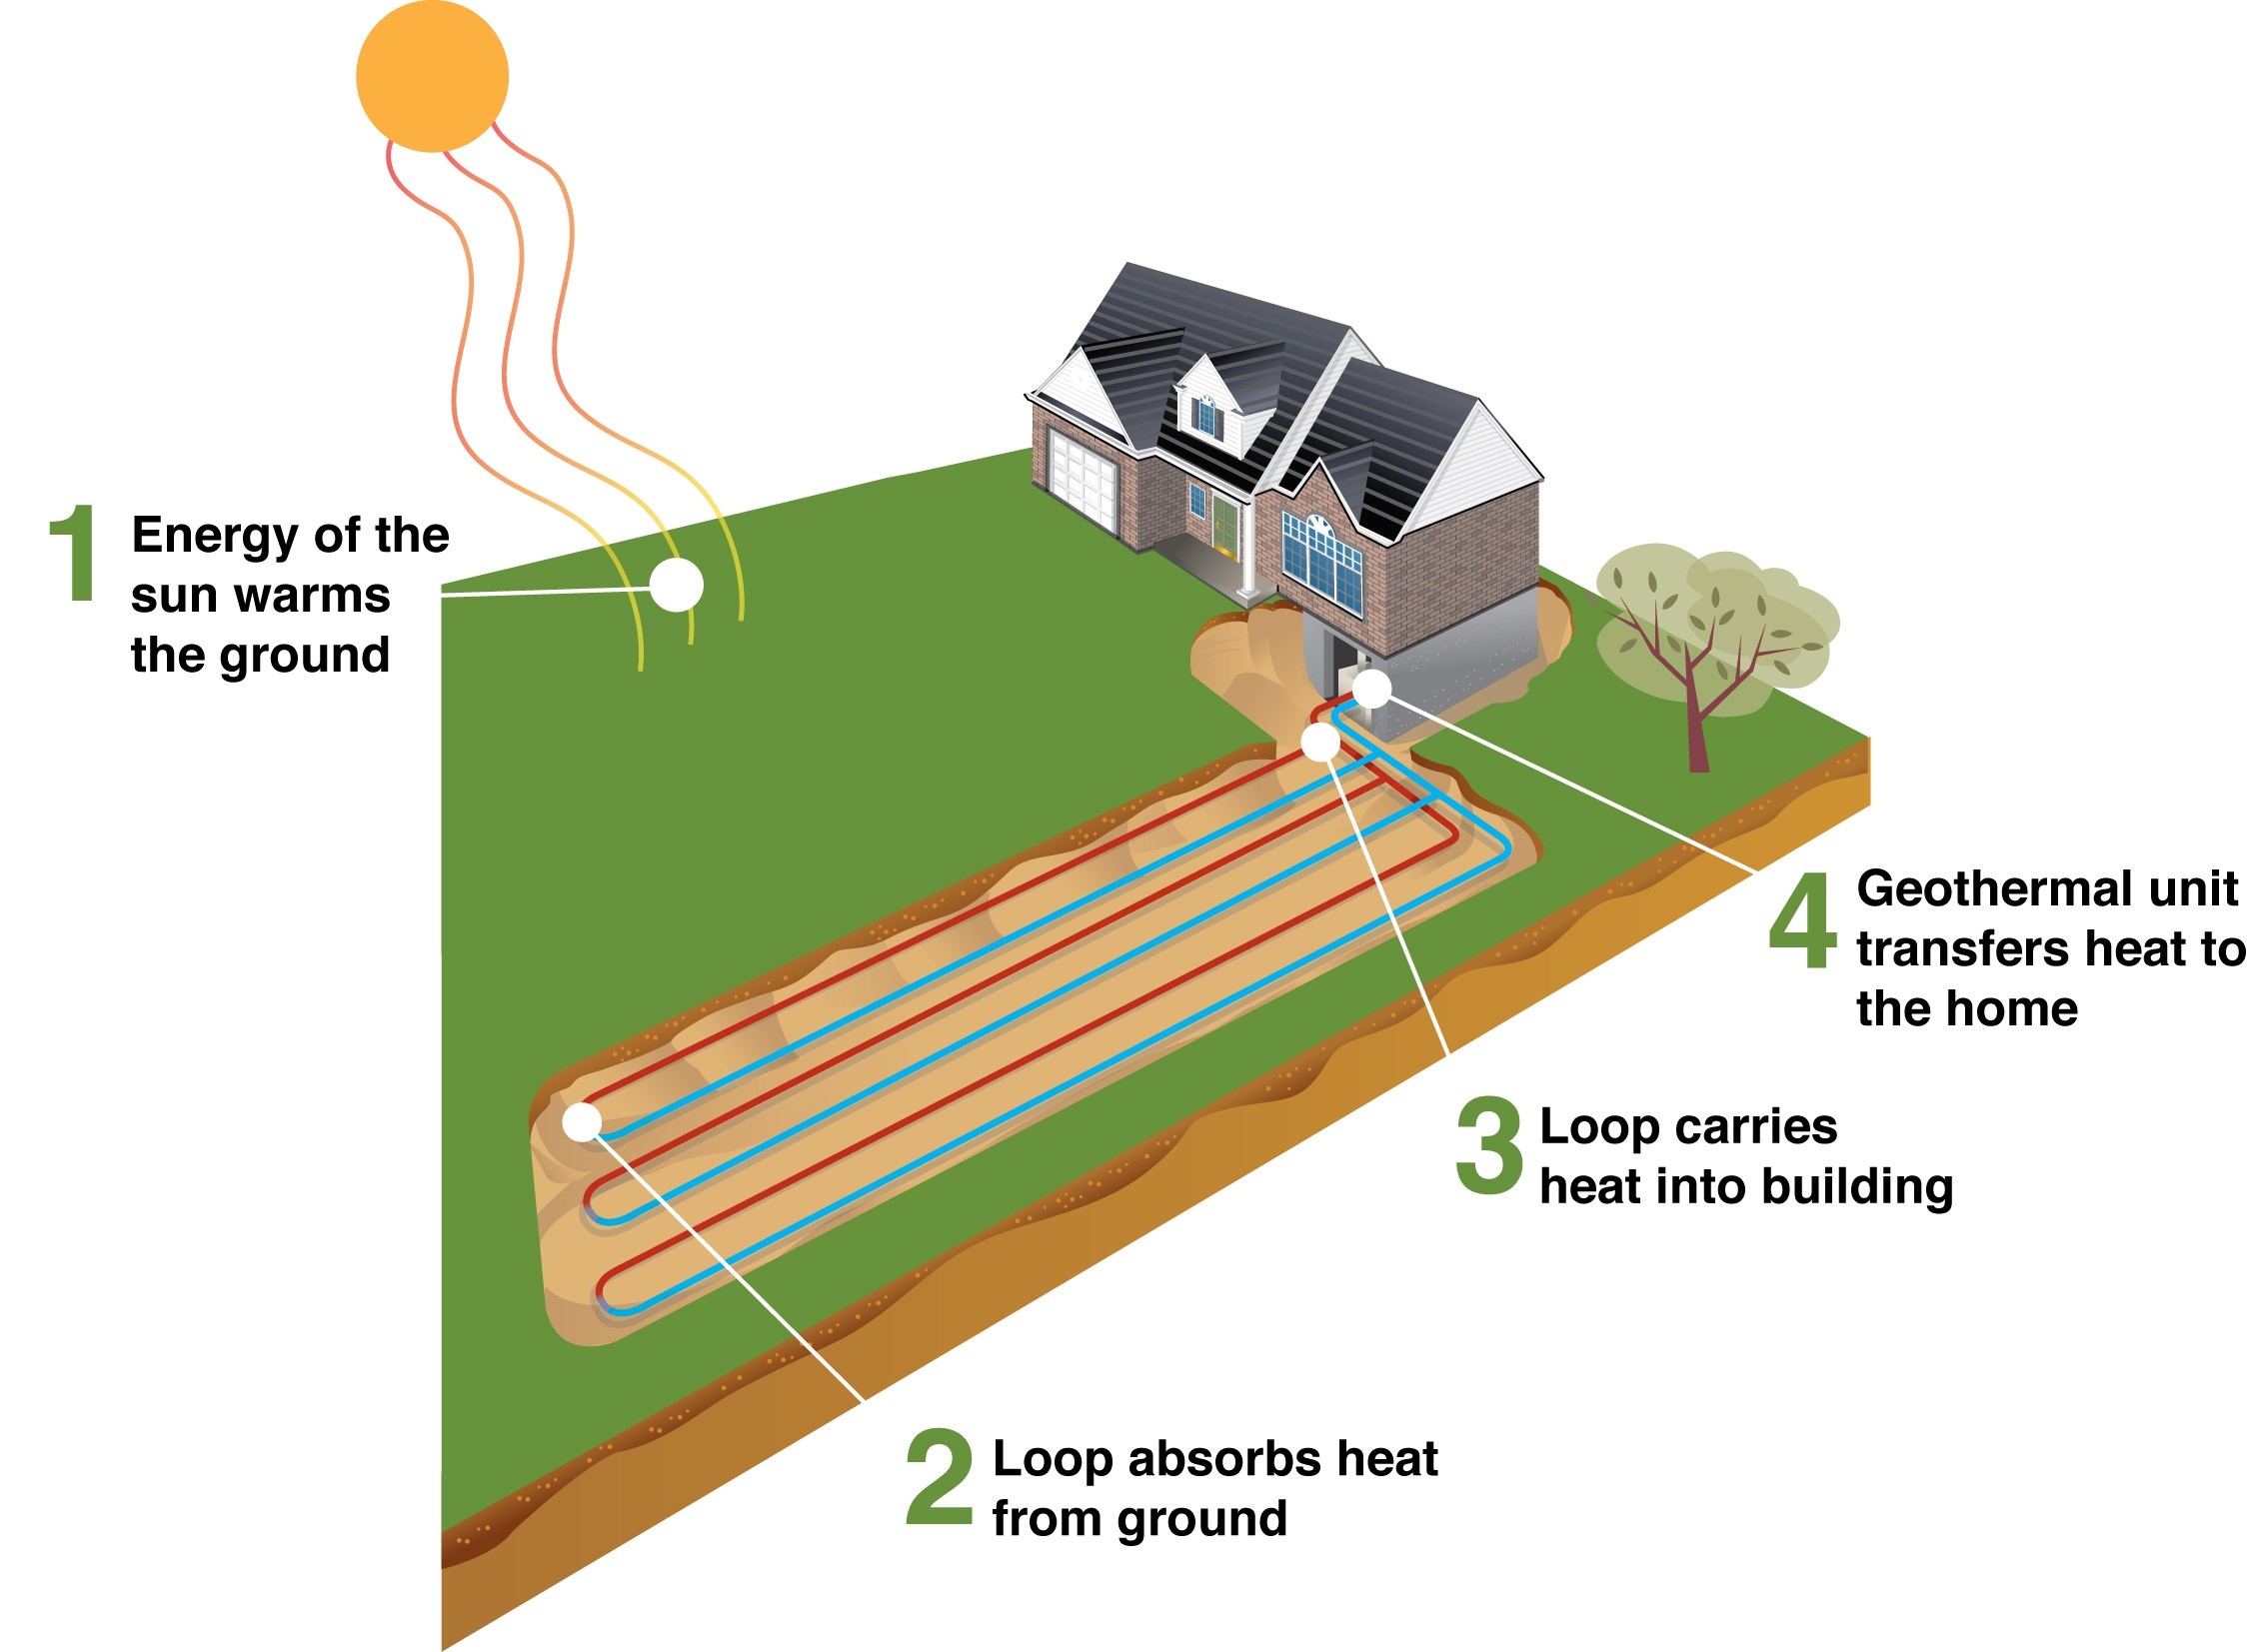
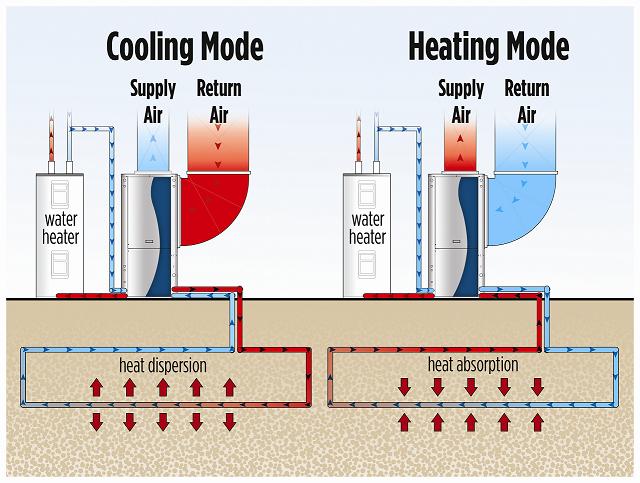
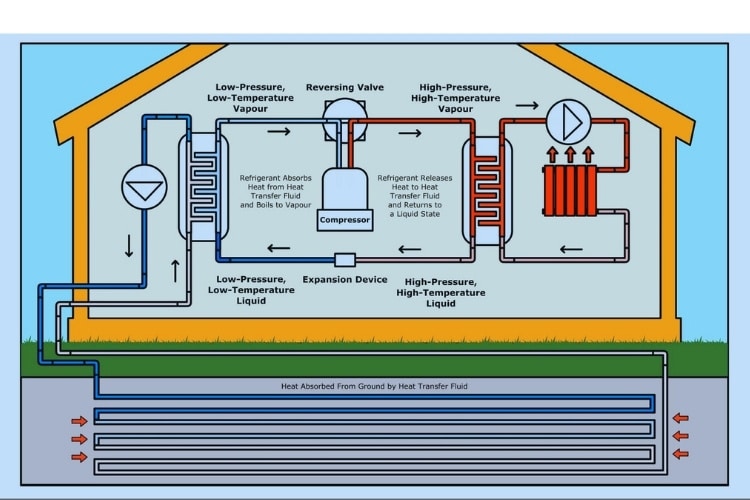
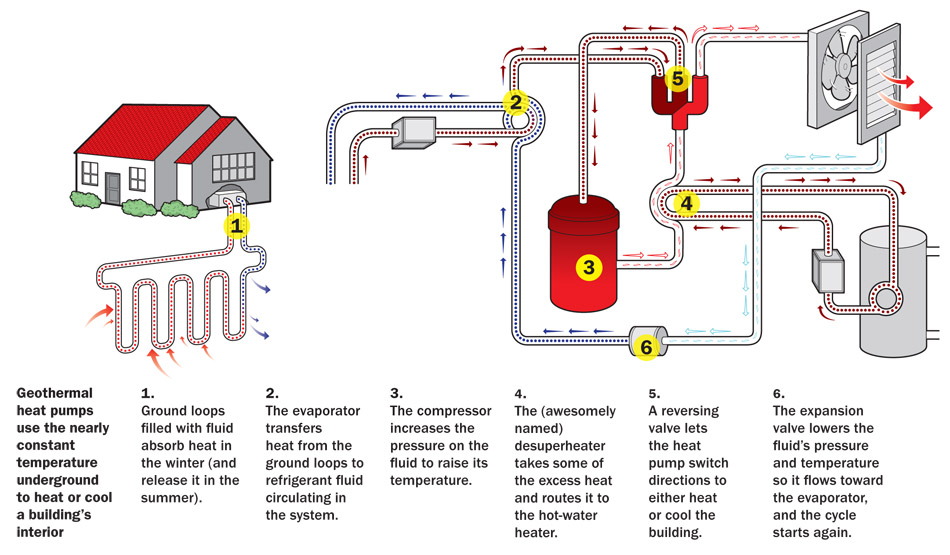
A geothermal heat pump, unlike traditional furnaces or air conditioners, doesn't *create* heat or cold. Instead, it *transfers* it. It leverages the Earth's relatively constant underground temperature (typically between 45-75°F, depending on location) to heat your home in the winter and cool it in the summer. Here's a breakdown of the key components and their roles:
- Ground Loop: This is a closed loop of pipes buried underground, filled with a water and antifreeze solution. It's the heart of the system, absorbing heat from the earth in winter and rejecting heat to the earth in summer.
- Heat Pump Unit: This unit, usually located indoors, contains a compressor, refrigerant, and heat exchangers. It circulates the refrigerant and uses it to transfer heat between the ground loop and your home's air distribution system.
- Air Handler: Similar to a standard furnace blower, the air handler circulates air through your home's ductwork. In heating mode, it blows warm air. In cooling mode, it blows cool air.
- Refrigerant: This is the working fluid that absorbs and releases heat as it cycles through the system.
- Compressor: The compressor is the engine of the heat pump, increasing the pressure and temperature of the refrigerant.
- Thermostat: This controls the system, telling it when to heat or cool the home to maintain the desired temperature.
Troubleshooting: A Step-by-Step Guide
Before you begin, always turn off the power to the geothermal unit at the breaker box. This is crucial for your safety. Then, follow these steps:
Step 1: Check the Thermostat
This is the simplest and often overlooked step. Ensure the thermostat is:
- Set to the correct mode: Is it set to "Heat," "Cool," or "Auto"? Make sure it's in the appropriate mode for the season and your desired outcome.
- Set to the correct temperature: Is the desired temperature set higher (in heating mode) or lower (in cooling mode) than the current room temperature? A common mistake is setting the thermostat too low in heating mode, expecting it to turn on but not realizing the room is already warmer.
- Programmed correctly: If you have a programmable thermostat, double-check that the program is set correctly for the current day and time. An incorrect setting could be preventing the system from running.
- Batteries (if applicable): Many thermostats require batteries. Replace them with fresh batteries to ensure proper operation. Low batteries can cause inaccurate readings and prevent the system from functioning correctly.
Step 2: Inspect the Breaker Box
A tripped breaker is a common cause of heating and cooling system failures. Locate the breaker labeled for your geothermal unit and:
- Check for a tripped breaker: A tripped breaker will usually be in the "off" or "middle" position.
- Reset the breaker: Flip the breaker completely to the "off" position and then back to the "on" position.
- Monitor for repeated tripping: If the breaker trips again immediately or shortly after resetting it, do not continue resetting it. This indicates a more serious electrical problem that requires professional attention. Repeatedly resetting a breaker can damage the breaker itself and potentially cause a fire.
Step 3: Examine the Air Filter
A clogged air filter restricts airflow, which can significantly reduce the efficiency of your geothermal system and even cause it to overheat or freeze up. Locate the air filter (usually near the air handler) and:
- Inspect the filter: Is it visibly dirty or clogged with dust and debris?
- Replace the filter: If the filter is dirty, replace it with a new filter of the correct size and type. Most filters have the size printed on the frame. Using the wrong size can damage the equipment.
- Establish a regular replacement schedule: Aim to replace your air filter every 1-3 months, depending on usage and air quality. A clean filter improves air quality and system efficiency.
Step 4: Check the Outdoor Unit (If Applicable)
While geothermal systems primarily rely on underground loops, some have outdoor components, such as a fan for additional cooling. Inspect these components for:
- Obstructions: Ensure the outdoor unit is free from obstructions, such as leaves, snow, or ice. These can restrict airflow and reduce efficiency.
- Debris: Remove any debris that may be blocking the unit.
- Icing: If the unit is icing up, do not attempt to chip away the ice. This can damage the unit. Instead, consult a professional.
Step 5: Listen for Unusual Noises
Pay attention to any unusual noises coming from the geothermal unit or the air handler. These noises can provide clues about potential problems:
- Grinding or squealing: This could indicate a problem with the blower motor or compressor, which requires professional repair.
- Hissing: A hissing sound could indicate a refrigerant leak, which is a serious problem that needs immediate attention from a qualified technician. Refrigerant leaks can be harmful to the environment and potentially dangerous.
- Banging: A banging sound could indicate loose components or problems with the ductwork.
Step 6: Check the Condensate Drain Line
In cooling mode, your geothermal system generates condensation, which is drained away through a condensate drain line. A clogged drain line can cause water to back up and shut down the system. To check the drain line:
- Locate the drain line: It's usually a PVC pipe near the indoor unit.
- Check for clogs: Look for any visible clogs or obstructions in the drain line.
- Clear the drain line: You can try using a wet/dry vacuum to suck out any clogs. Be careful not to damage the pipe. Alternatively, you can use a stiff wire to gently dislodge any obstructions.
- Pour a cup of vinegar: Pouring a cup of vinegar down the drain line can help prevent future clogs by killing algae and bacteria.
Step 7: Inspect the Circulation Pump (If Accessible)
The circulation pump moves the water/antifreeze solution through the ground loop. Access to this pump may require specialized knowledge or tools. If you are not comfortable working with plumbing or electrical components, skip this step and contact a professional. If you can safely access the pump:
- Check for leaks: Look for any signs of leaks around the pump.
- Listen for unusual noises: A noisy pump could indicate a problem with the bearings or impeller.
- Ensure it's running: Carefully feel the pump (if safe to do so) to see if it's vibrating, indicating it's running. Be extremely careful around electrical components.
When to Call a Professional
While these troubleshooting steps can help you identify and potentially fix some common problems, there are situations where you should always call a qualified HVAC technician. Never attempt repairs that you are not comfortable with or that involve complex electrical or plumbing work. Here are some scenarios that warrant professional attention:
- Refrigerant Leaks: Handling refrigerant requires specialized equipment and training. Refrigerant is harmful and can cause serious health problems if mishandled.
- Compressor Problems: The compressor is a complex and expensive component. Diagnosing and repairing compressor issues requires specialized knowledge and equipment.
- Electrical Problems: Working with electricity can be dangerous. Never attempt to repair electrical components unless you are a qualified electrician.
- Ground Loop Issues: Problems with the ground loop, such as leaks or clogs, require specialized equipment and expertise to diagnose and repair.
- Unusual Noises: Persistent or loud unusual noises coming from the system can indicate serious mechanical problems that require professional attention.
- Repeated Breaker Tripping: If the breaker for your geothermal system trips repeatedly, it indicates a serious electrical problem that needs to be addressed by a qualified electrician.
- You're Unsure: If you've gone through the troubleshooting steps and are still unsure about the cause of the problem, it's always best to err on the side of caution and call a professional.
Safety First!
Safety should always be your top priority when troubleshooting any appliance. Remember these key safety precautions:
- Turn off the power: Always turn off the power to the geothermal unit at the breaker box before performing any maintenance or repairs.
- Wear appropriate safety gear: Wear safety glasses and gloves when working on any appliance.
- Never work with wet hands: Avoid working with electrical components when your hands are wet.
- Be careful around sharp objects: Be careful when handling tools and working around sharp objects.
- If in doubt, call a professional: If you are unsure about any aspect of the troubleshooting process, it's always best to call a qualified technician.
Preventative Maintenance
The best way to avoid geothermal system problems is to perform regular preventative maintenance. This includes:
- Changing the air filter regularly: As mentioned earlier, a clean air filter is essential for efficient operation.
- Inspecting the system annually: Have a qualified HVAC technician inspect your geothermal system annually to identify and address any potential problems before they become major issues.
- Cleaning the outdoor unit: Regularly clean the outdoor unit (if applicable) to remove any debris that may be blocking airflow.
- Maintaining the ground loop: While the ground loop requires minimal maintenance, it's important to have it inspected periodically to ensure there are no leaks or clogs.
By following these troubleshooting steps and prioritizing preventative maintenance, you can help keep your geothermal system running smoothly and efficiently for years to come. Remember, when in doubt, always call a professional.