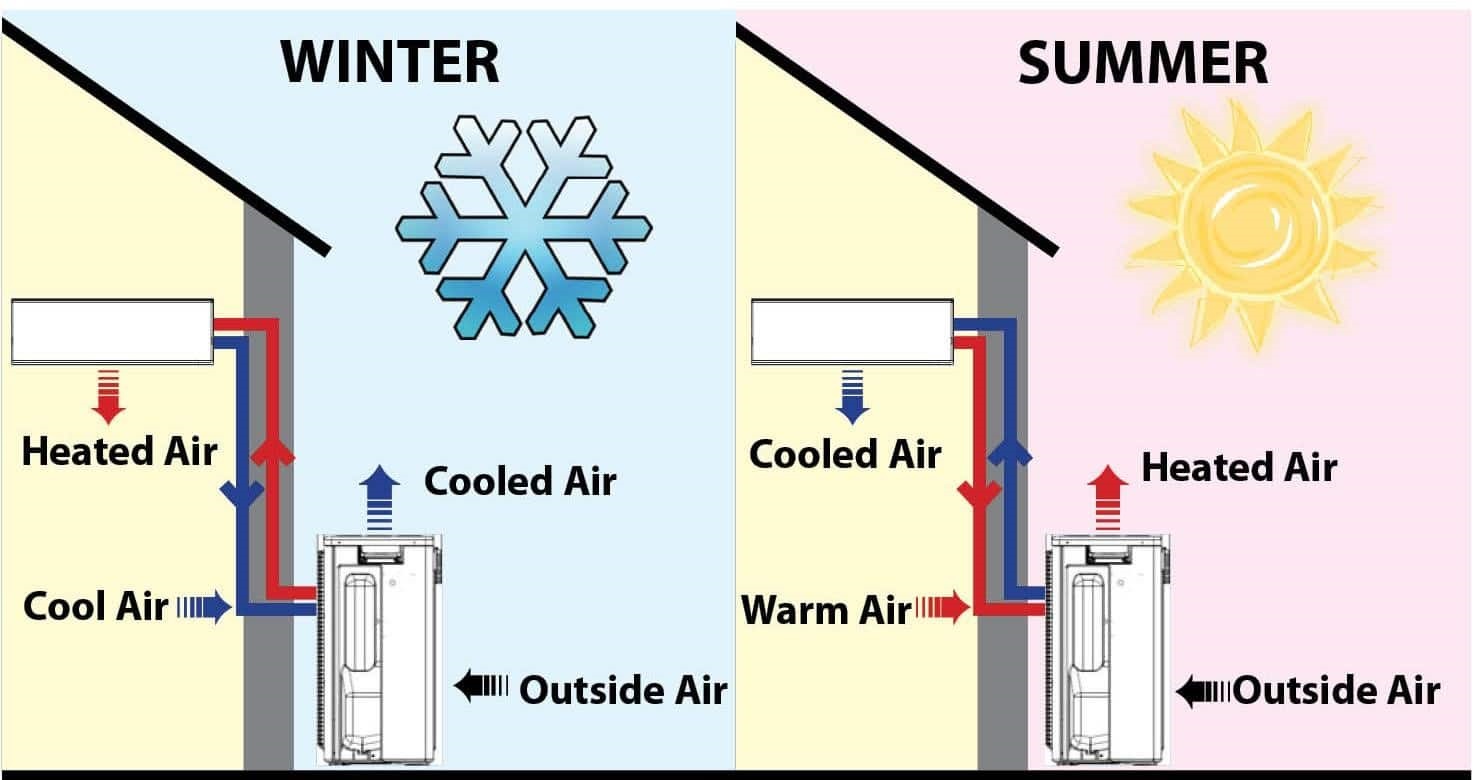
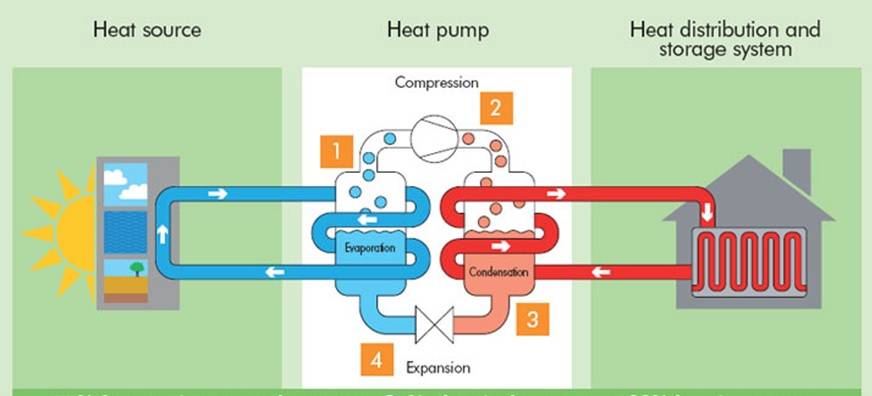
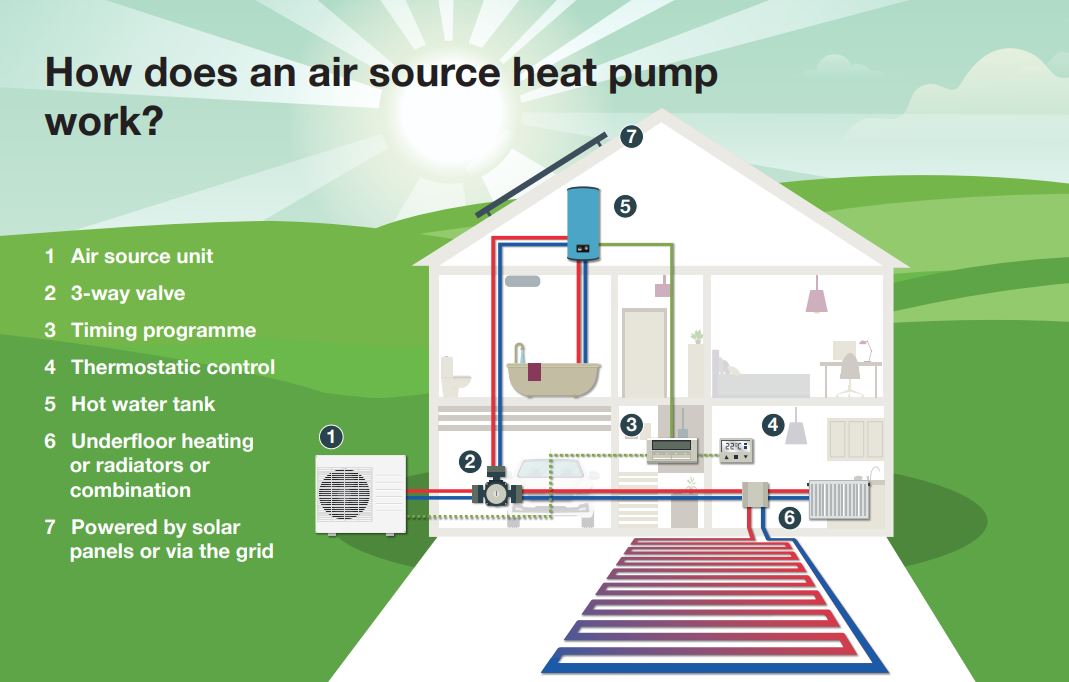
How Do Air Source Heat Pumps Work
Let's face it: your air source heat pump is supposed to keep you comfortable year-round, providing efficient heating in the winter and cooling in the summer. But what happens when it suddenly stops doing its job? A common frustration homeowners encounter is inconsistent heating or cooling. You might notice some rooms are much colder or warmer than others, or the system seems to run constantly without ever reaching the desired temperature. Before you call for expensive professional help, let's walk through some troubleshooting steps you can take.
Diagnosing the Problem: A Step-by-Step Approach
The key to fixing the issue is identifying the root cause. Follow these steps systematically to narrow down the potential problems:
Step 1: The Obvious Checks (No Tools Required)
Start with the easiest and most common culprits. These checks require no tools and can often resolve simple issues.
- Check the Thermostat: Is it set to Heat in the winter or Cool in the summer? Is the set temperature significantly different from the current room temperature? Make sure the thermostat is actually calling for heating or cooling. A simple fix could be that the thermostat lost power and needs new batteries. Some thermostats have a "hold" or "schedule" setting. Make sure it is set to "hold" to override any preprogrammed schedules.
- Inspect the Air Filter: A dirty air filter is the most common cause of poor heat pump performance. A clogged filter restricts airflow, forcing the system to work harder and reducing its efficiency. Check the filter – if it's visibly dusty or dirty, replace it immediately. This is a crucial maintenance task you should perform regularly (every 1-3 months) for optimal performance.
- Inspect the Outdoor Unit: Take a walk outside to your heat pump. Is the unit free from obstructions? Make sure there is nothing directly next to it, or within several feet of it. Snow, ice, leaves, or debris can block airflow, preventing the heat pump from extracting heat from the air (in heating mode) or releasing heat to the air (in cooling mode). Clear away any visible obstructions around the outdoor unit. Be careful not to damage the fins on the unit.
- Check the Breaker: Locate the circuit breaker that controls your heat pump. Make sure it hasn't tripped. If it has, reset the breaker and see if the problem resolves itself. If the breaker trips repeatedly, this indicates a more serious electrical issue requiring professional attention.
- Air Vents: Check to make sure that all vents are unobstructed. Furniture and rugs can block the airflow, and restrict your home's ability to heat or cool a specific room. Check dampers on the vents and make sure that they are open to the desired setting.
Step 2: Basic Checks with Simple Tools
If the initial checks didn't solve the problem, these next steps require some basic tools, but are still within the scope of most homeowners.
- Multi-meter: A multi-meter can be used to test the voltage across the breaker. Only perform this task if you are comfortable and experienced working with electrical circuits. If not, call a professional. First, turn off the breaker. Remove the panel cover to access the breaker, expose the wire terminals, and make sure that they are securely fastened. Replace the panel cover, turn the breaker back on, and use the multi-meter to measure the voltage across the breaker terminals. This reading should match the voltage marked on the breaker (typically 120V or 240V). A reading that's significantly off indicates a faulty breaker that needs to be replaced.
- Fin Comb: The aluminum fins on the outdoor unit can easily bend. These bent fins can significantly reduce airflow and efficiency. Use a fin comb to gently straighten any bent fins. This simple tool can be purchased at most hardware stores.
- Ice Removal: If your heat pump is in heating mode and the outdoor unit is covered in ice, it might be struggling to defrost properly. Most heat pumps have a defrost cycle, but sometimes it malfunctions. You can try to manually remove the ice with warm water. Never use sharp objects as you could damage the fins. If the icing persists, the defrost cycle might be faulty and require professional repair.
Step 3: Identifying Potential Issues (Visual Inspection)
These steps involve visual inspections that can help pinpoint potential problems without requiring specialized tools. However, remember to exercise caution and avoid touching any electrical components.
- Refrigerant Leaks: Look for signs of refrigerant leaks around the outdoor unit or along the refrigerant lines. These signs include oily residue or ice buildup on the lines. Refrigerant leaks require immediate professional attention, as refrigerant is harmful to the environment and can affect your health.
- Condensate Drain: In cooling mode, the heat pump produces condensate (water). Check the condensate drain line to ensure it's not clogged. A clogged drain line can cause water damage and reduce the system's cooling efficiency. You may see water staining around the indoor unit. A wet/dry vacuum can be used to clear the drain line.
- Ductwork: Inspect the visible ductwork for any obvious leaks or damage. Duct tape can be used to seal small leaks, but larger issues may require professional duct sealing.
DIY Actions You Can Take (Safely)
Based on your diagnosis, here are some simple and safe DIY actions you can take:
- Replace the Air Filter: As mentioned earlier, this is the most common and easily resolved issue. Keep a supply of clean air filters on hand for regular replacement.
- Clear Obstructions: Keep the area around the outdoor unit clear of debris, snow, ice, and vegetation.
- Reset the Breaker: If the breaker tripped, try resetting it. However, if it trips repeatedly, call an electrician.
- Straighten Fins: Use a fin comb to carefully straighten any bent fins on the outdoor unit.
- Clear Condensate Drain: Use a wet/dry vacuum to clear a clogged condensate drain line.
- Seal Duct Leaks: Use duct tape to seal small leaks in the visible ductwork.
When to Call a Professional HVAC Technician
While many issues can be resolved with simple troubleshooting and DIY actions, some problems are best left to the professionals. Call a qualified HVAC technician immediately if you encounter any of the following:
- Refrigerant Leaks: Handling refrigerant requires specialized equipment and training.
- Electrical Problems: Any issues involving wiring, capacitors, or other electrical components should be handled by a qualified electrician or HVAC technician.
- Compressor Issues: The compressor is the heart of the heat pump. If you suspect a compressor problem (e.g., unusual noises, failure to start), call a professional.
- Defrost Cycle Problems: If the heat pump is icing up repeatedly, the defrost cycle might be faulty.
- Major Ductwork Damage: Significant ductwork damage or leaks require professional repair or replacement.
- You're Uncomfortable Working on the System: If at any point you feel unsure or uncomfortable working on the heat pump, stop immediately and call a professional. It's better to be safe than sorry.
- System is Old or Inefficient: If your heat pump is old and inefficient, even after repairs, it might be time to consider a replacement. A new, energy-efficient heat pump can save you money on your energy bills in the long run.
- The Problem Persists: If you've tried all the DIY steps and the problem still exists, it's time to call in the experts.
Preventative Maintenance for Heat Pumps
To avoid unexpected breakdowns and ensure optimal performance, regular preventative maintenance is crucial. Here are some tips:
- Schedule Annual Professional Maintenance: Have a qualified HVAC technician inspect and tune up your heat pump annually. This includes cleaning the coils, checking refrigerant levels, inspecting electrical components, and lubricating moving parts.
- Change Air Filters Regularly: As mentioned earlier, replace the air filter every 1-3 months.
- Keep the Outdoor Unit Clean: Clear away any debris, snow, ice, or vegetation around the outdoor unit.
- Monitor System Performance: Pay attention to how your heat pump is performing. If you notice any unusual noises, reduced heating or cooling capacity, or other problems, address them promptly.
By following these troubleshooting steps and preventative maintenance tips, you can keep your air source heat pump running smoothly and efficiently for years to come. Remember, safety is always the top priority. When in doubt, call a professional.