How Do You Install A Mini Split
Imagine this: It's a scorching summer day, and you've just arrived home, eager to be greeted by the cool embrace of your mini-split air conditioner. But instead of a refreshing breeze, you're met with… nothing. A malfunctioning mini-split can be incredibly frustrating, but before you call in the professionals, let's explore some basic troubleshooting steps you can take yourself. This guide will walk you through common issues and safe, DIY fixes.
Safety First!
Before we dive in, safety is paramount. Always remember:
- Disconnect the power: Turn off the breaker supplying power to the mini-split unit before attempting any troubleshooting.
- Never work on gas lines: Refrigerant lines in a mini-split contain pressurized gas. Do not attempt to repair these yourself. Contact a qualified HVAC technician for any refrigerant-related issues.
- If unsure, seek professional help: If any step makes you uncomfortable or you lack the necessary skills, call a licensed electrician or HVAC technician.
Step 1: Power Check – Is it Even On?
The most obvious, yet often overlooked, step is verifying the power supply.
Checking the Breaker
The breaker is your first stop. Locate the breaker in your electrical panel that controls the mini-split unit. It's typically labeled, but if not, you might need to test each breaker (carefully!) to identify the correct one.
- Look for a tripped breaker: A tripped breaker is usually in the "off" or a middle position.
- Reset the breaker: Flip the breaker completely to the "off" position and then back to the "on" position.
- Test the unit: See if the mini-split now powers on. If it trips again immediately, do not keep resetting it. This indicates a more serious electrical fault that requires professional attention.
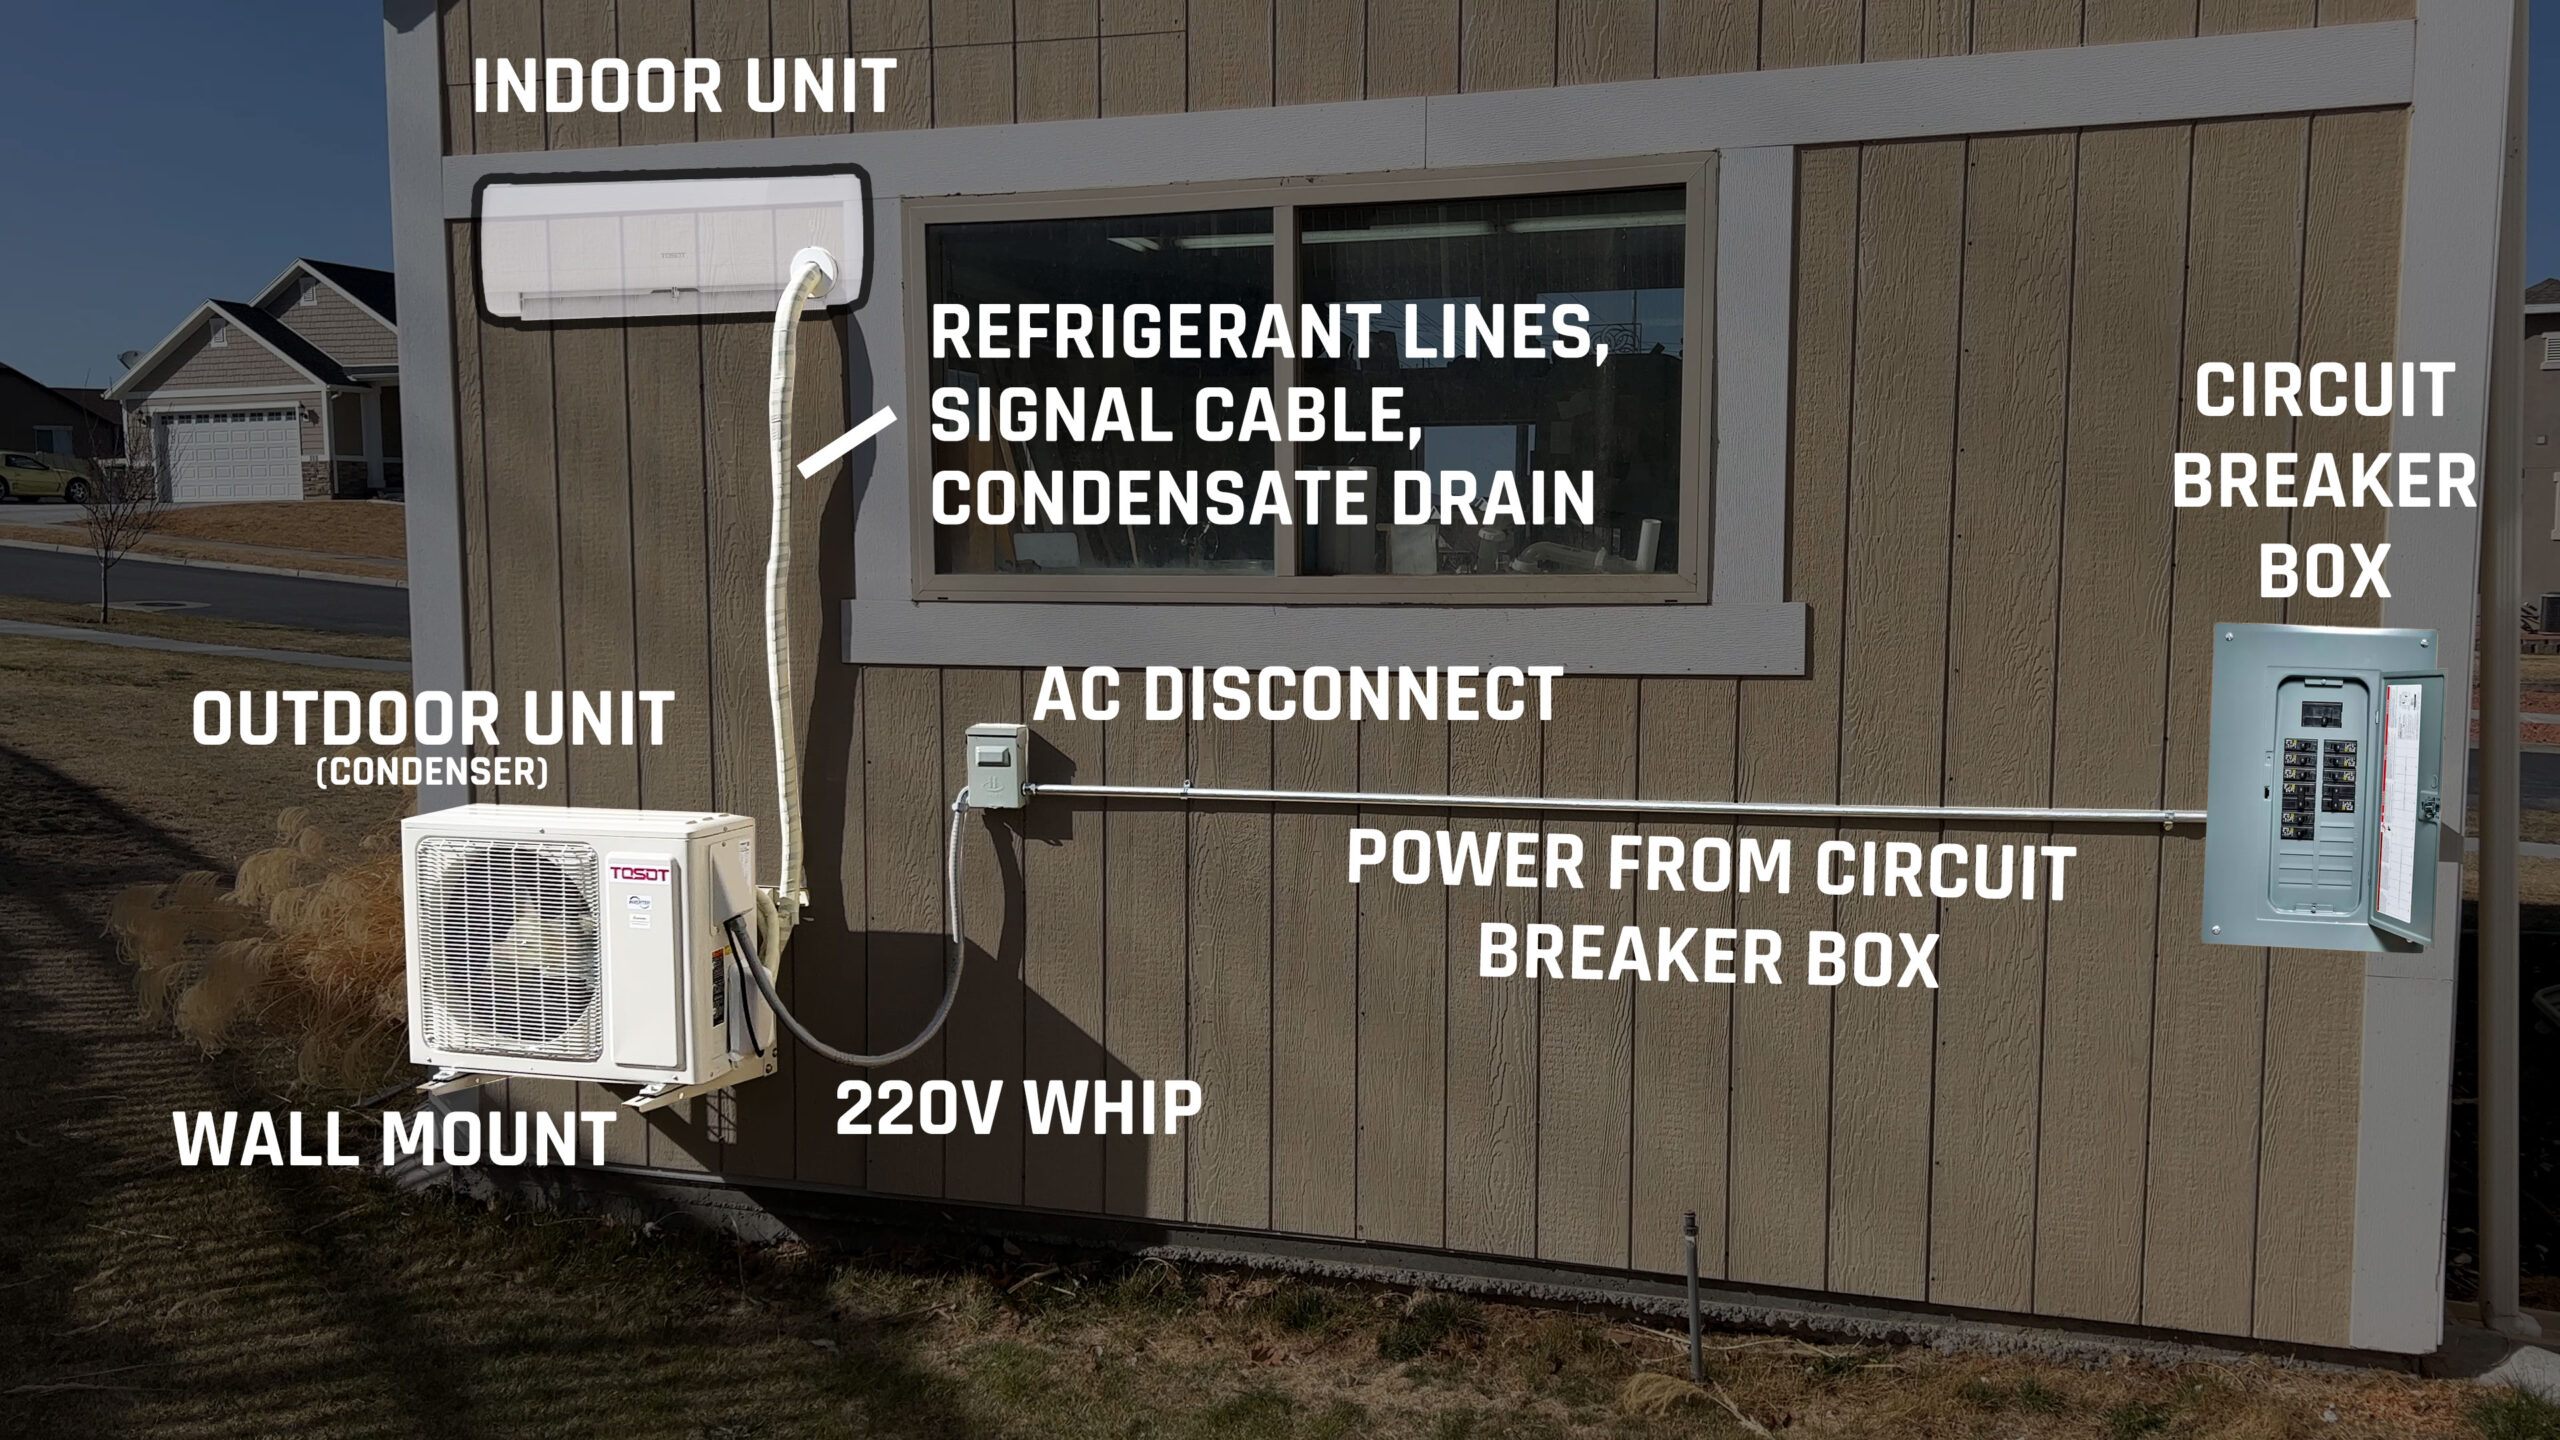
Examining the Disconnect Switch
Many mini-split systems have an additional disconnect switch located near the outdoor unit. This is a safety switch that allows you to cut power to the unit for servicing.
- Locate the disconnect switch: Look for a small box with a handle or a switch lever near the outdoor unit.
- Ensure it's in the "on" position: The switch should be flipped to the "on" position to allow power to flow to the unit.
Remote Control Batteries
Don't forget the basics! A dead remote means no control over your mini-split.
- Replace the batteries: Install fresh batteries in the remote control.
- Test the remote: Point the remote at the indoor unit and press the power button. Look for a response (a beep, a light, or the unit turning on).
- Check for obstructions: Make sure nothing is blocking the remote's signal to the indoor unit.
Step 2: Settings Review – Is it Set Up Correctly?
Sometimes the problem isn't a malfunction, but a simple settings issue.
Mode Selection
Ensure the mini-split is set to the correct mode (cool, heat, auto, etc.).
- Select the desired mode: Use the remote to select the cooling mode (usually a snowflake symbol) if you want cool air, or the heating mode (usually a sun symbol) if you want warm air.
- Auto mode: In auto mode, the unit will automatically switch between heating and cooling based on the room temperature.
Temperature Setting
Is the temperature set low enough (for cooling) or high enough (for heating)?
- Adjust the temperature: Lower the temperature setting for cooling or raise it for heating.
- Allow time to adjust: Give the unit some time to reach the set temperature. It may take several minutes to notice a change.
Fan Speed
A low fan speed might make it seem like the unit isn't working effectively.
- Increase the fan speed: Use the remote to increase the fan speed. A higher fan speed will circulate air more quickly.
Timer Settings
Accidental timer settings can prevent the unit from operating when you expect it to.
- Disable any timer settings: Check the remote and the unit's display for any active timer settings. Disable them if you want the unit to run continuously.
Step 3: Filter Inspection – Is Airflow Restricted?
Dirty filters are a common culprit behind reduced cooling or heating performance.
Locating the Filters
The air filters are typically located behind a panel on the indoor unit.
- Consult the manual: Refer to your mini-split's user manual for the exact location and removal instructions.
Cleaning the Filters
Clean filters allow for optimal airflow and efficiency.
- Remove the filters: Carefully remove the filters from the unit.
- Vacuum the filters: Use a vacuum cleaner with a brush attachment to remove dust and debris.
- Wash the filters (optional): Some filters can be washed with mild soap and water. Allow them to dry completely before reinstalling. Consult your user manual for specific washing instructions.
- Reinstall the filters: Ensure the filters are properly seated in the unit.
Step 4: Outdoor Unit Inspection – Is Something Blocking It?
The outdoor unit needs adequate airflow to function properly.
Clearing Obstructions
Check for any obstructions blocking the outdoor unit, such as leaves, branches, or snow.
- Remove debris: Clear away any debris from around the unit.
- Ensure adequate clearance: Make sure there is sufficient space around the unit for proper airflow (usually at least 12 inches).
Checking the Fins
The fins on the outdoor unit help dissipate heat. Bent or damaged fins can reduce efficiency.
- Inspect the fins: Look for bent or damaged fins.
- Straighten bent fins: Use a fin comb (available at most hardware stores) to gently straighten any bent fins. Be careful not to damage the fins further.
Ice Buildup
During winter, ice can accumulate on the outdoor unit, especially if the unit is operating in heating mode.
- Check for ice buildup: Inspect the outdoor unit for ice accumulation.
- Allow the unit to defrost: If ice is present, try turning off the unit for a few hours to allow it to defrost naturally.
- Do not use sharp objects: Never use sharp objects to remove ice, as this could damage the unit.
- If icing persists: If icing continues to be a problem, consult a professional, as this could indicate a refrigerant leak or other issue.
Step 5: Simple Part Replacements (with Caution)
Some simple parts, like capacitors, might be replaceable by a handy homeowner, but proceed with extreme caution and only if you're comfortable with basic electrical work.
Identifying the Capacitor (Leave this to professionals if unsure)
Capacitors are electrical components that help start and run the motor in the outdoor unit. A failing capacitor can prevent the unit from starting.
- Locate the capacitor: The capacitor is typically located inside the electrical compartment of the outdoor unit. Power must be disconnected!
- Identify the correct capacitor: Note the voltage and microfarad (µF) rating of the capacitor. You'll need to purchase a replacement with the exact same specifications.
Replacing the Capacitor (Leave this to professionals if unsure)
Important: Capacitors can store an electrical charge even after the power is disconnected. Discharge the capacitor before handling it. This is extremely important for safety! You can discharge it using a screwdriver with an insulated handle by shorting the terminals. Use extreme caution!
- Disconnect the wires: Carefully disconnect the wires from the old capacitor, noting their positions.
- Connect the wires to the new capacitor: Connect the wires to the new capacitor in the same positions as they were on the old one.
- Reassemble the unit: Reassemble the electrical compartment and restore power to the unit.
If you are uncomfortable with any of these steps, DO NOT attempt to replace the capacitor yourself. Contact a qualified HVAC technician.
When to Call a Professional
While these troubleshooting steps can resolve many common mini-split issues, some problems require the expertise of a qualified technician. Call a professional if you encounter any of the following:
- Refrigerant leaks: If you suspect a refrigerant leak (e.g., hissing sound, oily residue), do not attempt to repair it yourself. Refrigerant leaks require specialized equipment and knowledge.
- Electrical problems: If you suspect an electrical problem (e.g., burning smell, sparking), do not attempt to repair it yourself. Electrical problems can be dangerous.
- Compressor issues: The compressor is the heart of the cooling system. If you suspect a compressor issue, do not attempt to repair it yourself. Compressor repairs require specialized equipment and knowledge.
- Complex repairs: If you're unsure about any repair or if the problem persists after trying these troubleshooting steps, it's best to call a professional.
- Unit is still under warranty: Attempting repairs yourself while the unit is under warranty may void the warranty.
Preventative Maintenance
Regular maintenance can help prevent many mini-split problems and extend the life of your unit.
- Clean the filters regularly: Clean the air filters every month or two, or more often if you have pets or allergies.
- Clean the outdoor unit: Clean the outdoor unit annually to remove debris and ensure proper airflow.
- Schedule professional maintenance: Schedule professional maintenance at least once a year to have the unit inspected and serviced.
By following these troubleshooting steps, you can often diagnose and resolve minor mini-split issues yourself. Remember to prioritize safety and call a professional when necessary. With a little care and attention, you can keep your mini-split running smoothly and efficiently for years to come.


:no_upscale()/cdn.vox-cdn.com/uploads/chorus_asset/file/19497040/03_heat_pump.jpg)