How Does A Car Ac System Work
The Chilling Truth: Understanding How Your Car's AC System Works
When the summer heat turns your car into an oven, a functioning air conditioning (AC) system is more than a luxury – it's a necessity. But have you ever wondered how this complex system actually cools you down? Let's break down the components and processes involved in keeping you comfortable on the road.
The Core Components: A Quick Overview
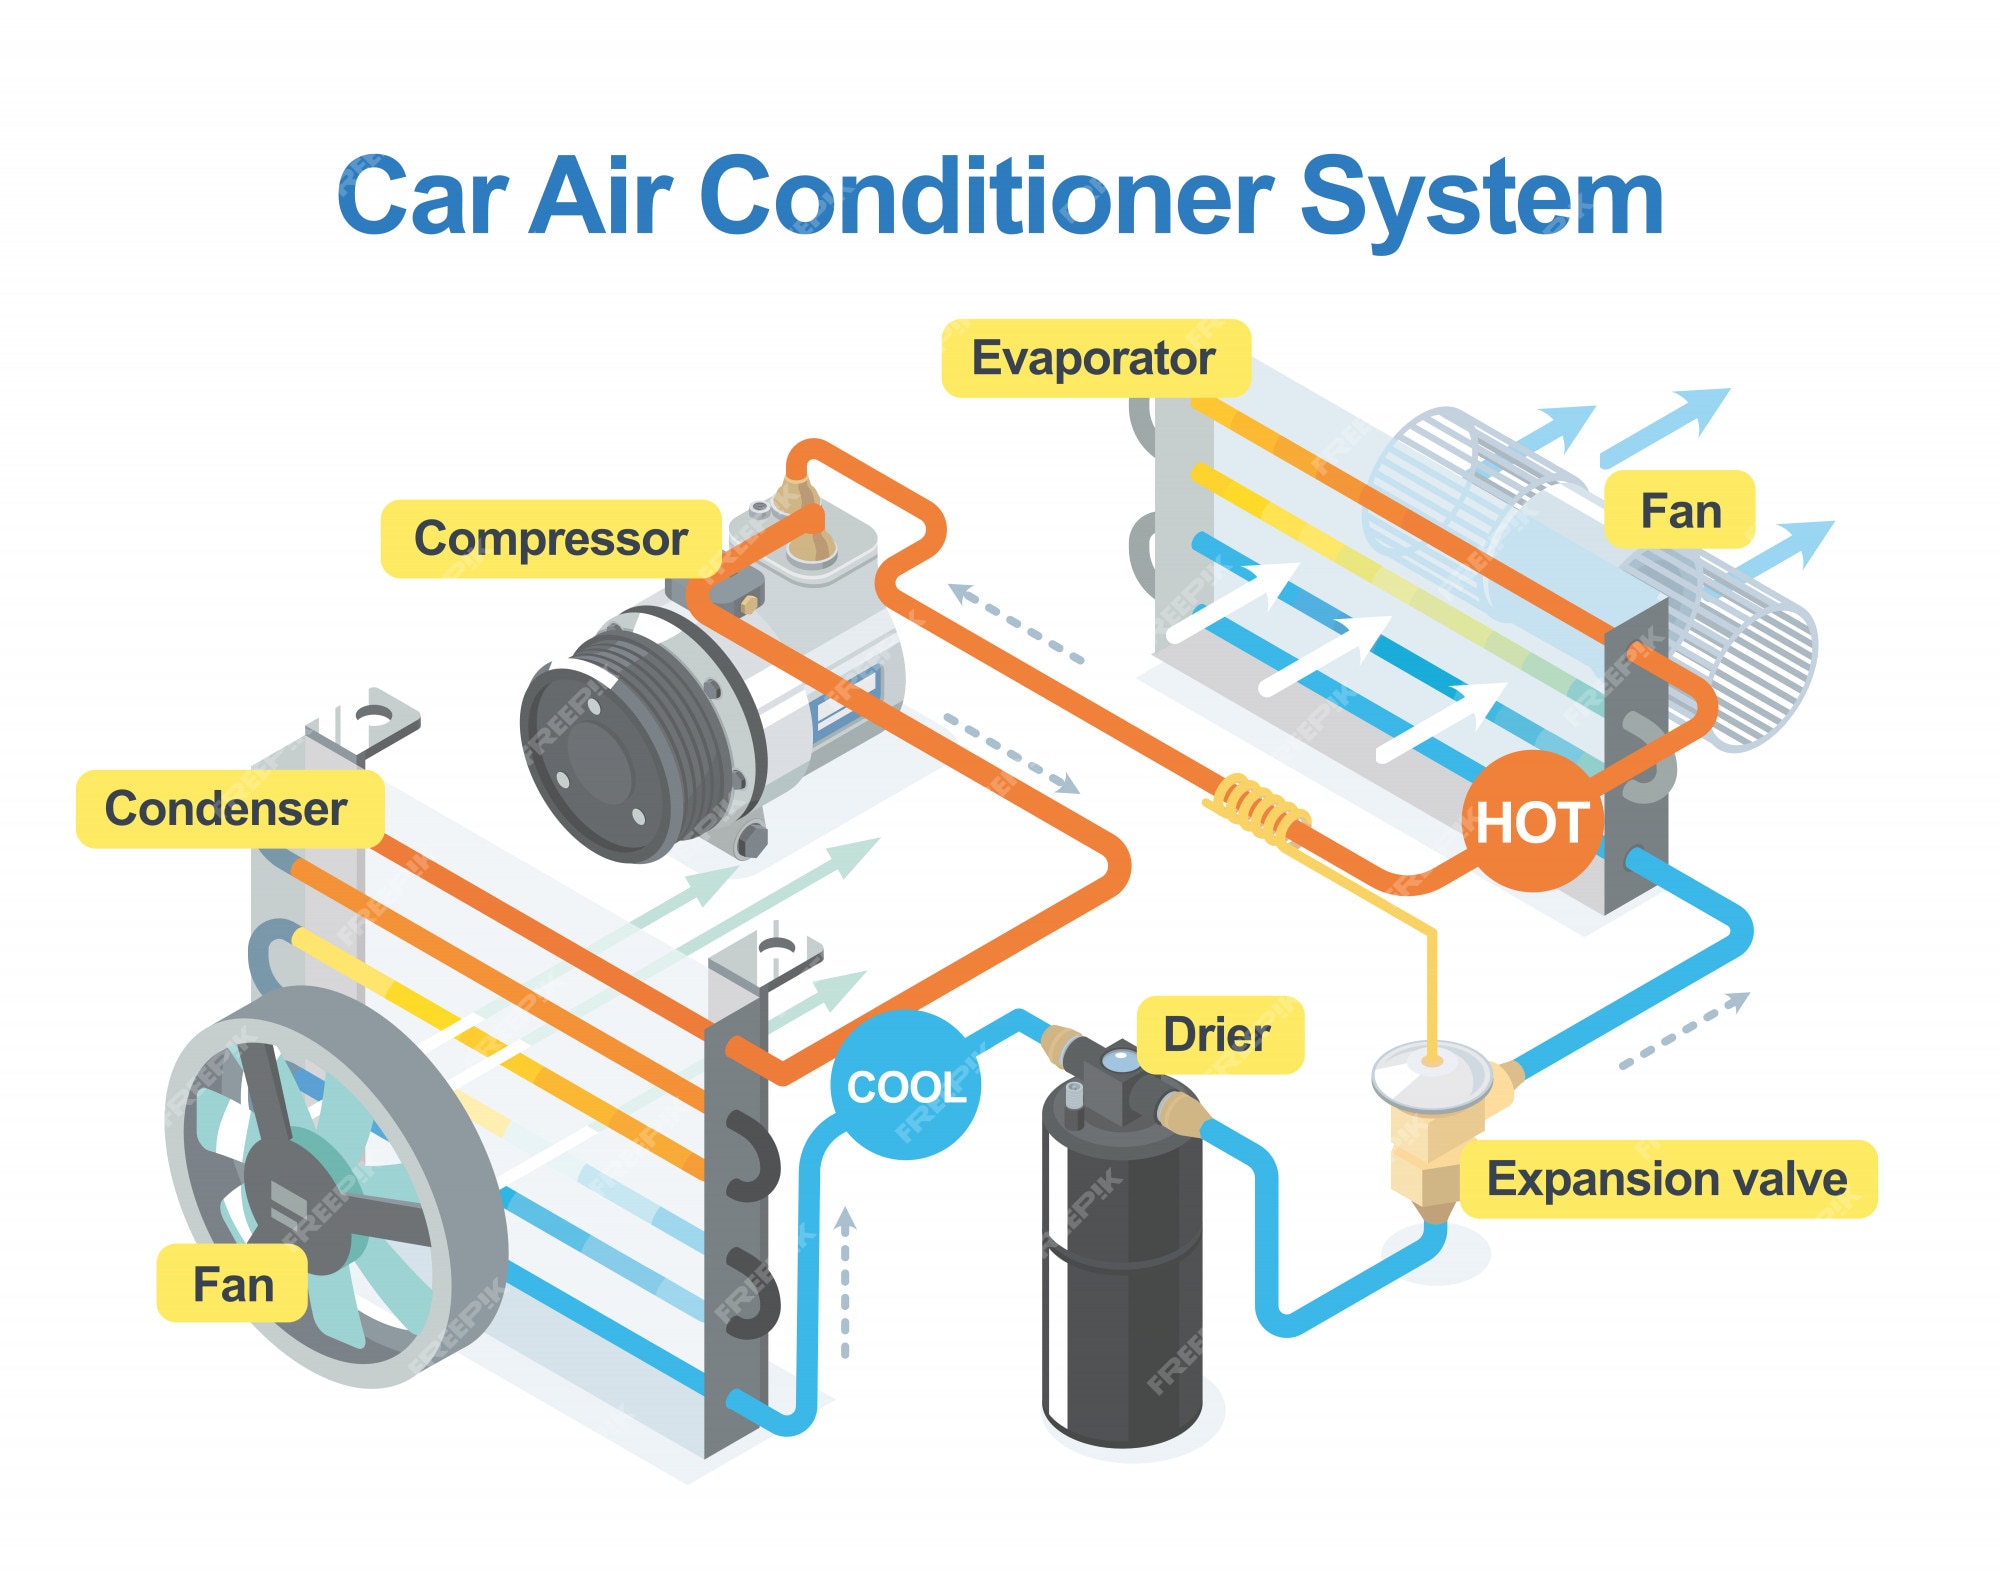
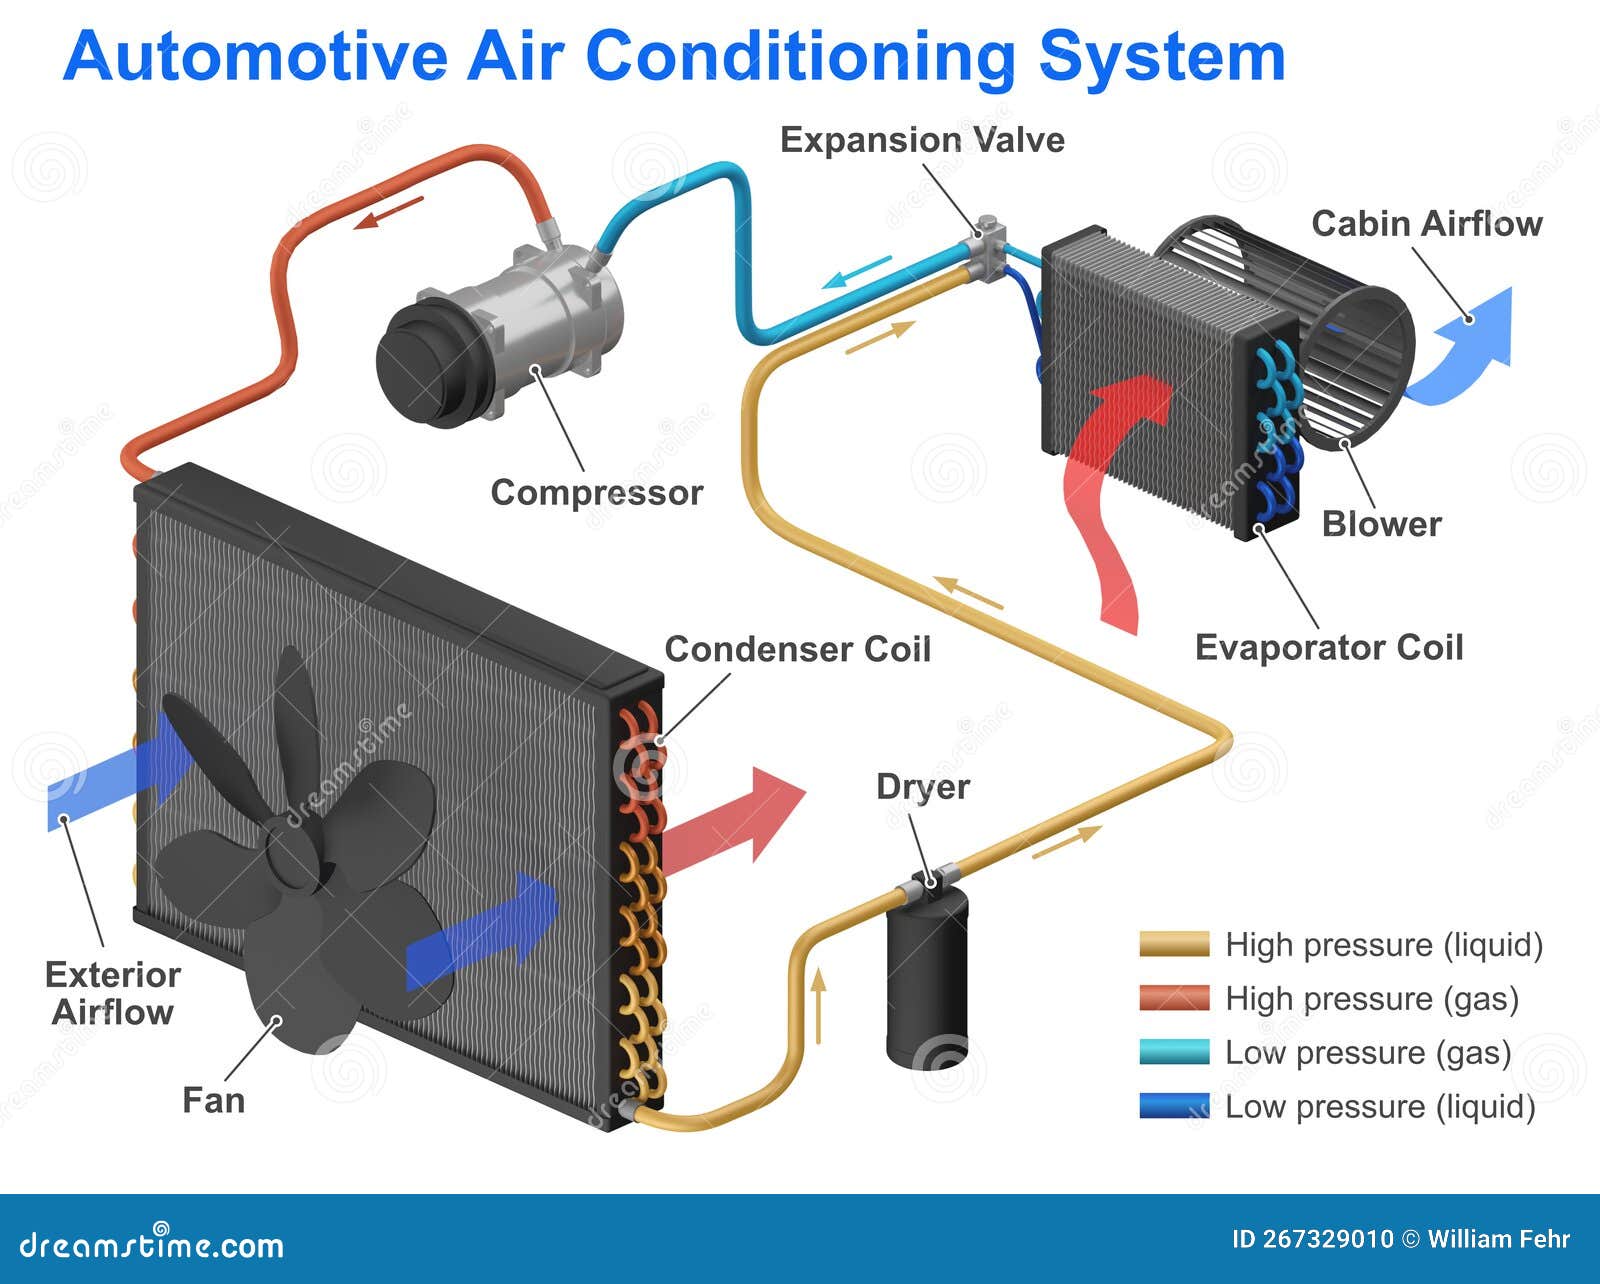
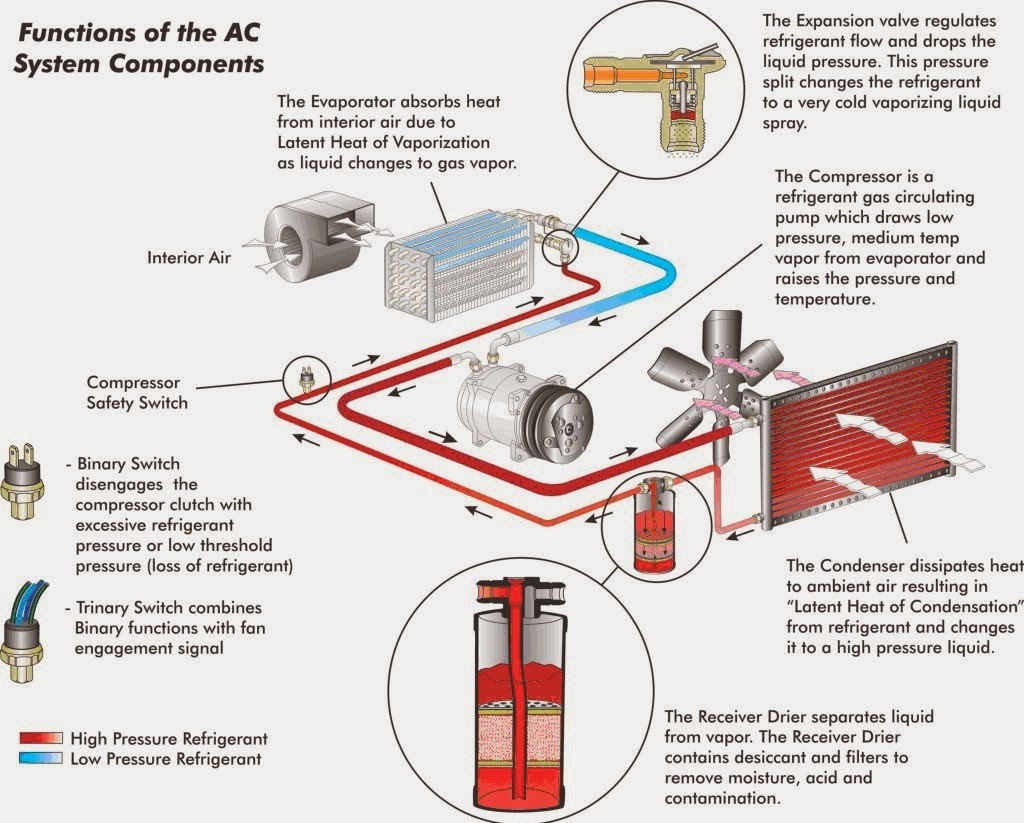
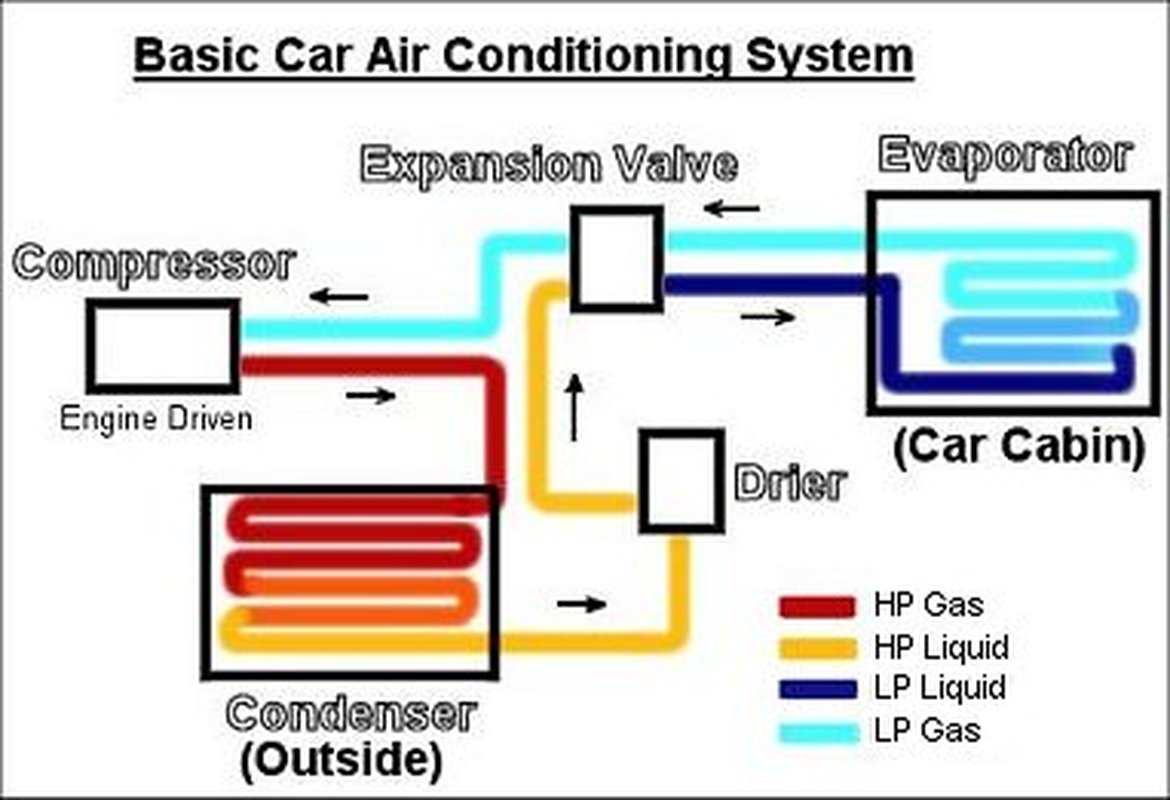
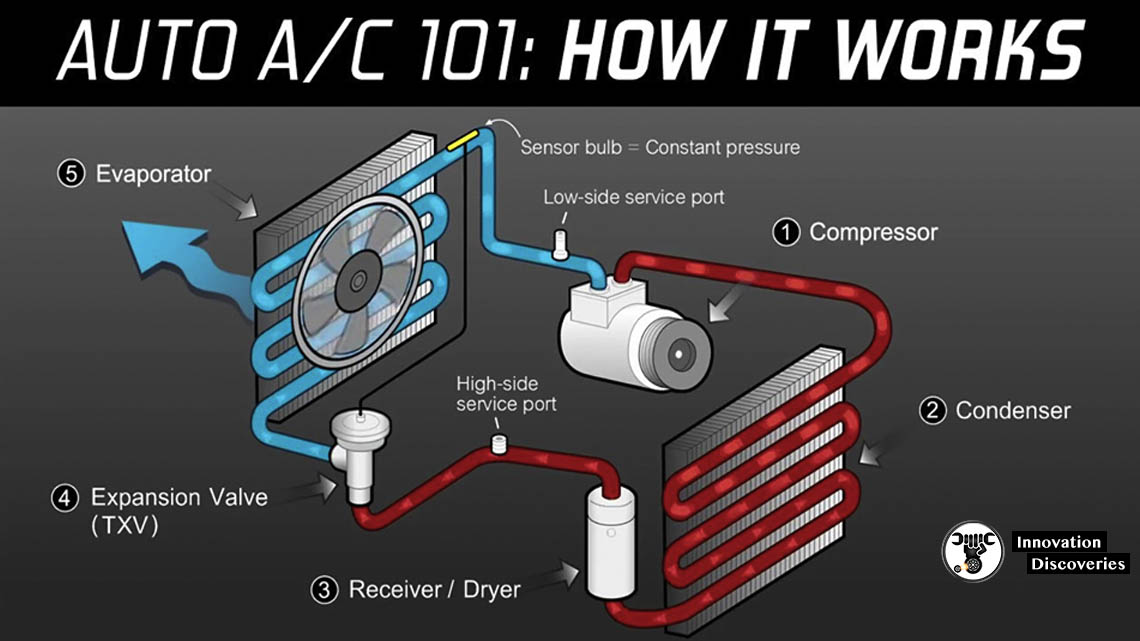
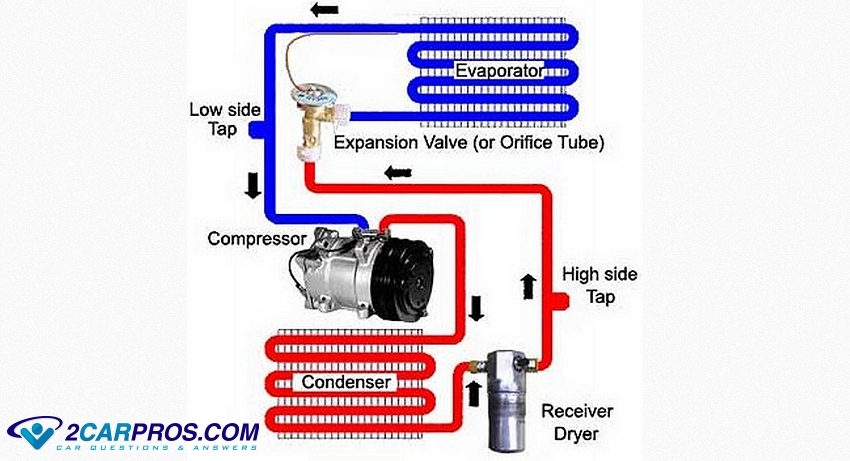
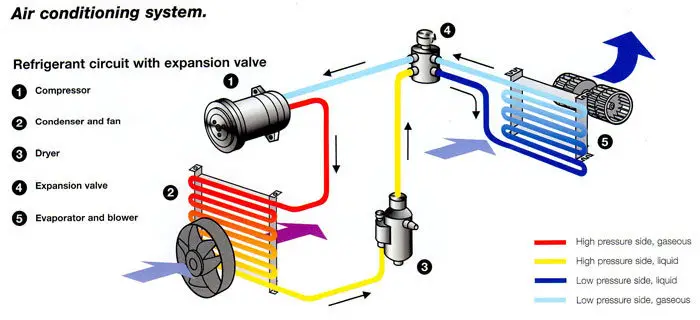
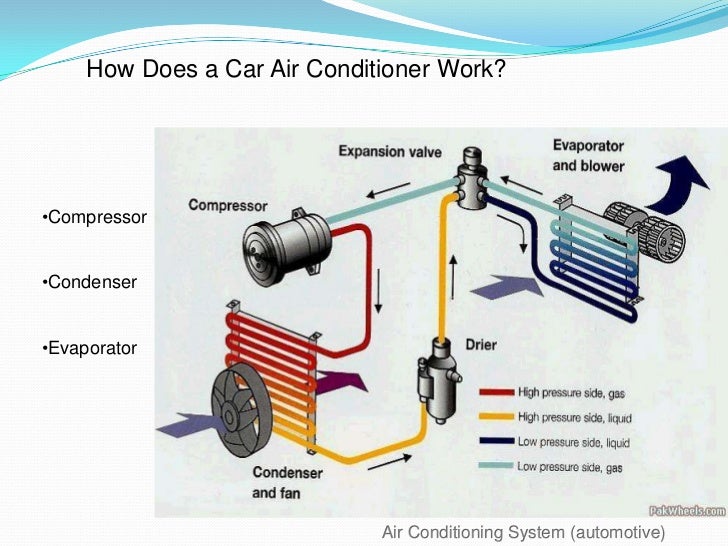
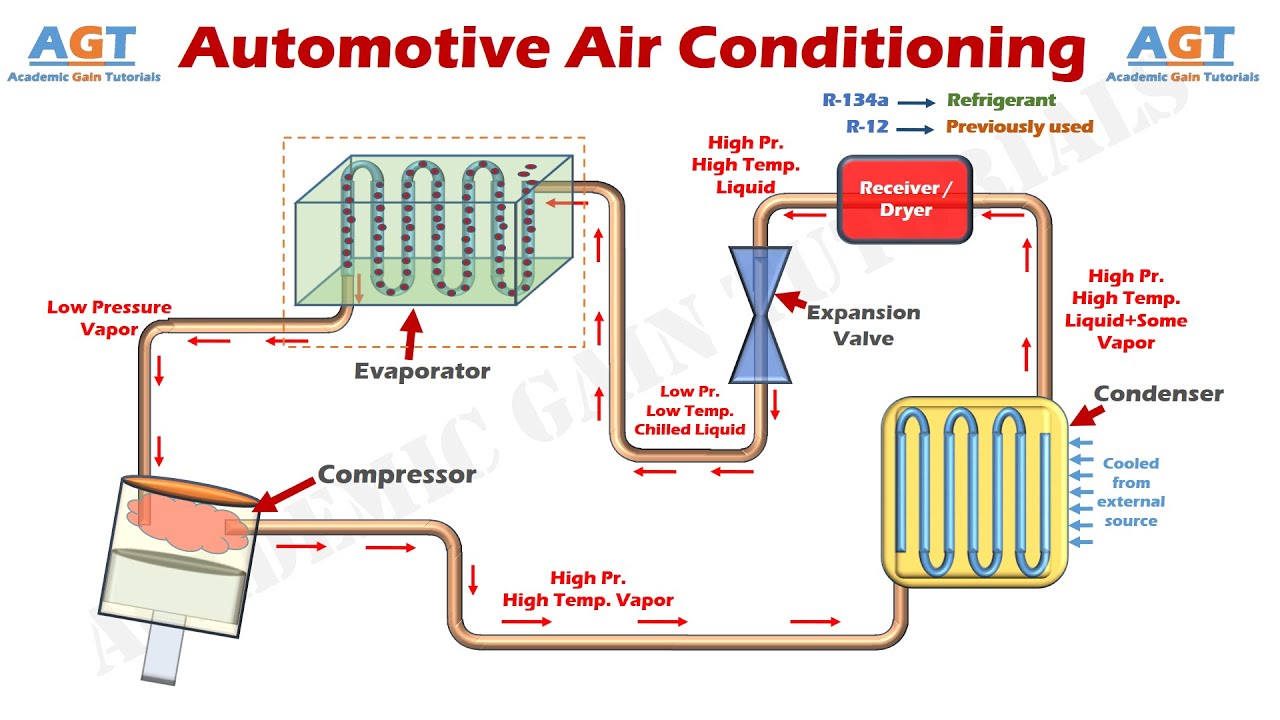
Your car's AC system is a closed-loop system that uses refrigerant to transfer heat. It consists of several key parts:
- Compressor: The heart of the system, responsible for compressing the refrigerant gas.
- Condenser: Located in front of the radiator, it dissipates heat from the high-pressure refrigerant gas, turning it into a liquid.
- Receiver-Drier (or Accumulator): Filters the refrigerant, removing moisture and debris. Some systems use an accumulator (typically found on systems with an orifice tube), while others use a receiver-drier (typically found on systems with a thermal expansion valve).
- Expansion Valve (or Orifice Tube): Meters the flow of refrigerant into the evaporator, causing a pressure drop.
- Evaporator: Located inside the dashboard, it absorbs heat from the cabin air, turning the refrigerant back into a gas.
- Refrigerant: The working fluid that carries heat throughout the system. Modern cars use R-134a or the newer R-1234yf, while older vehicles may still use R-12 (now phased out). Never mix refrigerants.
The Refrigeration Cycle: A Step-by-Step Guide
The magic of your car's AC lies in the continuous cycle of refrigerant phase changes:
- Compression: The compressor, driven by the engine's belt, takes in low-pressure, low-temperature refrigerant gas and compresses it. This significantly increases both the pressure and temperature of the refrigerant. Think of it like squeezing a balloon – the air inside gets hotter.
- Condensation: The high-pressure, high-temperature refrigerant gas then flows into the condenser. As air flows across the condenser (often aided by cooling fans), the refrigerant releases heat and cools down, transforming into a high-pressure, high-temperature liquid.
- Metering (Expansion): The high-pressure liquid refrigerant then passes through the expansion valve (or orifice tube). This component restricts the flow, creating a sudden pressure drop. This pressure drop causes some of the liquid refrigerant to flash into a gas, resulting in a very cold, low-pressure mixture of liquid and gas.
- Evaporation: This cold, low-pressure mixture then enters the evaporator. As warm air from the car's interior is blown across the evaporator, the refrigerant absorbs heat, causing the remaining liquid to boil and completely transform into a low-pressure, low-temperature gas. This process cools the air, which is then blown into the cabin.
- Back to the Compressor: Finally, the low-pressure, low-temperature refrigerant gas returns to the compressor, and the cycle begins again.
Common AC Problems and DIY Troubleshooting
A malfunctioning AC system can be frustrating. Here are some common issues and how you might diagnose them:
- No Cold Air:
- Possible Causes: Low refrigerant, faulty compressor, clogged condenser, bad expansion valve, electrical problems.
- DIY Checks: Check refrigerant level (if you have the proper tools and knowledge – see safety warnings below). Listen for the compressor clutch engaging when the AC is turned on. Inspect the condenser for debris blockage.
- Weak Airflow:
- Possible Causes: Clogged cabin air filter, blower motor issues, blocked air ducts.
- DIY Checks: Replace the cabin air filter. Check the blower motor for proper operation. Inspect air ducts for obstructions.
- AC Cuts Out Intermittently:
- Possible Causes: Overheating compressor, low refrigerant, electrical issues.
- DIY Checks: Monitor the compressor's operation. Check refrigerant levels (carefully!).
- Strange Noises:
- Possible Causes: Failing compressor, loose belt, debris in the system.
- DIY Checks: Listen carefully to pinpoint the source of the noise. Inspect the compressor belt for wear and tear.
Tools and Parts for Basic AC Maintenance
If you're comfortable tackling some basic AC maintenance, here's a list of helpful tools and parts:
- Refrigerant Gauge Set: For measuring refrigerant pressure (Requires proper training and certification for safe use.)
- Refrigerant: R-134a or R-1234yf (Ensure you use the correct type for your vehicle.)
- Vacuum Pump: For evacuating the system before recharging (Essential for proper system operation.)
- Leak Detector: To identify refrigerant leaks (Can be electronic or UV dye-based.)
- Wrench Set: For disconnecting and tightening AC components.
- Screwdriver Set: For various tasks around the AC system.
- Cabin Air Filter: For improving airflow and air quality.
- Safety Glasses: To protect your eyes from refrigerant and debris.
- Gloves: To protect your skin from refrigerant and other chemicals.
Safety First: Working with Refrigerant
Working with refrigerant can be dangerous. Refrigerant can cause frostbite, blindness, and other serious injuries. It's also harmful to the environment. Always follow these safety precautions:
- Wear safety glasses and gloves.
- Work in a well-ventilated area.
- Never release refrigerant into the atmosphere. It is illegal and harmful to the ozone layer.
- Properly dispose of used refrigerant. Contact a local recycling center or auto parts store for disposal options.
- Consider professional service. If you are not comfortable working with refrigerant, it's best to leave the job to a qualified technician.
When to Call a Professional
While some AC issues can be addressed with DIY methods, others require the expertise of a qualified HVAC technician. Here are some situations where professional help is recommended:
- Refrigerant Leaks: Locating and repairing refrigerant leaks requires specialized equipment and knowledge.
- Compressor Problems: Compressor replacement is a complex job that requires specialized tools and expertise.
- Expansion Valve/Orifice Tube Replacement: These components are often difficult to access and replace.
- Evacuating and Recharging the System: Proper evacuation and recharging are crucial for optimal system performance and longevity.
- Uncertainty: If you're unsure about the cause of the problem or how to fix it, it's always best to err on the side of caution and call a professional.
Estimating Repair Costs
The cost of AC repair can vary depending on the specific problem and the make and model of your vehicle. Here's a general idea of what you can expect to pay:
- Refrigerant Recharge: $100 - $300 (depending on refrigerant type and quantity)
- Cabin Air Filter Replacement: $20 - $50
- Compressor Replacement: $500 - $1200+ (including labor and parts)
- Condenser Replacement: $300 - $800+ (including labor and parts)
- Expansion Valve/Orifice Tube Replacement: $200 - $500+ (including labor and parts)
- Leak Repair: $150 - $500+ (depending on the location and severity of the leak)
Note: These are just estimates. It's always best to get a quote from a qualified mechanic before proceeding with any repairs.
Preventive Maintenance: Keeping Your AC Cool for Years to Come
Proper maintenance can help prevent costly AC repairs and extend the life of your system. Here are some tips:
- Run your AC regularly: Even in the winter, running your AC for a few minutes each week can help keep the system lubricated and prevent seals from drying out.
- Replace the cabin air filter regularly: A clean cabin air filter will improve airflow and air quality.
- Inspect the condenser: Keep the condenser free of debris, such as leaves and bugs.
- Have your AC system inspected annually: A professional inspection can identify potential problems before they become major issues.
By understanding how your car's AC system works and performing basic maintenance, you can keep it running cool and efficiently for years to come. However, always prioritize safety and don't hesitate to call a professional when needed. Enjoy the cool ride!